In the fast-evolving world of technology, keeping your PC up-to-date is crucial for optimal performance, whether you’re tackling demanding software, diving into the latest games, or simply multitasking with ease. One of the most impactful and often overlooked upgrades you can perform is installing or upgrading your Random Access Memory (RAM). RAM acts as your computer’s short-term memory, enabling it to access data quickly and efficiently. More RAM means your system can handle more tasks simultaneously, run more intensive applications, and generally feel snappier. This guide will walk you through the entire process of installing RAM on your PC, ensuring you have the confidence and knowledge to give your system the performance boost it deserves.
We’ll delve into everything from understanding RAM types and compatibility to a step-by-step installation process, complete with crucial safety precautions and post-installation checks. Whether you’re building a new machine, looking to enhance your existing setup for better productivity, or aiming to get the most out of your latest AI tools and software, mastering RAM installation is a fundamental skill for any tech enthusiast.
Understanding RAM: The Brains Behind the Speed
Before you even think about opening your PC case, it’s vital to understand what RAM is, how it functions, and the different types available. This foundational knowledge will ensure you purchase the correct modules and optimize your system for peak performance.
What is RAM and Why is it Important?
RAM, or Random Access Memory, is a volatile form of computer memory that stores data and program instructions currently being used by the CPU. Unlike your hard drive (HDD) or solid-state drive (SSD), which store data long-term, RAM provides ultra-fast access to information your processor needs right now. Think of it as your computer’s workbench; the larger the workbench (more RAM), the more tools and materials (programs and data) it can have readily available, leading to smoother multitasking and faster application loading times.
The benefits of sufficient RAM are numerous, especially in today’s digital landscape:
- Enhanced Multitasking: Run multiple applications, browser tabs, and background processes without slowdowns.
- Improved Software Performance: Demanding software like video editors, CAD programs, and virtual machines thrive on ample RAM.
- Smoother Gaming: Load textures faster, reduce stuttering, and enjoy higher frame rates in modern games.
- Faster AI Tools and Development: AI models and machine learning tasks often require significant memory to process large datasets efficiently.
- Boosted Productivity: Less waiting, more doing, directly impacting your overall efficiency.
Types of RAM and Compatibility Factors
Not all RAM is created equal. There are different generations, form factors, and specifications you need to be aware of to ensure compatibility with your motherboard and CPU.
Generations: DDR4 vs. DDR5
The most common types of RAM you’ll encounter today are DDR4 and DDR5.
- DDR4 (Double Data Rate 4): This has been the standard for many years, offering a good balance of speed and cost. Most mid-range to older high-end PCs built in the last decade utilize DDR4. DDR4 modules typically have 288 pins.
- DDR5 (Double Data Rate 5): The latest generation, DDR5, offers significantly higher speeds, improved power efficiency, and increased bandwidth compared to DDR4. It’s found in newer motherboards and CPUs, particularly those released from late 2021 onwards. DDR5 also has 288 pins, but the notch position is different, making it physically incompatible with DDR4 slots.
Crucial Compatibility Rule: You cannot mix DDR4 and DDR5 RAM on the same motherboard. Your motherboard will only support one generation. Always check your motherboard’s specifications to determine which DDR generation it supports.
Form Factors: DIMM vs. SODIMM
- DIMM (Dual In-line Memory Module): This is the standard form factor for desktop computers and servers. These modules are longer and designed to fit into dedicated slots on a desktop motherboard.
- SODIMM (Small Outline Dual In-line Memory Module): These are smaller, more compact modules designed for laptops, mini PCs, and some all-in-one desktops where space is limited. They are not interchangeable with DIMM modules.
Speed, Capacity, and Latency
Beyond the generation and form factor, other specifications impact performance:
- Speed (MHz/MT/s): Measured in megahertz (MHz) or megatransfers per second (MT/s), this indicates how quickly the RAM can transfer data. Higher speeds generally mean better performance. Common speeds include 2400MHz, 3200MHz (for DDR4), and 4800MHz, 6000MHz (for DDR5).
- Capacity (GB): This is the amount of data the RAM can store. Common capacities per module range from 4GB to 32GB, often installed in pairs or quads for total system memory (e.g., 16GB, 32GB, 64GB).
- Latency (CL): CAS Latency (CL) refers to the delay between the CPU requesting data from the RAM and the RAM providing it. Lower CL values generally indicate faster response times. While speed is often prioritized, lower latency RAM at the same speed can offer a slight edge.
Key Compatibility Check: Always consult your motherboard’s manual or manufacturer’s website for its “Qualified Vendor List” (QVL) or memory compatibility list. This list details RAM modules that have been tested and verified to work correctly with your specific motherboard. While not strictly necessary to choose from the QVL, it guarantees compatibility and optimal performance. Also, verify the maximum RAM capacity your motherboard supports and the recommended slot configuration for dual-channel or quad-channel operation.
Preparing for Installation: Safety First and Smart Choices
Before you begin the physical installation, thorough preparation is key. This phase involves crucial safety measures, gathering the right tools, and making informed decisions about your RAM upgrade strategy. Ignoring these steps can lead to component damage or an unsuccessful installation.
Research and Strategic Planning
The most critical step before purchasing RAM is to understand your current system and your upgrade goals.
- Identify Your Current RAM:
- Windows: Press
Ctrl+Shift+Escto open Task Manager, go to the “Performance” tab, and select “Memory.” It will show you the total capacity, speed, and how many slots are used. - Mac/Linux: Use “About This Mac” or
free -hin terminal, respectively. - Physical Inspection (Optional): If your PC is already open, you can physically inspect the RAM modules for stickers indicating speed (e.g., PC4-25600 for DDR4 3200MHz), capacity, and generation.
- Windows: Press
- Check Motherboard Specifications:
- Find your motherboard’s model number (often printed on the board itself, visible through the case, or identifiable via software like CPU-Z).
- Visit the manufacturer’s website and locate the specifications page for your specific model. Pay close attention to:
- Supported RAM Generation: DDR4 or DDR5.
- Maximum RAM Capacity: The total GB your motherboard can handle.
- Number of RAM Slots: Typically 2 or 4 for desktop PCs.
- Supported RAM Speeds: The fastest speeds your board can reliably run.
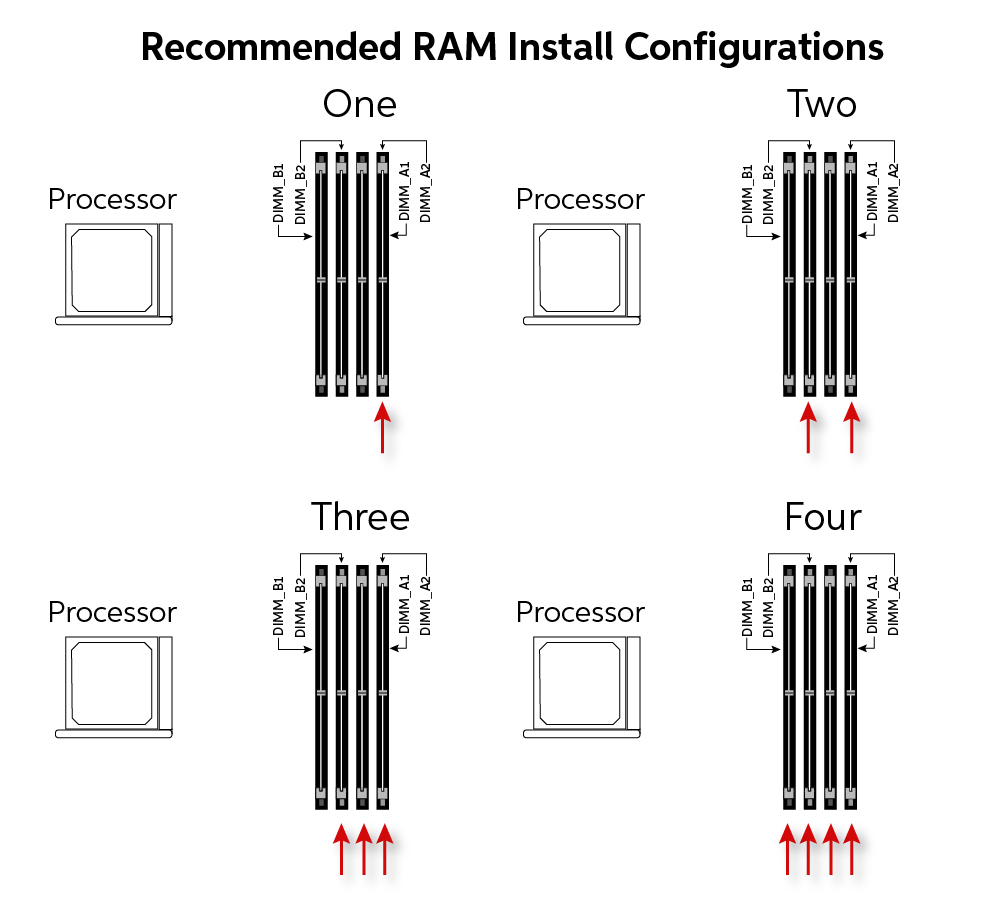
- Dual-Channel/Quad-Channel Support: Most consumer motherboards support dual-channel, which means installing RAM in specific pairs of slots for a performance boost. The manual will show which slots to use (e.g., A2 and B2).
- QVL (Qualified Vendor List): A list of tested and compatible RAM modules.
- CPU Compatibility (Less Common, but Important): While the motherboard is the primary determinant, your CPU also has a maximum supported RAM speed. The system will default to the lowest supported speed among your CPU, motherboard, and RAM modules.
- Decide Your Upgrade Path:
- Adding More RAM: If you have empty slots and your current RAM is sufficient, simply match the new RAM to your existing modules (same speed, capacity, and ideally, model/brand for best compatibility).
- Replacing Existing RAM: If you’re upgrading to a higher capacity or faster generation, you’ll replace your old modules entirely. This is common when moving from 8GB to 16GB, or 16GB to 32GB.
- Matching: For optimal dual-channel or quad-channel performance, always buy RAM kits (e.g., 2x8GB, 4x16GB) rather than individual sticks. This ensures they are binned and tested to work together.
Essential Tools and Workspace Setup
Having the right tools and a clean environment will make the process smoother and safer.
- Phillips Head Screwdriver: The most common tool for opening PC cases.
- Anti-Static Wrist Strap (Highly Recommended): This is crucial for preventing electrostatic discharge (ESD), which can permanently damage sensitive computer components. Clip it to an unpainted metal surface of your PC case once it’s unplugged.
- Clean, Well-Lit Workspace: A large, clutter-free table is ideal. Avoid working on carpet, which can generate static electricity.
- Flashlight (Optional): Useful for illuminating tight spaces inside the case.
- Small Container: For holding screws so they don’t get lost.
Safety Precautions: Protecting Yourself and Your Hardware
These steps are non-negotiable for a safe and successful installation.
- Power Down and Unplug: Completely shut down your PC. Crucially, unplug the power cable from the wall outlet and the back of your PC.
- Ground Yourself: This is paramount to prevent ESD.
- Method 1 (Best): Wear an anti-static wrist strap connected to an unpainted metal part of your PC case.
- Method 2: Periodically touch an unpainted metal part of your PC case before handling any components.
- Method 3: Touch a grounded metal object, like a metal pipe or a wall outlet screw (not the actual electrical contacts).
- Handle with Care: Always hold RAM modules by their edges, avoiding touching the gold contacts at the bottom. The oils and static from your skin can interfere with electrical connections.
- Work in a Safe Environment: Ensure your workspace is dry and free of excessive static. Avoid wearing wool sweaters or other static-generating clothing.
- Patience and Gentle Force: Computer components are surprisingly resilient but can be damaged by excessive force. If something isn’t fitting, recheck alignment rather than forcing it.
The Installation Process: Step-by-Step Guide
With your preparation complete, it’s time to get hands-on. Follow these steps carefully to install your new RAM modules.
H2: Opening Your PC Case and Locating RAM Slots
The first physical step is to gain access to your motherboard.
- Place PC on a Stable Surface: Lay your PC tower on its side on your clean workspace, with the side panel that allows access to the motherboard facing upwards.
- Remove the Side Panel: Most PC cases have a side panel secured by two or three thumb screws or Phillips head screws at the back. Unscrew these and slide the panel backward, then lift it away. Some cases might have a latch mechanism.
- Ground Yourself (Again): If you’re not wearing an anti-static strap, touch an unpainted metal part of the case.
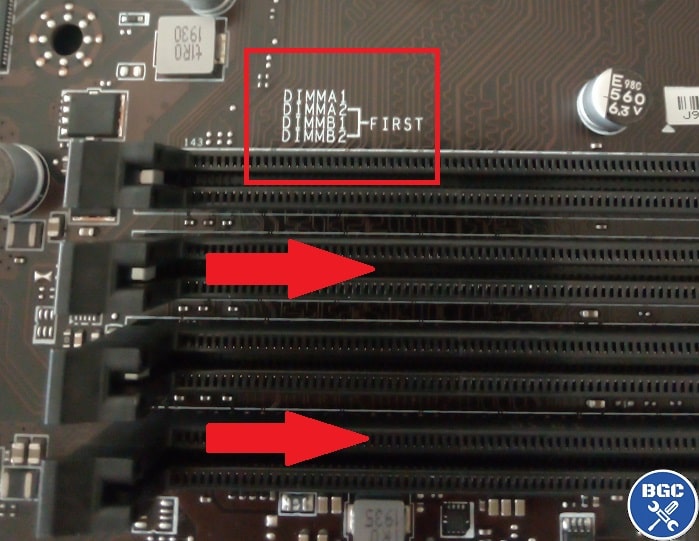
- Locate the RAM Slots: Look for long, narrow slots typically located to the right or above your CPU cooler. These are your DIMM slots. They usually have small plastic clips at either end. Desktop motherboards typically have two or four slots.
H2: Removing Old RAM (If Upgrading) and Installing New Modules
This is where the actual component handling comes into play.
- Removing Existing RAM (If Applicable):
- Gently push down the clips on both ends of the RAM module simultaneously. The module should pop up slightly.
- Carefully pull the module straight out of the slot.
- Place the old RAM in an anti-static bag or a safe, non-conductive place if you plan to keep or sell it.
- Preparing New RAM for Installation:
- Carefully remove the new RAM modules from their anti-static packaging, holding them by the edges.
- Aligning and Inserting New RAM:
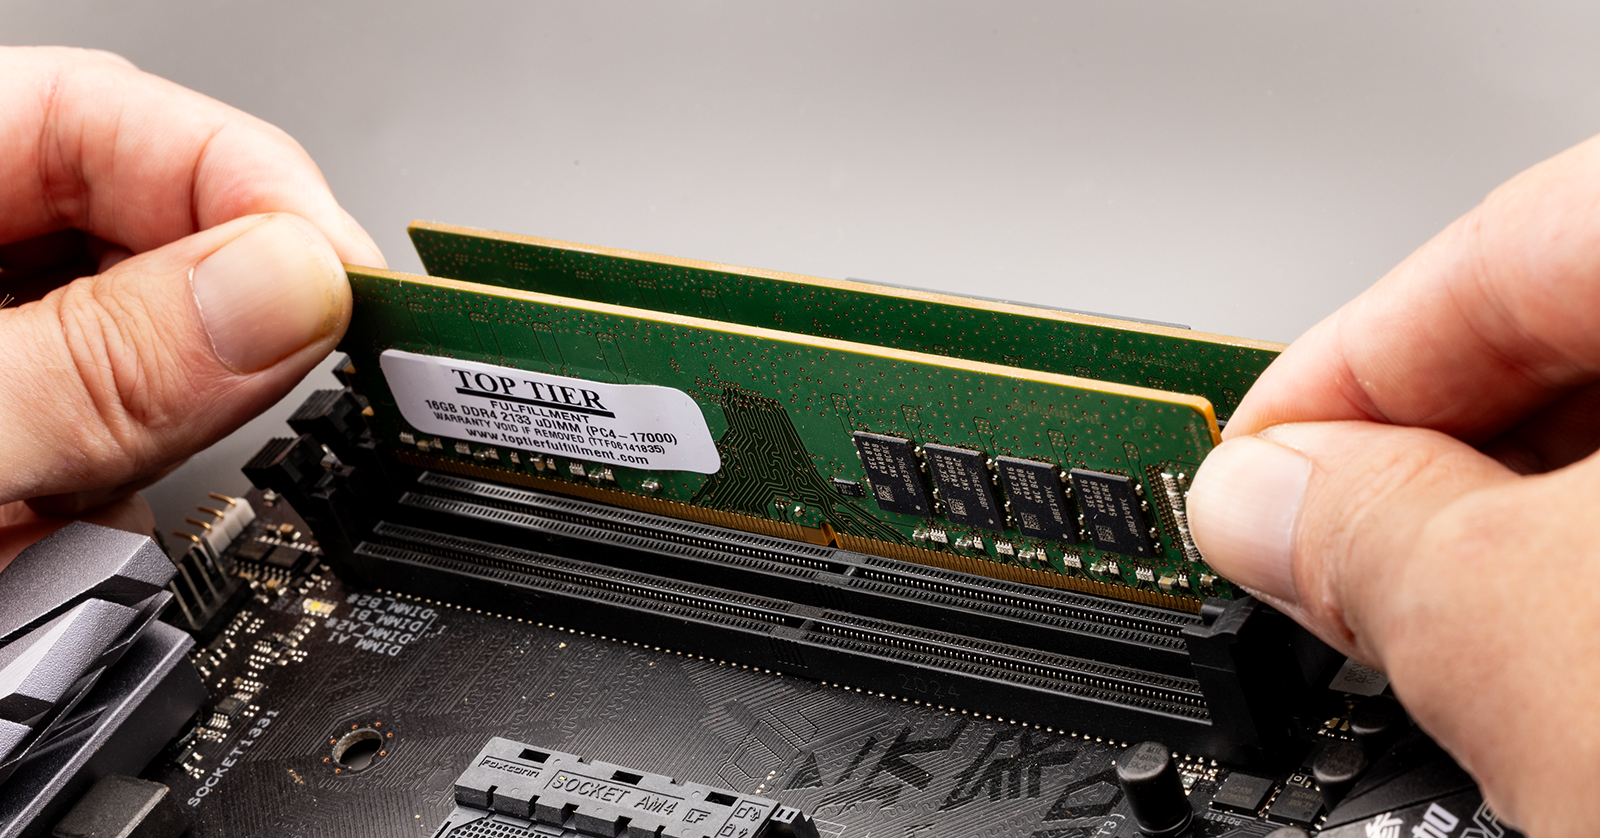
- Identify the Notch: Look at the bottom edge (gold contacts) of your RAM module. You’ll see a small notch.
- Match with Slot: Align this notch with the corresponding key in the RAM slot on your motherboard. The notch ensures the RAM is inserted in the correct orientation. Do not force it if it doesn’t align – you might have it backward or be trying to insert an incompatible module.
- Insert and Press Firmly: Place the module into the slot, ensuring both ends are aligned. Apply firm, even pressure to both ends of the module simultaneously until the clips on either side snap into place. You should hear an audible click, and the module should sit flush and level in the slot. Give it a gentle wiggle to ensure it’s securely seated.
- Dual-Channel/Quad-Channel Configuration:
- If you’re installing two or four modules, refer to your motherboard manual for the correct slot configuration for dual-channel (or quad-channel) operation. This typically involves skipping a slot (e.g., slots 2 and 4, or 1 and 3, rather than 1 and 2). Using the correct slots significantly boosts performance.
- Repeat the insertion process for all additional modules.
H2: Closing the Case and Initial Boot-Up
Once all RAM modules are securely in place, it’s time to close up your PC and test the installation.
- Reattach Side Panel: Carefully slide the side panel back onto your PC case and secure it with the screws you removed earlier.
- Reconnect Power and Peripherals: Plug your power cable back into the wall and your PC. Reconnect your monitor, keyboard, mouse, and any other peripherals.
- Boot Up Your PC: Press the power button.
- Expect a First Boot Delay: It’s common for the first boot after a RAM change to take a bit longer than usual, or even for the system to power cycle a couple of times. This is normal as the BIOS/UEFI detects and configures the new memory.
- Listen for Beeps: If your PC doesn’t boot and you hear a series of beeps, consult your motherboard manual. Beep codes often indicate specific hardware issues, and memory problems are a common cause (e.g., RAM not seated correctly).
Post-Installation Checks and Troubleshooting
After a successful boot, it’s essential to verify that your new RAM is recognized and functioning correctly.
Verify RAM in BIOS/UEFI
- Access BIOS/UEFI: As your PC starts, repeatedly press the designated key (usually
Del,F2,F10, orF12) to enter your system’s BIOS or UEFI settings. - Check Memory Information: Navigate to the “System Information,” “Main,” or “Memory” section. Here, you should see the total amount of RAM installed and its detected speed. Ensure these match your expectations.
Verify RAM in the Operating System
Once you’ve confirmed in BIOS, check within your operating system.
- Windows:
- Right-click the Start button and select “System.” Under “Installed RAM,” you should see the correct total capacity.
- For more detail, open Task Manager (
Ctrl+Shift+Esc), go to the “Performance” tab, and click on “Memory.” It will show total RAM, speed, and slots used.
- macOS:
- Click the Apple menu in the top-left corner, then “About This Mac.” The overview will display your total RAM.
- Linux:
- Open a terminal and type
free -horsudo lshw -short -C memory.
- Open a terminal and type
Run Memory Diagnostics
Even if your RAM is recognized, it’s wise to perform a memory diagnostic test to ensure stability and detect any potential errors.
- Windows Memory Diagnostic:
- Type “Windows Memory Diagnostic” into the Start menu search bar and run the application.
- Choose to “Restart now and check for problems (recommended).” Your PC will restart and run a memory test.
- MemTest86 (Advanced): For a more thorough test, especially if you suspect instability, you can download and create a bootable USB drive for MemTest86. This utility runs outside of your operating system and provides a comprehensive memory test.
Troubleshooting Common Issues
Despite careful installation, issues can sometimes arise.
- PC Won’t Boot / Black Screen / Beep Codes:
- Reseat RAM: The most common culprit. Power down, unplug, open the case, unclip and re-insert each RAM module, ensuring they click securely.
- Check Slot Configuration: Ensure RAM is in the correct slots for dual-channel operation as per your motherboard manual.
- Try One Stick at a Time: If you have multiple modules, try booting with just one stick in the primary slot (usually the one closest to the CPU, or slot A2 as per manual). If it boots, try adding the others one by one. This helps identify a faulty module.
- Clear CMOS: If the system is still unstable, you might need to clear your motherboard’s CMOS (Complementary Metal-Oxide-Semiconductor) memory. This resets BIOS settings to default. Refer to your motherboard manual for the location of the CMOS clear jumper or button, or simply remove the small coin-cell battery on the motherboard for a few minutes.
- RAM Not Recognized or Incorrect Capacity:
- Reseat RAM: Again, often the fix.
- BIOS/UEFI Update: Sometimes, newer RAM modules require a BIOS/UEFI update on older motherboards to be fully compatible and recognized. Check your motherboard manufacturer’s website for the latest BIOS version.
- Compatibility Check: Double-check your motherboard specifications against the RAM you purchased for generation (DDR4/DDR5) and speed support.
- System Instability / Blue Screens (BSODs):
- Run Memory Diagnostics: This is the first step to pinpoint potential errors in the RAM itself.
- XMP/DOCP Settings: If you enabled XMP/DOCP (see next section), try disabling it in BIOS and running RAM at its default JEDEC speed to see if stability improves. The RAM might be unstable at its advertised overclocked speeds.
Optimizing Your New RAM: Unleashing Full Potential
Once your RAM is installed and confirmed to be working, you can take a few extra steps to ensure you’re getting the best performance out of it.
Enabling XMP/DOCP in BIOS
Modern RAM modules often come with speeds higher than the default JEDEC standard. To achieve these advertised speeds (e.g., 3200MHz, 6000MHz), you typically need to enable an “Extreme Memory Profile” (XMP for Intel platforms) or “Direct Overclock Profile” (DOCP/EXPO for AMD platforms) in your motherboard’s BIOS/UEFI.
- Enter BIOS/UEFI: Restart your PC and press the appropriate key to enter BIOS/UEFI.
- Locate XMP/DOCP Setting: This setting is usually found under an “Overclocking,” “AI Tweaker,” “OC,” or “Advanced” menu. It might be labeled as “XMP,” “DOCP,” “A-XMP,” or “Memory Profile.”
- Enable Profile: Select the XMP/DOCP profile (usually “Profile 1” or the highest speed profile available).
- Save and Exit: Save your changes and exit the BIOS/UEFI. Your PC will restart, and your RAM should now be running at its rated speed.
- Verify: After booting into your OS, re-check Task Manager (Windows) or System Information to confirm the new, higher speed is detected.
Understanding RAM Timings
While less critical for casual users, understanding RAM timings can provide deeper insight into performance. Timings are represented by a series of numbers (e.g., CL16-18-18-38) and indicate the number of clock cycles required for various operations. Lower numbers generally mean faster response times. When buying RAM, matching timings with existing modules is good practice, especially in kits.
Conclusion: Empowering Your Tech Journey
Congratulations! You’ve successfully navigated the process of installing RAM on your PC. This seemingly simple upgrade offers a profound impact on your system’s capabilities, from enhancing daily productivity and speeding up software to providing the raw power needed for demanding tasks like gaming, video editing, and running sophisticated AI tools.
By understanding RAM compatibility, following safety protocols, and meticulously performing each installation step, you’ve not only boosted your PC’s performance but also gained valuable experience in PC hardware maintenance. This DIY approach not only saves money but also fosters a deeper connection with your technology, empowering you to troubleshoot and optimize your setup with confidence.
Remember, the world of tech is ever-evolving. Keeping an eye on the latest RAM generations and advancements will ensure your PC remains a powerhouse for years to come. Enjoy the newfound speed and responsiveness of your upgraded system!
aViewFromTheCave is a participant in the Amazon Services LLC Associates Program, an affiliate advertising program designed to provide a means for sites to earn advertising fees by advertising and linking to Amazon.com. Amazon, the Amazon logo, AmazonSupply, and the AmazonSupply logo are trademarks of Amazon.com, Inc. or its affiliates. As an Amazon Associate we earn affiliate commissions from qualifying purchases.