In the dynamic world of computing, where open-source innovation meets proprietary polish, the intersection of Ubuntu and Google Chrome presents a powerful combination for users seeking both versatility and performance. Ubuntu, a leading Linux distribution, offers a robust, secure, and highly customizable operating system, favoured by developers, tech enthusiasts, and everyday users alike. Google Chrome, on the other hand, stands as the world’s most popular web browser, renowned for its speed, extensive feature set, and deep integration with the Google ecosystem.
While Firefox comes pre-installed on Ubuntu, many users opt for Chrome due to its familiar interface, powerful developer tools, vast extension library, and seamless synchronization across multiple devices. Whether you’re a seasoned Linux user or new to the Ubuntu environment, installing Google Chrome is a straightforward process that significantly enhances your browsing experience, boosts productivity, and provides access to a wealth of web-based applications. This comprehensive tutorial will guide you through the process, ensuring a smooth and successful installation, along with tips for managing Chrome effectively on your Ubuntu system.
Why Choose Google Chrome for Ubuntu? Embracing a Seamless Digital Experience
When delving into the myriad of web browsers available for Ubuntu, Google Chrome consistently emerges as a top contender, not just for its market share but for the tangible benefits it brings to users. Its integration into the wider Google ecosystem, coupled with its performance-driven architecture, makes it an indispensable tool for many, aligning perfectly with the productivity and digital security aspects valued in the tech landscape.
Unmatched Browsing Experience and Ecosystem Integration
Google Chrome is engineered for speed and efficiency. Its V8 JavaScript engine ensures rapid execution of complex web applications, making your online interactions snappier and more responsive. The user interface, while minimalist, is highly intuitive, allowing for quick navigation and tab management. For those already immersed in Google’s suite of services – Gmail, Google Drive, Google Calendar, YouTube, and more – Chrome offers unparalleled integration. Logging into your Google account within Chrome instantly syncs your bookmarks, history, passwords, and extensions across all your devices, whether they run Windows, macOS, Android, or iOS. This cross-platform consistency is a huge boon for productivity, eliminating the need to reconfigure your browsing environment every time you switch devices. For the modern professional, this seamless continuity is not just a convenience; it’s a critical component of an efficient workflow.
Extensive Extension Library: Boosting Productivity and Security
One of Chrome’s most compelling features is its vast and diverse Chrome Web Store, home to hundreds of thousands of extensions. These small, powerful applications can transform your browsing experience, addressing almost any need imaginable. From productivity tools like task managers, note-taking apps, and distraction blockers, to specialized security extensions that block trackers, manage passwords, and enhance privacy, the options are limitless. For businesses and individuals focused on digital security, the availability of reputable ad-blockers, VPN integrations, and robust password managers directly within Chrome adds a significant layer of protection and control over their online footprint. This extensibility allows users to tailor Chrome precisely to their workflows and security requirements, making it a truly personalized browsing solution.
Robust Developer Tools and Cutting-Edge Features
For developers, designers, and tech-savvy individuals, Chrome’s built-in developer tools are an industry benchmark. Accessible with a simple right-click, these tools provide deep insights into web page structure (Elements), network activity, performance metrics, and console debugging. They are invaluable for front-end development, website optimization, and troubleshooting, directly contributing to higher productivity for anyone involved in web creation or analysis. Beyond developer tools, Chrome is often at the forefront of implementing new web standards and technologies, ensuring users have access to the latest features and security enhancements as soon as they become available. This forward-thinking approach means Chrome users on Ubuntu benefit from a constantly evolving browser that stays ahead of the curve.
A Note on Digital Security and Privacy
While Chrome’s integration with the Google ecosystem offers many advantages, discussions around data privacy are always relevant. Google has made strides in offering more user controls over privacy settings. Furthermore, by keeping Chrome updated (a process we’ll cover later), users benefit from the latest security patches against emerging web threats. Combining Chrome with privacy-enhancing extensions and being mindful of personal settings allows users to strike a balance between convenience and control over their digital security, ensuring their browsing habits on Ubuntu remain as private as they wish.
Preparing Your Ubuntu System for Google Chrome Installation
Before embarking on the installation of Google Chrome, it’s prudent to ensure your Ubuntu system is properly prepared. This preparatory phase is not just about convenience; it’s a crucial step that ensures a smooth installation, mitigates potential issues, and guarantees that your new browser operates efficiently and securely from the get-go. Adhering to these preliminary steps aligns with best practices for software management on Linux, contributing to overall system stability and performance.
System Requirements and Prerequisites
Fortunately, Google Chrome is not a resource-intensive application by modern standards, and most contemporary Ubuntu installations will meet its requirements comfortably. However, a few fundamental prerequisites must be in place:
- Internet Connection: This might seem obvious, but a stable internet connection is essential for downloading the Chrome installation package and any necessary dependencies.
- Administrative Privileges (Sudo Access): To install software on Ubuntu, you will need to have administrative rights, typically achieved by using the
sudocommand (superuser do) in the terminal. Your user account must be part of thesudogroup. If you are the primary user of your Ubuntu installation, you likely already have these privileges. - Sufficient Disk Space: The Chrome browser itself doesn’t require an enormous amount of space, but ensure you have a few hundred megabytes free for the application and its associated data. This is rarely an issue on modern systems.
- Ubuntu Version: Chrome supports most recent versions of Ubuntu. While specific version numbers might vary over time, if your Ubuntu installation is relatively up-to-date (e.g., Ubuntu 18.04 LTS or newer), you should have no compatibility issues.
Updating Your System: A Foundation for Stability and Security
Before installing any new software, it’s highly recommended to update your existing Ubuntu packages. This critical step serves several purposes:
- Security Patches: Updates often include vital security fixes, protecting your system from newly discovered vulnerabilities. Running an up-to-date system is a cornerstone of digital security.
- Bug Fixes: System updates address known bugs in existing software, improving overall system stability and performance.
- Dependency Resolution: New software often relies on specific versions of underlying libraries and packages. Updating your system ensures that these dependencies are met, preventing conflicts or errors during the Chrome installation process.
To update your Ubuntu system, open your terminal (you can usually find it by searching for “Terminal” in your applications menu, or by pressing Ctrl + Alt + T) and execute the following commands, one after the other:
sudo apt update
sudo apt upgrade -y
Let’s break down these commands:
sudo apt update: This command refreshes your package lists. It tells your system to fetch the latest information about available packages from the Ubuntu repositories (servers where software is stored). It doesn’t install anything yet, but it prepares your system with the most current knowledge of what’s available for upgrade.sudo apt upgrade -y: After updating the package lists, this command performs the actual upgrade. It compares the versions of the installed packages with the versions in the updated lists and downloads and installs newer versions of any packages that are outdated. The-yflag automatically confirms any prompts, allowing the upgrade process to proceed without manual intervention.
Allow these commands to complete their execution. Depending on how long it’s been since your last update, this process might take a few minutes. Once finished, your Ubuntu system will be in its most current and stable state, ready for the Google Chrome installation.
Step-by-Step Guide: Installing Google Chrome on Ubuntu
There are primarily two robust methods to install Google Chrome on Ubuntu: using the official .deb package downloaded from Google’s website, or leveraging the command line to add Google’s repository for a more integrated and maintainable installation. Both methods are effective, but one might be preferred depending on your comfort level with the terminal and your long-term maintenance preferences.
Method 1: Installing via the Official Google Chrome Website (Graphical Approach)
This method is straightforward and often preferred by users who are more comfortable with graphical interfaces than the command line.

- Open Your Existing Browser: Launch the default web browser on your Ubuntu system, which is usually Firefox.
- Navigate to the Official Chrome Download Page: In your browser’s address bar, type
www.google.com/chromeand press Enter. - Download the Chrome
.debPackage: On the Chrome download page, click the “Download Chrome” button. A pop-up window will appear, asking you to “Download Chrome for Linux.” Crucially, ensure you select the “64-bit .deb (For Debian/Ubuntu)” option. Then, click “Accept and Install.”- Self-correction: For older or specific architectures, one might need to choose
amd64.debori386.deb. Modern Ubuntu systems are almost exclusively 64-bit, so64-bit .debis the correct choice.
- Self-correction: For older or specific architectures, one might need to choose
- Save the File: Your browser will prompt you to save the file. Choose to “Save File” and note the location where it’s saved (typically your “Downloads” folder).
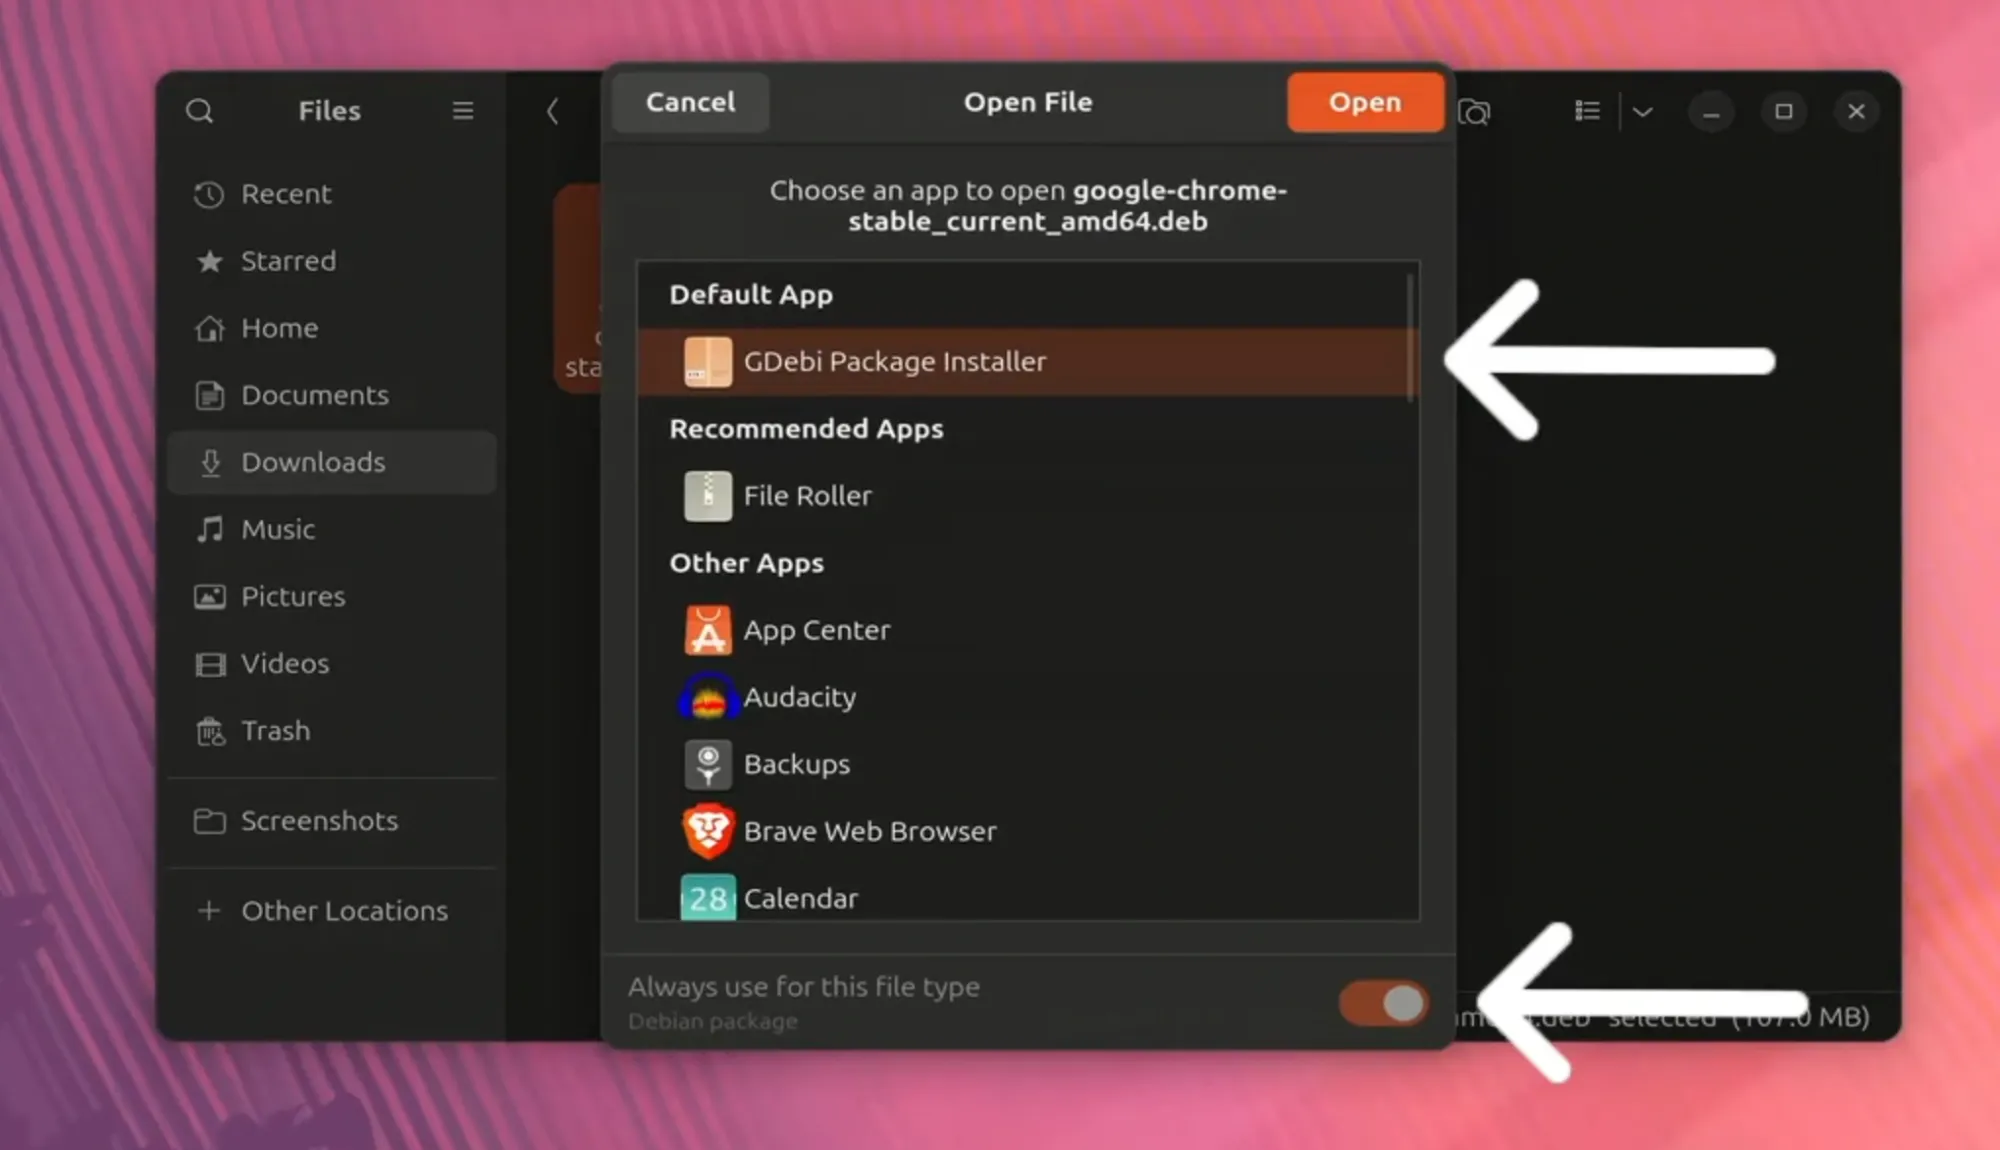
- Install the
.debPackage:- Using Software Center (Recommended for beginners): Navigate to your “Downloads” folder, locate the downloaded file (e.g.,
google-chrome-stable_current_amd64.deb), and double-click it. This action will typically open the Ubuntu Software Center (or equivalent package manager), which will present you with an “Install” button. Click “Install” and enter your password when prompted. The Software Center will handle all necessary dependencies. - Using
dpkgvia Terminal (Alternative): If the Software Center doesn’t work or you prefer the terminal for package installation:- Open your terminal (
Ctrl + Alt + T). - Navigate to your Downloads directory:
cd ~/Downloads - Install the package using
dpkg:
bash

sudo dpkg -i google-chrome-stable_current_amd64.deb
(Replacegoogle-chrome-stable_current_amd64.debwith the exact filename if it differs slightly). - Handle Dependencies: It’s common for
dpkgto report dependency errors. Don’t worry; this is easily fixed. Execute the following command to install any missing dependencies:
bash

sudo apt install -f
The-f(fix-broken) flag tellsaptto find and install all necessary packages that were missing during thedpkginstallation.
- Open your terminal (
- Using Software Center (Recommended for beginners): Navigate to your “Downloads” folder, locate the downloaded file (e.g.,
Once the installation completes, you can launch Google Chrome from your applications menu.
Method 2: Installing Google Chrome via the Command Line (Preferred for Automation and Updates)
This method is generally preferred by experienced Linux users because it adds Google’s official repository to your system, allowing Chrome to receive updates automatically alongside your other system packages. This ensures you always have the latest, most secure version of Chrome without manual intervention.
-
Download the Google Chrome
.debPackage: While we’ll add a repository, we first download the.debpackage to simplify adding Google’s signing key and repository. Open your terminal (Ctrl + Alt + T) and usewgetto download the current stable version of Google Chrome:wget https://dl.google.com/linux/direct/google-chrome-stable_current_amd64.debThis command downloads the
.debfile into your current directory (usually your home directory if you haven’tcded elsewhere). -
Install the
.debPackage and Dependencies: Install the downloaded package usingdpkg. This command also installs Google’s official GPG key and configures the repository:sudo dpkg -i google-chrome-stable_current_amd64.debIf
dpkgreports dependency errors (which is common if this is your first time installing Chrome this way), fix them usingapt:sudo apt install -fThis step is crucial. When you install a
.debpackage from Google, it automatically adds an entry to your/etc/apt/sources.list.d/directory (e.g.,google-chrome.list), which points to Google’s repository. It also imports the necessary GPG key to verify packages from this repository. -
Clean Up (Optional): You can remove the downloaded
.debfile as it’s no longer needed:
bash

rm google-chrome-stable_current_amd64.deb
After these steps, Google Chrome will be installed on your system. Because the repository was added, sudo apt update && sudo apt upgrade will automatically include Chrome in its updates.
Post-Installation: Verifying, Updating, and Managing Chrome
Once Google Chrome is installed on your Ubuntu system, there are a few essential steps to ensure it’s functioning correctly, stays updated, and to understand how to manage it in the future. These practices are fundamental to maintaining a secure and efficient browsing environment.
Launching Google Chrome
To launch your newly installed Google Chrome browser, you have a couple of options:
- From the Applications Menu: The most common way is to open your Ubuntu “Applications” menu (usually by clicking the nine-dot grid icon in the dock or searching for applications). Type “Chrome” in the search bar, and the Google Chrome icon should appear. Click on it to launch the browser.
- From the Terminal: For those who prefer the command line, you can simply type
google-chromein your terminal and press Enter. This will launch the browser, and you can close the terminal window afterward if you wish.
The first time you launch Chrome, it might ask if you want to make it your default browser and if you want to send usage statistics to Google. Configure these settings according to your preference. You’ll then be greeted by the Chrome welcome screen, ready for you to sign in with your Google account and start browsing.
Keeping Chrome Up-to-Date: A Cornerstone of Digital Security
Maintaining an up-to-date browser is paramount for digital security and accessing the latest features. Google frequently releases updates for Chrome, patching vulnerabilities, improving performance, and introducing new functionalities.
If you followed Method 2 (installing via the command line with the repository), Chrome updates will be handled automatically with your regular system updates. When you run sudo apt update && sudo apt upgrade, the system will check Google’s repository for a newer version of Chrome and install it if available. This is the most hassle-free and recommended way to manage Chrome updates on Ubuntu.
If you used Method 1 (downloading the .deb manually without explicitly adding the repository), subsequent updates would technically require you to manually download and install a newer .deb file. However, modern .deb packages from Google do add the repository automatically upon installation, so even with Method 1, your system should be configured for automatic updates via apt. You can verify this by checking if the file /etc/apt/sources.list.d/google-chrome.list exists. If it does, your system will update Chrome automatically.
Why is this important? Outdated software is a common entry point for cyber threats. By ensuring Chrome is always updated, you benefit from the latest security patches, protecting your browsing session from malware, phishing attempts, and other online dangers. It’s a simple yet highly effective measure for personal digital security.
Uninstalling Google Chrome
Should you ever need to remove Google Chrome from your Ubuntu system, the process is straightforward using the terminal:
- Open Terminal:
Ctrl + Alt + T - Remove the Chrome Package: Use the
apt removecommand:
bash

sudo apt remove google-chrome-stable
This command removes the Google Chrome application itself. - Remove Residual Configuration Files (Optional but Recommended): To completely purge all associated configuration files and user data (like bookmarks, history, etc.), you can use
purgeinstead ofremove:
bash

sudo apt purge google-chrome-stable
Caution: Usingpurgewill delete all Chrome-related data, including your user profile. If you plan to reinstall Chrome later and want to retain your settings, stick toremoveor manually back up your~/.config/google-chromedirectory. - Remove the Google Repository (Optional): If you no longer wish to have Google’s repository listed in your system’s package sources, you can remove the corresponding file:
bash

sudo rm /etc/apt/sources.list.d/google-chrome.list
- Update Package Lists: After removing the repository, it’s good practice to update your
aptpackage lists:
bash

sudo apt update
Troubleshooting Common Installation Issues
While the installation process is generally smooth, you might encounter minor issues:
- “Unable to locate package” or “E: Package ‘google-chrome-stable’ has no installation candidate”: This usually means the
aptcache is not updated, or the Google repository wasn’t added correctly. Ensure you’ve runsudo apt updateafter adding the repository or that the.debinstallation process correctly added it. - Dependency Errors: If
dpkgcomplains about missing dependencies, remember to runsudo apt install -f. This command is designed specifically to resolve such issues. wget“SSL certificate verification failed”: This is rare but can happen in highly restricted network environments. Ensure your system’s date and time are correct. If the issue persists, you might need to trywget --no-check-certificate [URL](use with caution, as it bypasses security checks).- “Failed to fetch” errors during
apt updaterelated to Google’s repository: This might indicate an issue with the repository URL or an expired GPG key. Re-downloading and installing the.debpackage might fix it, as it refreshes the key and repository entry.
For most issues, the solution lies in ensuring your system is updated (sudo apt update && sudo apt upgrade), that the correct .deb package is downloaded, and that sudo apt install -f is used after dpkg if dependencies are reported.

Conclusion: Empowering Your Ubuntu Experience with Chrome
Installing Google Chrome on Ubuntu is a simple yet impactful step towards optimizing your digital workflow. By following the clear, step-by-step instructions outlined in this guide, you can quickly and efficiently integrate one of the world’s most powerful web browsers into your open-source environment. Whether you choose the graphical download method or the command-line approach, the result is a seamless transition to a browsing experience defined by speed, extensibility, and deep integration with the Google ecosystem.
Beyond the initial installation, understanding how to keep Chrome updated is crucial for maintaining both digital security and access to the latest productivity-enhancing features. The automated update mechanism, thanks to Google’s official repository, ensures that your browser remains a robust and secure gateway to the internet without constant manual intervention.
In an era where technology trends continually evolve, and productivity tools are paramount, combining the flexibility of Ubuntu with the capabilities of Google Chrome offers users the best of both worlds. You’re now equipped to enjoy Chrome’s extensive extension library for enhanced productivity, its cross-platform syncing for a cohesive experience across all your devices, and its consistent performance for all your web-based tasks. Embrace your enhanced Ubuntu setup and unlock a more efficient and secure online journey.
aViewFromTheCave is a participant in the Amazon Services LLC Associates Program, an affiliate advertising program designed to provide a means for sites to earn advertising fees by advertising and linking to Amazon.com. Amazon, the Amazon logo, AmazonSupply, and the AmazonSupply logo are trademarks of Amazon.com, Inc. or its affiliates. As an Amazon Associate we earn affiliate commissions from qualifying purchases.