
In today’s digitally driven world, Python has cemented its place as one of the most versatile and widely used programming languages. From web development and data science to artificial intelligence and automation, Python powers a vast array of applications and systems. For anyone looking to dive into coding, run a specific application, or simply troubleshoot a tech issue, knowing whether Python is installed on your system – and which version – is a fundamental first step.
This comprehensive guide will walk you through the process of verifying your Python installation across major operating systems, helping you understand the nuances of what you find and what to do next. Whether you’re a budding developer, a system administrator, or just curious, mastering this basic check will streamline your workflow and prevent countless headaches down the line. We’ll delve into the ‘how-to’ for Windows, macOS, and Linux, explain the significance of version numbers, and provide insights into managing your Python environment effectively, tying into the broader themes of technological literacy and productivity crucial for any modern professional.
Why Verifying Your Python Installation is Crucial
Before we dive into the technicalities, it’s worth understanding why this simple check is so important. It’s more than just a quick command; it’s about establishing a stable foundation for your technical endeavors, ensuring compatibility, and optimizing your productivity.
Laying the Foundation for Development
For developers, knowing your Python status is akin to a builder checking their tools. Whether you’re writing a new script, contributing to an open-source project, or working on a professional application, you need to ensure that the correct version of Python is available. Different projects often require specific Python versions, and running code with an incompatible interpreter can lead to syntax errors, deprecated functionality warnings, or outright crashes. A quick check helps you avoid these pitfalls, allowing you to focus on the logic and creativity of your code rather than debugging environmental issues. It’s a fundamental part of setting up a robust development environment, which is a cornerstone of efficient tech work.
Running Essential Tools and Applications
Beyond direct coding, many popular software tools, utilities, and even sophisticated AI applications leverage Python behind the scenes. Think of data analysis libraries like Pandas, machine learning frameworks like TensorFlow or PyTorch, or even simple command-line tools designed to automate tasks. If these applications cannot locate a compatible Python installation, they simply won’t run. Verifying Python’s presence means you can troubleshoot why a tool isn’t working, ensure dependencies are met, and keep your critical software running smoothly. This understanding contributes significantly to your digital security and productivity, as many modern applications rely on such underlying technologies.
Maintaining a Streamlined Workflow
In the realm of technology, efficiency is paramount. A cluttered or misconfigured development environment can lead to wasted hours and frustration. By regularly checking and understanding your Python setup, you can prevent conflicts between different project requirements, manage multiple Python versions effectively, and ensure that your system’s PATH variables are correctly configured. This proactive approach not only saves time but also builds good habits for system management, a valuable skill in any tech-related role. It empowers you to maintain a clean, organized, and highly functional workspace, directly impacting your ability to deliver on projects and enhance your personal branding as a meticulous tech professional.
Step-by-Step Checks Across Major Operating Systems
The method for checking Python varies slightly depending on your operating system. Below, we’ll cover the precise steps for Windows, macOS, and Linux, ensuring you can confidently determine your Python status regardless of your platform.
On Windows: Command Prompt and PowerShell
Windows users have two primary command-line interfaces for checking Python: the Command Prompt (CMD) and PowerShell. Both work similarly, but PowerShell offers more advanced features.
Using Command Prompt (CMD):
- Open Command Prompt: Press
Win + R, typecmd, and pressEnter. Alternatively, search for “Command Prompt” in the Start menu. - Type the command: In the CMD window, type
python --versionand pressEnter. - Interpret the output:
- If Python is installed and correctly added to your system’s PATH, you should see something like
Python 3.x.x(wherex.xrepresents the specific version numbers). - If you’ve installed Python via the official installer, it also typically includes the
pylauncher, which allows you to run a specific Python version. Try typingpy --versionand pressEnter. This command might reveal a different version thanpython --versionif you have multiple installations. - If you see an error message like
'python' is not recognized as an internal or external command, operable program or batch file.or similar, it means Python is either not installed or not correctly added to your system’s PATH environment variables.
- If Python is installed and correctly added to your system’s PATH, you should see something like
Using PowerShell:
- Open PowerShell: Search for “PowerShell” in the Start menu and select “Windows PowerShell.”
- Type the command: In the PowerShell window, type
python --versionand pressEnter. - Interpret the output: The output will be similar to Command Prompt. If Python is found, you’ll see its version number. If not, you’ll get an error indicating the command is not recognized. Just like CMD, you can also try
py --version.
Understanding the PATH Variable (Windows Specific):
The “PATH” environment variable is crucial on Windows. It’s a list of directories where the operating system looks for executable files. If Python is installed but its installation directory isn’t in the PATH, Windows won’t know where to find the python command, leading to the “not recognized” error. When installing Python on Windows, make sure to check the “Add Python to PATH” option during setup to avoid this common issue. You can manually check and edit your PATH variables via System Properties, which is often a key step in troubleshooting.
On macOS: Terminal Commands and Considerations
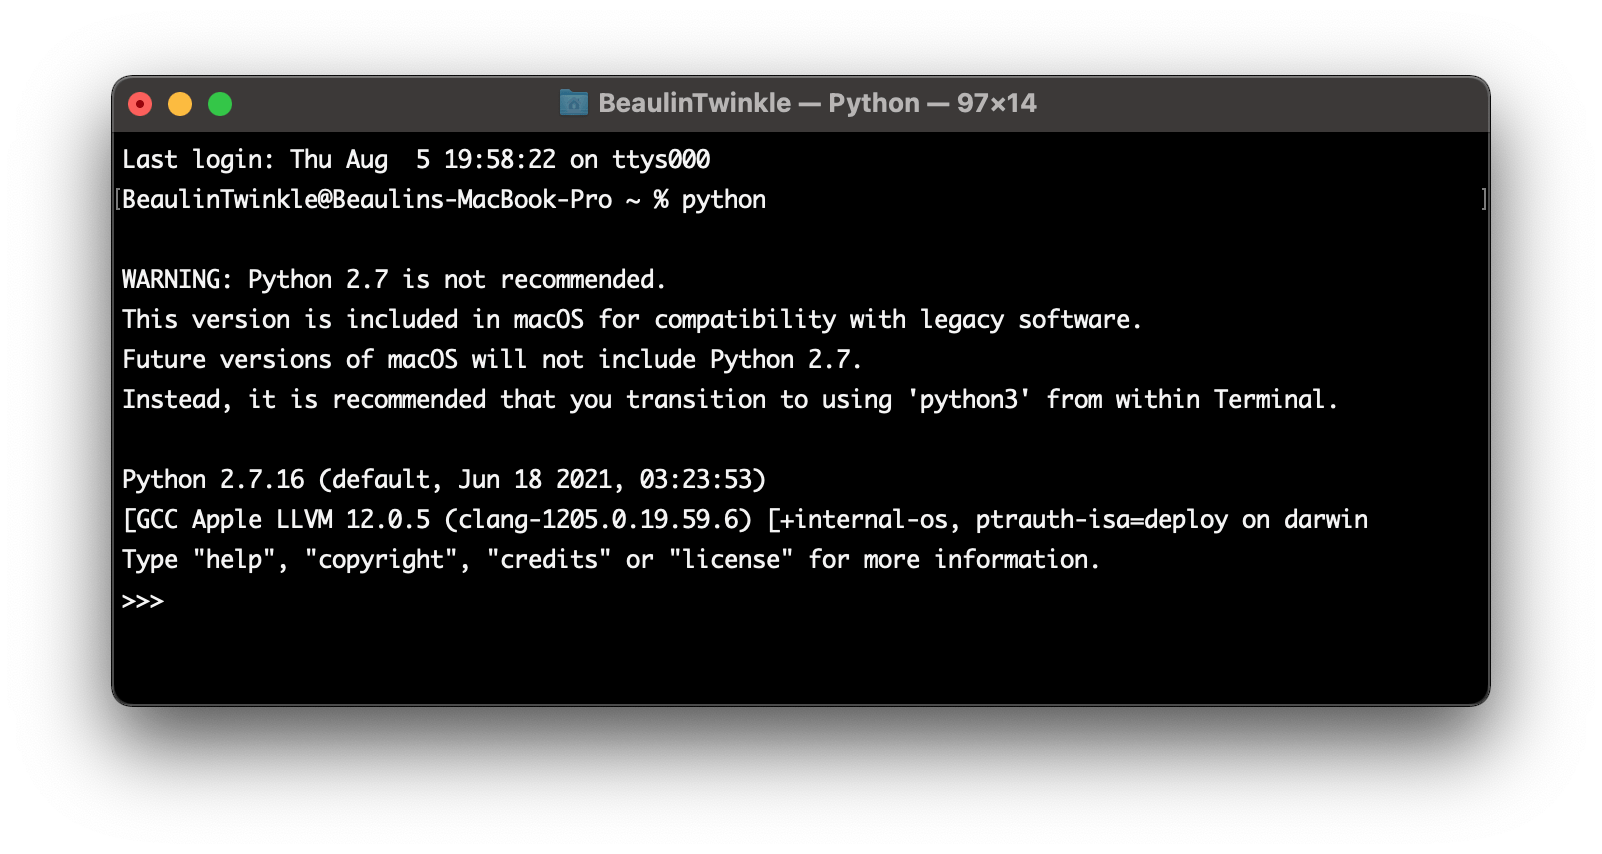
macOS comes with a version of Python pre-installed, historically Python 2.x, but newer macOS versions often come with Python 3.x or are easily configured to use it. However, it’s rarely the latest version, and Apple advises against modifying system Python. For development, it’s best to install your own version.
Using the Terminal:
- Open Terminal: Go to
Applications > Utilities > Terminalor search for “Terminal” using Spotlight (Cmd + Space). - Check for Python 2.x: Type
python --versionand pressEnter. Older macOS versions will likely returnPython 2.7.x. - Check for Python 3.x: Type
python3 --versionand pressEnter. This is the more relevant command for modern development. If Python 3 is installed (either by macOS or a user), you’ll seePython 3.x.x. - Interpret the output:
- If you see version numbers for
python3, you’re good to go. - If
python --versionreturnsPython 2.7.xandpython3 --versionreturns an error likecommand not found, it means you only have the old system Python 2 and need to install Python 3. - If both commands return
command not found, it’s an unusual scenario for macOS, suggesting a heavily modified system or a very old OS version.
- If you see version numbers for
Distinguishing System Python vs. User-Installed Python:
It’s important to understand that the Python that ships with macOS (/usr/bin/python) is part of the operating system and should generally not be tampered with. Most developers install Python 3 using a package manager like Homebrew (brew install python3), which installs it in a separate, user-managed location (/usr/local/bin/python3). This distinction is crucial for maintaining system stability and ensuring your development environment is isolated and manageable.
On Linux: Terminal Commands for Various Distributions
Like macOS, most Linux distributions come with Python pre-installed, often both Python 2.x and Python 3.x, though the default python command might point to Python 2.
Using the Terminal:
- Open Terminal: Use your distribution’s shortcut (e.g.,
Ctrl + Alt + Ton Ubuntu) or find it in your applications menu. - Check for Python 2.x: Type
python --versionand pressEnter. This might showPython 2.x.xif it’s the default. - Check for Python 3.x: Type
python3 --versionand pressEnter. This is the standard way to check for Python 3 on Linux. You should seePython 3.x.x. - Check for specific Python 2 interpreter: Type
python2 --versionand pressEnter. This will confirm if Python 2 is explicitly installed. - Interpret the output:
- If
python3 --versionreturns a version number, you have Python 3. - If
python --versionreturnsPython 2.x.x, it means Python 2 is the default for that command. - If any command returns
command not found, that specific Python version is not installed or not in the PATH.
- If
Different Distributions and Pre-installed Versions:
The specifics can vary slightly between Linux distributions.
- Ubuntu/Debian: Often come with Python 3.x installed by default, with
python3being the primary command.pythonmight alias topython2or might not be set by default. - Fedora/CentOS/RHEL: Similarly, recent versions favor Python 3.x.
It’s always a good practice to usepython3for modern Python development on Linux to explicitly call the Python 3 interpreter.
Decoding Your Python Status: What the Results Mean
Once you’ve run the appropriate commands, you’ll get one of a few outcomes. Understanding what these mean is critical for deciding your next steps.
Python Found: What Version and Where?
If your terminal or command prompt returns Python X.Y.Z (e.g., Python 3.9.7), congratulations – Python is installed! The version number (X.Y.Z) tells you precisely which version is available.
- X is the major version (e.g.,
3for Python 3). - Y is the minor version (e.g.,
9for Python 3.9). - Z is the micro/patch version (e.g.,
7for Python 3.9.7).
What to consider:
- Is it the right version? Many modern projects require Python 3.6 or newer. If you have an older Python 3 version or only Python 2, you might need to install a more recent one.
- Where is it located? To find the exact path of the Python executable being used, you can often use
which python(on macOS/Linux) orwhere python(on Windows CMD/PowerShell). This helps identify if you’re using a system-wide installation, a user-specific one, or one managed by a version manager. Knowing the location is key for advanced configuration and troubleshooting.

Python Not Found: Next Steps
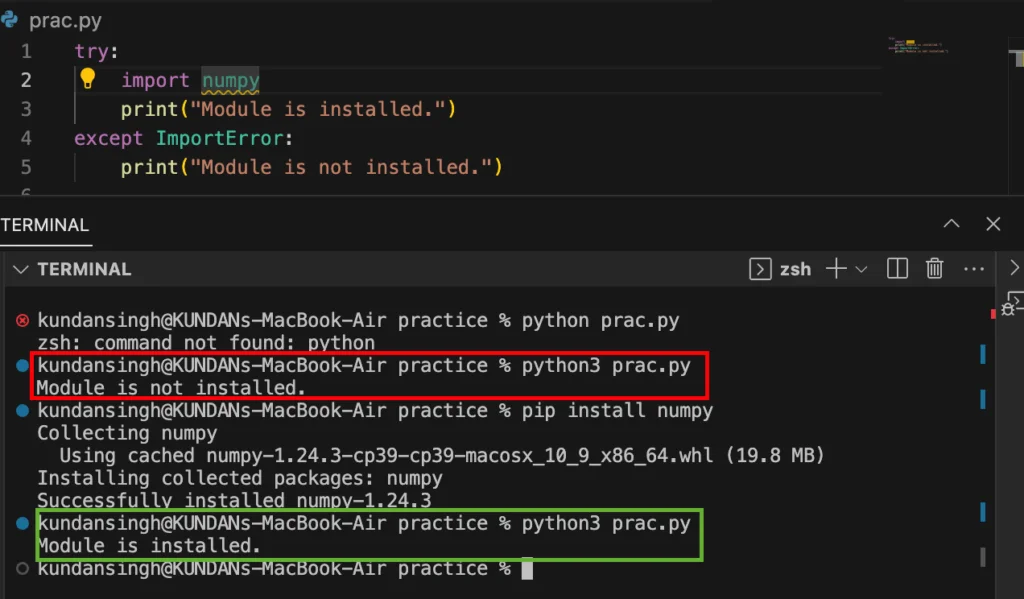
If you receive an error message indicating that python or python3 is not recognized, it means Python isn’t installed on your system or isn’t accessible via the system’s PATH.
Immediate actions:
- Double-check the command: Ensure you typed the command correctly (
python --version,python3 --version,py --version). - Consider a fresh installation: This is the most likely scenario. We’ll cover brief installation overviews in the next section.
- Investigate PATH (Windows): If you’re on Windows and think Python is installed, verify that its installation directory (e.g.,
C:Python39andC:Python39Scripts) has been added to your system’s PATH environment variable.
Addressing Multiple Installations and PATH Variables
It’s not uncommon, especially for seasoned developers or those who’ve experimented with different tools, to have multiple Python versions installed. This can lead to confusion if the ‘default’ python command points to an older version or if different commands (python, python3, py) invoke different interpreters.
Common scenarios and solutions:
pythonvs.python3: On Linux and macOS,pythonmight point to Python 2 (if present), whilepython3points to a Python 3 installation. Always usepython3for modern development. On Windows, thepylauncher often handles this gracefully, allowing you to specifypy -3.9to run Python 3.9 specifically.- PATH conflicts: If multiple Python installations are in your PATH, the one that appears earliest in the list will be used first. This can lead to unexpected behavior. Carefully managing your PATH is essential.
- Virtual Environments: This brings us to a crucial concept: using virtual environments, which elegantly solve the problem of managing multiple Python versions and project dependencies without system-wide conflicts.
Beyond the Basic Check: Mastering Your Python Environment
Simply knowing if Python is installed is a good start, but truly mastering your Python environment involves understanding versions, isolation, and efficient management tools. This advanced insight dramatically boosts your productivity and allows you to tackle complex projects with confidence, aligning perfectly with principles of effective tech utilization and personal branding.
The Significance of Python Versions (Python 2 vs. Python 3)
The most significant version distinction is between Python 2 and Python 3. Python 2 officially reached its end-of-life in 2020, meaning it no longer receives official support or security updates. For all new development, Python 3 is the undisputed standard.
However, you might encounter legacy systems or older tutorials still relying on Python 2. Knowing the difference is vital:
- Python 3: Modern, actively developed, with significant syntax changes and improvements over Python 2 (e.g.,
print()is a function, not a statement; integer division behavior). - Python 2: Legacy, unsupported, but might still be present on older systems for compatibility reasons. Avoid using it for new projects.
Always aim for a recent Python 3 version (e.g., 3.8, 3.9, 3.10, or newer) for optimal performance, features, and library compatibility.
Embracing Virtual Environments for Project Isolation
This is perhaps one of the most important concepts for any Python developer. A virtual environment is an isolated directory that contains its own Python interpreter and a set of installed packages (libraries).
Why are they important?
- Dependency Management: Different projects often require different versions of the same library. Without virtual environments, installing a new version for one project could break another.
- Cleanliness: Virtual environments keep project dependencies neatly separated from your global Python installation, preventing “dependency hell.”
- Reproducibility: You can easily share your project’s
requirements.txtfile, allowing others to recreate your exact development environment. - Security & Productivity: By isolating project dependencies, you minimize conflicts and ensure that each project runs exactly as intended, leading to fewer bugs and a more productive workflow.
How to use them (briefly):
- Create:
python3 -m venv my_project_env - Activate:
- Windows:
.my_project_envScriptsactivate - macOS/Linux:
source my_project_env/bin/activate
- Windows:
- Install packages:
pip install package_name(packages are installed into the active virtual environment). - Deactivate:
deactivate
Tools for Seamless Version Management (pyenv, venv, Anaconda)
While venv (the standard module for virtual environments) is excellent for project isolation, tools like pyenv and Anaconda provide more robust solutions for managing multiple Python interpreters on your system.
pyenv(macOS/Linux): A popular tool that lets you easily install and switch between different Python versions (e.g., 3.8, 3.9, 3.10). You can set a global Python version, or a local version specific to a directory (project). It integrates well withvenv.venv(Built-in Python Module): As discussed, this is Python’s standard way to create virtual environments for specific projects. It’s lightweight and works directly with your installed Python interpreter.- Anaconda/Miniconda: A powerful platform for data science and machine learning. Anaconda comes with a large suite of pre-installed scientific packages, while Miniconda is a minimal installer with just Python and the
condapackage manager.condaitself can manage multiple Python versions and create environments, often preferred in scientific computing for its ability to handle non-Python dependencies.
By leveraging these tools, you transform your Python setup from a potential source of frustration into a highly flexible and efficient development powerhouse, a mark of true tech proficiency.
What If Python Isn’t There? A Quick Installation Guide and Next Steps
If your checks revealed that Python isn’t installed or accessible, don’t worry! Installing it is straightforward. This section provides a brief overview; always refer to the official Python website or specific OS documentation for the most up-to-date and detailed instructions.
General Installation Overview for Each OS
For Windows:
- Download: Go to the official Python website (python.org/downloads/windows/).
- Run Installer: Download the latest stable Python 3 installer (usually the
x86-64 executable installer). - Important Step: During installation, make sure to check the box that says “Add Python to PATH” before clicking “Install Now.” This is crucial for running Python from your command line.
- Follow the prompts to complete the installation.
For macOS:
While macOS comes with some Python, it’s best to install your own using Homebrew.
- Install Homebrew (if not already installed): Open Terminal and run
/bin/bash -c "$(curl -fsSL https://raw.githubusercontent.com/Homebrew/install/HEAD/install.sh)" - Install Python 3: Once Homebrew is installed, run
brew install pythonin the Terminal. This will install the latest stable Python 3 version. Homebrew also handles adding it to your PATH correctly.
For Linux:
Most modern Linux distributions have Python 3 available in their package repositories.
- Update Package List:
- Debian/Ubuntu:
sudo apt update - Fedora:
sudo dnf check-update - CentOS/RHEL:
sudo yum check-update
- Debian/Ubuntu:
- Install Python 3:
- Debian/Ubuntu:
sudo apt install python3 - Fedora:
sudo dnf install python3 - CentOS/RHEL:
sudo yum install python3
You might also wantsudo apt install python3-pip(Ubuntu/Debian) to get the package installer.
- Debian/Ubuntu:
Verifying a New Installation
After installation, immediately open a new terminal/command prompt window (to ensure PATH changes are loaded) and re-run the python --version or python3 --version command specific to your OS. You should now see the version number of your newly installed Python.
Diving Deeper: Your Journey with Python
Installing Python is just the first step on an exciting journey. With Python installed and a foundational understanding of environment management, you’re now equipped to:
- Start coding: Begin with basic scripts, explore online tutorials, and build simple applications.
- Install packages: Use
pip(Python’s package installer) to add libraries like NumPy, Pandas, Flask, or Django:pip install package_name. - Explore new domains: Dive into web development, data analysis, machine learning, automation, or even game development. The possibilities are vast.
Mastering Python can significantly enhance your technical skills, opening doors to new career opportunities in a competitive job market. Whether you’re aiming for a side hustle, a full-time role in AI, or simply boosting your personal finance through programming, Python is a powerful ally. This initial check is more than a technicality; it’s the gateway to unlocking immense potential and driving innovation in the digital age.
aViewFromTheCave is a participant in the Amazon Services LLC Associates Program, an affiliate advertising program designed to provide a means for sites to earn advertising fees by advertising and linking to Amazon.com. Amazon, the Amazon logo, AmazonSupply, and the AmazonSupply logo are trademarks of Amazon.com, Inc. or its affiliates. As an Amazon Associate we earn affiliate commissions from qualifying purchases.