The digital revolution has placed immense value on our data. From precious family photos and videos to critical business documents and the ever-growing libraries of our favorite games, storage capacity is a constant concern. When your current hard drive starts to feel cramped, or if you’re looking to upgrade to a faster, more robust solution, the prospect of installing a new hard drive can seem daunting. However, with a clear understanding of the process and a methodical approach, this task is well within the reach of most tech-savvy individuals. This guide will demystify the process, breaking it down into manageable steps, whether you’re looking to expand your storage for personal use, boost your productivity, or even for business-critical applications.
Understanding Your Hard Drive Needs and Choosing the Right Drive
Before you even begin to consider the physical installation, it’s crucial to understand why you need a new hard drive and what kind of drive will best suit your requirements. This decision-making process can have a significant impact on your overall user experience, system performance, and even your budget.
Types of Hard Drives: SSDs vs. HDDs
The landscape of storage technology has evolved significantly. Today, the primary contenders are Solid State Drives (SSDs) and Hard Disk Drives (HDDs). Each offers distinct advantages and disadvantages, making the choice dependent on your specific needs and priorities.
Solid State Drives (SSDs): The Speed Demons
SSDs have revolutionized computer performance. Unlike traditional HDDs that use spinning magnetic platters, SSDs store data on interconnected flash memory chips. This fundamental difference leads to several key benefits:
- Speed: This is the undisputed champion of SSDs. Boot times are drastically reduced, application loading is near-instantaneous, and file transfers are lightning-fast. If you’re experiencing sluggishness with your current system, an SSD is often the single most impactful upgrade you can make. This is particularly beneficial for productivity tasks, gaming, and any application that heavily relies on reading and writing data.
- Durability: With no moving parts, SSDs are far more resistant to physical shock and vibration. This makes them an excellent choice for laptops or any device that might be moved around frequently.
- Power Efficiency: SSDs consume less power than HDDs, which can translate to slightly longer battery life in laptops and reduced energy costs in desktop systems.
- Quiet Operation: The absence of spinning platters means SSDs operate silently.
However, SSDs typically come with a higher cost per gigabyte compared to HDDs. While prices have fallen considerably, for massive storage needs, they can still be more expensive.
Hard Disk Drives (HDDs): The Capacity Kings
HDDs have been the workhorse of storage for decades. They utilize spinning platters coated with a magnetic material, read and written by a movable read/write head.
- Capacity: HDDs still offer the most storage for your money. If you need to store vast amounts of data – think extensive video libraries, large photo archives, or extensive game installations – HDDs remain the most cost-effective solution.
- Cost-Effectiveness: For sheer storage volume, HDDs are the clear winner in terms of price per gigabyte.
- Longevity (for certain data types): While SSDs have a finite number of write cycles, HDDs, under normal usage, can last for many years. However, they are more susceptible to mechanical failure.
The primary drawback of HDDs is their speed. The mechanical nature of their operation means they are significantly slower than SSDs for accessing data, which can lead to longer boot times, slower application loading, and slower file transfers.
Determining Your Storage Needs
Before purchasing a drive, ask yourself:
- What will I use this drive for? Is it for the operating system and frequently used applications (where speed is paramount)? Is it for storing large media files or backups (where capacity is key)? Or a combination of both?
- How much storage do I need? Consider your current usage and future needs. It’s always better to err on the side of having a little extra space than running out soon after installation.
- What is my budget? This will heavily influence whether you opt for a large HDD, a fast SSD, or a combination of both.
For most users, a hybrid approach is often the most practical and cost-effective. This typically involves using a smaller, faster SSD for your operating system and essential applications, and a larger, more affordable HDD for storing your media, documents, and less frequently accessed files. This configuration offers the best of both worlds: blazing-fast system performance and ample storage capacity.
Preparing for the Installation: Tools and Safety Precautions
Once you’ve selected the perfect drive, it’s time to prepare for the physical installation. This phase is crucial for a smooth and successful process, ensuring both your safety and the longevity of your components.
Essential Tools and Materials
While installing a hard drive isn’t an overly complex task, having the right tools on hand will make the process significantly easier and more efficient.
- Phillips Head Screwdriver: This is the most common tool you’ll need. Ensure you have a set with various sizes, as screw heads can differ slightly between computer cases and drive bays. A magnetic tip can be a lifesaver, preventing dropped screws from disappearing into the depths of your computer.
- Anti-Static Wrist Strap: This is perhaps the most important safety precaution. Electronic components are highly sensitive to electrostatic discharge (ESD). A tiny jolt of static electricity can permanently damage them. An anti-static wrist strap connects you to a grounded point (usually the metal chassis of your computer case), preventing the buildup of static charge.
- Flashlight or Headlamp: Many computer cases have limited lighting, especially in the internal components. A good light source will help you see what you’re doing, especially in tight spaces.
- Zip Ties or Velcro Straps: While not strictly necessary for the drive installation itself, cable management is vital for good airflow within your computer. Once the drive is installed, use these to tidy up any loose cables.
- Your New Hard Drive: Ensure you have the correct type (SATA for most modern systems, NVMe for very high-speed SSDs) and form factor (typically 2.5-inch for SSDs and 3.5-inch for HDDs, though smaller form factors exist).
- SATA Data Cable (if not included with the motherboard): Most motherboards come with a few SATA data cables. If you’re installing multiple drives or need an extra, ensure you have one.
- SATA Power Cable (from your power supply unit): Your power supply unit will have these cables.
Safety First: Preventing Damage to Your Components
Working with computer hardware requires a degree of care. Adhering to these safety guidelines will protect both you and your valuable components.
- Power Down Completely: Before opening your computer case, ensure the power supply switch at the back of the unit is turned off, and the power cord is unplugged from the wall outlet. This is non-negotiable.
- Ground Yourself: As mentioned, use an anti-static wrist strap. If you don’t have one, periodically touch a grounded metal object (like the unpainted metal of your computer case) before touching any internal components.
- Work on a Clean, Static-Free Surface: Avoid working on carpeted floors or surfaces that tend to accumulate static electricity. A wooden table or a dedicated anti-static mat is ideal.
- Handle Components Gently: Avoid touching the delicate circuitry on the drives or motherboard. Always handle components by their edges.
- Don’t Force Anything: If a cable or screw doesn’t seem to fit easily, don’t force it. Recheck your orientation and the compatibility of the parts. Forcing components can lead to irreversible damage.
- Keep Track of Screws: It’s a good idea to place screws in a small container or draw a diagram of your case to note where each screw came from.
The Physical Installation Process: Step-by-Step Guide
With your tools ready and safety precautions in place, you’re prepared to begin the physical installation. This process will vary slightly depending on whether you’re installing an SSD or an HDD, and the type of computer case you have.
Accessing Your Computer’s Interior
The first step is to gain access to the internal components of your computer.
- Turn Off and Unplug: Ensure your computer is completely powered off and unplugged from the wall.
- Remove the Side Panel: Most desktop computer cases have a side panel that can be removed by unscrewing a few screws on the back. Once the screws are out, the panel usually slides backward or hinges open. Consult your computer case manual if you’re unsure.
- Identify Drive Bays: Inside your case, you’ll see various bays designed to hold storage devices.
- 3.5-inch bays: Typically used for traditional HDDs.
- 2.5-inch bays: Primarily used for SSDs and laptop HDDs. Many cases have adapters to fit 2.5-inch drives into 3.5-inch bays.
- M.2 slots: These are specific slots on modern motherboards designed for compact NVMe SSDs. If you’re installing an NVMe drive, you’ll likely be mounting it directly onto the motherboard.
Installing the Drive
The actual mounting of the drive will depend on your case’s design. Many modern cases feature tool-less drive bays, which use clips or latches. Older cases might require screws.
For 3.5-inch HDDs and 2.5-inch SSDs (in drive bays):
- Prepare the Drive Bay: If your case uses a tool-less system, you might need to remove a bracket or release a latch. If screws are required, ensure you have the correct size.
- Mount the Drive:
- Tool-less: Slide the drive into the bay until it clicks into place or the locking mechanism secures it.
- Screws: Align the drive with the mounting holes in the bay and gently screw it in place. Do not overtighten.
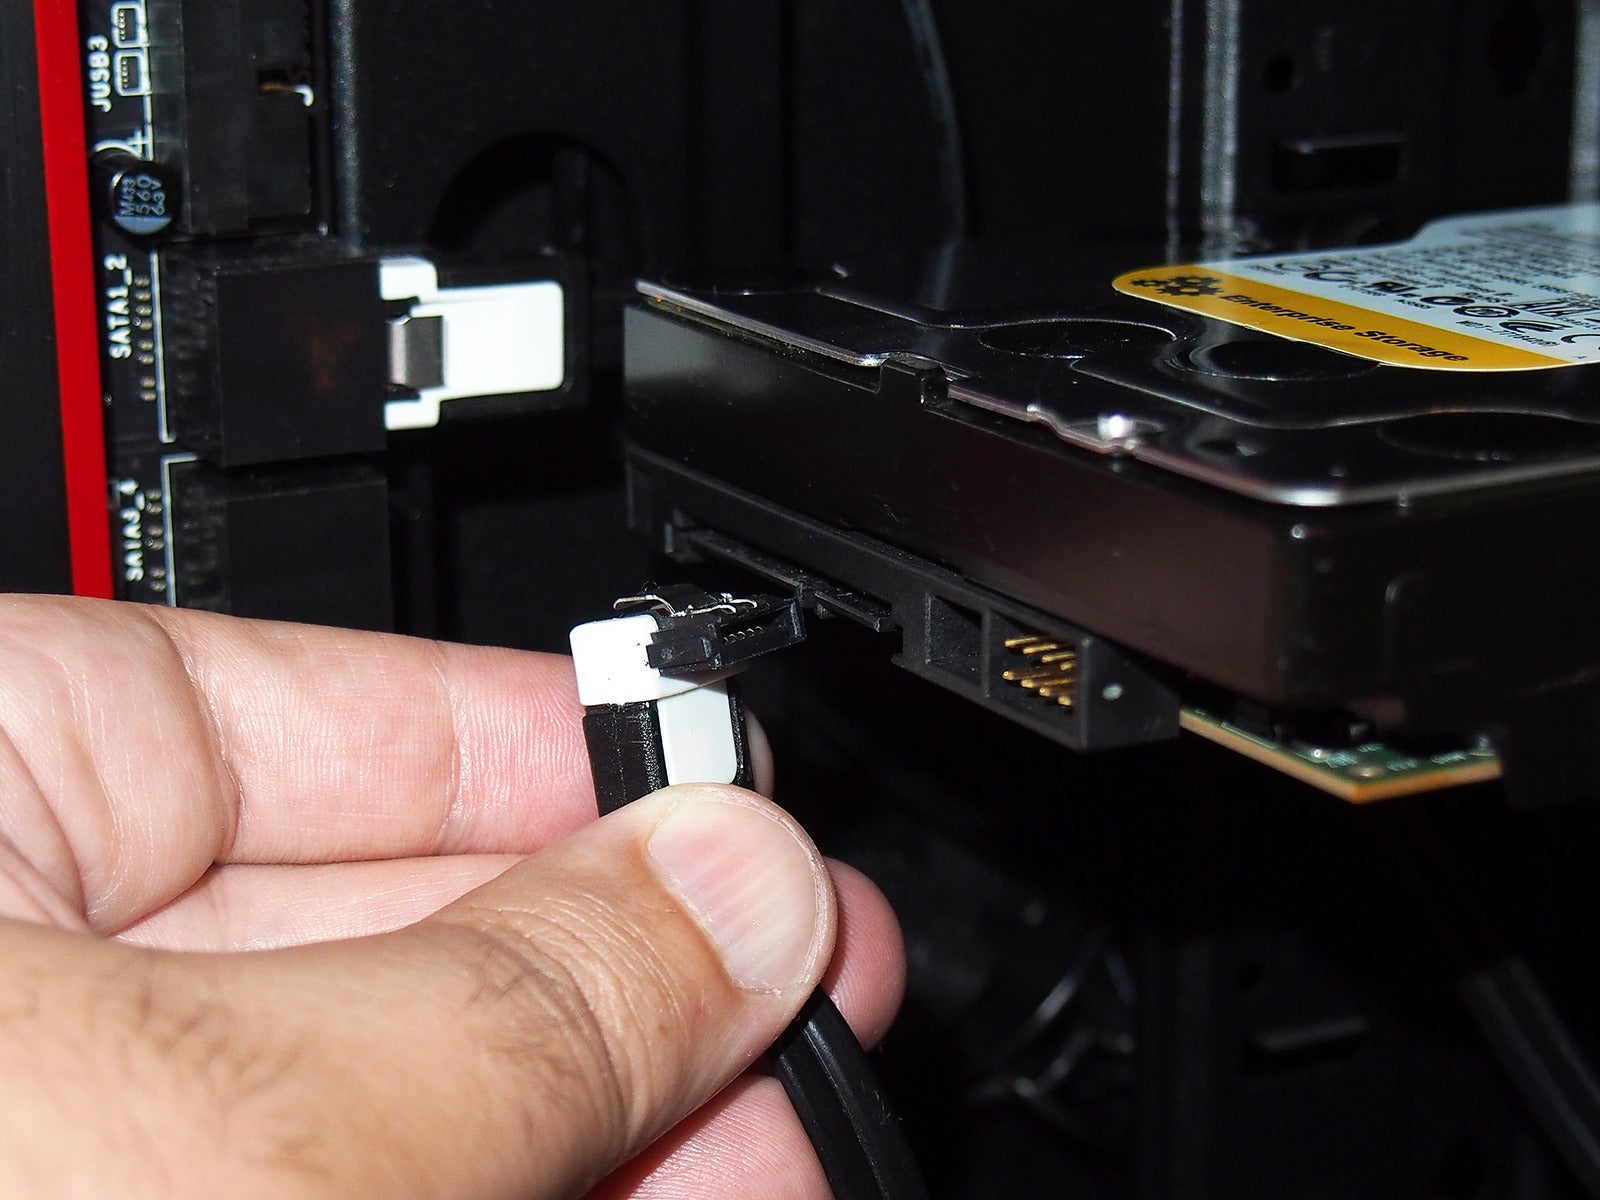
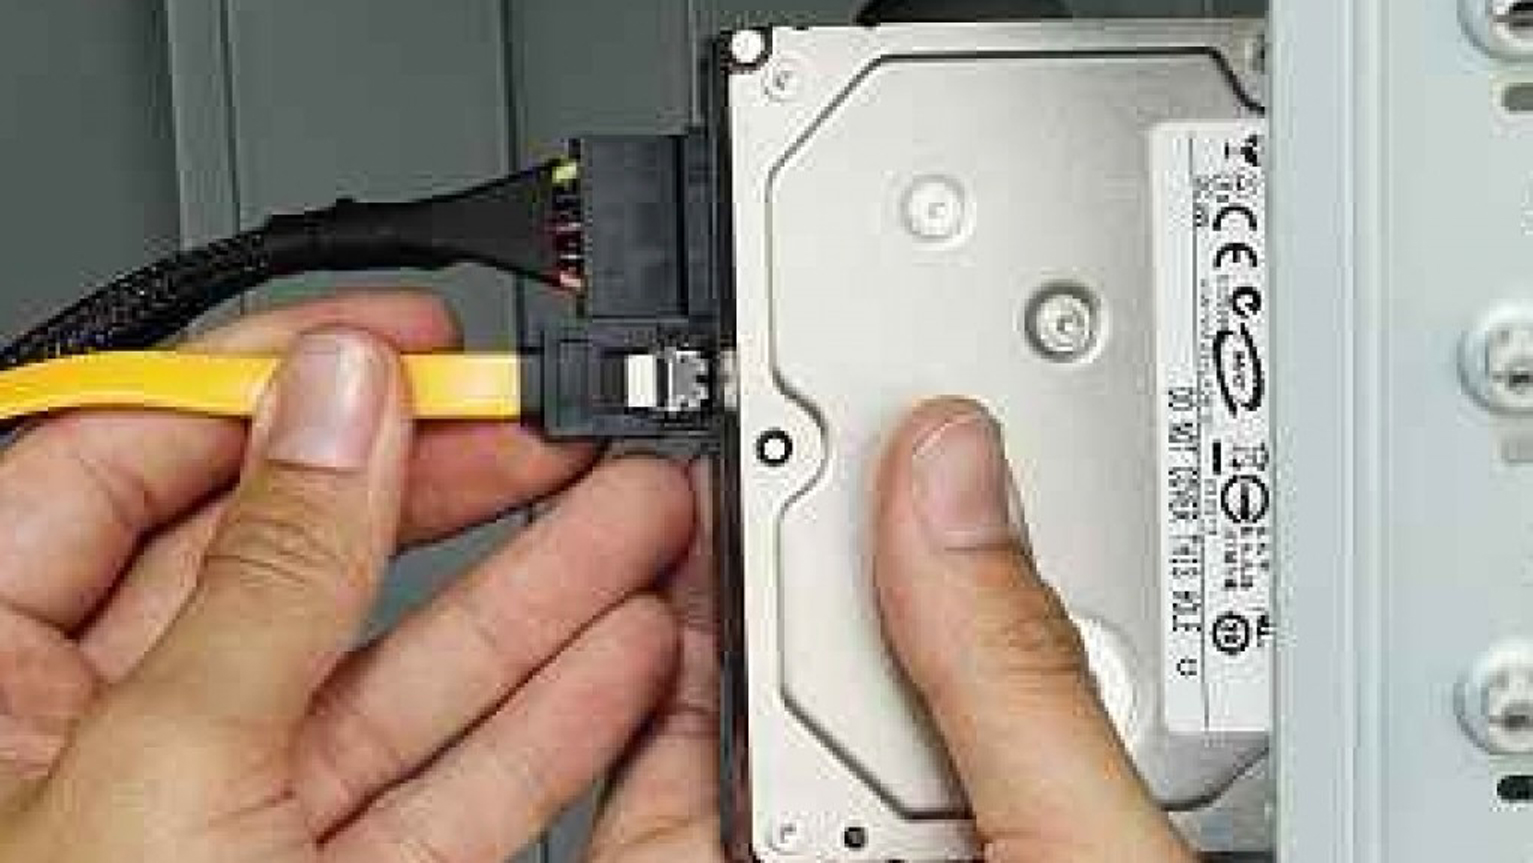
- Connect Cables:
- SATA Data Cable: Connect one end of the SATA data cable to the back of the hard drive (a small L-shaped connector). Connect the other end to an available SATA port on your motherboard. These ports are usually labeled “SATA” and are often colored red or black.
- SATA Power Cable: Connect a SATA power cable from your power supply unit to the power connector on the back of the hard drive. This connector is wider than the data connector. Ensure it’s firmly seated.
For NVMe SSDs (mounted on the motherboard):
- Locate the M.2 Slot: Consult your motherboard manual to find the M.2 slot(s). They are typically small, horizontal slots with a retaining screw at the end.
- Remove the Standoff Screw: Unscrew the small screw that holds the M.2 slot in place.
- Insert the NVMe SSD: Gently slide the NVMe SSD into the M.2 slot at an angle (usually around 30 degrees).
- Secure the SSD: Gently push the SSD down so it lies flat and then re-insert and tighten the standoff screw to secure it. Be careful not to overtighten.
Reassembling Your Computer
Once the drive is physically installed and connected:
- Cable Management: Tidy up any loose cables using zip ties or Velcro straps to improve airflow and make future maintenance easier.
- Replace the Side Panel: Slide or hinge the side panel back into place and secure it with the screws you removed earlier.
- Reconnect Peripherals: Reconnect your power cord, monitor, keyboard, mouse, and any other peripherals.
Initializing and Formatting the New Drive: Making it Usable
After the physical installation, your new drive is recognized by the system but isn’t yet ready to store data. It needs to be initialized and formatted. This process is handled within your operating system.
Accessing Disk Management (Windows)
Disk Management is the built-in Windows utility for managing storage devices.
- Boot Up Your Computer: Turn on your computer. Windows should detect the new hardware.
- Open Disk Management:
- Right-click on the Start button and select “Disk Management.”
- Alternatively, press
Windows Key + R, typediskmgmt.msc, and press Enter.
- Initialize the Disk:
- You will likely see a “Initialize Disk” window pop up automatically. If not, find your new drive in the Disk Management list. It will probably be labeled “Unallocated” or “Not Initialized.”
- Right-click on the disk and select “Initialize Disk.”
- Choose the partition style:
- GPT (GUID Partition Table): Recommended for modern systems and drives larger than 2TB.
- MBR (Master Boot Record): For older systems or drives smaller than 2TB. For most new installations, GPT is the standard.
- Click “OK.”
Creating a New Simple Volume (Partitioning and Formatting)
Once the disk is initialized, you can create partitions and format them.
- Create a New Simple Volume:
- In Disk Management, find your new, now initialized, disk. It will show as “Unallocated” space.
- Right-click on the “Unallocated” space and select “New Simple Volume.”
- The “New Simple Volume Wizard” will appear. Click “Next.”
- Specify Volume Size:
- By default, the wizard will use the maximum available space for a single partition. If you want to create multiple partitions, you can adjust the “Simple volume size in MB” here. For most users, a single large partition is sufficient. Click “Next.”
- Assign Drive Letter:
- Choose an available drive letter from the dropdown menu. This is the letter that will appear in File Explorer (e.g., D:, E:, F:). Click “Next.”
- Format Partition:
- File System: For most Windows installations, NTFS is the recommended file system.
- Allocation Unit Size: “Default” is usually fine.
- Volume Label: Give your drive a descriptive name (e.g., “Storage,” “Games,” “Data”).
- Perform a quick format: This is usually sufficient. Unchecking this will perform a full format, which takes much longer but can help identify bad sectors (though less common with new drives).
- Click “Next.”
- Complete the Wizard: Review your settings and click “Finish.”
Your new hard drive will now appear in File Explorer, ready to be used for storing your files, installing applications, or running your operating system. If you installed an SSD as your boot drive, you’ll need to reinstall your operating system onto it or clone your existing system from your old drive.
Ensuring Optimal Performance and Ongoing Maintenance
Installing a new hard drive is just the first step. To ensure you get the most out of your investment and maintain its performance over time, some post-installation steps and ongoing maintenance are recommended.
Setting Your New Drive as the Default (If Applicable)
If you’ve installed a new SSD as your boot drive, you’ll need to configure your system to boot from it.
- BIOS/UEFI Settings:
- Restart your computer and press the key indicated on the screen to enter BIOS/UEFI setup (often Del, F2, F10, or F12).
- Navigate to the “Boot” or “Boot Order” section.
- Prioritize your new SSD as the first boot device.
- Save your changes and exit BIOS/UEFI.
- Operating System Installation/Cloning:
- Clean Install: The most straightforward method is to perform a clean installation of your operating system onto the new SSD. This ensures a fresh start and optimal performance.
- Cloning: If you wish to keep your existing operating system and applications, you can use disk cloning software (often provided by SSD manufacturers or available as third-party tools) to copy your entire system from your old drive to the new one.
If your new drive is a secondary storage drive (an HDD or a second SSD), you can simply start using it for storage. You might choose to redirect your default save locations for documents, pictures, or downloads to this new drive for convenience.
Optimizing Drive Performance
- TRIM Command (for SSDs): TRIM is a command that helps SSDs maintain their performance by informing them which data blocks are no longer in use and can be wiped. Windows typically enables TRIM automatically for SSDs. You can verify this by searching for “Defragment and Optimize Drives” in the Windows search bar, selecting your SSD, and checking if “Solid state drive” is listed and optimization is enabled.
- Defragmentation (for HDDs): Unlike SSDs, HDDs benefit from defragmentation. This process reorganizes fragmented data on the drive, allowing the read/write head to access files more quickly. Windows’ “Defragment and Optimize Drives” tool can schedule this automatically for HDDs. Do NOT defragment SSDs; it is unnecessary and can reduce their lifespan.
- Firmware Updates: Manufacturers occasionally release firmware updates for their drives that can improve performance, stability, or fix bugs. Check the manufacturer’s website for your specific drive model and follow their instructions for updating firmware.
Regular Data Backups
While new drives are generally reliable, any storage device can fail. Implementing a regular backup strategy is crucial for data security.
- Cloud Storage: Services like Google Drive, Dropbox, OneDrive, and iCloud offer convenient ways to back up important files.
- External Hard Drives: Periodically backing up critical data to an external hard drive is a reliable method.
- Network Attached Storage (NAS): For more advanced users or businesses, a NAS device provides centralized storage and backup solutions for multiple devices on a network.
By following these steps, you can successfully install a new hard drive, enhance your computer’s capabilities, and ensure your valuable data remains safe and accessible. Whether you’re a gamer seeking faster load times, a professional looking for increased productivity, or a creative professional needing more space for your projects, a new hard drive can be a transformative upgrade.
aViewFromTheCave is a participant in the Amazon Services LLC Associates Program, an affiliate advertising program designed to provide a means for sites to earn advertising fees by advertising and linking to Amazon.com. Amazon, the Amazon logo, AmazonSupply, and the AmazonSupply logo are trademarks of Amazon.com, Inc. or its affiliates. As an Amazon Associate we earn affiliate commissions from qualifying purchases.