In the intricate ecosystem of your personal computer, the motherboard serves as the central nervous system, orchestrating communication between all components, from the CPU and RAM to storage devices and expansion cards. For this vital piece of hardware to function optimally, and indeed, to function at all, it relies on specialized software known as drivers. These drivers are the unsung heroes, acting as translators that enable your operating system to understand and interact with the physical hardware. Without them, your cutting-edge graphics card might display nothing, your lightning-fast SSD could go unrecognized, and your meticulously assembled PC might struggle with instability or even refuse to boot.
Whether you’re embarking on the exciting journey of building a new PC, performing a fresh installation of Windows, or simply troubleshooting an elusive hardware issue, understanding how to properly install and manage motherboard drivers is a fundamental skill for any tech enthusiast. This comprehensive guide will walk you through everything you need to know, from identifying your motherboard and sourcing the correct drivers to the precise installation steps and essential troubleshooting tips, ensuring your system runs smoothly, efficiently, and reliably.
Understanding Motherboard Drivers: The Foundation of Your PC’s Functionality
Before diving into the “how-to,” it’s crucial to grasp the “what” and “why” behind motherboard drivers. This foundational knowledge will empower you to make informed decisions and troubleshoot more effectively.
What Exactly Are Drivers?
At their core, drivers are pieces of software that allow your operating system (like Windows, macOS, or Linux) to communicate with a specific hardware device. Think of them as instruction manuals or dictionaries that the OS consults to understand how to “talk” to the unique language of a motherboard’s chipset, a sound card, a network adapter, or any other peripheral. Without the correct driver, your operating system would see the hardware as an unknown entity, unable to send commands or receive data from it.
For a motherboard, there isn’t just one “motherboard driver.” Instead, there’s a suite of drivers, each responsible for a different integrated component:
- Chipset Drivers: These are arguably the most critical. The chipset manages communication between the CPU and other components like memory, storage, and expansion slots (PCIe). Chipset drivers optimize these pathways, impacting overall system performance and stability.
- Audio Drivers: Control the integrated sound card, enabling sound output through speakers or headphones and input through microphones.
- LAN/Ethernet Drivers: Facilitate wired network connectivity, allowing your PC to connect to the internet or a local network.
- USB Drivers: While Windows has generic USB drivers, motherboard-specific USB drivers can optimize performance for certain USB controllers and ensure compatibility with newer USB standards (e.g., USB 3.0, USB 3.1, USB 3.2).
- SATA/Storage Drivers: Improve the performance and compatibility of your storage drives (HDDs and SSDs) connected via SATA ports. Sometimes referred to as AHCI/RAID drivers.
- Integrated Graphics Drivers: If your CPU has integrated graphics (e.g., Intel HD Graphics, AMD Radeon APU), these drivers are essential for display output and graphics acceleration.
Why Driver Installation is Crucial
The importance of correctly installed motherboard drivers cannot be overstated. They are the backbone of your PC’s operational integrity, directly influencing:
- Performance: Proper drivers unlock the full potential of your hardware. Outdated or incorrect chipset drivers, for instance, can lead to slower data transfer speeds, hindering overall system responsiveness. Graphics drivers impact frame rates in games and render times in creative applications.
- Stability: Missing or corrupted drivers are a leading cause of system instability, resulting in frequent crashes, freezes, Blue Screens of Death (BSODs), and unpredictable behavior. A stable system is a productive system.
- Compatibility: Drivers ensure that your operating system recognizes and can interact with all components and connected peripherals. Without them, devices might not be detected, or features might be unavailable.
- Security: Manufacturers often release driver updates that include security patches to address vulnerabilities, protecting your system from potential exploits.
- Features: Many drivers enable specific features unique to the hardware, such as power management settings, overclocking capabilities, or advanced audio enhancements.
When to Install or Update Your Motherboard Drivers
Knowing when to perform driver installations or updates is as important as knowing how:
- New PC Build: This is the primary scenario where a complete set of motherboard drivers is essential from scratch. After installing Windows, many components will work with generic drivers, but optimal performance requires manufacturer-specific ones.
- Fresh Operating System Installation: Similar to a new build, reinstalling Windows (even on an existing system) often wipes out existing drivers, necessitating a fresh installation.
- Troubleshooting Hardware Issues: If you’re experiencing problems with specific components (e.g., no sound, intermittent internet, USB devices not recognized), outdated or corrupted drivers are often the first culprits to investigate.
- Performance Degradation: A sudden drop in performance or unresponsiveness could be linked to driver issues. Updating chipset drivers, in particular, can sometimes resolve these.
- Hardware Upgrades: While not always necessary, installing a new CPU, RAM, or even a new storage drive might benefit from an updated chipset or storage driver.
- New Software or Games: Modern applications and games often leverage the latest driver optimizations. Keeping graphics and chipset drivers relatively current can improve compatibility and performance.
The Step-by-Step Process: Finding and Installing Your Motherboard Drivers
This section outlines the methodical approach to ensure you download and install the correct drivers for your specific motherboard. Patience and attention to detail are key.
Step 1: Identify Your Motherboard Model
This is the most crucial first step. Installing the wrong drivers can lead to system instability, conflicts, or even prevent your PC from booting.
- Physical Inspection: If you built the PC yourself, or if it’s easily accessible, the motherboard model is usually printed clearly on the board itself, often near the CPU socket, RAM slots, or PCIe slots. Look for names like “ASUS ROG STRIX Z690-F GAMING WIFI” or “MSI B550-A PRO.”
- Software Tools:
- System Information (Windows): Press
Windows Key + R, typemsinfo32, and hit Enter. Look for “BaseBoard Manufacturer,” “BaseBoard Product,” and “BaseBoard Version.” - Command Prompt (WMIC): Open Command Prompt as administrator, type
wmic baseboard get product,manufacturer,version,serialnumber, and press Enter. This provides a concise overview. - Third-Party Utilities: Programs like CPU-Z, Speccy, or HWiNFO64 are excellent free tools that provide detailed hardware information, including your motherboard model, chipset, and BIOS version. They are particularly useful if your system isn’t booting or for more comprehensive diagnostics.
- System Information (Windows): Press
- Documentation/Invoice: If you purchased a pre-built PC or had it custom-built, check the documentation that came with it or the original purchase invoice.
Once you have the exact model number (e.g., Gigabyte Z790 AORUS ELITE AX), write it down accurately.
Step 2: Navigating the Manufacturer’s Website
With your motherboard model identified, your next destination is the manufacturer’s official support website. Avoid third-party driver download sites, as they often bundle unwanted software, provide outdated drivers, or even malicious files.
- Common Manufacturers: ASUS, MSI, Gigabyte, ASRock, Biostar, EVGA (for Intel/AMD chipsets). For pre-built systems like Dell, HP, or Lenovo, you’ll go to their support site and search by your computer’s model number.
- Locating Support: On the manufacturer’s homepage, look for sections typically labeled “Support,” “Downloads,” “Service,” or “Drivers.”
- Searching by Model: Once in the support section, there will usually be a search bar or a product selector where you can type your motherboard model number. Select the exact model from the search results.
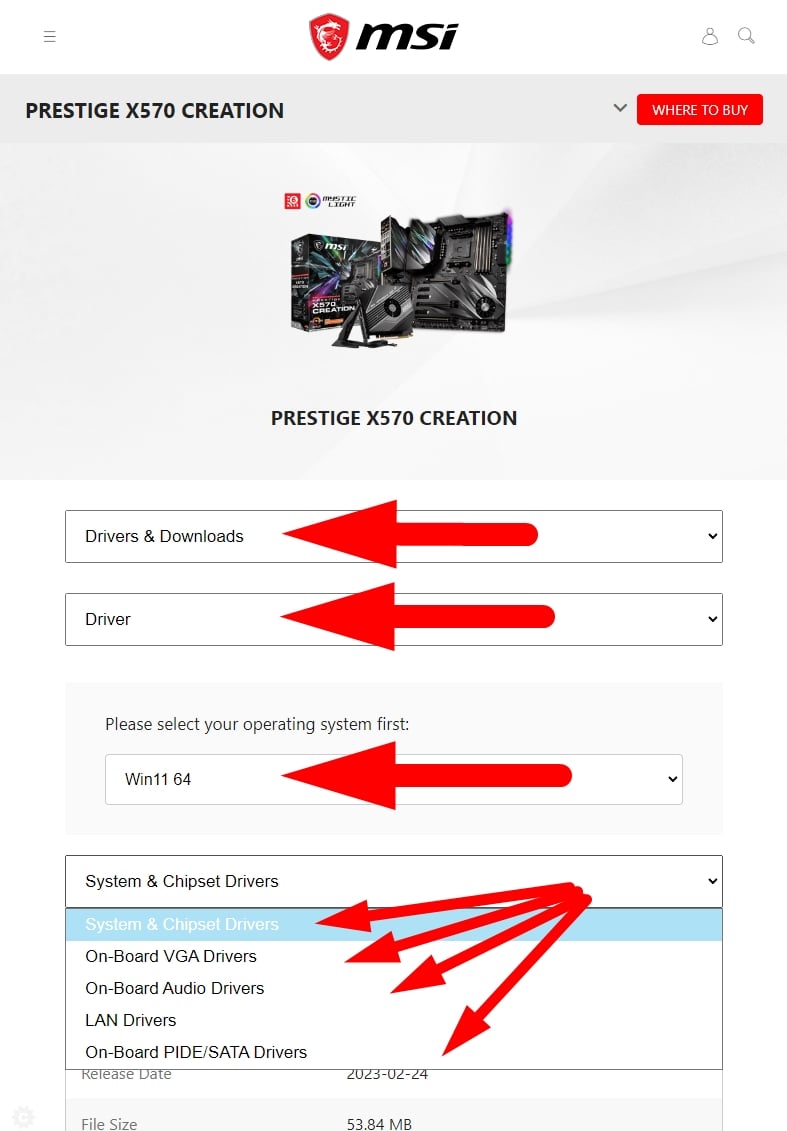
- Filtering by Operating System: Crucially, on the product support page, you’ll need to select your specific operating system (e.g., Windows 11 64-bit, Windows 10 64-bit). This ensures you download compatible drivers. Downloading 32-bit drivers for a 64-bit OS (or vice-versa) will lead to errors.
Step 3: Downloading the Essential Drivers
Once you’ve selected your OS, you’ll see a list of available drivers. It can be extensive, but focus on these core categories first:
- Chipset: Always download and install the latest chipset driver. This is fundamental.
- LAN/Ethernet: Essential for internet connectivity. If you can’t get online without it, you might need to download this on another computer and transfer it via USB.
- Audio: For sound functionality.
- USB: For optimal USB port performance and compatibility.
- SATA/RAID/Storage: Especially important if you’re setting up a RAID array or experiencing issues with storage device detection/performance.
- Integrated Graphics (if applicable): If your CPU has built-in graphics and you’re not using a dedicated graphics card (or for initial setup before installing a dedicated GPU), download these.
- Wi-Fi/Bluetooth (if integrated): If your motherboard has these features, their drivers will be listed separately.
Pro Tip: Create a dedicated folder on your hard drive (e.g., C:DriversMotherboard) and download all these drivers into it. This keeps them organized and makes future reinstallation easier. It’s also a good idea to download them onto a USB drive if you’re doing a fresh Windows installation and won’t have internet access initially.
Step 4: The Installation Sequence and Process
The order of driver installation can sometimes matter, particularly for a fresh Windows installation on a new build.
- Recommended Installation Order (for new builds/fresh OS):
- Chipset Drivers: Install these first. They lay the groundwork for how the CPU communicates with everything else.
- LAN/Ethernet Drivers: Install next to get internet access, which can be useful for subsequent installations or Windows Updates.
- SATA/Storage Drivers: If your drives aren’t being fully recognized or you have a RAID setup.
- Audio Drivers: For sound.
- USB Drivers: For full USB functionality.
- Integrated Graphics Drivers: If using.
- Wi-Fi/Bluetooth Drivers: If applicable.
- Other Utilities: Any other specific utilities provided by the manufacturer can be installed last.
- Installation Methods:
- Running
setup.exe(Most Common): Most downloaded drivers come as an executable file (e.g.,setup.exeorinstall.exe). Simply double-click it and follow the on-screen prompts. Many will require a system restart after installation. - Device Manager (Manual Installation): For drivers that come as a folder of
.inffiles (often for troubleshooting “unknown devices” or when an executable isn’t provided):- Press
Windows Key + Xand select “Device Manager.” - Locate the device with a yellow exclamation mark (unknown device) or the category of the device you want to update.
- Right-click on the device and select “Update driver.”
- Choose “Browse my computer for drivers.”
- Click “Browse” and navigate to the folder where you downloaded and extracted the driver files. Ensure “Include subfolders” is checked.
- Click “Next.” Windows will attempt to find and install the driver.
- Press
- Running
Important: After each major driver installation (especially chipset, graphics, and network), it’s highly recommended to restart your computer, even if not explicitly prompted. This allows the system to fully integrate the new drivers.
Step 5: Verifying Installation (Device Manager)
After installing all the necessary drivers, it’s good practice to verify their successful installation.
- Open Device Manager again.
- Look for any devices with yellow exclamation marks (“unknown device” or “other device”) which indicate a missing or problematic driver.
- Expand categories (e.g., “Sound, video and game controllers,” “Network adapters,” “System devices”) and check that your components are listed correctly without warnings.
- You can also right-click on a device, select “Properties,” then go to the “Driver” tab to see the driver provider, date, and version. This helps confirm you installed the latest manufacturer driver.
Advanced Scenarios and Best Practices for Driver Management
Beyond the initial setup, managing your drivers involves understanding different scenarios and adopting best practices for long-term system health.
Dealing with Integrated Graphics Drivers
If your CPU features integrated graphics (e.g., many Intel Core processors or AMD APUs), their drivers are crucial for initial display output and can sometimes cause conflicts if not managed correctly alongside a dedicated graphics card. Always install the integrated graphics drivers from your motherboard manufacturer (or Intel/AMD directly) if you plan to use them. If you have a dedicated GPU, you’ll still install the integrated drivers first, then your dedicated GPU drivers (NVIDIA or AMD), ensuring the dedicated GPU takes precedence for demanding tasks.
When to Use Windows Update vs. Manufacturer Drivers
Windows Update often provides generic drivers for many components, and sometimes even specific drivers from manufacturers. While convenient, Windows Update drivers are frequently older versions and may lack the specific optimizations, bug fixes, or advanced features found in the latest drivers directly from your motherboard manufacturer’s website.
Recommendation: For motherboard components (chipset, audio, LAN), always prioritize drivers from your motherboard manufacturer’s website. They are specifically tailored for your hardware. Windows Update can be a fallback if you can’t get online or find the specific driver, but it shouldn’t be your primary source for critical motherboard components. For dedicated graphics cards, always get drivers directly from NVIDIA or AMD.
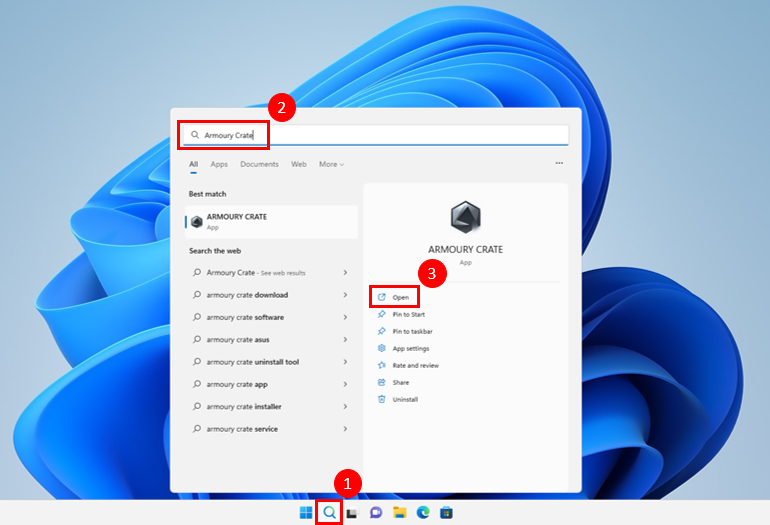
Driver Utilities and Software (Use with Caution)
Many motherboard manufacturers offer their own “all-in-one” utilities (e.g., ASUS Armory Crate, MSI Dragon Center, Gigabyte App Center) that can help manage drivers, BIOS updates, and system settings. These can be convenient but often come with added bloatware or background processes. Use them selectively if you find their specific features beneficial.
Avoid Third-Party Driver Updaters: Be extremely wary of generic “driver updater” software from unknown third-party vendors. While they promise convenience, they often:
- Install incorrect or outdated drivers.
- Bundle unwanted adware or malware.
- Charge for features that are free from official sources.
- Can destabilize your system.
Stick to official manufacturer websites for driver downloads.
Troubleshooting Common Driver Issues
Even with careful installation, problems can arise. Here are common issues and solutions:
- “No Internet Connection” After OS Install: This is typically due to a missing LAN/Ethernet driver. You’ll need to download it on another device and transfer it via USB.
- No Sound: The audio driver is either missing, corrupted, or incompatible. Reinstall the audio driver from the manufacturer’s website. Check your audio output settings in Windows.
- USB Devices Not Working/Slow: Ensure USB and chipset drivers are correctly installed. Try different USB ports.
- Yellow Exclamation Marks in Device Manager: Indicates a problem with a device, usually a missing or corrupted driver. Right-click the device, choose “Update driver,” and point it to the downloaded driver folder.
- Blue Screen of Death (BSODs): Drivers are a frequent cause of BSODs. If you recently updated a driver and started getting BSODs, try “rolling back” the driver in Device Manager (right-click device > Properties > Driver tab > Roll Back Driver). If you suspect a driver is causing a BSOD but aren’t sure which one, analyzing minidump files (advanced technique) can help pinpoint the culprit.
- System Freezes or Instability: Could be chipset drivers. Try reinstalling them cleanly.
- Driver Conflicts: Installing multiple drivers for the same component (e.g., trying to install different audio drivers) can cause conflicts. Uninstall old drivers before installing new ones.
Maintaining Driver Health: Beyond the Initial Setup
Once your drivers are installed and your system is running smoothly, ongoing maintenance ensures continued stability and optimal performance.
Regular Checks, Not Constant Updates
While it’s important to keep drivers updated, it’s generally not necessary to update them every week. Adopt a strategy of “if it ain’t broke, don’t fix it,” but also don’t let them become excessively outdated.
- When to Update: Consider checking for driver updates when:
- A new major Windows version is released.
- You install new hardware or peripherals.
- You encounter system instability or performance issues.
- New game titles or demanding software releases benefit from updated drivers.
- The manufacturer releases critical security patches for your motherboard.
- How Often: A good cadence might be to check every few months, or annually, unless you are actively troubleshooting or upgrading.
Creating System Restore Points
Before installing any new driver, especially major ones like chipset or graphics drivers, create a system restore point. This provides a safety net, allowing you to revert your system to a previous stable state if a new driver causes problems.
- How to Create: Search for “Create a restore point” in Windows, then click “Create…” and give it a descriptive name.
- How to Use: If an issue arises, you can go back to the “System Restore” utility and select a previous restore point.
Driver Backup Strategies
Having a local copy of your essential drivers is a smart move, particularly for crucial components like LAN drivers, which you might need to get online after a fresh OS installation.
- Save Downloaded Files: Keep the downloaded driver executable files in a clearly labeled folder on your main drive or, even better, on a separate USB flash drive or external hard drive.
- Cloud Storage: Upload copies of your essential drivers to cloud storage services like Google Drive, OneDrive, or Dropbox. This ensures access even if your primary storage fails.
By meticulously following these steps and adopting these best practices, you equip yourself with the knowledge to maintain a healthy, stable, and high-performing PC. Understanding motherboard drivers is not just about troubleshooting; it’s about empowering your system to deliver its full potential, ensuring a seamless and reliable computing experience for years to come.
aViewFromTheCave is a participant in the Amazon Services LLC Associates Program, an affiliate advertising program designed to provide a means for sites to earn advertising fees by advertising and linking to Amazon.com. Amazon, the Amazon logo, AmazonSupply, and the AmazonSupply logo are trademarks of Amazon.com, Inc. or its affiliates. As an Amazon Associate we earn affiliate commissions from qualifying purchases.