Minecraft, the global phenomenon of block-building and adventure, offers an incredible canvas for creativity and exploration. While its vanilla version provides endless hours of enjoyment, a vast and vibrant community has taken the experience to an entirely new level through modding. Mods, short for modifications, are user-created additions that can introduce anything from new blocks, creatures, and dimensions to significant gameplay overhauls and stunning visual enhancements. For PC players, the ability to customize their Minecraft journey with mods is a key advantage, transforming the game into a technological playground limited only by imagination.

This guide will walk you through the entire process of installing mods on your Minecraft PC, ensuring you have the knowledge and tools to unlock a universe of possibilities. We’ll cover the essential preparations, navigate the world of mod loaders like Forge and Fabric, detail how to find and install your favorite modifications, and equip you with troubleshooting tips to ensure a smooth modding experience. Whether you’re aiming for breathtaking graphics, complex industrial automation, or simply a handful of quality-of-life improvements, mastering mod installation is your first step into an enriched Minecraft universe.
1. Unleashing Creativity: Why Mod Your Minecraft Experience?
The allure of Minecraft mods extends far beyond mere novelty. For millions of players, mods are not just an add-on but an integral part of their ongoing engagement with the game. They represent a dynamic intersection of technology, community, and personal expression, significantly extending the game’s lifespan and appeal.
Beyond Vanilla: The World of Possibilities
Think of vanilla Minecraft as a robust foundation. Mods are the architectural masterpieces, intricate plumbing systems, and aesthetic flourishes that turn that foundation into a dream home. Want to fly around with jetpacks, explore entirely new biomes filled with fantastical creatures, or delve into magic systems that rival those of dedicated RPGs? There’s a mod for that. The diversity is astounding:
- Visual Enhancements: Shaders and texture packs dramatically transform the game’s aesthetics, adding realistic lighting, shadows, and stunning visual effects, making the blocky world surprisingly immersive.
- Gameplay Overhauls: Mods can introduce new combat mechanics, intricate crafting systems, or even entirely new progression paths, effectively creating a “new game” within Minecraft.
- Quality-of-Life Improvements: Simple mods can make inventory management easier, provide useful information on screen, or streamline repetitive tasks, enhancing productivity within the game.
- Technical and Industrial Systems: For those who love intricate machinery and automation, mods like IndustrialCraft or Applied Energistics offer complex technological trees, allowing players to build vast, efficient factories and power networks.
This constant influx of fresh content means Minecraft never truly gets old. It’s a testament to the open nature of the game and the dedication of its community, who continuously push the boundaries of what’s possible within the blocky world.
A Technological Playground: What Mods Offer
From a technological standpoint, mods are fascinating pieces of software that interact directly with the game’s core code. Installing them requires a basic understanding of file management, software installation, and compatibility – skills that are valuable across many aspects of digital life. The process itself is a mini-project in digital literacy, requiring players to identify correct versions, manage dependencies, and troubleshoot issues.
Furthermore, many popular mods and mod loaders have established themselves as strong “brands” within the community. Projects like OptiFine, a performance-enhancing and shader-enabling mod, or the Fabric and Forge mod loaders, have built reputations for reliability, innovation, and active development. These brands are maintained through consistent updates, clear documentation, and responsive community support, reflecting best practices in software development and user engagement. Engaging with this ecosystem isn’t just about playing a game; it’s about interacting with a vibrant, decentralized software development scene.
A Community-Driven Ecosystem
The modding community is a powerful example of collaborative effort. Mod developers often work independently or in small teams, driven by passion rather than direct financial incentives (though some do accept donations or have Patreon support). They share their creations freely, fostering a culture of innovation and mutual assistance. Platforms like CurseForge and Modrinth serve as central hubs, acting as digital marketplaces for mods, where developers can share their work and users can discover new content. These platforms not only host thousands of mods but also provide tools for managing them, cementing their brand as indispensable resources for any serious Minecraft modder. The shared goal is to enhance the Minecraft experience for everyone, creating a rich, evolving landscape that consistently adds value to the game.
2. Essential Preparations: Setting the Stage for Modding
Before diving into the exciting world of custom content, a few crucial steps are necessary to ensure a smooth and successful mod installation. Neglecting these preparations can lead to frustration, crashes, and potentially corrupt game saves. Think of this as laying a solid foundation before building your dream modded world.
Verifying Your Setup: Minecraft Java Edition and Java Runtime
The vast majority of Minecraft mods are designed for the Java Edition of the game on PC. If you own the Bedrock Edition (available on consoles, Windows 10/11 Store, and mobile), its modding process is fundamentally different, primarily relying on official add-ons or marketplace content, not the Java-based mods discussed here. Ensure you have the Java Edition installed and updated.
Secondly, Minecraft Java Edition relies on the Java Runtime Environment (JRE) to function. Most users will already have a compatible version installed with their game, but it’s crucial that it’s up-to-date and correctly configured. Mod loaders often require specific Java versions (e.g., Java 17 for Minecraft 1.18+). If you encounter issues, verifying or updating your Java installation is a key troubleshooting step. You can download the latest JRE from Oracle or use alternative OpenJDK distributions like Adoptium.
Backup Your Worlds: A Digital Security Precaution
This step cannot be stressed enough: always back up your Minecraft worlds before installing new mods or making significant changes to your game files. Mods, by their nature, alter the game. While most are stable, conflicts, bugs, or incorrect installations can corrupt your world saves. Losing hours or even years of progress is heartbreaking.
To back up your worlds:
- Open Minecraft and note the name of the world(s) you want to save.
- Navigate to your Minecraft installation directory. On Windows, this is typically
%appdata%.minecraft. You can easily access this by typingrunin the Windows search bar, then typing%appdata%and hitting Enter. - Inside the
.minecraftfolder, locate thesavesfolder. - Copy the entire
savesfolder to a safe location on your computer (e.g., your Documents folder, an external drive, or cloud storage).
This simple act is your insurance policy, protecting your creative endeavors and providing peace of mind. It’s a vital aspect of digital security when engaging with community-created software.
Understanding Mod Loaders: Your Gateway to Customization
Minecraft mods don’t just “plug in” to the game directly. They require a specialized piece of software called a mod loader. These loaders act as an intermediary, injecting the modded code into Minecraft’s core systems, enabling the mods to function. The two dominant mod loaders in the Minecraft Java Edition ecosystem are Forge and Fabric.
- Minecraft Forge: This has been the veteran and most widely used mod loader for many years. It boasts a vast library of mods, particularly for older versions of Minecraft, and is known for its robust API (Application Programming Interface) that allows for complex modifications.
- Fabric Loader: A newer, more lightweight, and increasingly popular alternative. Fabric is known for its speed, minimalistic design, and quicker updates to new Minecraft versions. It uses a different API, meaning mods made for Forge are generally not compatible with Fabric, and vice-versa.
Your choice of mod loader will largely depend on the specific mods you wish to install, as most mods are developed for one loader or the other. It’s rare for a mod to support both simultaneously. Research the mods you’re interested in first to determine which loader they require.
3. Choosing Your Modding Foundation: Forge vs. Fabric
The decision between Forge and Fabric is perhaps the most critical step after preparing your system. Both are excellent mod loaders, but they cater to slightly different needs and communities. Understanding their strengths and installation processes is key to a successful modding journey.
Minecraft Forge: The Enduring Standard
Forge has historically been the powerhouse of Minecraft modding, supporting thousands of mods and modpacks across many game versions. Its extensive API allows for deep integration and complex additions to the game.
Downloading Forge
- Visit the Official Forge Website: Go to
files.minecraftforge.net. - Select Your Minecraft Version: On the left sidebar, choose the specific Minecraft version you intend to mod (e.g., 1.20.1, 1.16.5). Crucially, the Forge version MUST match your Minecraft version exactly.
- Choose a Recommended Version: Look for the “Recommended” download for stability. If unavailable for your chosen version, select the latest release.
- Download the “Installer”: Click the “Installer” link. You’ll likely be redirected to an AdFocus page; wait for the “SKIP” button in the top right corner and click it to proceed to the download. Be cautious of other download links on this page.
Running the Installer
- Locate the Downloaded .jar File: Once downloaded, find the Forge installer
.jarfile in your downloads folder. - Execute the Installer: Double-click the
.jarfile. This will open the Forge installer window. If it doesn’t open, ensure you have Java installed correctly. You might need to right-click and select “Open with Java(TM) Platform SE Binary.” - Install Client: Ensure “Install client” is selected. The installer should automatically detect your
.minecraftdirectory. Click “OK.” - Completion: A message will appear indicating successful installation.
Verifying Installation
- Open the Minecraft Launcher: Launch the official Minecraft Launcher.
- Check Profiles: In the bottom-left corner of the launcher, click the arrow next to your current profile. You should see a new profile named “Forge” (or similar, depending on the version) available.
- Select Forge Profile: Choose the Forge profile and click “Play.” The game will launch, and you should see “Minecraft Forge” somewhere on the main menu, confirming successful installation.
Fabric Loader: The Lightweight and Modern Alternative
Fabric has rapidly gained popularity, particularly for newer Minecraft versions, due to its efficiency and developers’ ability to update mods quickly. It’s often preferred for performance-oriented modpacks and its modern approach to modding.
Downloading Fabric Installer
- Visit the Official Fabric Website: Go to
fabricmc.net/use. - Download the Universal .jar: Under “Download the installer,” click the “Universal Jar” link. This
.jarfile works for both client and server installations.
Using the Installer
- Locate and Run: Double-click the downloaded
fabric-installer-x.x.x.jarfile. - Client Tab: Ensure you are on the “Client” tab.
- Select Minecraft Version: Choose the exact Minecraft version you want to mod from the “Minecraft Version” dropdown.
- Select Loader Version: Keep the default or latest recommended “Loader Version.”
- Installation Directory: Verify that the “Install Location” points to your correct
.minecraftfolder. - Install: Click the “Install” button.
- Completion: A confirmation message will appear upon successful installation.
Setting Up Fabric API
Unlike Forge, many Fabric mods also require an additional “mod” called Fabric API. This is a core library that many Fabric mods rely on.
- Download Fabric API: Go to CurseForge (
curseforge.com/minecraft/mc-mods/fabric-api) or Modrinth (modrinth.com/mod/fabric-api). - Match Version: Download the Fabric API version that matches your specific Minecraft version (e.g., if you installed Fabric for Minecraft 1.20.1, download Fabric API for 1.20.1).
- Place in
modsfolder: Treat Fabric API like any other mod; you’ll place its.jarfile into yourmodsfolder, which we’ll cover in the next section.
Verifying Installation
- Open Minecraft Launcher: Launch the official Minecraft Launcher.
- Check Profiles: A new profile named “fabric-loader-X.X.X” (or similar) should be available.
- Select Fabric Profile: Choose this profile and click “Play.” If everything is correct, the game will launch with Fabric installed.
4. Discovering and Installing Your Favorite Mods
With your chosen mod loader set up, the real fun begins: finding and adding mods. This is where you bring your vision for a modded Minecraft experience to life, leveraging the vast resources available from the community.
Navigating Mod Repositories: CurseForge and Modrinth
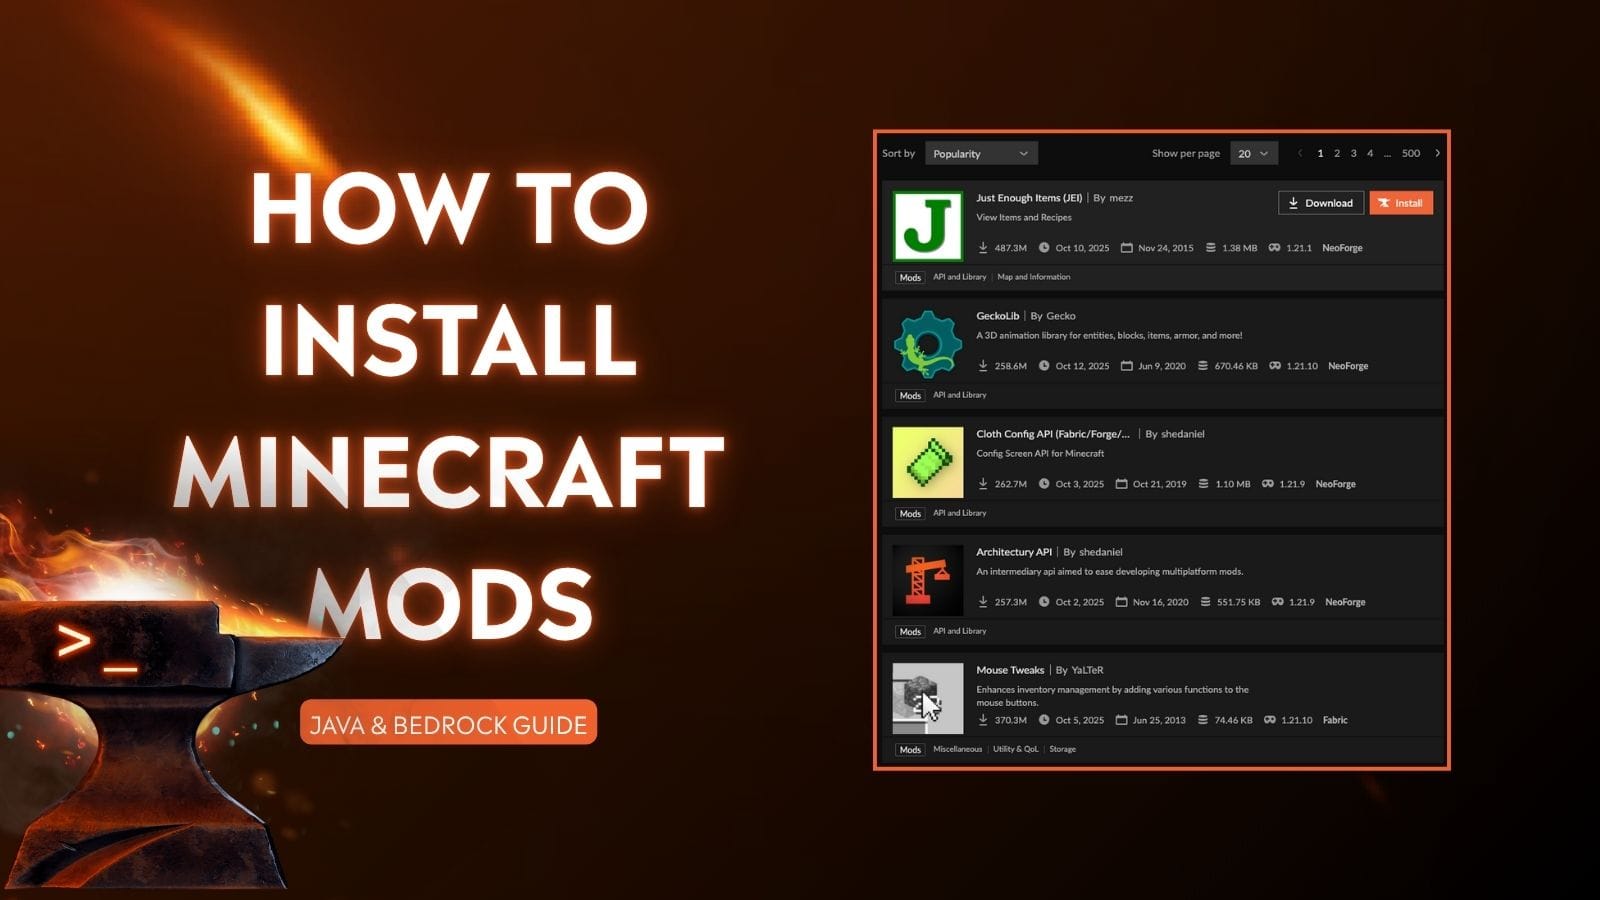
The primary and most trusted sources for Minecraft mods are dedicated repositories. These platforms serve as crucial central points, acting as established “brands” in the modding world, offering organized access to thousands of community creations.
- CurseForge (curseforge.com/minecraft/mc-mods): The long-standing leader in mod hosting. CurseForge boasts an enormous library, including many legacy mods and popular modpacks. It has a robust filtering system and often includes detailed mod descriptions, screenshots, and user comments. Many developers choose CurseForge for its wide reach and integrated modpack support.
- Modrinth (modrinth.com): A newer, community-focused platform rapidly gaining traction. Modrinth prides itself on a clean interface, open-source principles, and strong support for both Forge and Fabric mods. It’s often favored by developers for its API and user-friendly experience, making it a growing alternative for mod discovery.
When searching for mods, always prioritize these official repositories. Avoid downloading mods from less reputable websites, as they may contain outdated versions, malware, or incorrect files. Trust the established brands within the community.
Downloading Mods: Version Compatibility is Key
Once you’ve found a mod you like on CurseForge or Modrinth:
- Check Compatibility: The absolute most critical step is to ensure the mod’s version matches your Minecraft version AND your mod loader (Forge or Fabric). For example, if you’re playing Minecraft 1.20.1 with Forge, you need a mod specifically listed as compatible with “Minecraft 1.20.1 – Forge.” Mismatching versions is the most common cause of game crashes.
- Download the
.jarFile: Look for a “Download” button or a “Files” tab on the mod’s page. Download the.jarfile for the correct version. Again, be wary of ads or other download links.
Important Note on Dependencies: Many mods require other “library” mods to function (e.g., Fabric API for Fabric mods, or other utility mods like “Architectury API” for various Forge/Fabric mods). These dependencies will usually be listed in the mod’s description or on its download page. You must download and install all required dependency mods as well, ensuring they also match your Minecraft and loader versions.
Populating Your Worlds: Placing Mods in the mods Folder
Once you have your mod .jar files (and any necessary dependency .jar files) downloaded, the final step is to place them in the correct location.
- Locate Your
.minecraftFolder:- On Windows, type
%appdata%in the Windows search bar and press Enter. Open the.minecraftfolder. - Alternatively, open your Minecraft Launcher, go to “Installations,” hover over your Forge/Fabric profile, click the folder icon on the right.
- On Windows, type
- Find or Create the
modsFolder: Inside your.minecraftdirectory, you should see a folder namedmods. If it doesn’t exist (this can happen with a fresh mod loader install), simply create a new folder and name itmods(all lowercase). - Place Mod Files: Drag and drop all the
.jarfiles you downloaded into thismodsfolder. Do not extract the.jarfiles; place them as they are. - Launch Minecraft: Open your Minecraft Launcher, select your Forge or Fabric profile, and click “Play.”
If everything is set up correctly, your game should launch, and your installed mods will now be active! You can often verify this by checking the game’s main menu, which might show an indication of mods being loaded or provide a “Mods” button.
5. Troubleshooting and Advanced Tips for a Smooth Modding Journey
Modding, while rewarding, can sometimes present challenges. Game crashes, conflicts, or unexpected behavior are part of the learning curve. Understanding how to diagnose and resolve these issues is a crucial skill for any serious modder, contributing to a more productive and less frustrating experience.
Common Pitfalls: Crashes, Conflicts, and Mismatches
Most modding issues stem from a few common problems:
- Version Mismatch: As stressed earlier, this is the number one culprit. A mod for 1.16.5 will not work on 1.20.1, and a Forge mod won’t work with Fabric. Double-check every single mod’s version and loader compatibility.
- Missing Dependencies: A mod requires another mod (a library or API) to function, and you haven’t installed it. The game will usually crash, indicating a missing class or method related to the missing dependency.
- Mod Conflicts: Two or more mods try to alter the same aspect of the game in incompatible ways, leading to crashes or strange behavior. This is more common with large modpacks.
- Outdated Java: Your Java Runtime Environment is too old for the Minecraft version or mod loader you are using.
- Corrupted Download: The mod
.jarfile itself might be corrupted during download. Try re-downloading it.
Diagnosing Issues: The Crash Report and Log Files
When your game crashes, it’s not just a blank screen. Minecraft (or the mod loader) typically generates a crash report and writes extensive log files. These are your best friends for troubleshooting.
- Crash Report: After a crash, a window often appears, or a
crash-report-XXXX-XX-XX_XX.XX.XX-client.txtfile is generated in your.minecraft/crash-reportsfolder. Read the top few lines of this report. It usually points to the specific mod or class that caused the crash. Look for keywords likeCaused by:or references to mod names. - Latest Log File: The
latest.logfile (located in.minecraft/logs) contains a detailed record of everything that happened during your game session, including mod loading attempts and errors. If the crash report isn’t clear, scour thelatest.logfor[ERROR],[WARN], or[FATAL]messages, especially those occurring just before the crash.
Armed with these reports, you can often pinpoint the problematic mod, remove it, or search online forums for solutions specific to that error message.
Maintaining Your Modded Game: Updates and Best Practices
A modded Minecraft installation requires ongoing maintenance to ensure stability and compatibility, much like managing any other complex software environment.
- Update with Caution: When Minecraft updates to a new major version (e.g., from 1.20 to 1.21), expect all your mods and mod loaders to become incompatible. You’ll need to wait for developers to update their mods, which can take weeks or months. It’s often best to stick with an older, stable Minecraft version for heavily modded playthroughs until your desired mods are updated.
- One Mod at a Time: When adding new mods, do so one or two at a time. If the game crashes, you’ll immediately know which mod caused the issue, making troubleshooting much easier.
- Keep Mods Organized: Consider creating separate subfolders within your
modsfolder for different categories of mods, or for mods that are temporarily disabled. - Read Mod Pages Carefully: Developers often include vital information about compatibility, known issues, and recommended configurations.
- Engage with Communities: Forums, Discord servers, and subreddit communities for specific mods or mod loaders are invaluable resources. When seeking help, always provide your crash report and log files.
The journey into modded Minecraft is an investment – an investment of time in learning, troubleshooting, and curation. However, the returns are immense: a virtually limitless gaming experience that evolves with your desires, preventing the need to constantly seek out new games and adding incredible value to your existing Minecraft purchase. By following these guidelines, you’ll be well-equipped to navigate the technological landscape of modding, transforming your blocky world into an unparalleled adventure.
aViewFromTheCave is a participant in the Amazon Services LLC Associates Program, an affiliate advertising program designed to provide a means for sites to earn advertising fees by advertising and linking to Amazon.com. Amazon, the Amazon logo, AmazonSupply, and the AmazonSupply logo are trademarks of Amazon.com, Inc. or its affiliates. As an Amazon Associate we earn affiliate commissions from qualifying purchases.