In today’s digitally driven world, the ability to seamlessly connect and utilize peripherals like printers is crucial for both personal and professional productivity. While Macs are renowned for their user-friendly interface, navigating the process of installing a new printer might still pose a question for some users. Whether you’re setting up a brand-new wireless printer, a trusty USB model, or even a more specialized office machine, this comprehensive guide will walk you through every step, ensuring you can get printing in no time. We’ll cover the common methods, troubleshoot potential hiccups, and even touch upon some advanced considerations to enhance your printing experience on your Mac.
This guide is designed to be accessible to everyone, from those who are new to macOS to seasoned users who might be encountering a new printer model. We understand that technology can sometimes feel daunting, but with clear instructions and a systematic approach, installing a printer on your Mac will become a straightforward task. Let’s dive in and get your printing needs sorted.
Preparing for Printer Installation
Before you even begin the physical or digital connection process, a little preparation can save you time and frustration. This section will guide you through the essential pre-installation steps, ensuring a smooth and successful setup for your new printer.
Gather Your Printer Information
The first and most vital step is to have all the necessary information readily available. This includes:
- Printer Model and Manufacturer: You’ll need the exact make and model number of your printer. This is usually found on the printer itself, often on the front, back, or top panel. Knowing this will help you locate the correct drivers and software.
- Printer Type: Is it a wireless (Wi-Fi or Bluetooth) printer, or does it connect via USB? This will dictate the connection method you’ll use.
- Network Name (SSID) and Password (for Wireless Printers): If you’re setting up a Wi-Fi printer, you’ll need to know your home or office network’s name (SSID) and its password. Ensure your Wi-Fi network is operational and that your Mac is connected to it.
- Printer Documentation: Keep the printer’s user manual or quick start guide handy. It often contains specific instructions or troubleshooting tips relevant to your particular model. Many manufacturers also provide digital manuals on their websites.
Essential Software and Drivers
Modern printers often come with a “plug-and-play” experience, especially when using standard USB connections. However, for optimal functionality, advanced features, and sometimes even basic printing, you’ll likely need to install specific software and drivers.
- Manufacturer’s Website: The most reliable place to find the latest drivers and software for your printer is the manufacturer’s official website. Navigate to their support or downloads section, enter your printer’s model number, and download the macOS-compatible software.
- Included CD/DVD (Less Common Now): Some printers might still come with an installation disc. While convenient, it’s generally recommended to download drivers from the manufacturer’s website to ensure you have the most up-to-date versions, which can often resolve compatibility issues and security vulnerabilities.
- macOS Built-in Drivers: macOS has a robust system for automatically detecting and installing drivers for many common printer models. In many cases, when you connect a printer, your Mac will attempt to find and install the necessary software automatically. However, this isn’t always foolproof, and sometimes manual driver installation is required for full functionality.
Physical Setup and Connectivity Checks
Before diving into the software installation on your Mac, ensure your printer is physically set up and ready to go.
- Unpacking and Setup: Follow the printer’s manual for unpacking, removing any protective tapes or packaging, installing ink or toner cartridges, and loading paper.
- Power Connection: Ensure the printer is plugged into a power source and turned on.
- Connection Method:
- USB: Connect the USB cable from the printer directly to an available USB port on your Mac.
- Wireless (Wi-Fi): If your printer is wireless, consult its manual to initiate its Wi-Fi setup process. This often involves using the printer’s control panel to connect it to your Wi-Fi network. Some printers also have a WPS (Wi-Fi Protected Setup) button that can simplify this process if your router supports it.
- Ethernet: If your printer has an Ethernet port, connect it to your router or network switch using an Ethernet cable.
Adding Your Printer in macOS
Once your printer is physically set up and you’ve downloaded any necessary software, it’s time to tell your Mac about it. macOS provides a centralized location for managing printers, making the addition process relatively straightforward.
Using System Settings (macOS Ventura and Later)
For users running macOS Ventura and newer versions, the process of adding a printer is integrated within the System Settings application.
- Open System Settings: Click on the Apple logo in the top-left corner of your screen and select
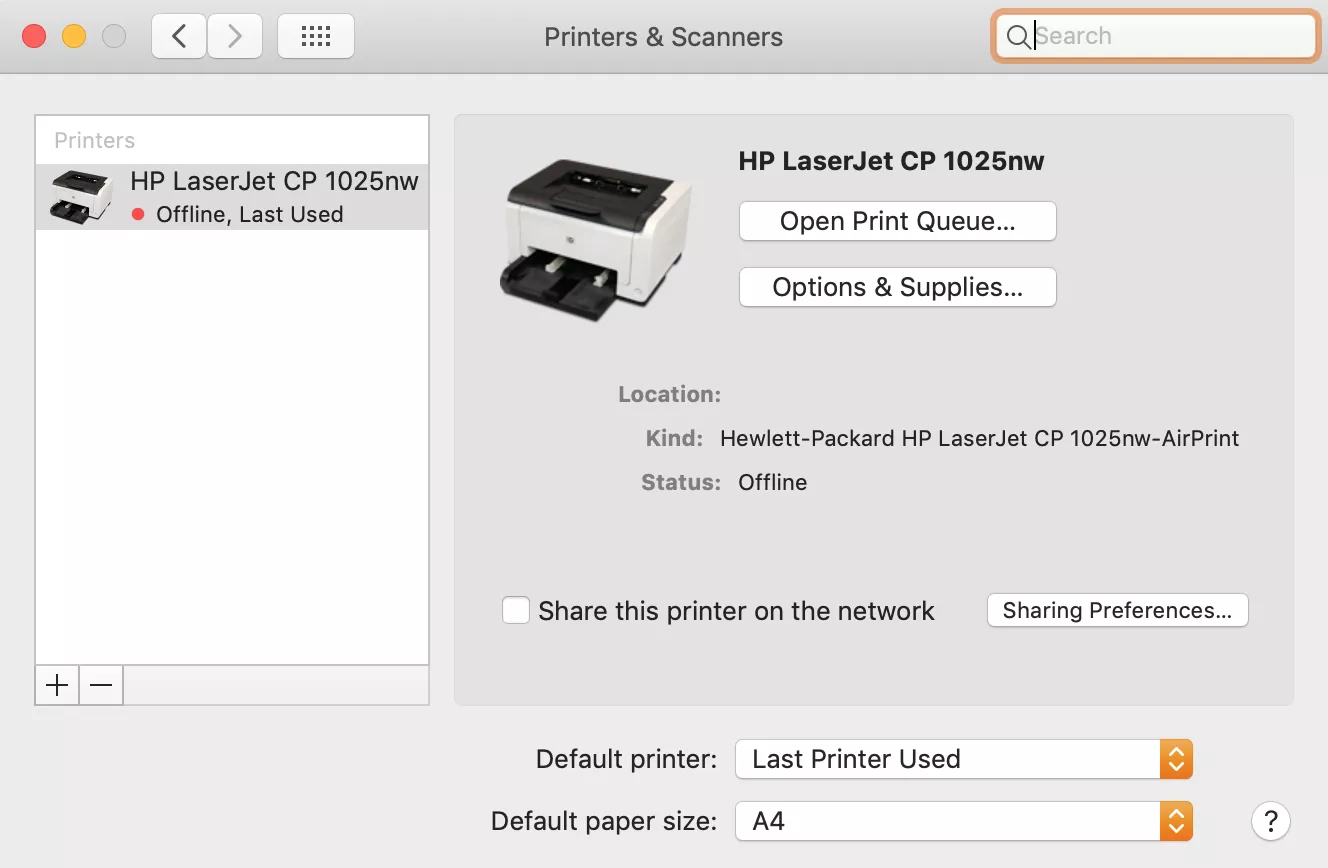
System Settings. - Navigate to Printers & Scanners: Scroll down the sidebar on the left and click on
Printers & Scanners. - Add Printer: At the bottom of the
Printers & Scannerswindow, you’ll see a button labeledAdd Printer, Scanner, or Fax.... Click on it. - Printer Discovery: Your Mac will now scan for available printers on your network and connected directly via USB.
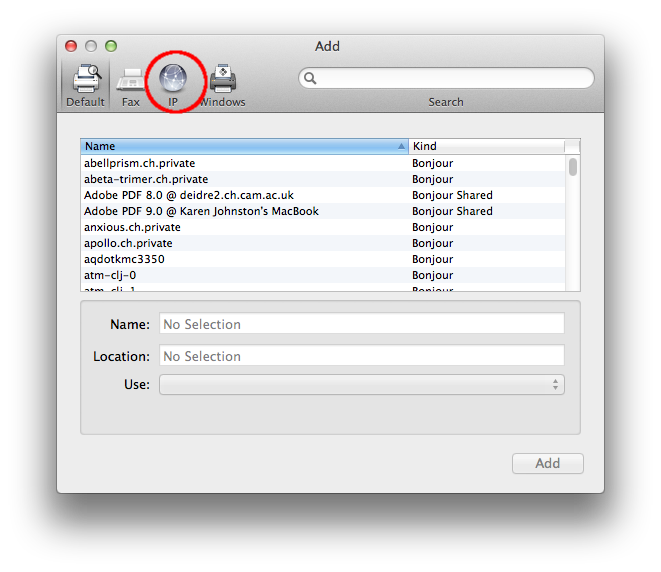
- Default Browser: Under the “Default” tab, you should see your printer listed if it’s automatically detected.
- IP Printer: If your printer is not automatically detected, but you know its IP address, you can click on the “IP” tab. Enter the printer’s IP address, choose the appropriate protocol (usually LPD, IPP, or HP Jetdirect), and macOS will attempt to find the correct driver.
- Windows Printer: If you’re adding a printer shared from a Windows computer, you can select the “Windows” tab and browse for shared printers on your network.
- Select Your Printer: Once your printer appears in the list, click on it.
- Choose Driver: macOS will usually try to automatically select the correct driver under the “Use” dropdown menu. If it doesn’t, or if you want to use specific software you downloaded, click the dropdown menu and select
Select Software.... Then, find your printer’s model number or the name of the driver package you installed. - Add: Click the
Addbutton. Your printer will now appear in the list of available printers in thePrinters & Scannerssettings, and it should also be available in your print dialog boxes across applications.
Using System Preferences (Older macOS Versions)
For users running macOS Monterey and earlier, the process is similar but accessed through System Preferences.
- Open System Preferences: Click on the Apple logo in the top-left corner of your screen and select
System Preferences. - Navigate to Printers & Scanners: Click on the
Printers & Scannersicon. - Add Printer: At the bottom of the
Printers & Scannerswindow, click the+(plus) button. - Printer Discovery: Similar to System Settings, your Mac will search for available printers.
- Default Tab: Your printer should appear here if detected automatically.
- IP Tab: Use this if you need to manually add the printer using its IP address.
- Windows Tab: For printers shared from Windows machines.
- Select Your Printer: Click on your printer when it appears.
- Choose Driver: In the “Use” dropdown, select the appropriate driver. If you downloaded specific software, choose
Select Software...and locate it. - Add: Click the
Addbutton.
Initializing and Testing Your Printer
After adding the printer, it’s wise to perform a test print to ensure everything is functioning correctly.
- Print a Test Page: Many applications, like TextEdit or Pages, allow you to print. Open a simple document, go to
File > Print, select your newly added printer, and clickPrint. - Printer Software Features: If you installed specific printer software, explore its features. This might include options for scanning, duplex printing (double-sided), adjusting print quality, or managing ink/toner levels.
Troubleshooting Common Printer Installation Issues
Even with clear steps, printer installations can sometimes encounter snags. This section addresses some of the most common problems and provides solutions to get you back on track.
Printer Not Appearing in the List
This is a frequent issue, especially with wireless printers.
- Check Connectivity:
- USB: Ensure the USB cable is securely plugged into both the printer and your Mac. Try a different USB port on your Mac.
- Wireless: Verify that your printer is connected to the correct Wi-Fi network. Check your router to ensure it’s broadcasting and that the printer is within range. Restart both your router and your printer.
- Reboot Everything: A simple restart can resolve many temporary network or device glitches. Restart your printer, your Mac, and your Wi-Fi router.
- Manual IP Address Entry: If your printer is on the network but not detected, manually add it via the IP address. You can usually find your printer’s IP address on its control panel or by logging into your router’s administration page.
- Firewall Settings: Occasionally, your Mac’s firewall might block printer discovery. Temporarily disable your firewall in
System Settings/Preferences > Security & Privacy > Firewallto see if that resolves the issue. Remember to re-enable it afterward.
“Driver Not Found” or “Unable to Install Driver” Errors
This usually means macOS can’t automatically find the correct software for your printer.
- Download Latest Drivers: Go to your printer manufacturer’s website and download the most recent macOS drivers specifically for your printer model. Run the installer package.
- Restart After Driver Installation: After installing drivers, restart your Mac before attempting to add the printer again.
- Select Software Manually: When adding the printer, ensure you manually select the correct driver from the “Use” dropdown menu, especially if you’ve just installed it.
- Reset Printing System: If you’re still encountering issues, resetting the printing system can clear out any corrupted printer settings. In the
Printers & Scannerssection of System Settings/Preferences, right-click (or Control-click) in the list of printers and selectReset printing system.... You’ll need to re-add all your printers afterward.
Print Jobs Stuck in the Queue
If you send a document to print and it just sits there, or you see multiple jobs in the queue, there might be a communication problem or an issue with the printer itself.
- Check Printer Status: Ensure the printer is powered on, has paper, and isn’t showing any error messages on its display.
- Clear the Print Queue: In the
Printers & Scannerssettings, select your printer. You should see a button to “Open Print Queue” or similar. In the queue window, you can pause or delete individual print jobs. Try pausing all jobs, restarting the printer, and then resuming the print jobs. - Restart Spooler (Advanced): While less common on macOS, you can sometimes resolve this by restarting the print spooler service. However, this is a more advanced troubleshooting step and usually not necessary.
Print Quality Issues
If your prints are coming out with streaks, faded colors, or incorrect formatting, it’s often an issue with ink/toner or settings.
- Check Ink/Toner Levels: Ensure your ink or toner cartridges aren’t empty or low.
- Run Printer Maintenance: Most printer driver software includes utility tools for cleaning print heads, aligning cartridges, or performing other maintenance tasks. Use these to improve print quality.
- Verify Print Settings: Double-check the print settings in the application you’re printing from. Ensure you’ve selected the correct paper type, print quality, and color settings.
Advanced Printer Usage and Considerations
Once your printer is successfully installed and working, you can explore ways to enhance your printing workflow and manage your printing resources more effectively.
Exploring Printer Features and Software
Modern printers offer a wealth of features beyond basic document printing.
- Scanning: If your printer is an all-in-one (multifunction) device, you’ll want to utilize its scanning capabilities. macOS has built-in scanning support accessible through the
Printers & Scannerssettings by clickingScanor through theImage Captureapp. The manufacturer’s specific scanning software may offer more advanced features like OCR (Optical Character Recognition) or document management. - Duplex Printing: Many printers support automatic or manual duplex printing, which allows you to print on both sides of the paper. This is a significant paper-saver and is easily accessible in the print dialog box under the
LayoutorPaper Handlingoptions. - Wireless Printing and AirPrint: AirPrint is Apple’s built-in wireless printing solution. If your printer supports AirPrint, it should be automatically discoverable on your network, and you won’t need to install any drivers. It’s the simplest way to print wirelessly from your Mac, iPhone, or iPad. Ensure your printer’s firmware is up to date to support the latest AirPrint features.
- Cloud Printing Services: While less common now with AirPrint’s prevalence, services like Google Cloud Print used to allow printing from anywhere. However, Google Cloud Print has been discontinued. For remote printing needs, consider printer-specific cloud services or secure remote access solutions.
Managing Printer Supplies and Maintenance
Keeping your printer well-maintained and stocked with supplies ensures consistent performance and longevity.
- Ink and Toner Management: Monitor your ink and toner levels regularly. The printer’s software or its display panel will usually notify you when levels are low. It’s often more cost-effective to buy multi-packs or larger capacity cartridges if available.
- Regular Cleaning: Dust and debris can affect print quality and even cause mechanical issues. Periodically clean the exterior of your printer with a soft, dry cloth. Refer to your printer’s manual for specific cleaning instructions for internal components if necessary.
- Firmware Updates: Printer manufacturers occasionally release firmware updates that can improve performance, add new features, or fix bugs. Check the manufacturer’s website periodically for any available updates for your printer model.
Printer Security Considerations
As printers become more connected, they can also become potential security vulnerabilities.
- Network Security: Ensure your Wi-Fi network is secured with a strong password (WPA2 or WPA3 encryption). This prevents unauthorized access to your printer and your network.
- Printer Passwords: Some business-grade printers allow you to set administrator passwords. Change default passwords to strong, unique ones to prevent unauthorized access to printer settings or sensitive information.
- Firmware Updates: As mentioned, keeping your printer’s firmware updated can patch security vulnerabilities.
By following these steps and keeping these considerations in mind, you can confidently install, use, and maintain your printer on your Mac, ensuring it remains a reliable tool for all your printing needs. Happy printing!
aViewFromTheCave is a participant in the Amazon Services LLC Associates Program, an affiliate advertising program designed to provide a means for sites to earn advertising fees by advertising and linking to Amazon.com. Amazon, the Amazon logo, AmazonSupply, and the AmazonSupply logo are trademarks of Amazon.com, Inc. or its affiliates. As an Amazon Associate we earn affiliate commissions from qualifying purchases.