In the dynamic landscape of modern technology, where digital documents often take precedence, the humble printer remains an indispensable tool for countless individuals and businesses. Whether you’re a student needing to print an assignment, a professional preparing a report, or a small business owner generating invoices, a reliable printer setup is crucial for productivity. Windows 10, with its robust operating system, offers several straightforward methods for installing and configuring a printer, yet many users find themselves puzzled by the process. This comprehensive guide will demystify printer installation in Windows 10, ensuring you can seamlessly integrate your device into your digital workflow and harness its full potential.
Our focus here is not just on the “how-to,” but also on understanding the underlying technological principles that make printing work, ensuring you’re empowered to troubleshoot and optimize your setup. In a world increasingly reliant on efficient tech solutions, mastering such fundamental skills contributes directly to your overall digital fluency and productivity, aligning perfectly with the core ethos of technological empowerment.
The Essentials: Preparing for Printer Installation
Before diving into the actual installation steps, a little preparation can save you a significant amount of time and frustration. Think of it as laying the groundwork for a stable and efficient printing experience. This initial phase is crucial, as many installation woes stem from overlooking these preliminary checks.
Gathering Your Essentials: Drivers, Cables, and Connectivity
The success of your printer installation hinges on having the right components and information at hand. Without these, even Windows 10’s intelligent detection capabilities might fall short.
-
Printer Drivers: These are software programs that allow your operating system to communicate with your printer. While Windows 10 often has built-in drivers for many common printers (known as “in-box” drivers), using the manufacturer’s official, up-to-date drivers is always recommended for full functionality and optimal performance. These drivers unlock all the advanced features of your printer, from specific paper tray controls to advanced color management. You can usually find the latest drivers on the printer manufacturer’s official website by searching for your printer model. Download them before you start the installation process.
-
Physical Connections: Determine how your printer connects to your computer or network. The most common connection types include:
- USB: A direct connection from the printer to a USB port on your computer. This is the simplest method for local printers. Ensure you have a standard USB-A to USB-B cable, often supplied with the printer.
- Wi-Fi (Wireless): Many modern printers can connect directly to your home or office Wi-Fi network. This allows multiple devices on the network to print to it without a direct cable connection to any single computer. You’ll need your Wi-Fi network name (SSID) and password.
- Ethernet (Network): Some printers, especially those in office environments, connect to a network router or switch via an Ethernet cable. This provides a stable, wired network connection.
- Bluetooth: Less common for primary printing, but some portable or specialized printers use Bluetooth for short-range wireless connectivity.
-
Power On: This might sound obvious, but ensure your printer is plugged into a power outlet and turned on. Verify that there are no error lights flashing on the printer’s control panel. A basic check of ink/toner cartridges and paper supply is also advisable to avoid immediate post-installation disappointments.
-
Network Status (for wireless/network printers): If you’re installing a network or wireless printer, ensure both your Windows 10 PC and the printer are connected to the same network. In a business context, this often means ensuring they are within the same subnet, which IT administrators usually manage. This foundational step prevents countless connection issues later on.
By taking these preparatory steps, you establish a solid foundation for a smooth and successful printer installation, setting the stage for uninterrupted productivity and avoiding unnecessary tech support calls.
Method 1: Installing a Local USB Printer
For many home users, installing a printer via USB is the most straightforward and common method. Windows 10 is generally excellent at detecting and configuring these devices with minimal user intervention.
Plug-and-Play Simplicity
The beauty of USB printers lies in their plug-and-play capability. When you connect a USB printer to your Windows 10 PC, the operating system is designed to detect the new hardware automatically and attempt to install the necessary drivers.
- Connect the USB Cable: With your printer powered on, connect one end of the USB cable to the printer and the other end to an available USB port on your Windows 10 computer.
- Automatic Detection: Windows 10 should immediately recognize the new device. You’ll typically see a notification in the bottom-right corner of your screen indicating that “Setting up a device” or “Installing device software” is underway.
- Driver Installation: Windows will first try to use any built-in (in-box) drivers. If these aren’t available or if the manufacturer has provided better drivers via Windows Update, it will attempt to download and install them automatically. This process can take a few minutes.
- Confirmation: Once the installation is complete, you should receive a notification stating that the “Device is ready to use” or “Your device has been successfully installed.”
- Test Print: To confirm successful installation, open a document (e.g., in Microsoft Word or Notepad) and try printing a test page. You can often find a “Print Test Page” option within the printer properties, accessible via “Settings” > “Devices” > “Printers & scanners.”
Manual Addition if Not Auto-Detected
Occasionally, Windows 10 might not automatically detect your USB printer, or the automatic driver installation might fail. In such cases, you can manually add the printer.
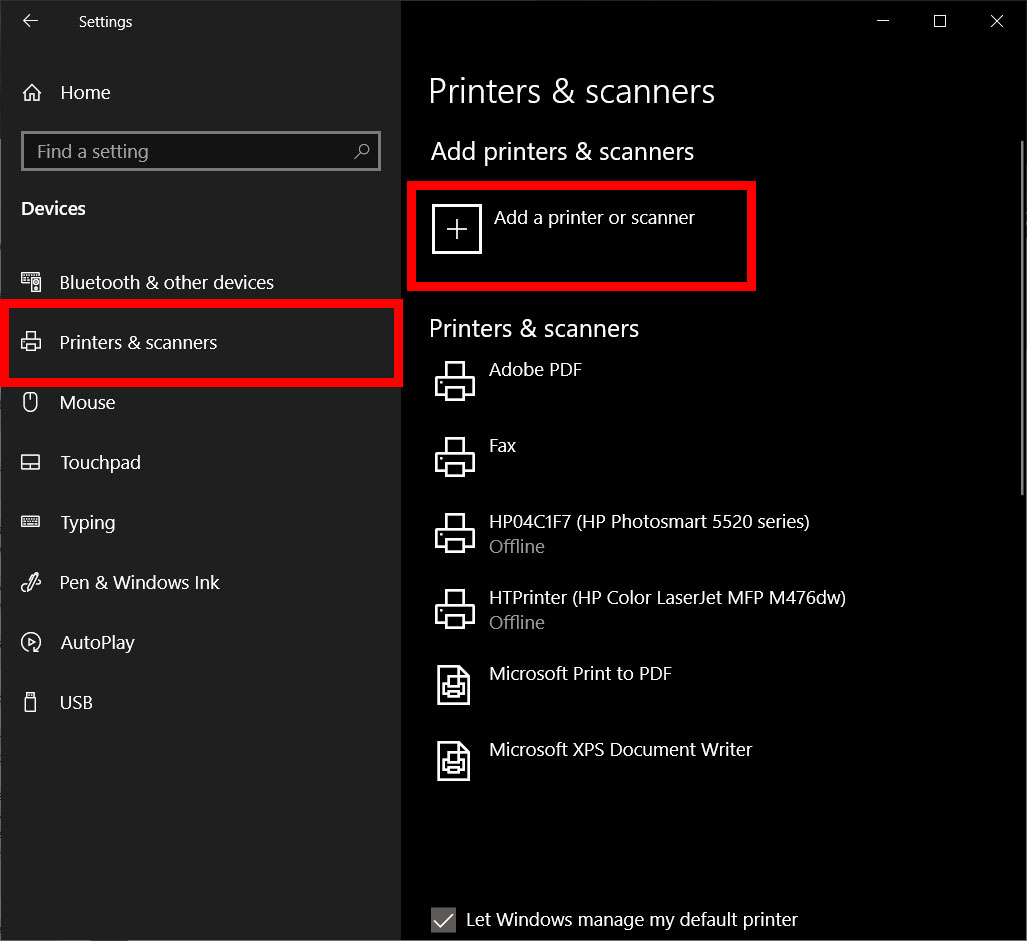
- Open Settings: Click on the Start button, then click the gear icon to open “Settings.”
- Navigate to Devices: Click on “Devices,” then select “Printers & scanners” from the left-hand menu.
- Add a Printer: Click the “+ Add a printer or scanner” button.
- Allow Scan: Windows will scan for available printers. Even if your printer wasn’t auto-detected, it might appear here after a manual scan. If it does, select it and click “Add device.”
- “The printer that I want isn’t listed”: If your printer still doesn’t appear after the scan, click on the “The printer that I want isn’t listed” link. This opens a wizard with more options.
- “Add a local printer or network printer with manual settings”: From the options presented, select “Add a local printer or network printer with manual settings” and click “Next.”
- Choose a Printer Port: Select “Use an existing port” and choose the appropriate USB port (e.g., “USB001,” “USB002,” or “DOT4_001”). If you’re unsure, try the highest numbered USB port first. Click “Next.”
- Install the Printer Driver:
- From Manufacturer List: Windows will display a list of printer manufacturers and models. Select your printer’s manufacturer from the left column and then your specific model from the right. Click “Next.”
- From Disk: If you downloaded drivers from the manufacturer’s website, click the “Have Disk…” button. Browse to the folder where you saved the drivers, select the
.inffile, and click “Open” then “OK.” Follow the on-screen prompts. This is the recommended approach for optimal performance and access to all printer features.
- Printer Name: Enter a name for your printer (the default name is usually fine) and click “Next.”
- Printer Sharing (Optional): Decide whether to share the printer on your network. For a personal USB printer, you’ll likely choose “Do not share this printer.” Click “Next.”
- Finish: You’re done! Click “Finish” and consider printing a test page.
By following these steps, even the most stubborn USB printer can be successfully integrated into your Windows 10 environment, ready to handle your printing tasks efficiently and reliably.
Method 2: Connecting a Wireless or Network Printer
Wireless and network printers offer unparalleled convenience, allowing multiple devices (computers, smartphones, tablets) to print from anywhere within the network range. This setup is particularly beneficial in multi-user environments or smart homes, enhancing collaborative productivity.
The Convenience of Network Printing
Connecting a printer to your network essentially turns it into a shared resource, accessible to anyone with the proper permissions. This method significantly streamlines workflows in offices and large households.
-
Connect the Printer to Your Network:
- For Wi-Fi Printers: Most modern Wi-Fi printers have a built-in control panel or a setup button (often WPS – Wi-Fi Protected Setup).
- WPS Method: Press the WPS button on your Wi-Fi router, then quickly press the corresponding WPS button on your printer. They should connect automatically.
- Manual Wi-Fi Setup: On the printer’s control panel, navigate to the network settings, select your Wi-Fi network (SSID), and enter your Wi-Fi password.
- For Ethernet Printers: Simply connect an Ethernet cable from the printer to an available port on your network router or switch. The printer should automatically obtain an IP address via DHCP.
- Bluetooth Printers: Ensure Bluetooth is enabled on both your printer and your Windows 10 PC. On your PC, go to “Settings” > “Devices” > “Bluetooth & other devices” and click “Add Bluetooth or other device.” Select “Bluetooth” and follow the on-screen prompts to pair.
- For Wi-Fi Printers: Most modern Wi-Fi printers have a built-in control panel or a setup button (often WPS – Wi-Fi Protected Setup).
-
Add the Network Printer in Windows 10:
- Open Settings: Go to “Settings” > “Devices” > “Printers & scanners.”
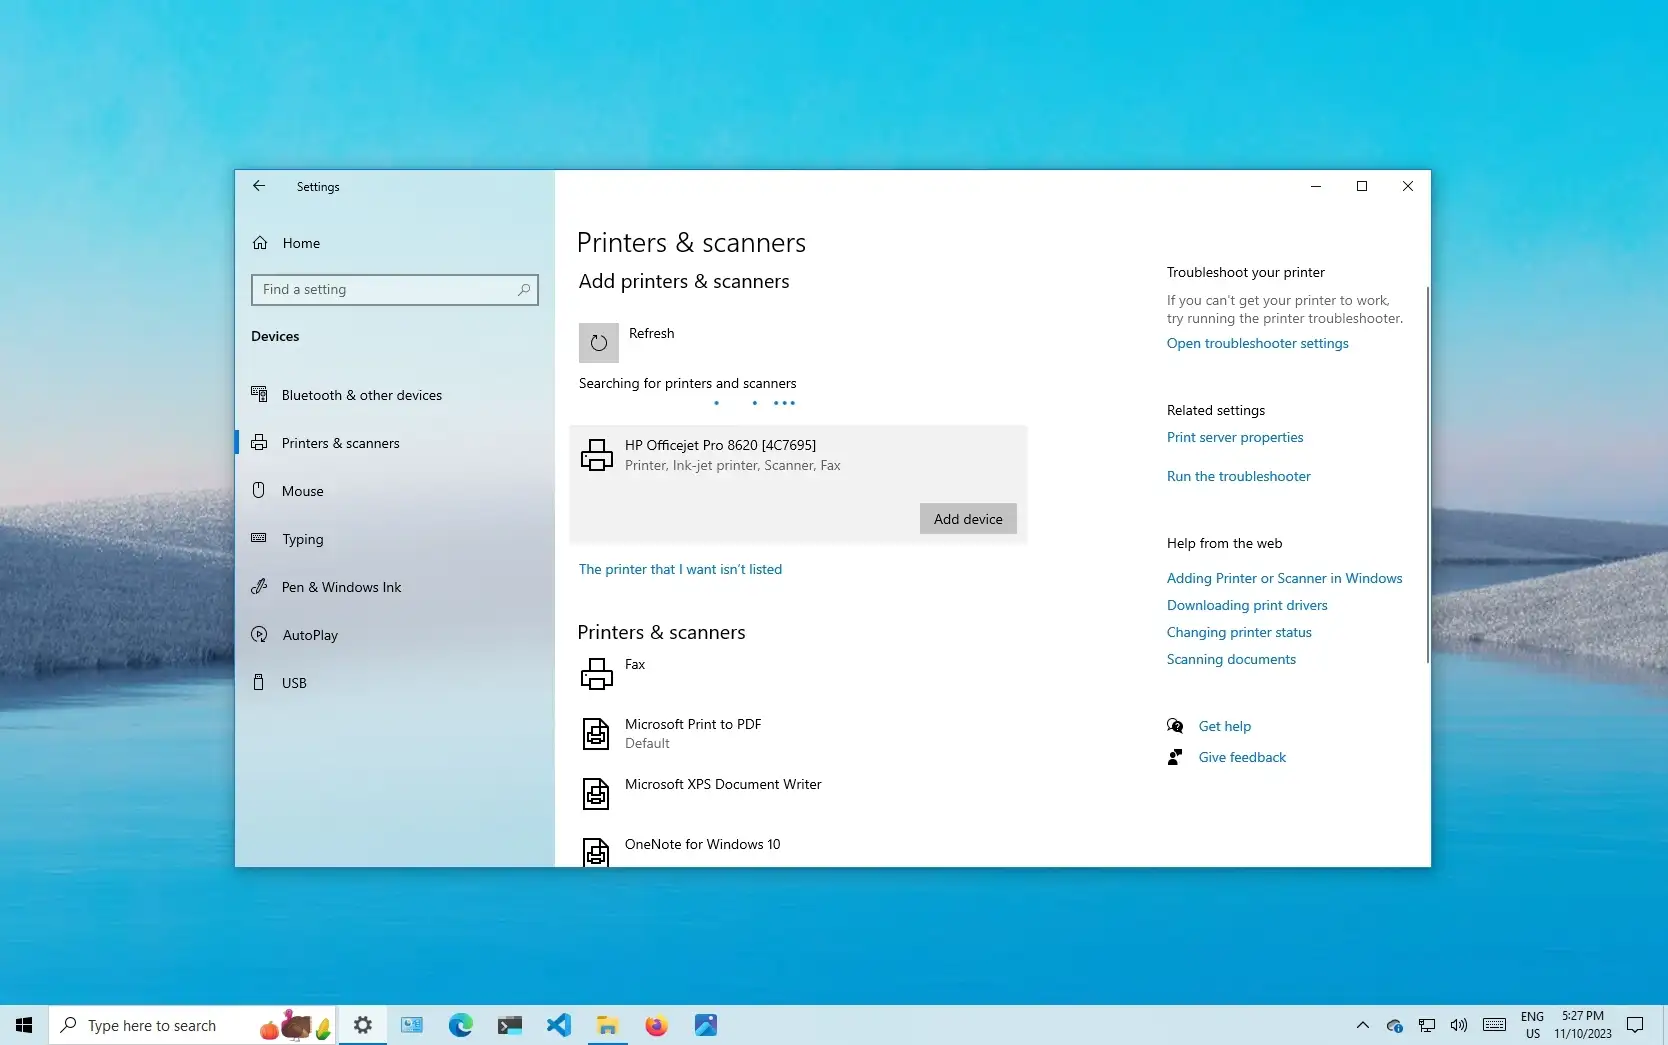
- Add a Printer: Click “+ Add a printer or scanner.”
- Automatic Scan: Windows will scan for discoverable printers on your network. If your printer is properly connected to the network, it should appear in this list (e.g., “HP LaserJet 200 via network” or “Epson WF-C5790 Series (Network)”). Select it and click “Add device.”
- “The printer that I want isn’t listed”: If your printer doesn’t show up automatically, click this link.
- Choose an Option:
- “Add a Bluetooth, wireless or network discoverable printer”: This is the most common option for Wi-Fi printers not immediately found. Windows will perform a more thorough scan.
- “Add a printer using a TCP/IP address or hostname”: This method is useful if you know your printer’s IP address (which you can often find on the printer’s network configuration page or via your router’s administration interface). Select “TCP/IP Device” as the device type, enter the IP address, and let Windows try to detect the driver. This method is particularly robust for fixed IP addresses in managed networks and adds a layer of digital security by allowing precise control over network device access.
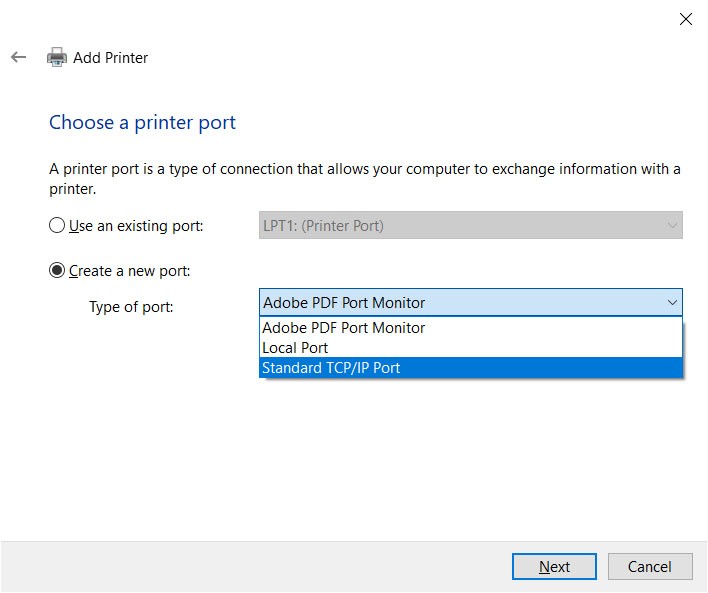
- “Add a local printer or network printer with manual settings”: This option can also be used, similar to the USB manual setup, but you’d select a “Standard TCP/IP Port” for the port type and then enter the IP address.
Driver Installation for Network Printers
Even when adding a network printer, the correct driver is essential. Windows 10 will often try to install a generic driver, but for full functionality:
- Use Manufacturer Drivers: If Windows doesn’t automatically install the manufacturer’s specific driver, you’ll need to manually install it. After adding the printer (or during the “Add a printer” wizard), you might be prompted to select the driver. Click “Have Disk…” and point to the drivers you downloaded from the manufacturer’s website.
- Windows Update: Sometimes, after adding a printer, Windows Update can provide more comprehensive drivers. Ensure your Windows Update settings are configured to download optional updates, which sometimes include device drivers.
Connecting a wireless or network printer offers a significant boost in flexibility and collective productivity. With the printer successfully installed and configured, all authorized users on the network can leverage its capabilities, fostering a more connected and efficient work environment.
Troubleshooting Common Printer Installation Issues
Even with the best preparation and following all steps meticulously, printer installation can sometimes present challenges. Understanding common issues and their solutions is a vital part of digital literacy, allowing you to quickly resolve problems and maintain your productivity.
When Things Don’t Go as Planned
Encountering a snag during printer installation is not uncommon. Here are some frequent problems and their corresponding troubleshooting steps:
-
Printer Not Showing Up in “Printers & scanners”:
- Check Power and Connection: Ensure the printer is on and properly connected (USB cable firmly in place, Wi-Fi connected to the correct network, Ethernet cable secure).
- Restart Printer and PC: A simple restart can often resolve temporary communication glitches.
- Run the “Add a printer or scanner” Scan Again: Sometimes, the initial scan misses it.
- Physical Port Check: If using USB, try a different USB port on your PC.
- Network Firewall: Your Windows Firewall or a third-party antivirus/firewall might be blocking communication with a network printer. Temporarily disable it to check if that’s the issue (re-enable immediately afterward for digital security).
- IP Address Conflict: For network printers, ensure it has a unique IP address on the network. Check your router’s administration page for connected devices.
-
Driver Issues (Corrupt, Outdated, or Missing):
- Download Latest Drivers: Always prioritize downloading the latest drivers directly from the printer manufacturer’s website for your specific Windows 10 version (32-bit or 64-bit).
- Update Existing Drivers: In “Device Manager” (search for it in the Start menu), expand “Printers” or “Print queues,” right-click your printer, and select “Update driver.” Choose to search automatically or browse for the drivers you downloaded.
- Uninstall and Reinstall Driver: If a driver seems corrupt, right-click the printer in Device Manager and select “Uninstall device.” Then, restart your PC and try the installation process again.
- Windows Update: Ensure Windows Update is current, as it sometimes includes driver updates.
-
Print Spooler Service Problems: The Print Spooler service manages print jobs in Windows. If it’s stuck or not running, printing won’t work.
- Restart Print Spooler:
- Search for “Services” in the Start menu and open it.
- Scroll down and find “Print Spooler.”
- Right-click it and select “Restart.” If it’s not running, select “Start.”
- Restart Print Spooler:
-
Network Connectivity Problems (for Network/Wireless Printers):
- Ping the Printer: If you know your printer’s IP address, open Command Prompt (search “cmd”) and type
ping [printer's IP address](e.g.,ping 192.168.1.100). If you get “Request timed out,” your PC cannot communicate with the printer. - Check Router Settings: Ensure your printer is visible in your router’s list of connected devices.
- Reset Printer Network Settings: Consult your printer’s manual on how to reset its network settings, then reconfigure its Wi-Fi or Ethernet connection.
- Ping the Printer: If you know your printer’s IP address, open Command Prompt (search “cmd”) and type
-
Windows’ Built-in Troubleshooter:
- Go to “Settings” > “Update & Security” > “Troubleshoot.”
- Click “Additional troubleshooters.”
- Select “Printer” and click “Run the troubleshooter.” Windows will attempt to diagnose and fix common printing problems.
Addressing these common issues systematically will often lead you to a resolution, allowing you to restore printing functionality swiftly and continue with your productive tasks.
Optimizing Your Printing Experience Beyond Installation
Successfully installing your printer is just the first step. To truly maximize your productivity and ensure longevity for your printing investments, it’s essential to understand how to manage and optimize your printer’s settings and maintain its health.
Managing Your Printers and Print Preferences
Windows 10 provides robust tools for managing your installed printers, allowing you to customize settings to suit your specific needs and even share printers across a network.
-
Setting a Default Printer: If you have multiple printers, Windows 10 will try to manage your default printer. However, you can explicitly set one:
- Go to “Settings” > “Devices” > “Printers & scanners.”
- Toggle off “Let Windows manage my default printer” if you want full control.
- Click on the printer you want to set as default, then click “Manage,” and finally “Set as default.” This ensures that when you hit “Print” from an application, it automatically selects your preferred device, saving clicks and improving efficiency.
-
Accessing Printer Properties and Preferences: Each printer has a range of customizable settings that can significantly impact output quality, speed, and even cost.
- From “Settings” > “Devices” > “Printers & scanners,” select your printer and click “Manage.”
- Click “Printer properties” to access advanced settings related to sharing, port, security, and color management (if supported).
- Click “Printing preferences” to configure settings like:
- Paper Size and Type: Essential for avoiding misprints and ensuring correct output.
- Print Quality: Draft for speed, standard for everyday use, high for best results. Adjusting this can save ink and speed up printing for non-critical documents.
- Duplex Printing: Print on both sides of the paper, a significant money-saver and environmentally friendly feature.
- Color vs. Grayscale: Printing in grayscale whenever color isn’t strictly necessary can dramatically reduce ink/toner costs.
- Layout and Orientation: Portrait or landscape, multiple pages per sheet.
- Maintenance Options: Head cleaning, nozzle checks, alignment, which are crucial for maintaining print quality.
-
Sharing Printers Over a Network: For small offices or home networks, sharing a USB-connected printer can be a cost-effective solution.
- In “Printer properties” (from the “Manage” screen), go to the “Sharing” tab.
- Check “Share this printer” and give it a share name.
- Ensure “Network Discovery” is turned on for your network profile (“Settings” > “Network & Internet” > “Status” > “Sharing options”).
- Digital Security Note: When sharing a printer, be mindful of who has access. Ensure your network is secure with a strong password, and consider permissions if sensitive documents are printed. This is a crucial aspect of managing corporate identity and data.
Keeping Your Printer Secure and Efficient
In the realm of technology, maintenance is key to longevity and efficiency. Printers are no exception. Proactive management not only extends the life of your device but also helps you manage printing costs effectively.
-
Firmware Updates: Just like your computer, printers have firmware that can be updated. Manufacturer websites often provide firmware updates that improve performance, add features, or patch security vulnerabilities. Regular firmware updates are a vital part of digital security, especially for network-connected devices.
-
Driver Updates: Keep your printer drivers updated. These updates often resolve bugs, improve compatibility with new software, and enhance overall printing performance. Regularly checking the manufacturer’s website or allowing Windows Update to install optional driver updates can keep your printer running smoothly.
-
Ink/Toner Management (Money-Saving Tip): Monitor your ink or toner levels proactively. Many printer drivers include utilities that show current levels. Buying replacement cartridges in advance, especially during sales, can save money. Also, consider “high-yield” cartridges for better cost-per-page. Opting for draft mode or grayscale for internal documents can significantly extend cartridge life, directly impacting your personal or business finance by reducing recurring supply costs.
-
Energy Saving Settings: Modern printers often come with energy-saving modes, such as automatic power-off after a period of inactivity. Configuring these settings can reduce your electricity consumption, contributing to both environmental sustainability and lower utility bills, a subtle yet impactful aspect of managing personal finance.
-
Regular Cleaning: Periodically clean the printer’s exterior, paper path, and print heads (using the printer’s utility). Dust and debris can lead to paper jams and print quality issues.
By actively managing and optimizing your printer, you not only ensure reliable performance for your immediate tasks but also contribute to the overall efficiency and security of your digital environment. This holistic approach to technology empowers you to get the most out of your gadgets, turning potential frustrations into seamless productivity.
In conclusion, installing a printer in Windows 10 is a foundational tech skill that, once mastered, significantly enhances your digital productivity. Whether through the plug-and-play ease of USB or the versatile convenience of network printing, Windows 10 offers robust pathways to get your device up and running. Beyond the initial setup, proactive management, driver updates, and smart usage of settings ensure your printer remains a reliable and efficient component of your daily workflow. Embrace these steps, troubleshoot with confidence, and make your printer a true asset in your pursuit of seamless technology integration and enhanced output.
aViewFromTheCave is a participant in the Amazon Services LLC Associates Program, an affiliate advertising program designed to provide a means for sites to earn advertising fees by advertising and linking to Amazon.com. Amazon, the Amazon logo, AmazonSupply, and the AmazonSupply logo are trademarks of Amazon.com, Inc. or its affiliates. As an Amazon Associate we earn affiliate commissions from qualifying purchases.