The whir of a new printer, the crisp lines of freshly printed pages – it’s a satisfying experience, but one that can sometimes be marred by the installation process. Whether you’re a tech-savvy individual or someone who prefers a more straightforward approach, this guide is designed to demystify the process of installing a new printer. We’ll cover everything from unpacking and setup to driver installation and troubleshooting, ensuring you can get your new printing companion up and running without unnecessary hassle.
The landscape of printers is diverse, offering a spectrum of technologies, functionalities, and connectivity options. From basic inkjet models perfect for home use to sophisticated laser printers designed for high-volume office environments, and even the latest all-in-one devices that combine printing, scanning, and copying, there’s a printer for every need. This article aims to provide a clear, step-by-step approach, regardless of the specific model you’ve chosen, so you can quickly transition from unboxing to printing your first document. We’ll also touch upon the importance of understanding your printer’s capabilities and ensuring it integrates smoothly with your existing tech ecosystem, aligning with the broader themes of technology and productivity.
Unpacking and Physical Setup: Laying the Foundation for Printing
Before diving into the digital realm of software and drivers, the physical setup of your new printer is paramount. This initial stage sets the stage for a smooth and functional printing experience.
1. Unboxing and Initial Inspection
The journey begins with carefully unboxing your new printer. Manufacturers package their devices with protective materials to ensure they arrive in pristine condition.
- Gentle Opening: Use a box cutter or scissors to carefully slice through the packing tape, being mindful not to damage the printer itself or any included accessories.
- Inventory Check: Once the box is open, locate the packing list or quick start guide. This document will detail all the components that should be included, such as the printer, power cord, USB cable (if applicable), ink or toner cartridges, and any setup discs. Cross-reference the contents with the list to ensure nothing is missing. If any items are absent, contact the manufacturer or retailer immediately.
- Remove Protective Materials: Printers are often secured with numerous pieces of tape, foam padding, and plastic wraps. Meticulously remove all these protective elements from both the exterior and interior of the device. Pay close attention to openings like paper trays, toner/ink cartridge compartments, and scanner lids. Failing to remove all protective materials can lead to operational errors or even damage.
2. Connecting the Hardware
With the printer unpacked and inspected, it’s time to connect its physical components.
- Power Connection: Locate the power port on the back of the printer and connect the provided power cord. Plug the other end into a surge protector or directly into a wall outlet. It’s always recommended to use a surge protector to safeguard your new device from power fluctuations.
- Data Connection (Wired):
- USB Connection: Many printers still come with a USB cable for a direct connection to your computer. If your printer and computer both have USB ports, connect one end of the USB cable to the printer and the other to an available USB port on your computer.
- Ethernet Connection (for Networked Printers): If your printer is designed for network connectivity and you intend to connect it via a wired network, use an Ethernet cable. Connect one end to the Ethernet port on the printer and the other end to an available port on your router or network switch.
- Data Connection (Wireless): Modern printers often offer wireless connectivity via Wi-Fi. This connection is typically established during the software setup process, but the printer itself will need to be powered on and within range of your wireless network. Some printers may have a dedicated button or menu option to initiate wireless setup.
3. Installing Ink or Toner Cartridges
This is a critical step that often differs significantly between inkjet and laser printers. Always refer to your printer’s specific manual for precise instructions.
- Inkjet Printers:
- Access the Cartridge Bay: Open the printer’s cover to access the ink cartridge carriage. The carriage will usually move to a central position, allowing for easy access.
- Remove Protective Seals: New ink cartridges are typically sealed with tape or plastic tabs. Carefully remove these seals as instructed by the cartridge packaging. Do not touch the electrical contacts or the ink nozzles.
- Insert Cartridges: Align the ink cartridges correctly with their designated slots and push them firmly until they click into place. Ensure you are installing the correct color cartridges in their respective positions.
- Laser Printers:
- Access the Toner Compartment: Open the designated compartment for the toner cartridge. This is often a front panel or a top-loading access point.
- Remove Protective Packaging: Toner cartridges are usually secured within a protective housing. Remove any plastic seals, clips, or wrappers as instructed. Some cartridges have a photosensitive drum that needs to be kept away from light, so work relatively quickly.
- Insert Toner Cartridge: Gently slide the toner cartridge into its designated slot until it is securely seated. You may hear a click as it locks into place.
Once all physical connections and cartridge installations are complete, power on the printer. Some printers may perform an initial calibration or initialization process.
Installing the Printer Software and Drivers: The Digital Bridge to Printing
With the physical setup complete, the next crucial step is to install the necessary software and drivers that allow your computer to communicate with the printer. This is where the “Tech” aspect of our website’s focus truly comes into play.
1. Locating and Installing Drivers
Drivers are essential pieces of software that act as translators, enabling your operating system (Windows, macOS, Linux) to understand and control your printer.
- Using the Included Installation Media: Many printers come with a CD or DVD containing the printer drivers and utility software.
- Insert the Disc: If your computer has a CD/DVD drive, insert the disc that came with your printer.
- Run the Setup Program: The disc should automatically launch an installer program. If it doesn’t, navigate to the disc in your file explorer and double-click on the setup or install file (often named
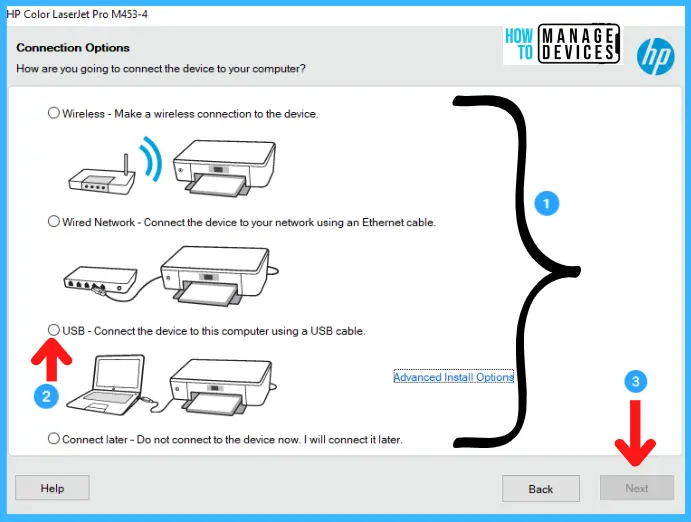
setup.exeorinstall.exe). - Follow On-Screen Instructions: The installer will guide you through the process. It will likely ask you to accept license agreements, choose installation types (e.g., typical, custom), and then prompt you for connection type (USB, wireless, Ethernet).
- Downloading Drivers from the Manufacturer’s Website (Recommended): In many cases, especially with newer printers or if your computer lacks a CD/DVD drive, downloading the latest drivers directly from the manufacturer’s website is the most reliable method.
- Identify Your Printer Model: You’ll need the exact model name and number of your printer. This is usually found on the front or top of the printer itself, or on the original packaging.
- Navigate to the Support/Downloads Section: Go to the official website of your printer manufacturer (e.g., HP, Canon, Epson, Brother). Look for a “Support,” “Downloads,” or “Drivers” section.
- Enter Your Printer Model: Type your printer model into the search bar provided on the support page.
- Select Your Operating System: It’s crucial to select the correct operating system (e.g., Windows 11, macOS Ventura, Ubuntu 22.04) and its architecture (32-bit or 64-bit) to ensure you download compatible drivers. Most modern computers are 64-bit.
- Download the Latest Driver Package: Download the recommended or full driver and software package. This often includes the essential drivers as well as helpful utility applications for scanning, ink level monitoring, and maintenance.
- Run the Downloaded Installer: Once the download is complete, locate the downloaded file (usually in your “Downloads” folder) and double-click it to run the installer. Follow the on-screen prompts, similar to using the CD/DVD.
2. Connecting During Software Installation
The installation process will typically guide you on when and how to connect the printer.
- USB Connection: If you’re using a USB connection, the installer will often instruct you to connect the USB cable after the software has been partially or fully installed. This allows the operating system to detect the new hardware and associate it with the installed drivers.
- Wireless/Network Connection: For wireless or Ethernet connections, the installer will guide you through the setup process.
- For Wi-Fi: You’ll usually be prompted to select your Wi-Fi network from a list and enter your network password. Some printers offer WPS (Wi-Fi Protected Setup) for a simpler connection.
- For Ethernet: If you’ve already physically connected the printer via Ethernet, the installer will likely detect it on the network automatically.
- Printer’s Control Panel: Some wireless setups might require you to configure the Wi-Fi settings directly on the printer’s control panel first, and then the computer software will find it on the network.
3. Printer Setup and Configuration
Once the drivers are installed and the printer is connected, you’ll likely have a final setup or configuration step.
- Setting as Default Printer: The installer may ask if you want to set this new printer as your default printer. If it’s the primary printer you’ll be using, it’s convenient to make it the default so that applications automatically select it. You can change this later through your operating system’s printer settings.
- Registering the Printer: Some manufacturers encourage you to register your printer online for warranty purposes and support.
- Running a Test Print: Most installation wizards conclude with an option to print a test page. This is a vital step to confirm that the installation was successful and the printer is functioning correctly.
Troubleshooting Common Installation Issues: Overcoming Hurdles to Seamless Printing
Despite best efforts, installation can sometimes present challenges. This section delves into common problems and their solutions, drawing on the “Tech” and “Productivity” aspects of our website’s focus. A smoothly functioning printer is key to efficient workflow.
1. Printer Not Detected by Computer
This is one of the most frequent issues.
- Check Connections: Double-check all physical connections: power cable is firmly plugged in at both ends, and the USB or Ethernet cable is securely attached to both the printer and the computer/router.
- Restart Devices: A simple restart can often resolve temporary glitches. Turn off both your computer and the printer. Unplug the printer’s power cord for about 30 seconds, then plug it back in and power it on. Start your computer afterward.
- USB Port Issues: Try a different USB port on your computer. Sometimes, a specific port might be faulty or not providing enough power. Avoid using USB hubs initially, as they can sometimes interfere with detection.
- Firewall/Antivirus Interference: Your security software might be blocking the connection. Temporarily disable your firewall and antivirus program and try the installation again. Remember to re-enable them afterward.
- Driver Conflict: If you previously had another printer installed, there might be a driver conflict. Uninstall all previous printer software and drivers before attempting to install the new one.
2. Error Messages During Installation
Specific error messages can provide clues.
- “Driver not found” or “Driver is unavailable”: This usually means the wrong driver was downloaded or the installation file is corrupted. Re-download the driver from the manufacturer’s official website, ensuring you’ve selected the correct model and operating system.
- “Printer offline”: This typically indicates a communication problem.
- Check Printer Status: Ensure the printer is powered on and not displaying any error messages on its own screen.
- Wireless Connectivity: If it’s a wireless printer, check if it’s still connected to your Wi-Fi network. You might need to re-enter the Wi-Fi password on the printer or through its utility software.
- Windows Specific: In Windows, go to “Printers & Scanners” in Settings. Right-click on your printer and ensure “Use Printer Offline” is NOT checked.
- “Access Denied” or Permissions Errors: You might not have administrator privileges to install software. Log in to your computer with an administrator account and try the installation again.
3. Print Quality Issues
If the printer installs but the print quality is poor.
- Run Printer Maintenance Utilities: Most printer software includes built-in maintenance tools for nozzle checks, printhead cleaning, and alignment. Run these from the printer’s software utility.
- Check Ink/Toner Levels: Ensure the ink or toner cartridges are not empty or critically low.
- Paper Type and Settings: Verify that the paper type loaded in the tray matches the settings in your print dialog box. Using the wrong settings can affect print quality.
- Inspect Cartridges: Remove and re-seat the ink or toner cartridges, ensuring they are properly locked in place and any protective seals were fully removed.
4. Wireless Printing Problems
- Network Congestion: If your Wi-Fi network is heavily used, it can sometimes cause slow printing or disconnections.
- Router Placement: Ensure the printer is within a reasonable range of your Wi-Fi router.
- IP Address Conflicts: In rare cases, two devices on your network might have the same IP address. Restarting your router can often resolve this.
5. Seeking Further Assistance
If you’ve exhausted these troubleshooting steps, don’t hesitate to seek further help:
- Printer Manual: Your printer’s user manual is an invaluable resource, often containing detailed troubleshooting sections specific to your model.
- Manufacturer’s Support Website: Most manufacturers have extensive FAQs, troubleshooting guides, and online support forums.
- Customer Support: Contact the manufacturer’s customer support directly. Have your printer model, serial number, and a description of the problem ready.
By systematically addressing each step of the installation process and being prepared for potential troubleshooting, you can ensure your new printer becomes a reliable tool for all your printing needs, contributing to your overall digital productivity.
aViewFromTheCave is a participant in the Amazon Services LLC Associates Program, an affiliate advertising program designed to provide a means for sites to earn advertising fees by advertising and linking to Amazon.com. Amazon, the Amazon logo, AmazonSupply, and the AmazonSupply logo are trademarks of Amazon.com, Inc. or its affiliates. As an Amazon Associate we earn affiliate commissions from qualifying purchases.