In an increasingly connected world, safeguarding our homes and businesses has become more critical than ever. Security cameras, once a luxury reserved for commercial establishments, are now an accessible and indispensable tool for enhancing personal safety, deterring crime, and providing invaluable peace of mind. While professional installation services offer convenience, the rise of user-friendly technology has made do-it-yourself (DIY) security camera installation a viable and rewarding project for many. This not only offers significant cost savings but also provides a deeper understanding and greater control over your home’s digital security infrastructure.
This comprehensive guide will walk you through every essential step of installing your security camera system, from initial planning and hardware selection to physical setup, software configuration, and ongoing maintenance. Leveraging insights into the latest tech trends and digital security best practices, we aim to empower you to build a robust and effective surveillance system tailored to your specific needs, seamlessly integrating it into your smart home ecosystem for enhanced productivity and unparalleled safety.
Laying the Foundation: Planning Your Security Camera System
Before you even unbox your cameras, a thorough planning phase is crucial. This initial groundwork ensures that your system effectively covers vulnerable areas, integrates smoothly with your existing setup, and provides the functionality you truly need. Thinking strategically at this stage will save you time, effort, and potential frustration down the line.
Assessing Your Needs and Property
The first step is to conduct a detailed security assessment of your property. Walk around both the interior and exterior, identifying potential weak points or areas of concern.
- Vulnerable Entry Points: Focus on all ground-floor doors, windows, and any other access points like basement windows or garage doors. These are often primary targets.
- High-Value Areas: Consider locations where valuables are stored, such as living rooms, studies, or storage areas.
- Blind Spots: Look for areas around your property that are obscured from view, perhaps by fences, hedges, or adjacent buildings. These need strategic coverage.
- Foot Traffic and Activity: Observe patterns of activity. Where do people typically enter and exit? What areas see the most movement? Covering these high-traffic zones is paramount.
- Indoor vs. Outdoor: Determine how many cameras you’ll need for each environment. Outdoor cameras require specific weatherproofing and robust mounting, while indoor cameras might prioritize aesthetics and discreet placement.
- Field of View Requirements: For each location, consider the desired field of view (FoV). Do you need a wide-angle lens to cover an entire backyard, or a narrower, more focused view for a front door?
- Night Vision: Evaluate the level of ambient light in each area at night. Most modern cameras offer infrared (IR) night vision, but some advanced models provide color night vision, which can offer clearer details.
By meticulously mapping out these requirements, you’ll gain a clear picture of how many cameras you need, where they should be placed, and what specific features each camera should possess.
Choosing the Right Camera Technology
The security camera market is diverse, offering a wide array of technologies, each with its own advantages and considerations. Your choice will largely depend on your property’s layout, budget, and desired level of integration.
-
Wired Systems (PoE/Coaxial):
- Power over Ethernet (PoE): These IP cameras receive both power and data through a single Ethernet cable, simplifying installation. They offer reliable connectivity, high bandwidth for superior video quality, and are less susceptible to Wi-Fi interference. Ideal for new constructions or properties where running Ethernet cables is feasible.
- Coaxial (Analog/HD-CVI/TVI/AHD): Older analog systems use coaxial cables for video and separate cables for power. While traditional analog has lower resolution, modern HD-over-coax systems offer high-definition video over existing coaxial infrastructure, making them suitable for upgrading older CCTV systems without extensive re-cabling.
- Pros: Highly reliable, secure, often better video quality at long distances, no battery concerns.
- Cons: More complex installation due to cabling, less flexible placement.
-
Wireless Systems (Wi-Fi):
- These cameras connect to your home’s Wi-Fi network for data transmission and typically require a power outlet. They offer greater flexibility in placement as long as they are within Wi-Fi range.
- Pros: Easier to install (no extensive video cabling), flexible placement, often integrates well with smart home apps.
- Cons: Can suffer from Wi-Fi interference, signal drops, potential security vulnerabilities if not properly secured, reliant on a stable Wi-Fi network, still require a power source.
-
Battery-Powered Cameras:
- Completely wire-free, these cameras run on rechargeable batteries and connect via Wi-Fi. They are excellent for temporary monitoring or locations where power access is challenging.
- Pros: Utmost flexibility in placement, easy to move, truly wireless installation.
- Cons: Require periodic recharging or battery replacement, often have limited recording capabilities to conserve battery life, typically have a slight delay in activating.
Beyond connectivity, consider key features:
- Resolution: Aim for at least 1080p (Full HD). 2K (1440p) or 4K (2160p) cameras provide significantly more detail, which can be crucial for identifying faces or license plates.
- Field of View (FoV): Wider angles (e.g., 120-180 degrees) cover more area, while narrower angles provide more detail in a specific spot.
- Night Vision: Infrared (IR) LEDs provide black and white night vision. Some advanced cameras offer “starlight” or color night vision using larger sensors and advanced image processing, which can be more informative.
- Two-Way Audio: A built-in microphone and speaker allow you to listen in and communicate with visitors or deter intruders remotely.
- Pan/Tilt/Zoom (PTZ): Remotely adjustable cameras offer dynamic coverage, useful for large areas or when you need to follow movement.
- Weatherproofing (IP Rating): For outdoor cameras, look for an IP65, IP66, or IP67 rating, indicating resistance to dust and water ingress.
- Storage Options:
- NVR/DVR: Network/Digital Video Recorders store footage locally on a hard drive, offering privacy and often continuous recording.
- Cloud Storage: Footage is uploaded to remote servers, accessible from anywhere. Offers protection against physical theft of the recorder but usually requires a subscription.
- SD Card: Some cameras have onboard SD card slots for local backup, suitable for single cameras or short-term storage.
Consider integrating with smart home platforms like Alexa, Google Home, or Apple HomeKit (a key “Tech” and “Apps” trend) for unified control and automation. This can enhance productivity by allowing voice commands or triggering actions based on camera events.
Essential Tools and Materials
Having the right tools on hand will make the installation process smoother and safer.
- Drill: A cordless drill is essential for mounting cameras and routing cables. Ensure you have a variety of drill bits suitable for wood, masonry, and metal.
- Screwdrivers: Philips and flathead screwdrivers for mounting brackets and adjusting screws.
- Ladder: A sturdy ladder is necessary for reaching optimal mounting heights.
- Pencil/Marker: For marking drill points.
- Measuring Tape: For accurate placement.
- Stud Finder: Crucial for securely mounting cameras to wall studs, especially outdoors.
- Cable Ties/Clips: For neat and secure cable management.
- Wiring Tools (for wired systems): Cable stripper, crimping tool (for RJ45 connectors on Ethernet cables), and possibly a network cable tester.
- Mounting Hardware: The cameras typically come with basic hardware, but you might need stronger anchors (e.g., masonry anchors for brick walls) depending on your wall material.
- Power Source/Extension Cords: For cameras requiring direct power, ensure access to outlets. Outdoor-rated extension cords may be needed during setup.
- Safety Gear: Gloves, safety glasses, and potentially a headlamp if working in dimly lit areas.
The Hands-On Process: Step-by-Step Installation
With your planning complete and tools ready, it’s time to physically install your cameras. This section details the practical steps for mounting, wiring, and preparing your system for digital integration.
Strategic Camera Placement and Mounting
Proper physical placement is paramount for effective surveillance. This goes beyond just point-and-shoot; it involves optimizing for coverage, deterrence, and image quality.
- Optimal Height: For outdoor cameras, aim for 8-10 feet off the ground. This height is high enough to deter tampering but low enough to capture clear facial features. Indoor cameras can be mounted at similar heights or discreetly placed on shelves, depending on the desired view.
- Angle for Coverage: Angle the camera to cover the most critical area. Avoid pointing cameras directly at the sun or other bright lights, especially at dawn or dusk, as this can cause glare and obscure the image. Similarly, ensure no large obstructions (trees, poles, eaves) block the camera’s view.
- Minimize Blind Spots: Systematically check for any areas not covered by your cameras. Sometimes, a slight adjustment to the angle or adding a small supplementary camera can eliminate these vulnerabilities.
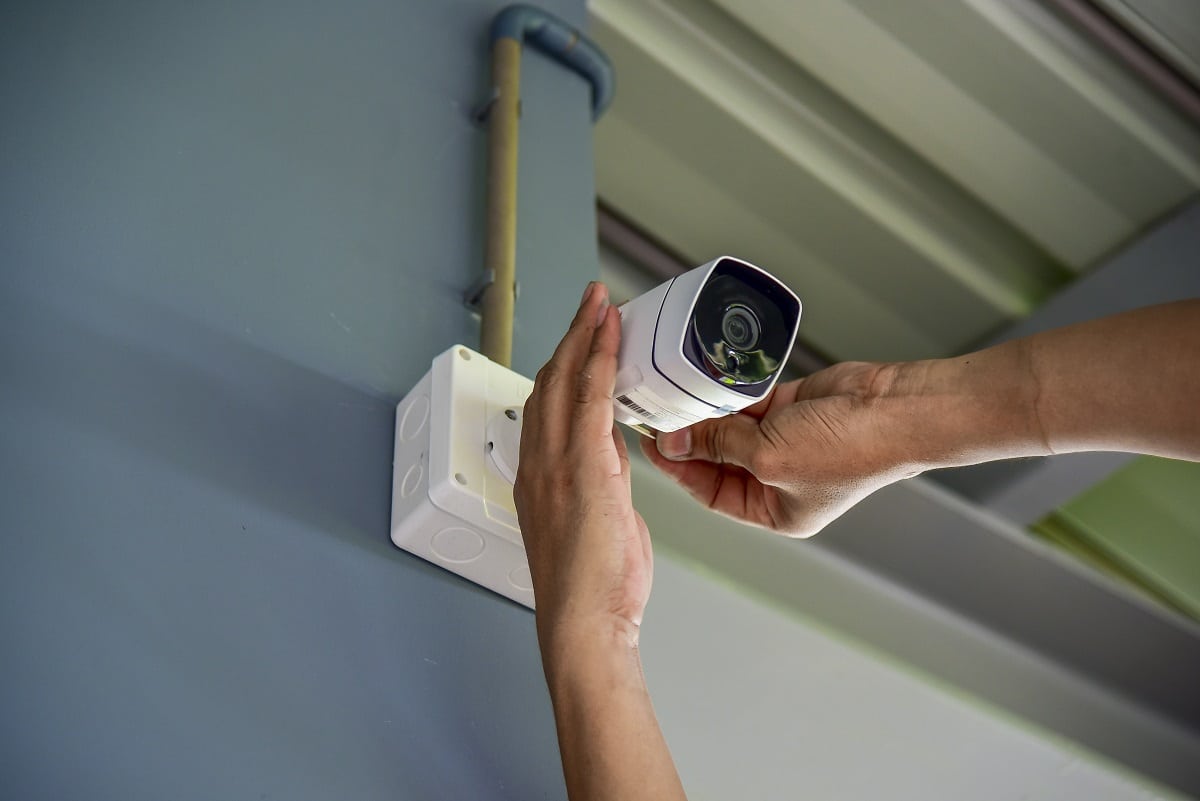
- Secure Mounting:
- Mark Drill Points: Hold the camera or mounting bracket in the desired position, ensuring the view is optimal, and mark the screw holes with a pencil.
- Drill Pilot Holes: Using the appropriate drill bit (smaller than your screw diameter), drill pilot holes. For wooden studs, this makes screwing easier. For masonry or drywall, you’ll need to drill larger holes to accommodate anchors before inserting screws.
- Attach Mounting Bracket: Securely fasten the mounting bracket to the wall, ceiling, or soffit.
- Mount the Camera: Attach the camera to the bracket. Most cameras allow for adjustment of the viewing angle after mounting.
- Weatherproofing for Outdoor Cameras: Ensure any cable entry points into your building are sealed with silicone caulk to prevent water ingress. If drilling through walls, use a drip loop for cables to ensure water runs off before reaching the entry point. Protect outdoor cameras under eaves or overhangs if possible, even if they are weatherproof.
Wiring and Power Connections
This step varies significantly depending on whether you’ve chosen a wired (PoE, coaxial) or wireless system. Regardless, neat and secure cable management is essential for reliability and aesthetics.

-
Wired Systems (PoE/Coaxial):
- Plan Cable Runs: Map out the most discreet and protected routes for your cables. This might involve running them through attics, crawl spaces, inside walls, or along baseboards. Using conduit for outdoor cable runs is highly recommended to protect against weather and pests.
- Run Cables: Carefully pull the cables through your chosen routes. Label them at both ends to avoid confusion later.
- Terminate Cables (PoE): If you’re using bulk Ethernet cable, you’ll need to strip the outer jacket, arrange the wires according to either T568A or T568B standard (ensure consistency), and crimp an RJ45 connector onto each end. Use a network cable tester to verify connectivity.
- Connect to NVR/DVR: Plug the terminated Ethernet (PoE) or coaxial cables into the corresponding ports on your NVR or DVR. For coaxial, also connect the power cables to the central power supply unit.
- Secure Cables: Use cable clips or ties to secure cables neatly along their runs, preventing snags or damage.
-
Wireless Systems:
- Power Access: While wireless for data, most Wi-Fi cameras still require a power source. Position them near an outdoor-rated electrical outlet or run a discreet power cable from an indoor outlet.
- Cable Management (Power): Even for power cables, route them neatly and securely, ensuring they don’t pose a tripping hazard or look unsightly.
- Battery-Powered Cameras: Simply mount the camera. Ensure batteries are fully charged before installation. Note their location for future recharging.
Setting Up Your Recording Device (NVR/DVR)
If you’re using an NVR (Network Video Recorder) for IP cameras or a DVR (Digital Video Recorder) for analog/HD-over-coax cameras, this device is the heart of your system.
- Placement: Place the NVR/DVR in a secure, cool, and well-ventilated location, away from direct sunlight and moisture. Ensure it’s easily accessible for maintenance but not obvious to potential intruders.
- Connections:
- Camera Connections: Connect all camera cables (Ethernet for NVR, coaxial for DVR) to the respective ports on the back of the recorder.
- Monitor Connection: Connect the NVR/DVR to a monitor (via HDMI or VGA) for initial setup and local viewing.
- Network Connection: Connect the NVR/DVR to your home router or network switch via an Ethernet cable. This is crucial for remote viewing and software updates.
- Power: Plug in the power adapter for the NVR/DVR.
- Initial Setup:
- Power on the NVR/DVR. It will usually boot into a setup wizard.
- Hard Drive Formatting: If the hard drive is new or unformatted, the system will prompt you to format it. This is essential for recording.
- Basic Configuration: Follow the on-screen prompts to set the date, time, language, and create an administrator password. Always create a strong, unique password as this is a critical digital security measure.
- Camera Detection: The NVR/DVR should automatically detect and display the connected cameras. If not, you may need to manually search for IP cameras on your network or check cable connections.
Activating Your System: Configuration and Digital Integration
With the physical installation complete, the next phase involves software setup, network configuration, and customizing your system for optimal performance and integration into your digital life. This is where your system truly comes alive, transforming raw video feeds into intelligent security insights.
Software Installation and Network Connectivity
This step connects your hardware to your digital world, enabling remote monitoring and intelligent features.
- Manufacturer’s App/Software: Download the official mobile app (for iOS or Android) or desktop software provided by your camera manufacturer. These apps are the primary interface for managing your system.
- Connect to Wi-Fi (for wireless cameras): For standalone Wi-Fi cameras, open the app, follow the instructions to put the camera into pairing mode, and connect it to your home Wi-Fi network. Ensure your Wi-Fi signal is strong at the camera’s location.
- Networking NVR/DVR for Remote Access: If using an NVR/DVR, ensure it’s connected to your router. The app will usually guide you through scanning a QR code on the recorder or manually entering its serial number/IP address to link it to your account. This establishes the connection for remote viewing over the internet.
- User Accounts and Passwords: Create user accounts within the app. Crucially, use strong, unique passwords for all accounts associated with your security system. Enable two-factor authentication (2FA) if available. This is a fundamental aspect of digital security, preventing unauthorized access to your video feeds and settings.
- Firmware Updates: Immediately check for and install any available firmware updates for your cameras and NVR/DVR. Firmware updates often include critical security patches and performance improvements, keeping your system protected against newly discovered vulnerabilities (a key aspect of “Tech Trends” and “Digital Security”).
Customizing Settings and Features
Once connected, delve into the system’s settings to tailor it to your specific security and productivity needs.
- Adjust Camera Angles and Focus: Use the live view on your monitor or app to fine-tune each camera’s physical angle. Ensure the focus is sharp for maximum clarity. For PTZ cameras, test the pan, tilt, and zoom functionalities.
- Motion Detection Zones and Sensitivity: Define specific areas within the camera’s view where motion detection should be active. For example, exclude a busy street or swaying trees to minimize false alarms. Adjust sensitivity levels to avoid triggering alerts from small animals or weather events, striking a balance between detection and nuisance notifications.
- Recording Schedules: Configure when your cameras record. Options typically include:
- Continuous Recording (24/7): Best for critical areas with large storage.
- Motion-Activated Recording: Saves storage and bandwidth, recording only when motion is detected.
- Scheduled Recording: Records during specific times of the day (e.g., when you’re away at work).
- Push Notifications and Alerts: Set up instant notifications to your phone or email when motion is detected, or other events occur. This allows for immediate awareness and response. Customize notification frequency to avoid alert fatigue.
- Two-Way Audio/Siren: Test the two-way audio feature to ensure you can communicate through the camera. If your camera has a built-in siren, test its functionality to deter intruders.
- Privacy Settings (Masking): Many cameras allow you to “mask” certain areas of the view to exclude them from recording, respecting the privacy of neighbors or public spaces. This is an important ethical and legal consideration.
Integrating with Smart Home Ecosystems
Modern security cameras are powerful gadgets that can extend their functionality by integrating with your broader smart home ecosystem. This leverages “AI Tools” and “Apps” to create a more responsive and automated environment.
- Voice Assistants: Link your security cameras with Amazon Alexa or Google Assistant. This allows you to view live feeds on compatible smart displays (e.g., Echo Show, Google Nest Hub) using simple voice commands (e.g., “Alexa, show me the front door camera”).
- Unified Dashboards: Many smart home platforms provide a centralized dashboard where you can view all your connected devices, including security cameras, smart locks, and lighting. This enhances productivity by simplifying control and monitoring.
- Automations and Routines: Create automated routines where camera events trigger other smart home actions:
- “If motion is detected at the front door at night, turn on the porch lights.”
- “When the garage camera detects movement after midnight, flash interior lights.”
- “When I leave home (geofencing), arm the security system and activate motion detection.”
- Interoperability: Explore IFTTT (If This Then That) or similar services that allow different smart devices and apps to “talk” to each other, further expanding the automation possibilities of your security system. This level of integration transforms your security cameras from mere recording devices into intelligent components of a proactive digital security network.
Post-Installation Essentials: Optimizing and Maintaining Security
Installing your security camera system is a significant achievement, but it’s just the beginning. To ensure its longevity, reliability, and continued effectiveness, ongoing testing, maintenance, and adherence to best practices are crucial. Neglecting these steps can compromise your digital security and the return on your initial “Tech” investment.
Thorough Testing and Troubleshooting
Before considering the job done, rigorously test every aspect of your new security system.
- Live View Verification: Check the live feed from every camera on your monitor and through the mobile app. Ensure images are clear, properly focused, and cover the intended areas. Verify that there are no blank screens or “no signal” messages.
- Motion Detection Alerts: Simulate motion in front of each camera within its designated detection zone. Confirm that you receive timely push notifications or email alerts as configured. Adjust sensitivity if you’re getting too many false alarms or missing genuine events.
- Recording and Playback: Trigger a recording (either through motion or manual activation), then attempt to play it back. Verify that the footage is saved correctly, the timestamp is accurate, and the playback quality is good. Test searching for specific events or times.
- Remote Access: Disconnect your phone from your home Wi-Fi and try to access the live feed and recorded footage using cellular data. This confirms that your remote access is properly configured and not just working on your local network.
- Night Vision Test: Wait until dark or simulate darkness to test the night vision capabilities of each camera. Ensure the IR illuminators are working and the night vision image is clear enough to identify objects or people.
- Troubleshooting Common Issues:
- No Signal/Offline Camera: Check power connections, network cables (for wired), or Wi-Fi signal strength (for wireless). Reboot the camera or NVR/DVR.
- Blurry Image: Clean the lens. Adjust focus if your camera has a manual focus ring.
- False Motion Alerts: Refine motion detection zones and sensitivity settings in the app.
- No Remote Access: Verify your NVR/DVR is connected to the internet, check router settings (port forwarding if required, though many systems use peer-to-peer cloud services), and ensure your app account is correctly linked.

Ongoing Maintenance and Best Practices
A security system is only as good as its upkeep. Regular maintenance ensures optimal performance and extends the lifespan of your equipment.
- Regular Cleaning: Periodically clean camera lenses to remove dust, dirt, spiderwebs, and water spots that can obscure the view and degrade image quality. Use a soft, damp cloth and avoid abrasive cleaners.
- Check Cable Connections: For wired systems, occasionally inspect all cable connections for any signs of wear, corrosion, or loose connections. Secure any dangling cables.
- Firmware Updates: Make it a habit to check for and install firmware updates regularly. Manufacturers frequently release updates to patch security vulnerabilities, improve performance, and add new features. This is a crucial element of maintaining robust digital security.
- Review Footage Periodically: Even if nothing untoward has happened, occasionally review random snippets of recorded footage. This helps you confirm that your cameras are recording as expected and that the image quality remains high.
- Strong Password Policy: Reiterate the importance of strong, unique passwords for your camera system accounts. Consider changing them periodically. Never use default passwords.
- Backup Critical Footage: If specific events occur that require long-term retention, back up that footage to an external hard drive, USB stick, or a secure cloud storage service, independent of your camera system’s primary storage.
- Data Privacy Considerations: Be mindful of local regulations and ethical considerations regarding surveillance. Position cameras to avoid infringing on neighbors’ privacy, and be transparent about surveillance if necessary. Understand how your chosen system handles your data, especially with cloud storage, aligning with your personal branding and digital security comfort levels.
By meticulously following these steps, you not only install a functional security camera system but also integrate it effectively into your home’s digital ecosystem. This DIY approach empowers you with knowledge, saves on professional service costs, and provides a continuous layer of digital security and peace of mind for your property. As technology evolves, staying informed about “Tech Trends” and consistently maintaining your system will ensure it remains a reliable guardian for years to come.
aViewFromTheCave is a participant in the Amazon Services LLC Associates Program, an affiliate advertising program designed to provide a means for sites to earn advertising fees by advertising and linking to Amazon.com. Amazon, the Amazon logo, AmazonSupply, and the AmazonSupply logo are trademarks of Amazon.com, Inc. or its affiliates. As an Amazon Associate we earn affiliate commissions from qualifying purchases.