Minecraft, a cultural phenomenon that has captivated millions worldwide, offers an unparalleled canvas for creativity and exploration. While its vanilla experience is rich and engaging, the true power of Minecraft lies in its modding community. Mods, short for modifications, are user-created add-ons that can transform the game in countless ways, from introducing new creatures and dimensions to overhauling game mechanics or simply adding quality-of-life improvements.
For many players, the idea of “modding” can seem daunting, conjuring images of complex code and potential system instability. However, manually installing mods in Minecraft is a skill that empowers players to take full control of their game, tailor it to their exact preferences, and unlock an almost infinite realm of possibilities. While automated launchers exist, understanding the manual process provides invaluable insight, troubleshooting prowess, and the ability to use specific, often niche, mods that might not be supported by one-click solutions. This comprehensive guide will walk you through every step, demystifying the process and equipping you with the knowledge to customize your Minecraft experience like a seasoned pro.

Understanding the Essentials Before You Begin
Before diving headfirst into the world of custom content, it’s crucial to grasp the foundational concepts and prerequisites. A little preparation goes a long way in ensuring a smooth and successful modding experience, minimizing frustration, and maximizing your enjoyment.
What are Minecraft Mods?
At their core, Minecraft mods are pieces of software designed by the community to alter or extend the game’s original code. They can range from simple aesthetic changes, like new texture packs or shader support, to colossal content additions that introduce entirely new gameplay loops, biomes, enemies, or even crafting systems.
Imagine a mod that lets you build complex automation systems, or one that adds hundreds of new crops and farming techniques, or even one that transforms your blocky world into a photorealistic landscape. These are just glimpses of what mods can achieve. The beauty of mods lies in their ability to cater to every imaginable playstyle, whether you’re an explorer, a builder, a redstone engineer, or a combat enthusiast. They significantly enhance replayability and can breathe new life into a game you thought you knew inside out.
Key Components: Forge, Fabric, and LiteLoader (Mod Loaders)
While mods are the stars of the show, they often can’t run on their own. They need a “mod loader” – a crucial intermediary that facilitates the interaction between the mod files and the Minecraft game client. Think of a mod loader as a compatibility layer or an operating system specifically designed for mods. Without it, Minecraft wouldn’t know how to interpret and integrate the custom code.
There are several popular mod loaders, each with its own ecosystem of compatible mods. The two most prominent are:
- Minecraft Forge: This has historically been the most widely used and robust mod loader. Forge boasts an extensive library of mods, making it the go-to choice for a vast majority of modding endeavors, especially for older Minecraft versions or large modpacks. It’s known for its stability and the sheer volume of content available.
- Minecraft Fabric: A newer and more lightweight alternative, Fabric has gained significant traction, particularly for newer Minecraft versions. It’s designed to be more modular and faster, often allowing for quicker updates to new Minecraft versions. While its mod library might be smaller than Forge’s in some categories, it offers a distinct set of unique and innovative mods, often focusing on performance enhancements and client-side utilities. Many Fabric mods require the Fabric API to function, which is a separate download that acts as a core library for Fabric mods.
- LiteLoader: Less prevalent now, LiteLoader was primarily used for client-side mods (mods that only affect your personal game experience without altering the server-side mechanics), such as minimaps or chat utilities. It could sometimes be run alongside Forge. For most modern modding, Forge or Fabric will be your primary choices.
The choice between Forge and Fabric is critical; a mod designed for Forge will not work with Fabric, and vice-versa. Always check which mod loader a specific mod requires before proceeding.
Essential Prerequisites and Considerations
Before you embark on the installation journey, ensure your system and mindset are prepared. These considerations will save you headaches down the line:
- Java Runtime Environment (JRE): Minecraft is built on Java. For modding, you need to have the correct version of Java installed on your system. Different Minecraft versions sometimes require different Java versions (e.g., Minecraft 1.17+ requires Java 16 or newer, while older versions typically use Java 8). Ensure your Java installation is up-to-date and compatible with your desired Minecraft version.
- Backup Your World Saves: This is perhaps the most crucial advice. Modding, by its nature, modifies game files. While manual installation is generally safe, unexpected issues can occur. Always, always create a backup of your precious Minecraft world saves before installing any mods. You can usually find your saves folder within the
.minecraftdirectory. Copy the entire ‘saves’ folder to a safe location (e.g., your desktop or an external drive). - Clean Minecraft Installation (Optional but Recommended): If you’ve had previous modding attempts or your game is acting strangely, starting with a fresh
.minecraftfolder can often prevent conflicts. You can achieve this by deleting your existing.minecraftfolder (after backing up saves!) and then launching the vanilla Minecraft launcher, which will re-download all necessary files. - Compatibility is Key: Mods are highly version-specific. A mod designed for Minecraft 1.18.2 will almost certainly not work on 1.19 or 1.16.5. Furthermore, the mod loader (Forge or Fabric) must also match the Minecraft version. Double-check that your chosen mod, mod loader, and Minecraft version are all perfectly aligned.
- Reliable Mod Sources: Download mods only from trusted websites. The two most reputable platforms are CurseForge and Modrinth. These sites host a vast majority of legitimate mods, often with integrated malware scanning and community reviews. Avoid sketchy third-party sites that promise “free mods” but might bundle them with viruses or adware.
Step-by-Step Guide to Installing a Mod Loader (Forge/Fabric)
The first major hurdle in manual modding is installing the mod loader itself. This acts as the foundation upon which all your chosen mods will run. We’ll cover the installation process for both Forge and Fabric.
Installing Minecraft Forge
Forge has long been the standard for Minecraft modding due to its extensive library and robust framework.
- Download Forge: Go to the official Forge website (files.minecraftforge.net). On the left sidebar, select the Minecraft version you intend to mod (e.g., 1.18.2, 1.19.4). You’ll typically see two options: “Recommended” and “Latest.” For stability, always opt for the “Recommended” version. Click the “Installer” button to download the
.jarfile. - Run the Installer: Locate the downloaded Forge installer
.jarfile (it might be in your ‘Downloads’ folder). Double-click it.- Security Warning: Your operating system might warn you about running a
.jarfile. Confirm that you want to run it. - Installer Window: A small “Mod System Installer” window will appear. Ensure “Install client” is selected. The “Install server” option is for dedicated servers.
- Verify Path: Check that the “Install Directory” path points to your correct
.minecraftfolder. This is usuallyC:Users[YourUsername]AppDataRoaming.minecrafton Windows. - Click OK: Click the “OK” button to begin the installation. Forge will download the necessary libraries and integrate itself into your Minecraft launcher.
- Security Warning: Your operating system might warn you about running a
- Verify Installation:
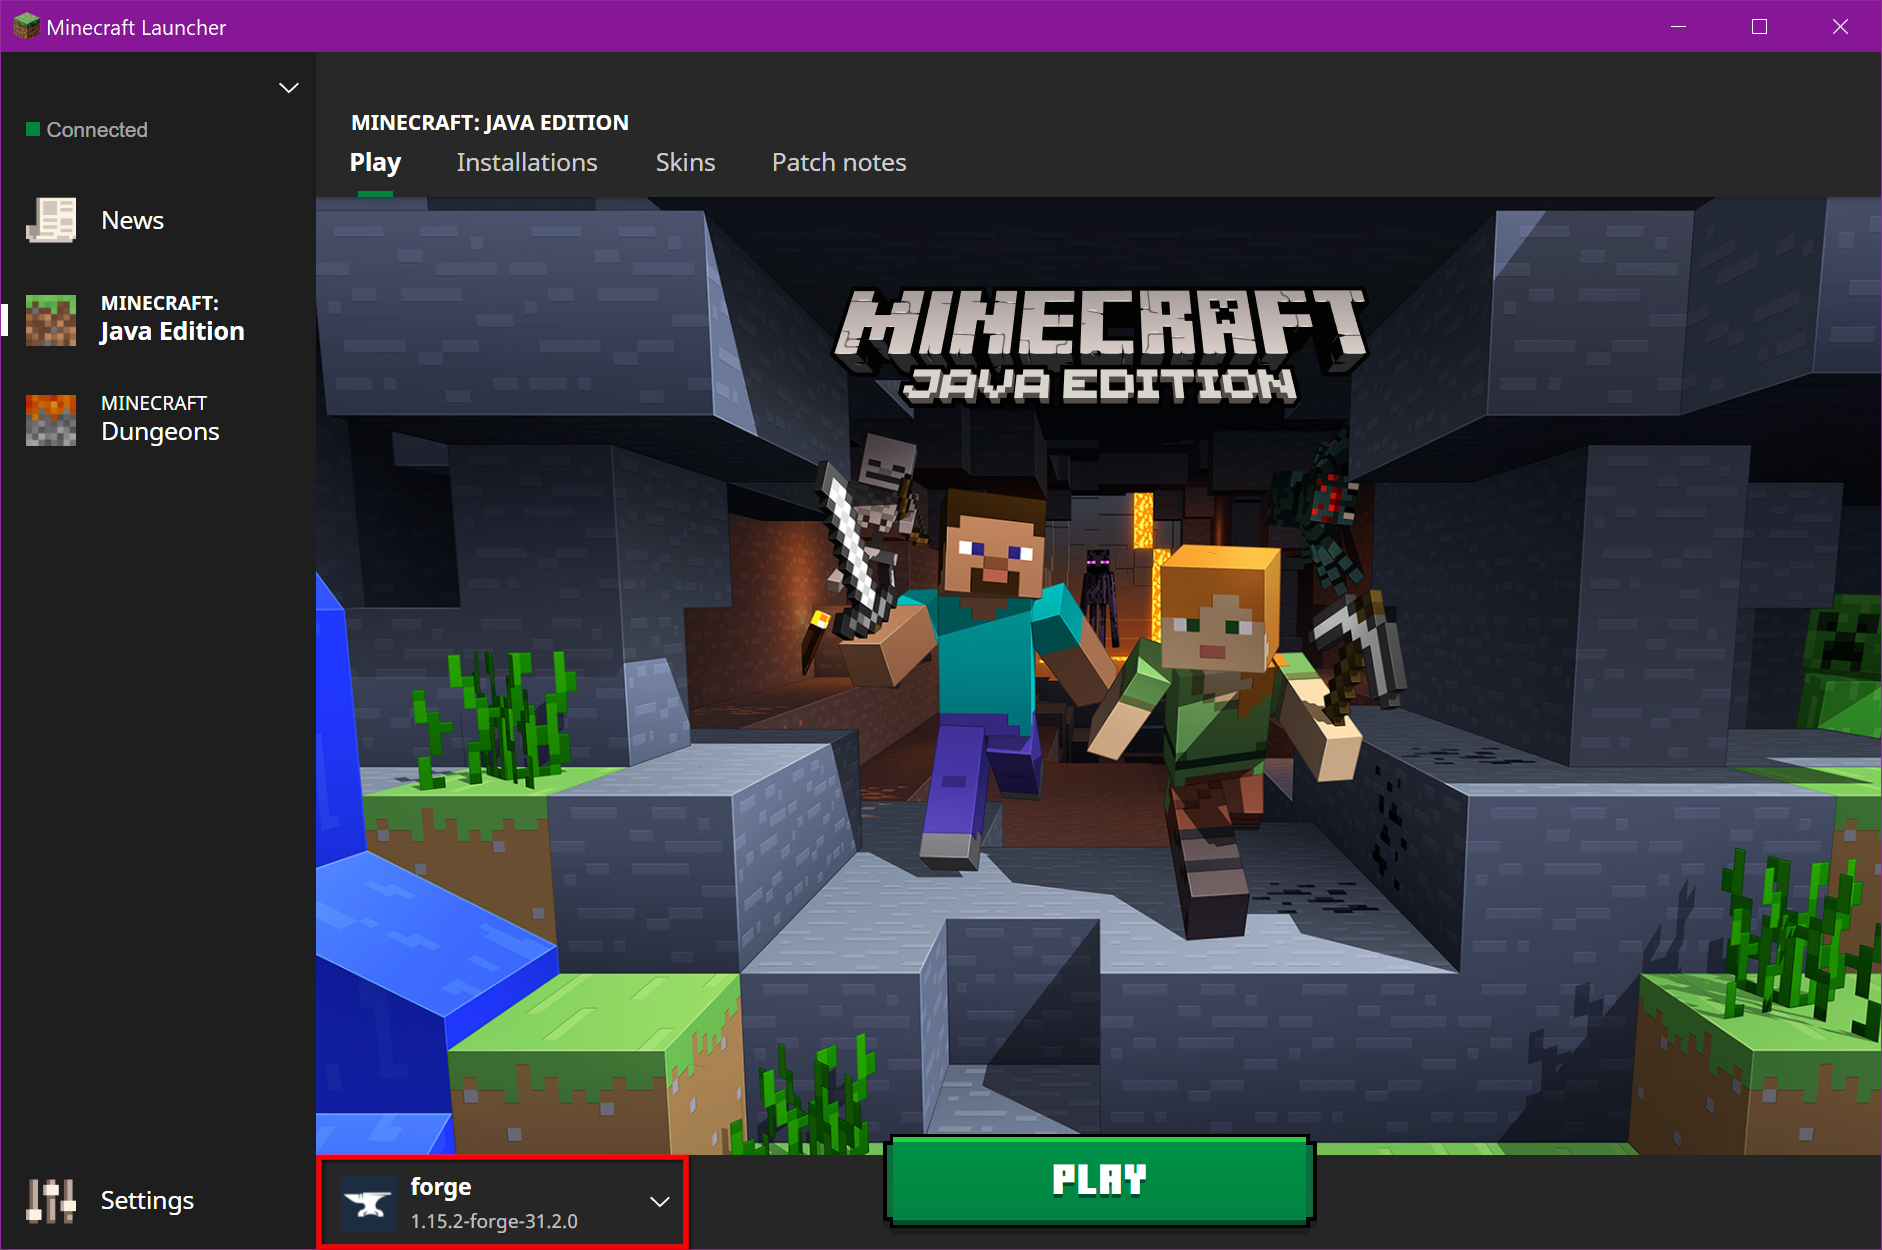
- Open your official Minecraft Launcher.
- Look for a new “installation” profile named “forge” or “Minecraft Forge” in the dropdown menu next to the “Play” button.
- Select this profile.
- Click “Play.” Minecraft should launch with Forge integrated. You’ll likely see a different splash screen or a “Mods” button on the main menu, confirming that Forge is installed successfully. Don’t worry if the “Mods” list is empty – you haven’t added any yet!
Installing Minecraft Fabric
Fabric offers a lightweight and often faster alternative, popular for newer Minecraft versions and specific utility mods.
- Download Fabric Installer: Navigate to the official Fabric website (fabricmc.net/use/). Download the “Universal JAR” installer.
- Run the Installer: Double-click the downloaded Fabric installer
.jarfile.- Installer Window: The Fabric installer will open.
- Select Minecraft Version: Choose the Minecraft version you want to mod from the dropdown menu (e.g., 1.19.4).
- Select Loader Version: Choose the recommended Fabric Loader version.
- Verify Install Location: Ensure the “Install location” points to your
.minecraftfolder. - Click Install: Click the “Install” button.
- Download Fabric API (Crucial Dependency): Unlike Forge, many Fabric mods rely on a core library called Fabric API. This needs to be downloaded separately and placed in your
modsfolder just like any other mod.- Go to a trusted mod source like CurseForge or Modrinth.
- Find the Fabric API version that matches your chosen Minecraft version.
- Download the
.jarfile. Do not try to run this JAR file.
- Verify Installation:
- Open your official Minecraft Launcher.
- A new profile named “fabric-loader-[version]” should appear in the dropdown menu.
- Select this profile.
- Click “Play.” Similar to Forge, a different splash screen or “Mods” button might indicate successful installation, though Fabric’s integration is often more subtle until mods are added.
Manually Installing Your Desired Minecraft Mods
With your chosen mod loader successfully installed, you’re now ready for the main event: adding the mods themselves! This process involves finding the right mods, downloading them safely, and placing them in the correct location.
Finding and Downloading Mods Safely
This step is critical for digital security and ensuring compatibility.
- Use Reputable Sources: As mentioned, always prioritize CurseForge and Modrinth. These platforms are designed for mod distribution, feature robust filtering, and have large, active communities that can help identify problematic files.
- CurseForge: Known for its vast selection and long history. You can browse by game version and mod loader.
- Modrinth: A newer, open-source platform, gaining popularity for its modern interface and commitment to creator-friendly policies. Also offers excellent filtering options.
- Filter by Minecraft Version and Mod Loader: When searching for mods, use the filtering options to narrow down results to your specific Minecraft version (e.g., 1.19.4) and your installed mod loader (Forge or Fabric). This will prevent you from downloading incompatible files.
- Read Mod Descriptions and Requirements: Before downloading, carefully read the mod’s description page.
- Dependencies: Many mods require other “library” mods to function (e.g., a specific “Core” mod by the same author, or the Fabric API for Fabric mods). These dependencies will usually be listed. Make a note of them and download them too.
- Installation Instructions: Some mods might have unique installation steps (e.g., needing to be placed in a specific subfolder, or requiring an unzipped file). Always defer to the mod author’s instructions.
- Bugs/Issues: Check the comments or “Issues” tab. If many users are reporting crashes with your specific Minecraft version, it might be wise to wait for an update or choose a different mod.
- Download the Correct File: Look for the “Download” button. Ensure you’re downloading the
.jarfile for the correct version of Minecraft and the correct mod loader. Do not download executable files (.exe) unless it’s a dedicated installer from a trusted source for a mod loader itself. Most mods are distributed as.jarfiles.
Locating Your Minecraft ‘mods’ Folder
Once you have your mod files (and any necessary dependencies), you need to place them in the correct directory. This is usually a folder named mods located within your main .minecraft directory.
The location of the .minecraft folder varies slightly by operating system:
- Windows:
- Press
Windows Key + Rto open the Run dialog. - Type
%appdata%and press Enter. - Open the
.minecraftfolder.
- Press
- macOS:
- Open Finder.
- In the menu bar, click “Go” > “Go to Folder…”.
- Type
~/Library/Application Support/minecraftand press Enter.
- Linux:
- Navigate to
~/.minecraft(the dot indicates a hidden folder, so you might need to enable “Show Hidden Files” in your file manager).
- Navigate to
Using the Minecraft Launcher (Easiest Method):
The simplest way to find your .minecraft folder is directly through the Minecraft Launcher:
- Open the Minecraft Launcher.
- Go to the “Installations” tab.
- Hover over the mod loader profile you created (Forge or Fabric).
- Click the folder icon that appears. This will open your
.minecraftdirectory directly.
Once inside the .minecraft folder, you should see a folder named mods. If it doesn’t exist, simply create a new folder and name it mods (all lowercase). This folder is where all your mod .jar files will reside.
Placing Mods into the Folder
This is the most straightforward step:
- Open the
modsfolder you located in the previous step. - Drag and drop (or copy and paste) all the
.jarfiles of your downloaded mods and their dependencies into thismodsfolder. - Important: Do NOT extract the
.jarfiles unless the mod author specifically instructs you to. The.jarfile itself is the mod. Extracting it will typically break the mod. - Ensure that the Fabric API (if you’re using Fabric) is also placed in this
modsfolder.
Handling Dependencies (e.g., Fabric API, CoFH Core)
As noted, many mods aren’t standalone. They rely on other library mods to provide common functions or resources. These are called “dependencies.”
- Identify Dependencies: Mod descriptions on CurseForge or Modrinth will explicitly list any required dependencies. For Fabric mods, Fabric API is almost always a dependency. For Forge mods, some mod authors create their own “core” libraries (e.g., CoFH Core, CodeChicken Lib) that several of their other mods might use.
- Download Dependencies: Treat dependencies just like any other mod. Go to their respective pages on a trusted mod site, ensure the version matches your Minecraft and mod loader, and download the
.jarfile. - Place in
modsFolder: All dependency.jarfiles must be placed in the samemodsfolder as the main mods that require them. If a dependency is missing or is the wrong version, your game will likely crash on startup or the mod simply won’t load.
Launching Minecraft and Troubleshooting Common Issues
With your mod loader installed and your mods placed correctly, it’s time for the moment of truth: launching Minecraft and verifying everything works! Even for experienced modders, troubleshooting is an integral part of the process, so knowing how to diagnose common problems is invaluable.
Launching Minecraft with Mods
- Open Minecraft Launcher: Start your official Minecraft Launcher.
- Select Modded Profile: In the dropdown menu next to the “Play” button, ensure you have selected the correct profile for your mod loader (e.g., “forge,” “fabric-loader-[version]”).
- Click “Play”: Hit the “Play” button.
- Observe Loading Screen: Minecraft will now launch. The loading process will likely take longer than vanilla Minecraft, as the mod loader needs to initialize and load all the mod files. You might see a different loading screen or text indicating that mods are being loaded.
- Verify Mods In-Game: Once you reach the main menu, look for a “Mods” button. Clicking this button should display a list of all the mods successfully loaded. If your mods appear here, congratulations! You’ve successfully modded Minecraft. Now, jump into a world (preferably a new one for testing, or your backed-up one) and start enjoying your enhanced gameplay.
Common Troubleshooting Tips
It’s rare for a mod setup to work perfectly on the first try, especially with multiple mods. Don’t get discouraged! Most issues are easily diagnosable and fixable.
- Game Crashes on Startup (Crash to Desktop): This is the most common issue.
- Check Compatibility: Did you double-check that every mod, the mod loader, and your Minecraft version are all compatible? (e.g., Minecraft 1.19.4 Forge, with Forge 1.19.4 mods). This is the leading cause of crashes.
- Missing Dependencies: Are all required library mods (like Fabric API, or specific “Core” mods) present in your
modsfolder and of the correct version? - Corrupted Mod Files: Sometimes a download can be corrupted. Try re-downloading the problematic mod.
- Conflicting Mods: If you’ve installed many mods, they might conflict with each other. This is harder to diagnose.
- Solution: Remove all mods from your
modsfolder except for your mod loader (Forge/Fabric API). Then, add mods back one by one, launching Minecraft after each addition, until you identify the mod that causes the crash. This process of elimination is incredibly effective.
- Solution: Remove all mods from your
- Mods Not Appearing In-Game (No “Mods” button, or empty list):
- Wrong Profile Selected: Did you select the Forge or Fabric profile in the Minecraft Launcher before clicking “Play”?
- Mods Not in Correct Folder: Double-check that all
.jarmod files are directly inside themodsfolder within your.minecraftdirectory. They shouldn’t be in subfolders (unless a mod specifically instructs it). - Mod Loader Issue: Is the mod loader (Forge or Fabric) itself installed correctly and appearing as an option in your launcher? If not, reinstall the mod loader.
- Performance Issues (Lag, Low FPS):
- Too Many Mods: Each mod consumes system resources. If your computer is struggling, try removing some of the more resource-intensive mods (e.g., large content mods, complex shaders).
- Outdated Graphics Drivers: Ensure your graphics card drivers are up-to-date.
- Java Arguments: For advanced users, adjusting Java’s memory allocation (RAM) in the Minecraft Launcher’s “Installations” settings (under “More Options” > “JVM Arguments”) can help. A common recommendation is
-Xmx4Gfor 4GB of RAM, but don’t allocate more than half of your system’s total RAM.
- Consulting Log Files: When a crash occurs, Minecraft often generates a
crash-reportfile in your.minecraft/crash-reportsfolder. Thelatest.logfile in the.minecraft/logsfolder also contains valuable information. These files provide clues about what went wrong and are essential when seeking help from modding communities. Paste these logs into pastebin.com and share the link when asking for help on modding forums or Discord servers.
By systematically addressing these common issues, you’ll find that most modding problems have straightforward solutions. Patience and persistence are key!

Conclusion
Manually installing mods in Minecraft is a rewarding process that transforms your game from a familiar world into an endlessly customizable sandbox. By following this detailed guide, you’ve not only learned the practical steps but also gained a deeper understanding of how the modding ecosystem functions. From selecting the right mod loader – be it the robust Forge or the nimble Fabric – to navigating the intricacies of dependencies and troubleshooting common hiccups, you are now equipped with the technical prowess to personalize your Minecraft experience.
This journey into manual mod installation aligns perfectly with the spirit of technology and digital exploration. You’ve taken control of your software environment, debugged potential issues, and harnessed community-driven innovations to enhance a beloved application. Remember to always prioritize digital security by downloading from reputable sources, and never forget to back up your precious game worlds.
The world of Minecraft modding is vast and ever-evolving. There are thousands of mods waiting to be discovered, each offering unique adventures and creative outlets. Don’t be afraid to experiment, explore new possibilities, and share your customized game with friends. Embrace the power of modification, and let your imagination run wild in a Minecraft universe truly tailored by you. Happy crafting!
aViewFromTheCave is a participant in the Amazon Services LLC Associates Program, an affiliate advertising program designed to provide a means for sites to earn advertising fees by advertising and linking to Amazon.com. Amazon, the Amazon logo, AmazonSupply, and the AmazonSupply logo are trademarks of Amazon.com, Inc. or its affiliates. As an Amazon Associate we earn affiliate commissions from qualifying purchases.