In an era defined by rapid technological advancements, a well-functioning computer is more than just a convenience – it’s an indispensable tool for productivity, communication, and entertainment. Whether you’ve just acquired a brand-new machine without an operating system, are looking to breathe new life into an aging PC, or need to troubleshoot persistent software issues, installing Windows is a fundamental skill that empowers you to take control of your digital environment. This guide, tailored for both novices and seasoned tech enthusiasts, demystifies the process, ensuring a smooth, secure, and successful Windows installation. Beyond the technical steps, we’ll explore how mastering this process aligns with maximizing your tech investment, safeguarding your digital assets, and enhancing your overall digital experience.
The Foundation: Understanding Why and Preparing for Installation
Before diving into the intricate steps of installation, it’s crucial to understand the “why” behind a fresh Windows setup and to meticulously prepare your system. This foundational stage not only prevents potential headaches down the line but also ensures that your new operating system functions optimally from day one.
Why a Fresh Windows Installation Matters
A clean installation of Windows offers numerous benefits that extend beyond simply getting your computer to boot. It’s an opportunity for a digital reset, often leading to significant improvements in performance and stability.
- Optimal Performance: Over time, operating systems can accumulate digital clutter—leftover files from uninstalled programs, fragmented data, and corrupted system files. A clean install wipes the slate clean, eradicating these performance bottlenecks and restoring your computer to its factory-fresh speed and responsiveness. For those focused on productivity and efficiency, this translates directly into saved time and reduced frustration.
- Enhanced Stability and Security: Persistent bugs, unexpected crashes, or even malware can compromise your system’s integrity. Reinstalling Windows effectively eliminates these deep-seated issues, providing a stable foundation. Furthermore, starting with a fresh OS allows you to install the latest security updates from Microsoft, bolstering your digital defenses against evolving cyber threats. In the realm of digital security, a clean install is often the most effective reset button.
- Troubleshooting and Problem Solving: When a computer experiences severe, intractable problems—such as endless boot loops, critical system file corruption, or unresolvable driver conflicts—a fresh Windows installation is often the most reliable solution. It’s the ultimate fix for software-related ailments that conventional troubleshooting methods can’t remedy.
- Upgrading to a Newer Version: Whether you’re moving from Windows 10 to Windows 11, or simply performing a major feature update, a clean installation can provide a smoother transition than an in-place upgrade. It ensures compatibility and prevents carrying over potential issues from the older system.
- New PC or SSD Installation: If you’ve just purchased a barebones PC without an OS or are upgrading to a new Solid State Drive (SSD), installing Windows is a necessary first step to make your hardware functional. This DIY approach not only saves the cost of a pre-installed OS but also allows for a customized setup.
Essential Pre-Installation Checklist
Preparation is key to a successful Windows installation. Skipping these vital steps can lead to data loss, compatibility issues, or a stalled installation process. Think of this as protecting your digital assets and ensuring a smooth financial transaction (your time) during the setup.
- Backup All Critical Data: This is, without a doubt, the most crucial step. Installing Windows, especially a clean install, typically formats the drive where the operating system resides, erasing everything on it. Ensure all your documents, photos, videos, music, and any other important files are securely backed up to an external hard drive, a USB flash drive, or a cloud storage service (like OneDrive, Google Drive, or Dropbox). Neglecting this step can lead to irreversible data loss, a financial and emotional cost no one wants to bear.
- Verify System Requirements: Each version of Windows has minimum hardware requirements for processor speed, RAM, storage, and graphics. Before you begin, confirm your computer meets these specifications. For example, Windows 11 has stricter requirements, including a Trusted Platform Module (TPM) 2.0 and Secure Boot capabilities. Checking these prevents frustrating installation failures.
- Obtain Your Windows Product Key: If you’re installing a licensed version of Windows, you’ll need its 25-character product key. This might be on a sticker on your computer, in an email from an online purchase, or linked to your Microsoft account. While you can often skip entering it during installation and activate later, having it ready streamlines the process and ensures your genuine Windows “brand” is recognized.
- Secure Installation Media (USB Drive): You’ll need a USB flash drive with at least 8GB of storage (preferably 16GB for larger ISOs or future-proofing). This drive will be turned into a bootable installer. Ensure it contains no important data, as the process will format it.
- Download the Windows ISO File: Microsoft provides official ISO files for Windows 10 and Windows 11. Visit the official Microsoft website and download the relevant ISO file for the version you intend to install. This ensures you’re using a legitimate, unadulterated version of the operating system, safeguarding your investment against pirated or modified software.
- Gather Necessary Drivers (Optional but Recommended): While Windows often includes generic drivers, it’s wise to download specific drivers for your motherboard (chipset), graphics card, network adapter (Ethernet/Wi-Fi), and any unique peripherals from your computer manufacturer’s website. Store these on a separate USB drive. Having them ready ensures immediate functionality, especially for internet access post-installation.
- Stable Internet Connection: A reliable internet connection will be invaluable post-installation for downloading updates, drivers, and essential software.
- Power Source: For laptops, ensure it’s plugged into an AC power source throughout the entire installation process to prevent unexpected shutdowns. For desktops, a stable power supply is equally important.
By meticulously going through this checklist, you mitigate risks, save time, and lay a solid groundwork for a trouble-free installation, protecting your digital investment.
The Core Process: Step-by-Step Windows Installation
With your preparations complete, you’re ready to embark on the actual installation journey. This section guides you through creating the bootable media and navigating the Windows Setup Wizard, transforming your computer from a blank slate into a functional machine.
Creating Your Bootable Windows Installation Media
This crucial step involves taking the downloaded Windows ISO file and writing it onto your USB flash drive in a way that your computer can boot from it.
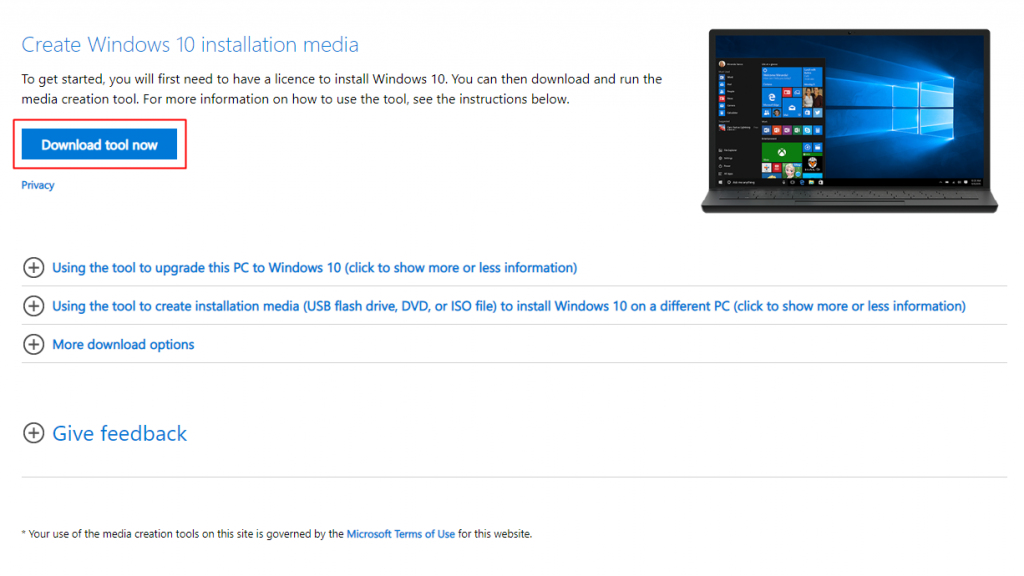
- Using the Windows Media Creation Tool (Recommended for Windows 10/11):
- Download the Media Creation Tool from Microsoft’s official website.
- Run the tool. Accept the license terms.
- Choose “Create installation media (USB flash drive, DVD, or ISO file) for another PC.”
- Select your language, edition, and architecture (usually 64-bit).
- Select “USB flash drive” as the media to use, then choose your connected USB drive from the list.
- The tool will download the necessary files and create the bootable USB drive. This is often the simplest and most reliable method, ensuring the integrity of your installation files.
- Using Rufus (For Advanced Users or Specific Scenarios):
- Download Rufus from its official website.
- Insert your USB drive.
- Open Rufus, select your USB drive under “Device.”
- Click “SELECT” and browse to your downloaded Windows ISO file.
- For “Partition scheme,” generally leave it as “GPT” for modern UEFI systems or “MBR” for older BIOS systems. If unsure, “GPT” is usually the correct choice for new installations.
- Click “START.” Rufus will format the drive and copy the files, making it bootable. This tool offers more control and is particularly useful for creating specialized bootable drives or bypassing certain Windows 11 requirements (like TPM/Secure Boot, though this isn’t officially supported by Microsoft and might carry risks).
Navigating the Windows Setup Wizard
Once your bootable USB is ready, the next step is to instruct your computer to boot from it and then follow the on-screen prompts of the Windows Setup Wizard.

- Boot from the USB Drive:
- Insert the bootable USB into your computer.
- Restart your computer. As it starts up, you’ll need to repeatedly press a specific key to enter the BIOS/UEFI setup or the Boot Menu. Common keys include F2, F10, F12, Del, or Esc (check your motherboard or PC manufacturer’s manual).
- In the Boot Menu, select your USB drive. If you enter the BIOS/UEFI, you’ll need to navigate to the “Boot Options” or “Boot Order” section and set your USB drive as the primary boot device. Save and exit.
- Your computer should now boot from the USB, and you’ll see the Windows logo appear. You might be prompted to “Press any key to boot from USB…”
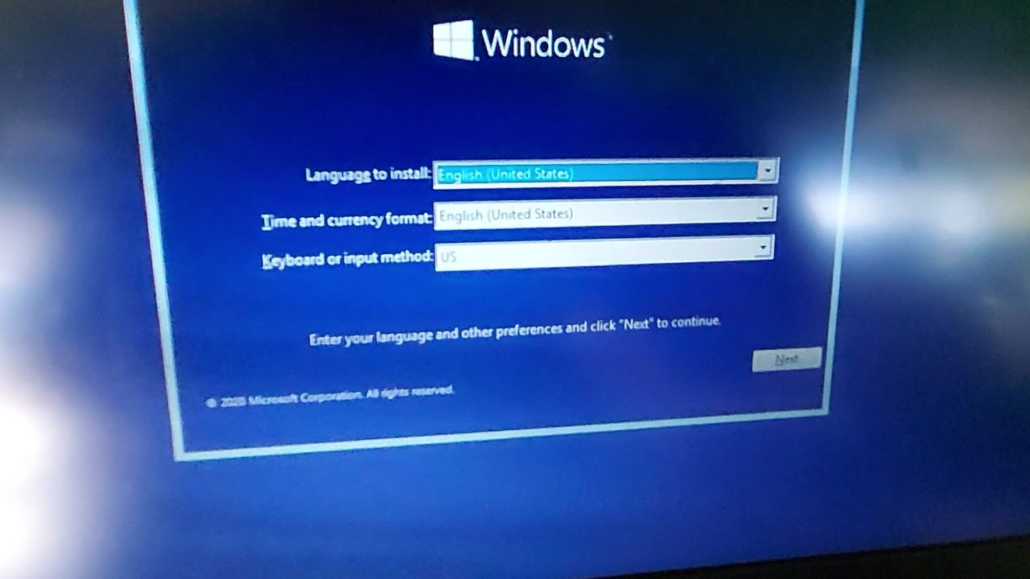
- Initial Setup Screen:
- The first screen will ask you to select your language, time and currency format, and keyboard or input method. Make your selections and click “Next.”
- Click “Install now.”
- Product Key Entry:
- You’ll be prompted to enter your Windows product key. If you have it, enter it now. If you’re reinstalling Windows on a machine that previously had a digital license, or if you plan to activate later, you can click “I don’t have a product key” or “Do this later.” Windows will typically activate automatically once connected to the internet if a digital license is tied to your hardware or Microsoft account.
- License Terms:
- Read the Microsoft Software License Terms. If you agree, check the box and click “Next.”
- Choose Installation Type:
- This is a critical step:
- Upgrade: Installs Windows while keeping your files, settings, and applications. This is generally not recommended for a “clean” install as it can carry over existing issues.
- Custom: Install Windows only (advanced): This is the option you want for a clean installation. Select this to perform a fresh install without retaining old data.
- This is a critical step:
- Drive Partitioning and Formatting:
- This is another crucial step. You’ll see a list of drives and partitions.
- For a new drive or clean install on an existing drive: Select each existing partition (e.g., “Drive 0 Partition 1,” “Drive 0 Partition 2”) and click “Delete” until the entire drive is shown as “Unallocated Space.”
- Once you have “Unallocated Space,” select it and click “New” to create a new partition for Windows. You can choose the full size of the drive or create smaller partitions if you wish (e.g., one for Windows, another for data). Click “Apply.” Windows will create additional small system partitions (e.g., Recovery, EFI System Partition).
- Select the main partition where you want Windows installed (usually the largest one) and click “Next.”
- Windows Installation Process:
- Windows will now begin copying files, installing features, and installing updates. This process will take some time and your computer will restart multiple times. Do not turn off your computer during this stage.
- Initial Configuration and First Boot:
- After the final restart, you’ll be greeted by the Out-Of-Box Experience (OOBE). This involves setting up your region, keyboard layout, connecting to a network, creating a user account (or signing in with a Microsoft account), and configuring privacy settings.
- Microsoft often prompts you to create or sign in with a Microsoft account, which integrates cloud services like OneDrive and enhances your digital brand across devices. You can usually choose an offline account if preferred, though features might be limited.
- Carefully review the privacy settings to ensure your data preferences align with your comfort level.
- Once these steps are complete, Windows will finalize the setup, and you’ll finally see your desktop. Congratulations, your new operating system is installed!
Optimizing Your New System: Post-Installation Essentials
Installing Windows is just the first major step. To ensure your system runs smoothly, securely, and efficiently, several post-installation tasks are critical. These steps elevate your basic setup into a fully functional and personalized computing environment, protecting your investment and enhancing your user experience.
Driver Installation and System Updates
The immediate aftermath of a clean Windows installation often leaves you with a basic system. Drivers and updates are crucial for unlocking your hardware’s full potential and safeguarding your system.
- Install Essential Drivers:
- Even if your computer seems to be working, generic drivers might be in use, limiting performance. Install the specific drivers you downloaded in the preparation phase. Start with chipset drivers for your motherboard, followed by graphics card drivers (NVIDIA, AMD, Intel), and then network drivers (Ethernet and Wi-Fi) if not already functioning. Audio drivers and drivers for any unique peripherals (e.g., a specialized webcam or printer) should follow.
- How to install drivers: Run the setup files you downloaded. Alternatively, for missing drivers, open “Device Manager” (right-click the Start button), locate devices with yellow exclamation marks, right-click, and choose “Update driver” (then “Search automatically for drivers” or “Browse my computer for drivers” if you have the files locally).
- The ‘Brand’ Impact: Properly installed drivers ensure your hardware components, from your processor to your graphics card, perform as intended by their manufacturers, reflecting positively on the overall brand experience of your PC.
- Run Windows Update:
- Connect your computer to the internet. Go to
Settings > Windows Updateand click “Check for updates.” - Allow Windows to download and install all available updates. This is crucial for security patches, bug fixes, and additional driver updates that Microsoft provides. You might need to restart your computer several times.
- Digital Security and Longevity: Regular updates are a cornerstone of digital security, protecting your system from newly discovered vulnerabilities. They also contribute to the long-term stability and compatibility of your operating system, ensuring your investment remains viable.
- Connect your computer to the internet. Go to
Software Essentials and Data Restoration
A functional operating system is only part of the equation; you need applications to make it productive. This stage involves installing your go-to software and restoring your precious data.
- Install Essential Software:
- Antivirus/Security Software: While Windows Defender provides baseline protection, many users opt for third-party antivirus solutions for enhanced security. Install your preferred security suite promptly.
- Web Browser: Download and install your preferred web browser (Chrome, Firefox, Edge, Brave, etc.).
- Productivity Suite: Install your office productivity software (Microsoft Office, LibreOffice, Google Workspace apps via browser).
- Communication Tools: Install video conferencing apps (Zoom, Teams), messaging apps.
- Creative/Specialized Software: If you use graphic design tools, video editors, CAD software, or any niche applications, install them now.
- Money Aspect: Installing the right software allows you to leverage your computer for income-generating activities, personal finance management, or educational pursuits, maximizing the “money” value of your investment.
- Restore Your Backed-Up Data:
- Now is the time to copy your backed-up files from your external drive or cloud storage back to your computer. Organize them into logical folders to maintain a clean and efficient file system.
- Protecting Your Investment: This step ensures that your personal and professional data, which often holds significant sentimental or financial value, is safely back where it belongs. It’s the culmination of your backup efforts, proving the value of foresight.
Troubleshooting and Maintenance: Ensuring Longevity and Performance
Even with meticulous preparation, issues can arise during or after installation. Knowing how to troubleshoot common problems and maintain your system will empower you to keep your computer running optimally, extending its lifespan and maximizing its value.
Common Installation Hurdles and Solutions
Encountering an error can be frustrating, but many installation issues have straightforward solutions.
- “No Boot Device Found” or Boot Loop:
- Cause: The computer isn’t detecting the bootable USB or the boot order in BIOS/UEFI is incorrect.
- Solution: Recheck that the USB drive is properly inserted. Restart and access BIOS/UEFI to ensure the USB drive is prioritized in the boot order. If using a UEFI system, ensure “Secure Boot” is correctly configured (sometimes temporarily disabling it, then re-enabling after install, helps). Also, check if the USB was created correctly (MBR vs. GPT partitioning scheme in Rufus).
- “Windows cannot be installed to this disk. The selected disk has an MBR partition table…” (or GPT error):
- Cause: You’re trying to install Windows on a drive with a partition style (MBR/GPT) incompatible with your computer’s boot mode (BIOS/UEFI).
- Solution: During the drive selection step, delete all existing partitions on the target drive to leave it as “Unallocated Space.” Then, try to proceed. Windows Setup will often automatically convert the disk to the appropriate style. If not, use the
diskpartcommand line utility (access it by pressingShift + F10during setup) to clean the disk and convert it:diskpart > list disk > select disk [number] > clean > convert gpt(orconvert mbr).
- Missing Drivers During Setup (e.g., Wi-Fi not working):
- Cause: Windows doesn’t have a built-in driver for a specific hardware component, or it has a generic one that lacks full functionality.
- Solution: This is why downloading network drivers beforehand is crucial. If you don’t have internet after installation, use another device to download the relevant network drivers onto a separate USB drive and install them manually.
- Windows Activation Issues:
- Cause: Incorrect product key, issues with digital license recognition, or no internet connection during activation.
- Solution: Double-check your product key. Ensure your computer is connected to the internet. If you have a digital license tied to your Microsoft account, sign in with that account. If problems persist, use the “Troubleshoot” option in
Settings > Update & Security > Activationor contact Microsoft Support. Protecting your license is about protecting the legitimacy of your software brand.
- Installation Freezes or Crashes:
- Cause: Faulty installation media, corrupted ISO file, or hardware issues (e.g., bad RAM stick).
- Solution: Re-download the ISO and re-create the bootable USB. If the problem continues, consider testing your RAM (e.g., with MemTest86) or checking other hardware components.
Maintaining Your Windows Installation for Peak Performance
A clean installation is a great start, but ongoing maintenance is essential to keep your system fast and secure.
- Regular Windows Updates: Continue to check for and install updates regularly. This is your primary defense against security vulnerabilities and ensures access to the latest features and performance enhancements.
- Driver Updates: Periodically check your hardware manufacturers’ websites for updated drivers, especially for graphics cards. Newer drivers can often bring performance improvements or fix bugs.
- Software Management:
- Uninstall Unused Programs: Regularly remove software you no longer use. This frees up disk space and reduces background processes.
- Be Selective: Only install software from trusted sources. Avoid “crapware” or bundled software that can slow down your system.
- Keep Software Updated: Outdated software can have security flaws. Enable automatic updates where possible.
- Disk Cleanup and Defragmentation (for HDDs):
- Use Windows’ built-in Disk Cleanup tool to remove temporary files, system logs, and other unnecessary data.
- If you still use a traditional Hard Disk Drive (HDD), regularly defragment it. (SSDs do not need defragmentation and it can actually reduce their lifespan).
- Malware Scans: Run full system scans with your antivirus software periodically to catch any lurking threats.
- Backup Strategy: Maintain a consistent backup routine for your important files. While a clean install can fix system issues, it won’t recover data lost due to hardware failure without a backup. This is paramount to protecting your digital and financial investments.
- System Restore Points: Windows automatically creates restore points before major changes, but you can also create them manually. These allow you to roll back your system to an earlier state if a new update or software causes problems, providing a safety net.
By following these post-installation and maintenance guidelines, you empower yourself with a resilient, high-performing computer. You’re not just installing an operating system; you’re building a reliable digital foundation that supports your productivity, creativity, and financial well-being, while ensuring your personal tech brand is one of efficiency and security. Mastering Windows installation is more than just a tech skill; it’s an investment in your digital future.
aViewFromTheCave is a participant in the Amazon Services LLC Associates Program, an affiliate advertising program designed to provide a means for sites to earn advertising fees by advertising and linking to Amazon.com. Amazon, the Amazon logo, AmazonSupply, and the AmazonSupply logo are trademarks of Amazon.com, Inc. or its affiliates. As an Amazon Associate we earn affiliate commissions from qualifying purchases.