
In the modern digital landscape, the ability to pivot between different operating systems is more than just a technical skill—it is a strategic advantage. Whether you are a developer looking to test software in a native Linux environment, a brand strategist seeking a secure platform for data analysis, or an entrepreneur aiming to reduce overhead costs by utilizing open-source software, virtualization is the bridge that gets you there.
Ubuntu, the world’s most popular Linux distribution, offers a robust, secure, and free environment that caters to tech-savvy users and business professionals alike. By installing Ubuntu on VirtualBox, you can run Linux as a “guest” operating system inside your current Windows or macOS “host” without the need to repartition your hard drive or risk your primary data. This guide will walk you through the entire installation process while highlighting how this setup empowers your tech capabilities, enhances your brand’s digital security, and optimizes your financial resources.
1. Prerequisites: Preparing Your Digital Workspace
Before diving into the installation, it is essential to ensure your hardware and software are ready. Virtualization requires a baseline of system resources to ensure that both your host and guest OS run smoothly.
Hardware Requirements
To run Ubuntu efficiently on a virtual machine (VM), your computer should ideally have:
- RAM: At least 8GB (with 4GB dedicated to the VM).
- CPU: A modern processor with virtualization support (Intel VT-x or AMD-V) enabled in the BIOS/UEFI.
- Storage: At least 25GB of free space (SSD is highly recommended for speed).
Software Downloads
- Oracle VM VirtualBox: Navigate to the official VirtualBox website and download the latest version for your host OS (Windows, macOS, or Linux). VirtualBox is a powerful, free, and open-source hypervisor that helps tech professionals manage multiple environments without additional licensing fees—a major win for your “Money” strategy.
- Ubuntu ISO Image: Visit the Ubuntu official website and download the latest LTS (Long Term Support) version. LTS versions are preferred for branding and business stability because they offer five years of guaranteed security and maintenance updates.
2. Setting Up the Virtual Machine Environment
Once you have your software ready, the next step is to create a “container” or Virtual Machine where Ubuntu will live.
Creating the VM Shell
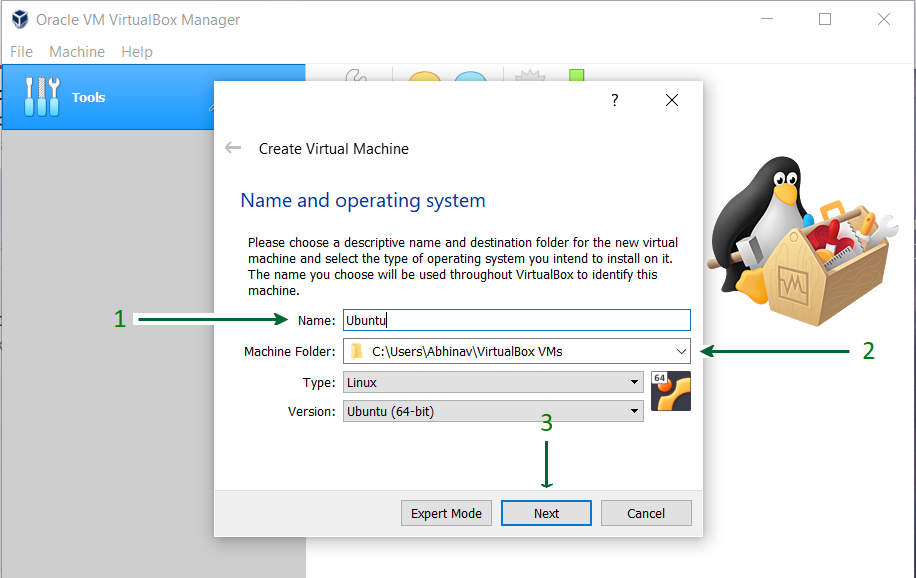
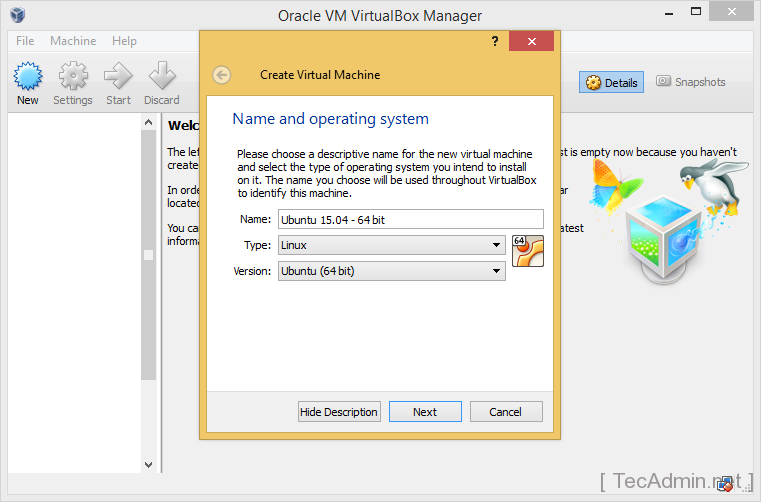
Open VirtualBox and click the “New” button. A wizard will appear:
- Name: Give it a recognizable name like “Ubuntu Workstation.”
- Folder: Choose where the VM files will be stored.
- ISO Image: Select the Ubuntu ISO file you just downloaded. VirtualBox 7.0 and later can often detect the OS type automatically.
- Type and Version: Ensure it says “Linux” and “Ubuntu (64-bit).”
Hardware Allocation (The Tech Foundation)
This is where you balance performance and stability:
- Base Memory: Aim for at least 4096 MB (4GB). If you are using this VM for heavy Tech tasks like AI model training or complex software builds, consider 8GB if your host allows.
- Processors: Allocate at least 2 CPUs. This prevents the VM from feeling sluggish and ensures your “Productivity” remains high.
Virtual Hard Disk
Choose “Create a Virtual Hard Disk Now.”
- Disk Size: 25GB is the minimum, but if you plan to use this for professional Brand design or large-scale data projects, 50GB–80GB is safer.
- Disk Type: VDI (VirtualBox Disk Image) is the standard.
- Storage on Physical Hard Disk: Select “Dynamically allocated.” This is a smart financial move for your storage management, as it only uses space on your physical drive as you actually fill it up within the VM.
3. The Ubuntu Installation Process: Step-by-Step
With the VM shell created, it is time to boot into the Ubuntu installer. Select your new VM and click “Start.”
Initial Boot and Language Selection
After the Ubuntu splash screen appears, you will be prompted to “Try Ubuntu” or “Install Ubuntu.” Choose “Install Ubuntu.” Select your preferred language and keyboard layout. For most international business and tech work, “English (US)” is the standard.

Updates and Software Selection
You will be asked about the type of installation:
- Normal Installation: Includes a web browser, office software (LibreOffice), games, and media players. This is best for a complete “Digital Office” setup.
- Minimal Installation: Only the basics. This is ideal if you are a “Tech” minimalist who wants to build a lean, high-performance environment from scratch.
- Other Options: Check the boxes for “Download updates while installing” and “Install third-party software for graphics and Wi-Fi hardware.” This ensures your drivers are optimized for the best visual experience.
Installation Type (Data Safety)
The installer will ask if you want to “Erase disk and install Ubuntu.” Do not be alarmed. Because you are running this in VirtualBox, it will only erase the virtual disk you created in the previous step, not your actual Windows or Mac files. Click “Install Now” and then “Continue.”
Location and User Configuration
Select your timezone on the map. Finally, set up your user account:
- Your Name: Your professional or brand name.
- Computer’s Name: How the VM will appear on a network.
- Username and Password: Choose a strong password. From a Digital Security perspective, this is your first line of defense against unauthorized access to your virtual work environment.
Wait for the installation to finish. Once done, click “Restart Now.” If prompted to “Remove the installation medium,” simply press Enter.
4. Post-Installation Optimization for Tech and Productivity
To truly make Ubuntu feel like a native part of your workflow, you must perform a few technical tweaks.
Installing Guest Additions
This is the most important “Tech” step. In the VirtualBox menu, go to Devices > Insert Guest Additions CD Image. Follow the prompts to install. This unlocks:
- Full-Screen Resolution: Dynamically adjusts the Ubuntu window to fit your monitor.
- Shared Clipboard: Allows you to copy-paste text and links between your host OS and Ubuntu—a massive boost for productivity.
- Shared Folders: Seamlessly move files (like brand assets or financial spreadsheets) between systems.
Updating the System
Open the Terminal (Ctrl+Alt+T) and run:
sudo apt update && sudo apt upgrade
Regularly updating your system is a core tenet of digital security and ensures your software tools remain compatible with the latest industry standards.
5. Strategic Value: Why Ubuntu on VirtualBox Matters
Installing Ubuntu isn’t just a technical exercise; it’s a move that impacts your Brand and your Money.
Tech: A Playground for Innovation
For those interested in Technology Trends and AI Tools, Linux is the native tongue. Most AI frameworks, server configurations, and coding environments are designed for Linux first. By having an Ubuntu VM, you can experiment with Docker, Python environments, or cybersecurity tools without cluttering your main OS.
Brand: Consistency and Professionalism
From a Brand Strategy perspective, using Linux allows you to maintain a clean, distraction-free environment for your creative or strategic work. You can dedicate this VM solely to “Corporate Identity” design or “Market Research,” ensuring that your primary computer stays organized. Furthermore, knowing how to operate in a Linux environment adds a layer of technical authority to your Personal Branding.
Money: Financial Efficiency and Side Hustles
The “Money” aspect of using Ubuntu is undeniable.
- Zero Licensing Fees: Unlike Windows, Ubuntu is free. This reduces the cost of scaling your business or starting a new side hustle.
- Legacy Hardware: VirtualBox allows you to squeeze more life out of your current hardware. Instead of buying a new machine to test a different OS, you simply run a VM.
- Online Income: Many online income streams, such as web hosting, running bots, or data scraping, are more efficient and cheaper to run on a Linux-based architecture.
Conclusion
Installing Ubuntu Linux on VirtualBox is a gateway to a more versatile and professional digital existence. By following this guide, you have not only expanded your Tech toolkit but also created a platform that supports Brand consistency and Financial intelligence. Whether you are using it to browse the web more securely, develop the next big app, or manage your business finances with open-source tools, your new Ubuntu VM is a powerful asset in your professional arsenal.
Welcome to the world of Linux—where the only limit is your curiosity.
aViewFromTheCave is a participant in the Amazon Services LLC Associates Program, an affiliate advertising program designed to provide a means for sites to earn advertising fees by advertising and linking to Amazon.com. Amazon, the Amazon logo, AmazonSupply, and the AmazonSupply logo are trademarks of Amazon.com, Inc. or its affiliates. As an Amazon Associate we earn affiliate commissions from qualifying purchases.