
In the rapidly evolving landscape of technology, the ability to understand and manage your operating system is a fundamental skill for anyone looking to optimize their digital experience. Whether you’re a seasoned tech enthusiast, a student exploring new software, or a professional seeking greater control over your computing environment, installing an operating system from a bootable flash drive offers a flexible and efficient solution. This guide will walk you through the entire process of installing Ubuntu, a popular and powerful open-source Linux distribution, using a USB flash drive. We’ll cover everything from preparing your hardware to navigating the installation steps, ensuring a smooth and successful setup.
Why Choose Ubuntu and a Flash Drive Installation?
Before diving into the “how,” it’s crucial to understand the “why.” Ubuntu has gained immense popularity for its user-friendliness, robust performance, and extensive software repository, making it an excellent choice for both beginners and advanced users. Its open-source nature means it’s free to download, use, and distribute, fostering a vibrant community of developers and users who contribute to its continuous improvement.
Installing from a flash drive, often referred to as a USB installation, offers several distinct advantages:
- Speed and Efficiency: Modern USB drives are significantly faster than traditional optical media (CDs/DVDs), leading to quicker boot times and installation processes.
- Portability and Reusability: A bootable flash drive can be used to install Ubuntu on multiple computers without needing to burn a new disc each time. This is incredibly useful for IT professionals, educators, or anyone who manages several machines.
- Accessibility: Many modern laptops and desktops no longer come with optical drives, making a flash drive the primary or only viable method for installing an operating system from external media.
- Flexibility: You can easily try out different versions of Ubuntu or other Linux distributions by simply reformatting and recreating the bootable flash drive. This allows for experimentation and comparison without committing to a permanent installation.
- Troubleshooting and Repair: A bootable Ubuntu USB can also serve as a powerful tool for troubleshooting existing operating systems, recovering lost data, or performing system repairs.
This guide is structured to provide a clear, step-by-step approach, making the process accessible even for those new to Linux or operating system installations. We will cover the necessary prerequisites, the creation of the bootable media, and the actual installation process on your target computer.
Preparing for Installation: Essential Steps
Before you can begin the installation, a few preparatory steps are essential to ensure a smooth and error-free process. This involves gathering the necessary materials and understanding a few key concepts.
1. Gather Your Essentials
You will need a few key components to get started:
- A USB Flash Drive: This is the cornerstone of our installation. A minimum of 8GB capacity is recommended, though 16GB or larger is ideal for future-proofing and potentially carrying additional tools. Ensure it’s a reliable drive, as the data on it will be erased during the creation of the bootable media.
- Ubuntu ISO Image: This is the operating system installer file. You can download the latest LTS (Long Term Support) version of Ubuntu Desktop from the official Ubuntu website. LTS versions are recommended for their stability and extended support periods. The website usually offers different flavors of Ubuntu (e.g., Kubuntu, Xubuntu) if you prefer a different desktop environment, but for this guide, we’ll focus on the standard Ubuntu Desktop.
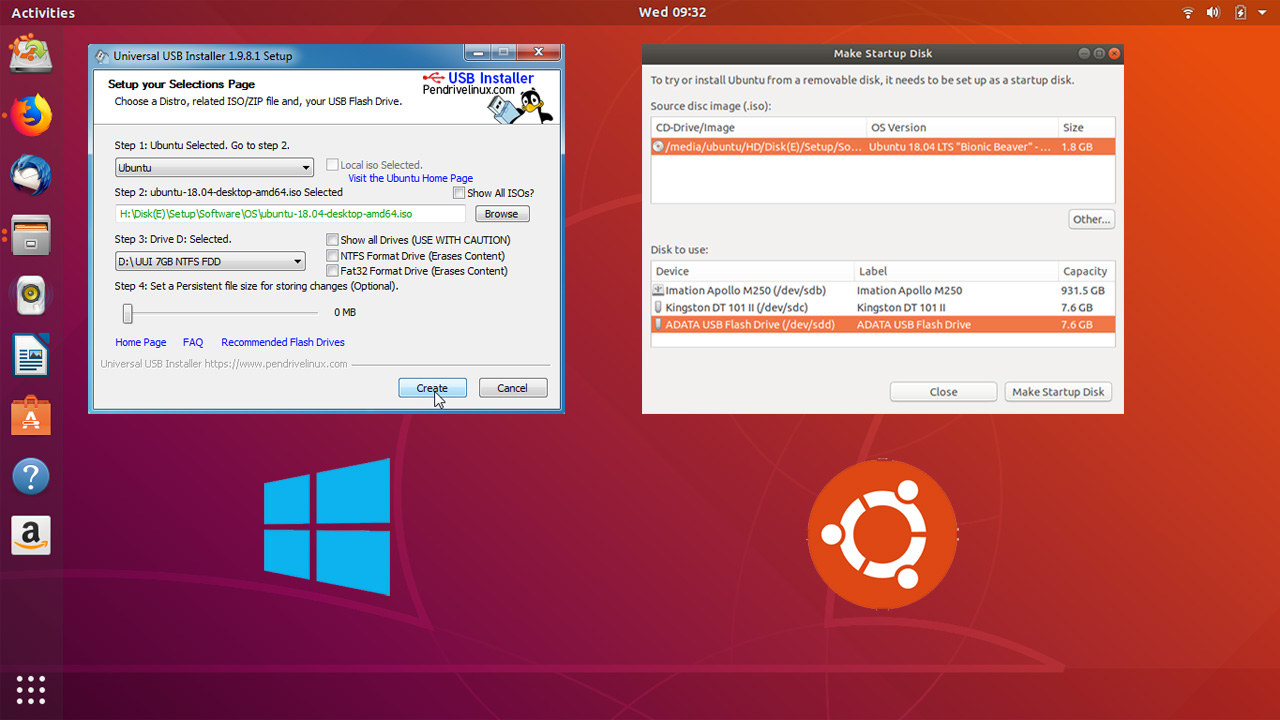
- USB Bootable Media Creation Tool: This is software that takes the Ubuntu ISO image and “burns” it onto your USB drive, making it bootable. Popular and reliable options include Rufus (for Windows), UNetbootin (cross-platform), and Etcher (cross-platform). We’ll discuss how to use one of these in the next section.
- A Target Computer: This is the machine where you intend to install Ubuntu. Ensure it meets the minimum system requirements for Ubuntu Desktop. Generally, most modern computers should be more than capable.
- Internet Connection (Optional but Recommended): While not strictly necessary for the core installation, an internet connection during the setup process allows Ubuntu to download the latest updates and software packages, ensuring you start with a fully patched and equipped system.
2. Back Up Your Data
This is a critical step and cannot be stressed enough. Installing a new operating system, especially on a drive that previously held another OS, can lead to data loss if not handled carefully.
- Identify Important Files: Determine all the personal files, documents, photos, videos, and any other data that you cannot afford to lose.
- External Storage: Back up these files to an external hard drive, another USB drive, or a cloud storage service (like Google Drive, Dropbox, or OneDrive).
- System Settings and Applications: If you’re replacing an existing operating system, consider backing up application settings and license keys if possible. For a fresh installation, you’ll need to reinstall your applications.
3. BIOS/UEFI Settings
Your computer’s BIOS (Basic Input/Output System) or UEFI (Unified Extensible Firmware Interface) is the firmware that initializes your hardware during the boot process. To install from a USB drive, you’ll need to configure your BIOS/UEFI to boot from the USB device before it attempts to boot from your internal hard drive.
- Accessing BIOS/UEFI: The method for accessing BIOS/UEFI varies by manufacturer, but it typically involves pressing a specific key during the initial startup screen. Common keys include
Del,F2,F10,F12, orEsc. You might see a message on the screen indicating which key to press (e.g., “Press F2 to Enter Setup”). - Boot Order: Once inside the BIOS/UEFI settings, navigate to the “Boot” or “Boot Order” section. You’ll need to change the boot sequence so that your USB drive is listed before your hard drive or SSD. The exact naming for USB devices can vary, often appearing as “USB-HDD,” “USB-ZIP,” or the specific brand name of your flash drive.
- Saving Changes: After adjusting the boot order, make sure to save your changes before exiting the BIOS/UEFI. This is usually done by pressing
F10or selecting an “Save and Exit” option.
Creating Your Bootable Ubuntu Flash Drive
With your essentials gathered and your target computer prepared, the next crucial step is to create the bootable Ubuntu flash drive. This process involves using specialized software to transfer the Ubuntu operating system installer onto your USB drive in a way that allows your computer to boot from it.
1. Choosing and Using a USB Bootable Media Creation Tool
There are several excellent free tools available, each with its own strengths. For this guide, we’ll outline the general process, which is very similar across most tools.
Using Rufus (Recommended for Windows Users)
Rufus is a small, portable, and highly effective utility for creating bootable USB drives.
- Download Rufus: Visit the official Rufus website (https://rufus.ie/) and download the latest version. It’s a portable application, meaning you don’t need to install it.
- Launch Rufus: Run the downloaded Rufus executable file.
- Insert Your USB Drive: Plug your USB flash drive into your computer. Rufus should automatically detect it.
- Select Your USB Drive: In Rufus, under the “Device” dropdown, ensure your correct USB drive is selected. Double-check this to avoid accidentally formatting the wrong drive.
- Select the Ubuntu ISO Image: Click the “SELECT” button next to “Boot selection.” Browse to the location where you downloaded the Ubuntu ISO image and select it.
- Partition Scheme and Target System: Rufus will usually automatically detect the correct settings for your ISO. For most modern computers, GPT (GUID Partition Table) with UEFI (non CSM) is the standard. If you’re working with an older computer that uses legacy BIOS, you might need to select MBR and BIOS (or UEFI-CSM). If unsure, stick with the default recommended by Rufus for your ISO.
- Volume Label: You can leave this as default or give it a descriptive name like “Ubuntu Installer.”
- File System and Cluster Size: These can also usually be left at their default settings.
- Start the Process: Click the “START” button. Rufus will likely prompt you about downloading Syslinux or GRUB files if they are not included in the ISO. Confirm to proceed.
- Warning and Confirmation: Rufus will warn you that all data on the USB drive will be destroyed. Confirm that you understand and wish to proceed by clicking “OK.”
- Wait for Completion: The process can take several minutes, depending on the speed of your USB drive and your computer. Rufus will show a progress bar. Once it’s complete, the status will change to “READY.”
- Close Rufus: Click “CLOSE.” Your bootable Ubuntu flash drive is now ready.
Using Etcher (Cross-Platform)
Etcher is known for its simplicity and user-friendly interface, making it a great choice for Windows, macOS, and Linux users.
- Download Etcher: Visit the BalenaEtcher website (https://www.balena.io/etcher/) and download the version appropriate for your operating system.
- Install and Launch Etcher: Install Etcher and then run the application.
- “Flash from file”: Click on “Flash from file” and select your downloaded Ubuntu ISO image.
- “Select target”: Click on “Select target” and choose your USB flash drive. Again, ensure you select the correct drive.
- “Flash!”: Click the “Flash!” button. You may be prompted for your administrator password.
- Wait for Flashing and Validation: Etcher will now write the ISO to your USB drive and then validate it to ensure the data integrity. This process can take some time.
- Completion: Once finished, Etcher will notify you. You can then safely eject your USB drive.
2. Verifying the Bootable Drive (Optional but Recommended)
While most tools perform validation, you can also manually verify that your drive is bootable. The simplest way is to attempt to boot from it on your target computer. If the computer successfully boots into the Ubuntu installer environment, your drive has been created correctly.
Installing Ubuntu from Your Flash Drive
Now that you have your bootable Ubuntu flash drive, it’s time to install Ubuntu on your target computer. This involves booting from the USB drive and following the on-screen installer prompts.
1. Booting from the USB Drive
- Insert the USB Drive: Make sure your newly created bootable Ubuntu flash drive is plugged into a USB port on your target computer.
- Restart or Power On: Restart your computer if it’s already on, or power it on if it’s off.
- Access Boot Menu (Alternative to BIOS/UEFI): Some computers have a dedicated “Boot Menu” key that you can press during startup to select which device to boot from without permanently changing the BIOS/UEFI settings. This key is often
F12,F10, orEsc. If you know this key, you can press it repeatedly as soon as the computer starts up and then select your USB drive from the menu. This is a convenient option if you only need to boot from the USB temporarily. - Boot from USB (Using BIOS/UEFI Settings): If you’ve already configured your BIOS/UEFI to prioritize USB booting, the computer should automatically attempt to boot from the flash drive.
- Ubuntu Boot Menu: If successful, you will see the Ubuntu boot menu, which usually presents options like “Try Ubuntu” and “Install Ubuntu.”
2. The Ubuntu Installation Process
Welcome and Initial Choices
- Language Selection: Upon booting into the Ubuntu installer, you’ll first be asked to select your preferred language for the installation process and the installed system. Choose your language and click “Continue.”
- Keyboard Layout: Select your keyboard layout. You can test your layout in the provided text box. Click “Continue.”
- Updates and Other Software: This is an important screen:
- “Normal installation” vs. “Minimal installation”:
- Normal installation: Installs a web browser, utilities, office software, games, and media players. This is recommended for most users.
- Minimal installation: Installs a web browser and basic utilities. This is for users who want a leaner system and plan to install specific applications later.
- “Download updates while installing Ubuntu”: Highly recommended. This will download the latest updates for Ubuntu, ensuring your installation is more secure and up-to-date from the start. This requires an internet connection.
- “Install third-party software for graphics and Wi-Fi hardware and additional media formats”: Strongly recommended. This option installs proprietary drivers and codecs that are necessary for many hardware components (like Wi-Fi cards and graphics cards) and for playing various media formats.
- Click “Continue” after making your selections.
- “Normal installation” vs. “Minimal installation”:
Installation Type: Partitioning Your Drive
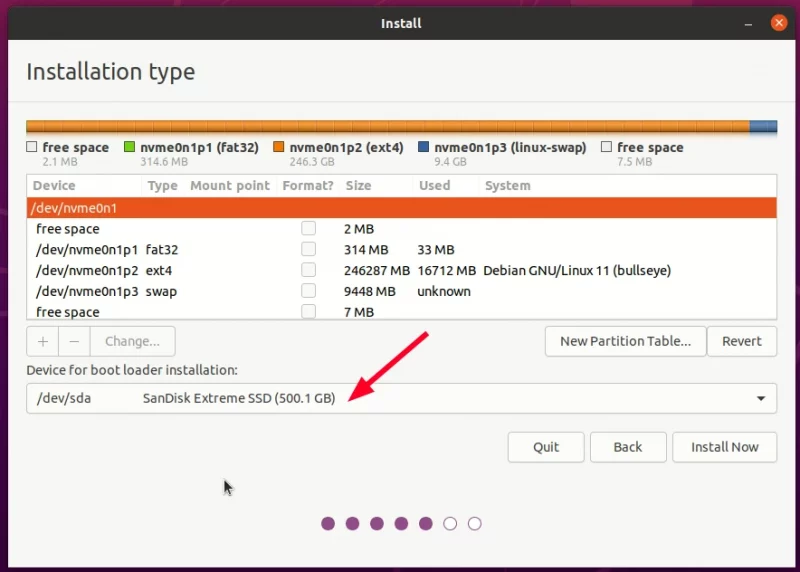
This is the most critical step where you decide how Ubuntu will be installed on your hard drive. You have several options:
-
“Install Ubuntu alongside [Existing OS]”: If you have another operating system (like Windows) already installed, this option will attempt to resize its partition and create a new partition for Ubuntu. This allows you to dual-boot, choosing which OS to start when your computer boots. This is generally the safest option for beginners wanting to try Ubuntu without removing their existing OS.
-
“Erase disk and install Ubuntu”: This will delete all data on your entire hard drive and install Ubuntu as the sole operating system. Use this option only if you have backed up all your important data and want a clean installation of Ubuntu.
-
“Something else”: This option gives you complete manual control over disk partitioning. You can create, delete, and resize partitions, assign file systems (like ext4 for Ubuntu), and specify mount points (e.g.,
/,/home,swap). This is for advanced users who want to customize their partition layout.For beginners, “Install Ubuntu alongside [Existing OS]” or “Erase disk and install Ubuntu” are the recommended choices. If you choose “Something else,” ensure you understand the concepts of partitions, mount points, and file systems. You’ll typically need at least a root partition (
/) and possibly a swap partition.If you choose to erase the disk, the installer will show you how the disk will be partitioned (e.g., one large partition for Ubuntu). If you choose “Install alongside,” it will show you the proposed partitioning for both operating systems.
Carefully review the proposed changes before proceeding. -
Click “Install Now” after selecting your desired installation type and confirming the partitioning.
Location and User Account Setup
- Your Location: Select your time zone on the map. This sets the system clock and regional settings. Click “Continue.”
- Create Your User Account:
- Your name: Enter your full name.
- Your computer’s name: This is the hostname that will be used to identify your computer on a network.
- Pick a username: This will be your login name.
- Choose a password: Select a strong, memorable password.
- Confirm your password: Re-enter your password.
- Login options: You can choose to log in automatically or require a password. For security, requiring a password is recommended.
- Click “Continue.”
Installation Progress
The installer will now begin copying files and configuring your system. This process can take anywhere from 15 minutes to an hour or more, depending on your computer’s speed and whether you chose to download updates. You can follow the progress on the screen, which often displays interesting facts about Ubuntu or Linux.
Installation Complete
Once the installation is finished, you’ll see a message prompting you to restart your computer.
- Restart Your Computer: Click “Restart Now.”
- Remove Installation Media: The installer will prompt you to remove the installation medium (your USB flash drive) and press Enter. It’s crucial to remove the USB drive at this point, otherwise, your computer might try to boot from it again.
3. First Boot into Ubuntu
After restarting, your computer should boot into your newly installed Ubuntu system.
- If you dual-booted: You will see a GRUB bootloader menu where you can choose between Ubuntu and your other operating system.
- If you installed Ubuntu as the sole OS: Your computer will boot directly into Ubuntu.
You’ll be presented with the Ubuntu login screen. Enter your password to log in.
Upon logging in, you’ll be greeted with the Ubuntu desktop. It’s a good idea to check for any remaining updates by opening the “Software Updater” application.
Conclusion
Installing Ubuntu from a flash drive is a rewarding process that opens the door to a powerful, flexible, and open-source computing experience. By following the steps outlined in this guide, you can confidently create a bootable USB and install Ubuntu on your computer, whether it’s for a fresh start, a dual-boot setup, or to revive an older machine.
This process not only equips you with a new operating system but also enhances your understanding of computer systems and software installation. The skills acquired here are transferable and will serve you well as you continue to explore the vast and ever-evolving world of technology. Remember to always back up your data before undertaking any operating system installation, and don’t hesitate to leverage the extensive Ubuntu community resources if you encounter any issues. Enjoy your new Ubuntu environment!
aViewFromTheCave is a participant in the Amazon Services LLC Associates Program, an affiliate advertising program designed to provide a means for sites to earn advertising fees by advertising and linking to Amazon.com. Amazon, the Amazon logo, AmazonSupply, and the AmazonSupply logo are trademarks of Amazon.com, Inc. or its affiliates. As an Amazon Associate we earn affiliate commissions from qualifying purchases.