In an era where data is the new gold, how we store, manage, and protect that data has become a defining factor for both personal productivity and business success. For tech enthusiasts, small business owners, and digital creators, the quest for a reliable, scalable, and cost-effective storage solution often leads to one name: TrueNAS. While TrueNAS CORE has long been the gold standard for FreeBSD-based storage, the arrival of TrueNAS SCALE has shifted the paradigm.
TrueNAS SCALE moves the platform to a Linux base (Debian), bringing with it the power of containers, high availability, and massive scalability. Whether you are looking to build a home lab to sharpen your tech skills, create a robust media server, or implement a professional-grade storage solution for your brand’s digital assets, learning how to install TrueNAS SCALE is a foundational step. This guide provides a comprehensive walkthrough of the installation process while exploring how this technology intersects with your brand’s identity and your financial bottom line.
Why TrueNAS SCALE is a Game-Changer for Tech Enthusiasts and Small Businesses
Before diving into the “how,” it is essential to understand the “why.” In the world of technology trends, TrueNAS SCALE represents a significant shift toward hyper-converged infrastructure. By moving from FreeBSD to Linux, iXsystems (the developers of TrueNAS) unlocked a world of compatibility.
The Power of the Linux Kernel
TrueNAS SCALE is built on Debian Bullseye. For the average user, this means better hardware support, especially for newer GPUs and network interface cards (NICs). In terms of “Tech” trends, this allows for more seamless integration of Docker containers and Kubernetes, making SCALE much more than just a Network Attached Storage (NAS) device—it is a full-blown application server.
Protecting Your Brand’s Digital Identity
From a “Brand” perspective, your data is your reputation. If you are a photographer, a video editor, or a corporate entity, losing your project files can be catastrophic. TrueNAS SCALE uses the ZFS file system, which is renowned for its data integrity features, such as self-healing and snapshots. By hosting your own server, you maintain total control over your corporate identity and client data, ensuring that no third-party cloud provider can hold your assets hostage or suffer a breach that compromises your brand’s trust.
The “Money” Factor: Reducing Cloud Dependency
From a “Money” and personal finance standpoint, the argument for TrueNAS SCALE is even stronger. Monthly subscriptions for Google Drive, Dropbox, or AWS S3 add up over time. By investing in hardware upfront and running TrueNAS SCALE, you create a private cloud that scales with your needs without recurring monthly fees. This is a classic “online income” optimization strategy: minimize overhead to maximize profit.
Preparing for Success: System Requirements and Pre-Installation Steps
A successful installation begins long before you plug in a USB drive. Because TrueNAS SCALE handles critical data, your hardware choices are paramount.
Hardware Specifications: Minimum vs. Recommended
While you can run TrueNAS SCALE on modest hardware, the ZFS file system thrives on RAM.
- Processor: A 64-bit CPU is required. For basic file sharing, a dual-core processor suffices, but if you plan on running “Apps” or virtual machines, aim for a quad-core or higher.
- RAM: 8GB is the absolute minimum. However, 16GB is the “sweet spot” for small builds. If you are utilizing deduplication or running many containers, more is always better. Whenever possible, use ECC (Error Correction Code) RAM to prevent data corruption.
- Boot Drive: You will need a dedicated drive for the OS. A small 120GB SSD is perfect. Avoid using high-capacity HDDs for the boot drive, and never use a cheap USB stick for long-term use, as the constant logging will burn it out quickly.
Downloading the ISO and Creating Bootable Media
- Visit the official TrueNAS website and download the TrueNAS SCALE ISO (stable version).
- Use a tool like Rufus (on Windows) or BalenaEtcher (on Mac/Linux) to “burn” the ISO onto a USB flash drive (at least 8GB).
- Ensure your target server is connected to your network via Ethernet. Wi-Fi is generally not supported or recommended for NAS stability.
Step-by-Step Guide to Installing TrueNAS SCALE
With your hardware ready and your bootable USB in hand, it is time to perform the installation. This process is surprisingly straightforward, even for those who are not Linux experts.
1. Booting the Installer
Insert the USB drive into your server and power it on. You may need to enter the BIOS/UEFI (usually by pressing F2, F12, or Del) to select the USB drive as the primary boot device. Once the TrueNAS SCALE splash screen appears, select “Install/Update.”
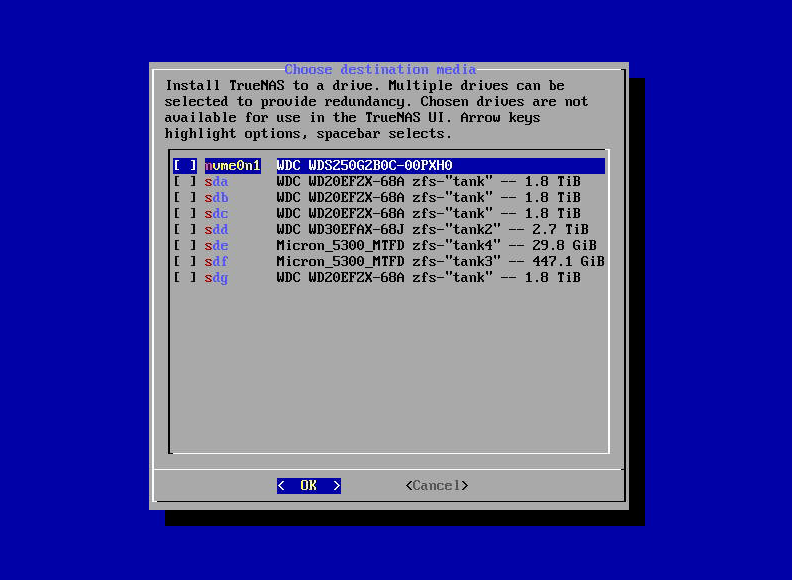
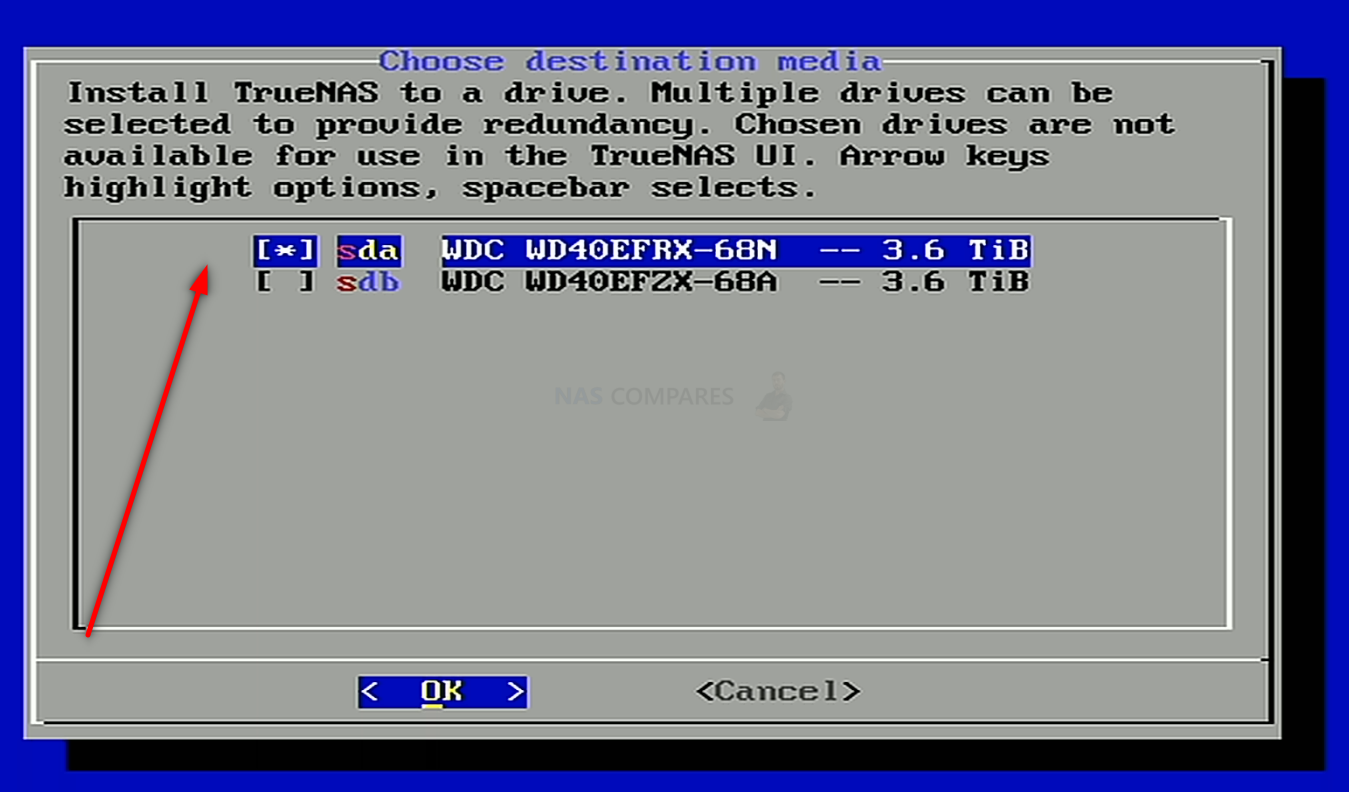
2. Selecting the Destination Drive
The installer will list all detected drives. Use the arrow keys and spacebar to select your dedicated boot drive (the SSD mentioned earlier). Warning: This process will wipe all data on the selected drive. Do not select the drives you intend to use for storage pools yet.
3. Setting Up Credentials and Boot Mode
- Administrative User: The system will ask if you want to set a password for the ‘root’ user or create a new administrative user. For most users, setting a strong root password is the standard approach.
- Boot Mode: You will be asked to choose between BIOS and UEFI. Most modern systems (post-2011) should use UEFI. If you are repurposing very old hardware, BIOS may be necessary.
- Swap Partition: The installer may ask if you want to create a swap partition on the boot drive. Generally, choosing “Create Swap” is a safe bet for system stability.
Once these selections are made, the installation will proceed. It usually takes less than 10 minutes. When finished, remove the USB drive and reboot the system.
Post-Installation: Configuring Your Storage Pool and Network
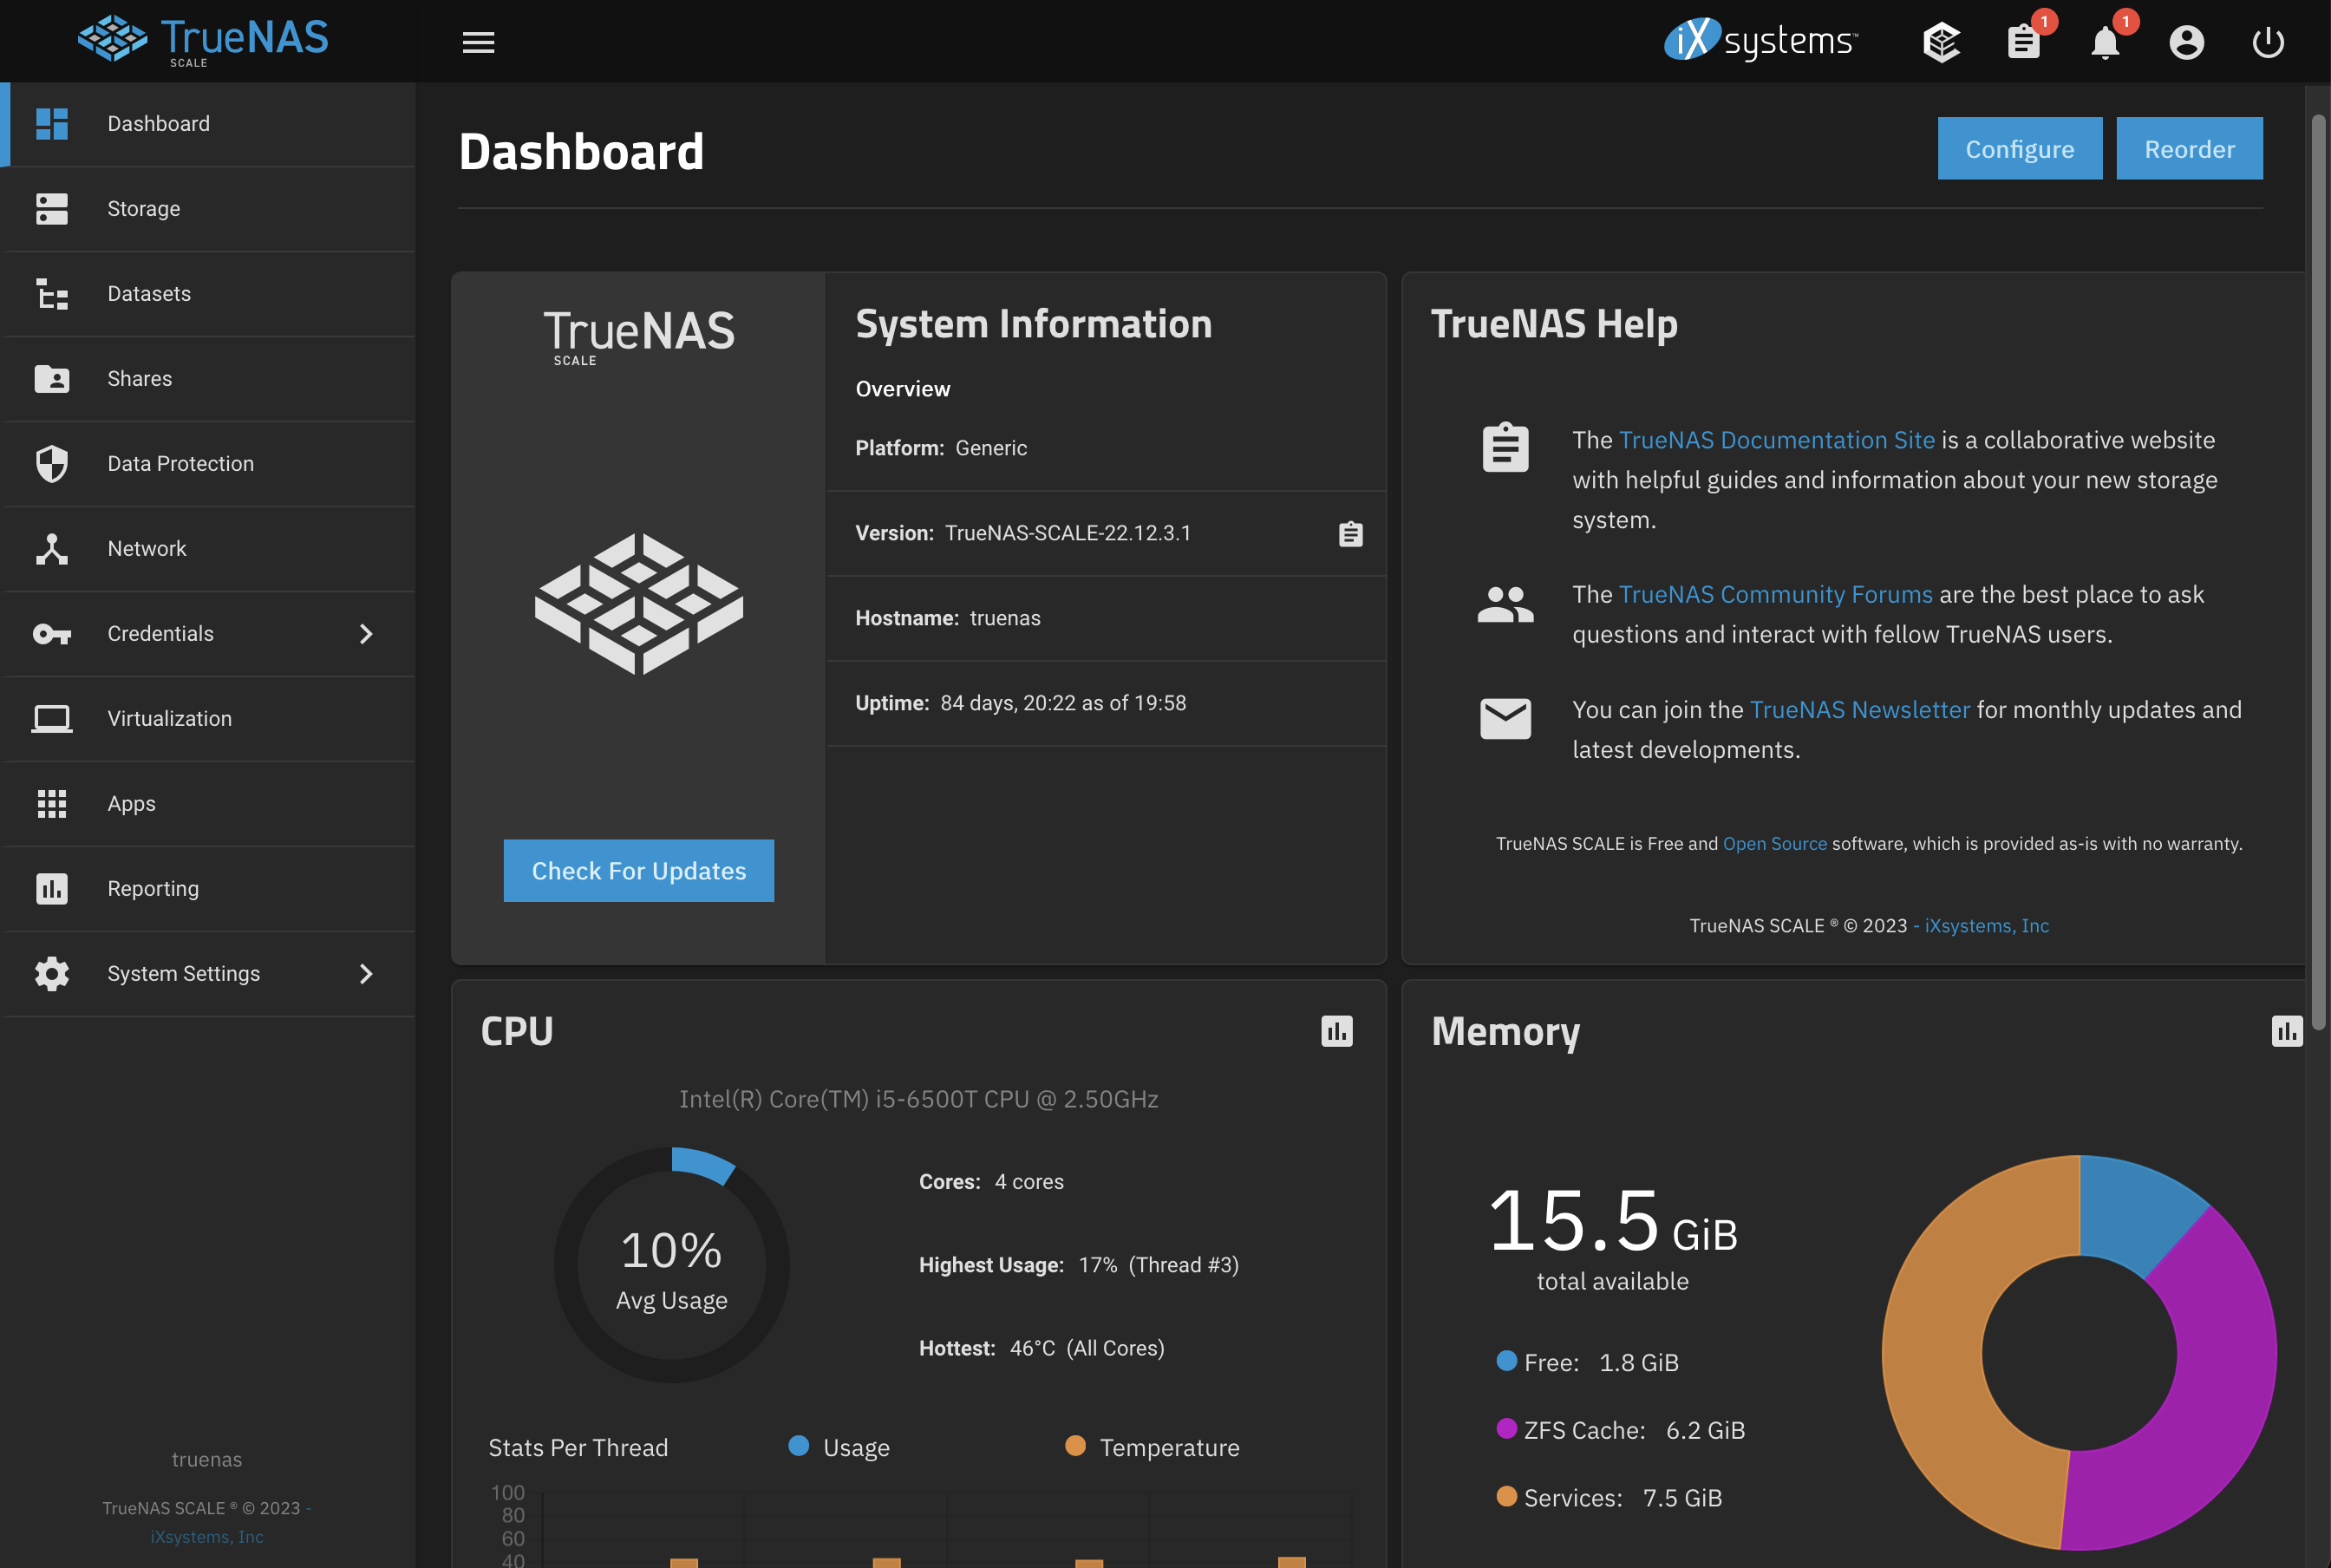
When the system reboots, you will see a console screen displaying an IP address (e.g., 192.168.1.50). This is your gateway to the TrueNAS SCALE Web GUI. From this point forward, you won’t need a monitor or keyboard attached to the server itself.
Accessing the Web Interface
Open a web browser on your main computer and type in the IP address shown on the server console. Log in using the username root and the password you created during installation. You are now looking at the dashboard, the nerve center of your data empire.
Creating Your First ZFS Pool
Your drives are currently “unassigned.” To use them, you must create a Pool.
- Navigate to Storage > Create Pool.
- Give your pool a name (e.g., “DataVault” or “MediaStorage”).
- Select the drives you want to include.
- Choose your vdev layout. For most users with 3 or more drives, RAID-Z1 (allows one drive to fail) or RAID-Z2 (allows two drives to fail) is recommended. This redundancy is what protects your “Brand” assets from hardware failure.
Setting Up User Accounts and Permissions
Navigate to Credentials > Local Users. Create a user for yourself and anyone else who needs access. It is a security best practice to avoid using the ‘root’ account for daily file transfers. By setting up granular permissions, you ensure that only authorized individuals can access sensitive “Money” or “Finance” documents.
Leveraging the Power of SCALE: Apps, Virtualization, and Data Security
The “SCALE” in TrueNAS SCALE refers to its ability to scale out and its hyper-converged nature. This is where the “Tech” and “Productivity” aspects truly shine.
Deploying Applications
TrueNAS SCALE features an “Apps” section based on Kubernetes. With a few clicks, you can install:
- Nextcloud: A private alternative to Google Suite.
- Plex or Jellyfin: To manage your media library.
- Pi-hole: To block advertisements across your entire network, enhancing digital security.
- Home Assistant: For managing smart home gadgets.
This ecosystem allows you to run professional-grade software without needing a separate server, saving both space and electricity (and therefore, money).
Setting Up SMB/NFS Shares
To actually use your storage on Windows, Mac, or Linux, you need to share it.
- SMB (Server Message Block): The standard for Windows and most macOS users.
- NFS (Network File System): Preferred for Linux environments and virtualization.
Go to Shares, click Add under Windows Shares (SMB), and select the folder (dataset) you created. You can now map this as a network drive on your laptop.
Security Best Practices
In the world of “Digital Security,” a NAS is a prime target. Always:
- Enable Snapshots: Set up a task to take daily snapshots of your data. This is your best defense against ransomware.
- Use Two-Factor Authentication (2FA): Protect your Web GUI login.
- Avoid Port Forwarding: Never expose your TrueNAS login directly to the internet. Use a VPN (like Tailscale or WireGuard, both available as apps in SCALE) to access your files remotely.
Conclusion: The Future of Your Digital Assets
Installing TrueNAS SCALE is more than just a technical tutorial; it is a strategic move for anyone serious about their digital life. By following this guide, you have moved your data from fragmented external drives and expensive cloud subscriptions into a centralized, secure, and professional-grade ecosystem.
From a Tech standpoint, you now possess a powerful Linux-based server capable of running the latest apps. From a Brand perspective, you have secured your intellectual property with the legendary reliability of ZFS. And from a Money perspective, you have built a high-value asset that eliminates recurring costs and provides a platform for future digital growth.
As you continue to explore TrueNAS SCALE, you will find that the possibilities are nearly endless—from automated backups of your mobile devices to hosting your own development environments. Your journey into self-hosting has just begun, and with TrueNAS SCALE, you have the best possible foundation to build upon.
aViewFromTheCave is a participant in the Amazon Services LLC Associates Program, an affiliate advertising program designed to provide a means for sites to earn advertising fees by advertising and linking to Amazon.com. Amazon, the Amazon logo, AmazonSupply, and the AmazonSupply logo are trademarks of Amazon.com, Inc. or its affiliates. As an Amazon Associate we earn affiliate commissions from qualifying purchases.