In the vast landscape of network protocols, some stand as foundational pillars, while others evolve into more sophisticated forms. Telnet, an acronym for TELecommunication NETwork, is undeniably one of the former. Despite its age and the emergence of more secure alternatives, understanding and occasionally utilizing Telnet remains a relevant skill for IT professionals, network administrators, and curious tech enthusiasts alike. Whether you’re troubleshooting a legacy system, performing basic port connectivity tests, or simply delving into the historical roots of network communication, knowing how to install and use Telnet is a fundamental piece of your technological toolkit.
This article serves as a comprehensive guide, meticulously detailing the process of installing Telnet across the most prevalent operating systems: Windows, macOS, and various Linux distributions. Beyond just installation, we’ll delve into its core functionality, practical applications, and critically, its significant security implications in today’s interconnected digital world. As part of a website focused on technology trends, software, and digital security, we aim to equip you with the knowledge not just of how to use Telnet, but also when and why to consider its secure alternatives.
Understanding Telnet: A Look Back at a Fundamental Network Protocol
Before we dive into the installation process, it’s crucial to grasp what Telnet is, how it functions, and its historical significance. This context will help you appreciate its capabilities while also understanding its limitations, especially concerning modern security standards.
What is Telnet and How Does It Work?
Telnet is a network protocol used on the internet or local area networks to provide a bidirectional interactive text-oriented communication facility using a virtual terminal connection. Developed in 1969, it was one of the first protocols ever implemented and allowed users to remotely access computers and execute commands as if they were sitting directly in front of them.
At its core, Telnet operates using a client-server model. A Telnet client (the program you run on your machine) connects to a Telnet server (a program running on the remote machine). Once connected, the client sends commands as text over the network, and the server executes these commands, sending the text output back to the client. This interaction happens over TCP port 23 by default.
The brilliance of Telnet for its time was its simplicity and ubiquity. It provided a universal method for connecting to remote systems, irrespective of the underlying hardware or operating system. However, this simplicity comes with a significant drawback that we will explore in detail later: security. Telnet transmits all data, including usernames and passwords, in plain text.
The Legacy and Lingering Relevance of Telnet
In the early days of computing, when network security was not the paramount concern it is today, Telnet was the de facto standard for remote access. It facilitated the collaborative development of early internet applications and allowed researchers to share computing resources efficiently. Its influence on modern networking protocols, particularly SSH (Secure Shell), is undeniable. SSH essentially built upon Telnet’s functionality, adding robust encryption and authentication mechanisms.
Despite being largely superseded by SSH for secure remote administration, Telnet still finds niche applications where its simplicity or legacy compatibility is beneficial:
- Testing Network Connectivity: One of Telnet’s most common modern uses is to check if a specific port on a remote server is open and listening. For instance,
telnet mail.example.com 25can quickly tell you if your mail server is accepting connections on the SMTP port. This is a quick diagnostic tool for network administrators. - Interacting with Legacy Systems: Some older network devices, industrial control systems, or specialized hardware might still only offer Telnet for configuration and management. In these specific, isolated environments, Telnet might be the only option.
- Learning and Education: Understanding Telnet helps in comprehending fundamental client-server interactions and the evolution of network protocols. It’s a stepping stone for grasping more complex concepts.
- Basic HTTP/SMTP/POP3 Debugging: You can manually interact with application layer protocols (like sending an email manually via SMTP or requesting a webpage via HTTP) to diagnose issues, bypassing client software.
While its role has diminished, understanding its mechanics and knowing how to enable it when absolutely necessary remains a valuable, albeit specialized, skill.
Step-by-Step Installation Guides for Major Operating Systems
Telnet client is often not installed or enabled by default on modern operating systems due to its security vulnerabilities. However, enabling it is typically a straightforward process. Here’s how to do it on Windows, macOS, and Linux.
Installing Telnet on Windows
Windows, for security reasons, does not enable the Telnet Client by default. However, it’s usually available as an optional feature that can be turned on.
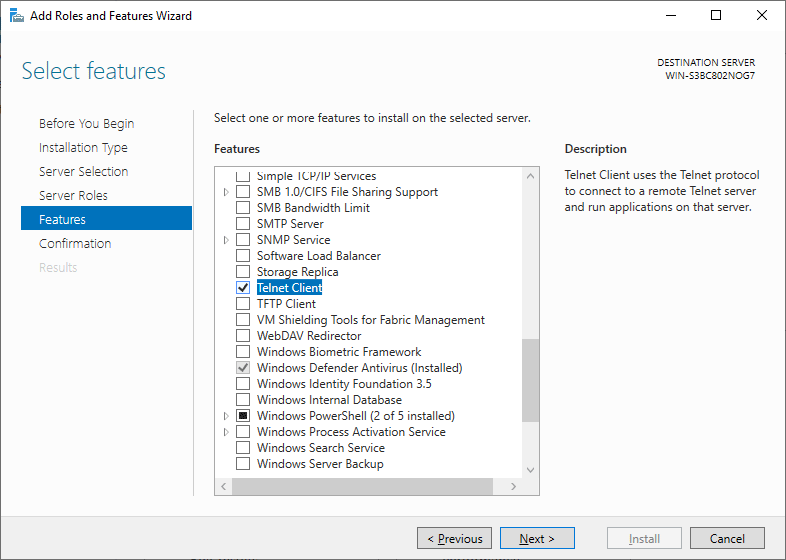
Enabling Telnet Client via Windows Features
This is the most common and recommended method for Windows users.
- Open Control Panel:
- In Windows 10/11, search for “Control Panel” in the Start menu and open it.
- Alternatively, right-click the Start button, select “Run,” type
control, and press Enter.
- Navigate to Programs and Features:
- In the Control Panel, click on “Programs” or “Programs and Features.”
- Turn Windows features on or off:
- On the left-hand side of the “Programs and Features” window, click “Turn Windows features on or off.” This will open a new dialog box. You might need administrator privileges for this step.
- Enable Telnet Client:
- Scroll down the list of Windows features until you find “Telnet Client.”
- Check the box next to “Telnet Client.”
- Confirm and Install:
- Click “OK.” Windows will now install the Telnet Client. This process usually takes a few moments.
- Once completed, you will typically receive a notification that the changes have been applied.
Using PowerShell or Command Prompt for Installation
For those who prefer command-line interfaces or need to script the installation, you can enable the Telnet Client using PowerShell or the Command Prompt with administrative privileges.
- Open PowerShell or Command Prompt as Administrator:
- Search for “PowerShell” or “CMD” in the Start menu.
- Right-click on “Windows PowerShell” or “Command Prompt” and select “Run as administrator.”
- Execute the Installation Command:
- In the administrative PowerShell or Command Prompt window, type the following command and press Enter:
cmd

dism /online /Enable-Feature /FeatureName:TelnetClient
dism(Deployment Image Servicing and Management) is a command-line tool used to service a Windows image./onlinespecifies that you are targeting the running operating system./Enable-Featureinstructs DISM to enable a Windows feature./FeatureName:TelnetClientspecifies the exact feature to enable.- You will see a progress indicator, and upon successful completion, a message indicating that “The operation completed successfully.”
- In the administrative PowerShell or Command Prompt window, type the following command and press Enter:
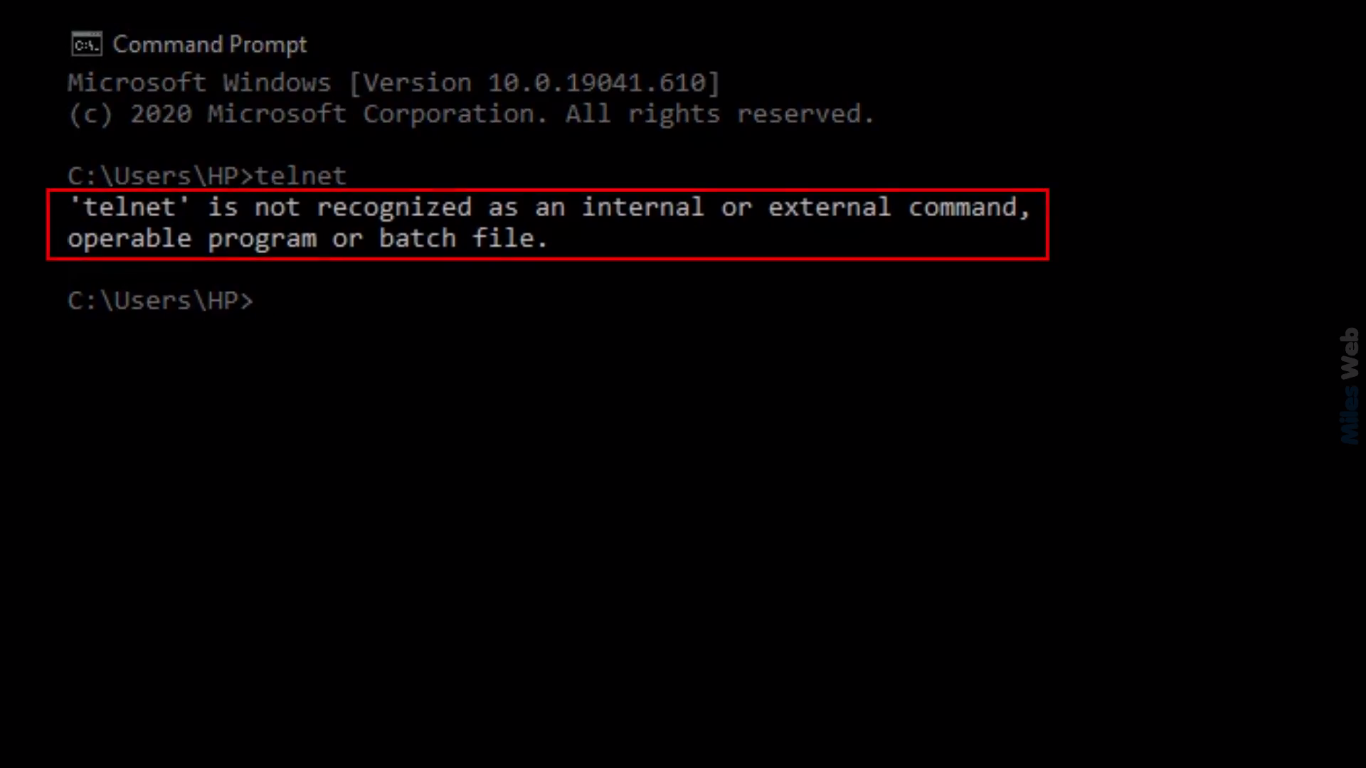
Verifying Telnet Installation on Windows
To confirm that Telnet has been successfully installed, open a regular Command Prompt or PowerShell window (no need for administrator privileges this time) and type:
telnet
If it’s installed correctly, you will see output similar to:
Welcome to Microsoft Telnet Client

Escape Character is 'CTRL+]'

Microsoft Telnet>
Type quit and press Enter to exit the Telnet prompt. If you receive an error like “‘telnet’ is not recognized as an internal or external command, operable program or batch file,” then the installation was not successful, and you should re-check the steps.
Installing Telnet on macOS
Unlike Windows, macOS does not include a built-in Telnet client by default in recent versions. The most straightforward and recommended way to install it is by using Homebrew, a popular package manager for macOS.
Leveraging Homebrew for Modern macOS Installations
If you don’t have Homebrew installed, you’ll need to install it first. Homebrew simplifies the installation of various open-source software on macOS.
- Install Homebrew (if not already installed):
- Open your Terminal application (you can find it in Applications/Utilities or search for “Terminal”).
- Paste the following command and press Enter. Follow the on-screen instructions, which may include entering your password and installing Xcode Command Line Tools.
bash

/bin/bash -c "$(curl -fsSL https://raw.githubusercontent.com/Homebrew/install/HEAD/install.sh)"
- Install Telnet using Homebrew:
- Once Homebrew is installed, simply type the following command in your Terminal and press Enter:
bash

brew install telnet
- Homebrew will download and install the Telnet client. You’ll see output indicating the progress and success of the installation.
- Once Homebrew is installed, simply type the following command in your Terminal and press Enter:
Verifying Telnet Installation on macOS
To verify the installation, open a new Terminal window and type:
telnet
You should see output indicating that Telnet is running and waiting for commands, typically showing its usage instructions or a prompt similar to:
usage: telnet [-4] [-6] [-8] [-E] [-L] [-N] [-S tos] [-X atype] [-c] [-d] [-e char] [-k realm] [-l user] [-a] [-r] [host [port]]
If you get a “command not found” error, ensure Homebrew is correctly installed and its path is in your shell’s configuration. You might need to restart your Terminal or run brew doctor to troubleshoot.
Installing Telnet on Linux Distributions
Linux distributions also typically omit the Telnet client by default in favor of SSH. However, it can be easily installed using the respective package manager for your distribution.
Installation on Debian/Ubuntu-based Systems
For distributions like Ubuntu, Debian, Linux Mint, etc., use the apt package manager.
- Update Package List:
- Open a terminal.
- Update your package lists to ensure you’re getting the latest version information:
bash

sudo apt update
- Install Telnet Client:
- Install the
telnetpackage:
bash

sudo apt install telnet
- When prompted, type
Yand press Enter to confirm the installation.
- Install the
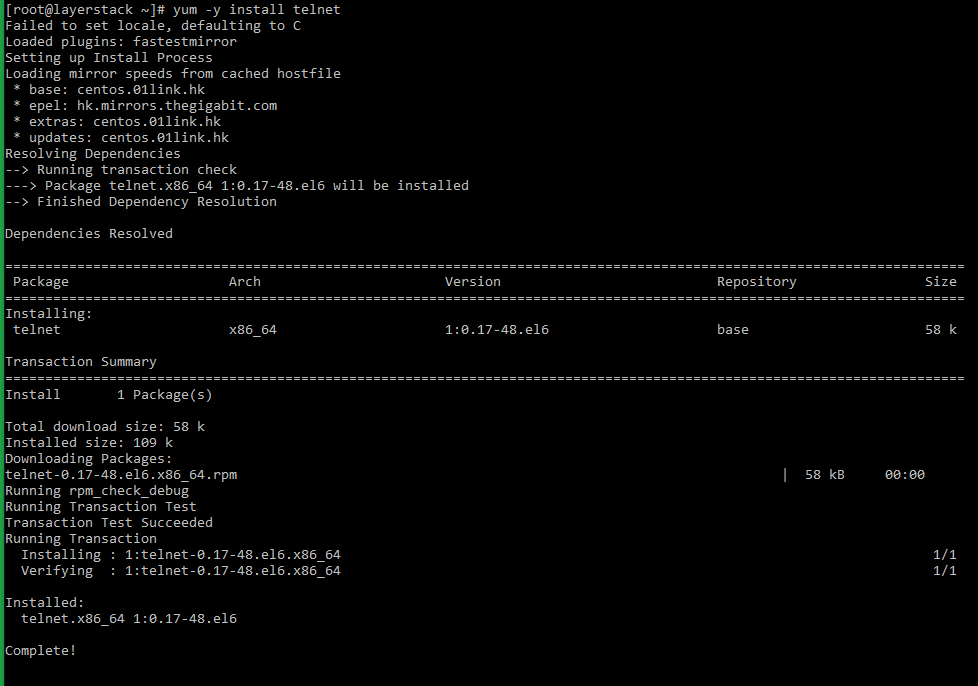
Installation on Red Hat/CentOS/Fedora-based Systems
For distributions like Fedora, CentOS, RHEL, AlmaLinux, Rocky Linux, etc., use dnf (newer Fedora/RHEL) or yum (older CentOS/RHEL).
- Install Telnet Client:
- Open a terminal.
- Use
dnforyumto install thetelnetpackage:
bash

sudo dnf install telnet

# OR (for older systems)

sudo yum install telnet
- Type
Yand press Enter when prompted to confirm the installation.
Verifying Telnet Installation on Linux
After installation, verify it by simply typing telnet in your terminal:
telnet
Similar to macOS, you should see the Telnet command’s usage information:
usage: telnet [-4] [-6] [-8] [-E] [-L] [-N] [-S tos] [-X atype] [-c] [-d] [-e char] [-k realm] [-l user] [-a] [-r] [host [port]]
If you encounter a “command not found” error, double-check your installation commands and ensure your system’s package manager ran successfully.
Basic Telnet Usage and Practical Applications
Now that you have the Telnet client installed, let’s explore how to use it and some of its common practical applications, especially for basic network troubleshooting.
Connecting to a Remote Host
The basic syntax for using Telnet to connect to a remote host is:
telnet [hostname or IP address] [port number]
[hostname or IP address]: This is the target server’s name (e.g.,google.com) or its IP address (e.g.,8.8.8.8).[port number]: This is the specific TCP port you want to connect to. If you omit the port number, Telnet defaults to port 23, which is the standard Telnet server port.
Examples:
- Connecting to a web server (HTTP on port 80):
telnet example.com 80
If successful, you’ll see a blank screen or some banner text. You can then manually type HTTP commands, e.g.,GET / HTTP/1.1and then press Enter twice. - Connecting to a mail server (SMTP on port 25):
telnet mail.example.com 25
If the connection is established, you’ll likely see a banner from the mail server (e.g.,220 mail.example.com ESMTP Postfix). You can then manually issue SMTP commands likeHELO domain.com,MAIL FROM:<you@domain.com>, etc. - Connecting to a known Telnet server (on port 23, if available):
telnet my-legacy-router
or simply
telnet 192.168.1.1
This would attempt to establish a full Telnet session, prompting for a username and password if the server is configured.
Exiting Telnet:
To exit an active Telnet session, typically you press Ctrl + ] (Control key and right square bracket) to enter the Telnet prompt, and then type quit and press Enter.
Common Use Cases and Troubleshooting Tips
- Port Connectivity Testing: This is Telnet’s most valuable modern role. If you suspect a firewall is blocking a specific port, or a service isn’t running on a server, a quick Telnet test can confirm connectivity.
- If Telnet connects successfully and shows a blank screen or a service banner, the port is open and the service is likely listening.
- If it hangs and eventually displays “Connecting To [host]…Could not open connection to the host, on port [port]: Connect failed,” then the port is likely blocked by a firewall or the service isn’t running.
- Verifying Service Banners: For protocols like SMTP, FTP, or HTTP, connecting via Telnet allows you to see the service’s initial banner, which can often provide version information or clues for troubleshooting.
- Manual Protocol Interaction: For developers or network engineers, Telnet allows for direct, manual interaction with application-layer protocols, which can be invaluable for debugging custom applications or understanding protocol mechanics.
- Troubleshooting: “Connection refused” vs. “Connection timed out”:
- “Connection refused” usually means a service is actively denying the connection (e.g., a service isn’t running, or it’s configured not to accept connections from your IP).
- “Connection timed out” generally indicates that a firewall is blocking the connection, or the remote host is unreachable.
The Critical Security Implications and Modern Alternatives
While Telnet is useful for specific troubleshooting tasks, it is paramount to understand its severe security limitations, especially in today’s threat landscape.
Why Telnet is Insecure for Production Environments
The fundamental flaw of Telnet, which makes it unsuitable for any sensitive communication, is its lack of encryption. All data transmitted between the Telnet client and server, including usernames, passwords, and the entire session content, is sent in plain text.
This means that anyone with access to any network device along the communication path (e.g., a malicious actor on the same Wi-Fi network, an attacker who has compromised a router, or even a curious network administrator) can easily intercept and read the entire conversation using network sniffers like Wireshark. This poses an unacceptable risk, leading to:
- Credential Theft: Your usernames and passwords for remote systems are exposed, giving attackers direct access.
- Session Hijacking: An attacker can capture your session and take control of your authenticated connection.
- Information Disclosure: Any sensitive data exchanged during the session, such as configuration details, private keys, or proprietary information, is vulnerable.
- Lack of Authentication Integrity: While Telnet does have authentication (username/password), there’s no way to verify the authenticity of the server you’re connecting to, making it susceptible to man-in-the-middle attacks.
Therefore, using Telnet for remote administration or any activity involving sensitive information over untrusted networks (like the internet) is highly discouraged and can lead to severe security breaches.
Embracing Secure Alternatives: The Rise of SSH and Beyond
Given Telnet’s inherent security weaknesses, it has largely been replaced by more robust and secure protocols. The most prominent and widely adopted alternative for remote command-line access is SSH (Secure Shell).
SSH Advantages:
- Encryption: All communication between the client and server is encrypted, protecting data from eavesdropping.
- Strong Authentication: SSH supports various strong authentication methods, including password-based, public-key authentication (highly recommended), and more, often providing two-factor authentication.
- Data Integrity: SSH ensures that data transmitted has not been tampered with in transit.
- Secure Tunneling/Port Forwarding: SSH can securely tunnel other network services (like VNC, RDP, or even internal web applications) over an encrypted connection, further enhancing security.
Other Secure Alternatives for Specific Use Cases:
- RDP (Remote Desktop Protocol): For graphical remote access to Windows machines.
- VNC (Virtual Network Computing): For graphical remote access across various operating systems.
- HTTPS (HTTP Secure): For secure web-based management interfaces.
- SFTP (SSH File Transfer Protocol) / SCP (Secure Copy Protocol): For secure file transfers, replacing insecure FTP.
For any scenario that involves remote system administration, transferring files, or accessing systems over potentially insecure networks, SSH should always be your first choice. It provides the same functionality as Telnet but with the crucial addition of strong encryption and authentication, making it the industry standard for secure remote access.
Conclusion: Navigating Network Protocols with Awareness
The Telnet protocol, a relic from the early days of networking, offers a simple yet powerful means of interacting with remote systems. Knowing how to install and use the Telnet client on Windows, macOS, and Linux provides a valuable troubleshooting tool for network connectivity and legacy system interaction. From quickly checking if a port is open to debugging application-layer protocols, Telnet still holds a specific, albeit limited, place in the toolkit of a discerning tech professional.
However, its convenience comes at a critical cost: security. The unencrypted transmission of data makes Telnet a severe liability for any sensitive operation. In an era where digital security threats are ever-present and sophisticated, prioritizing secure communication protocols like SSH is not just a recommendation but a necessity.
As technology enthusiasts and professionals, our goal should always be to leverage the right tools for the right job, with a strong emphasis on security and best practices. Understand Telnet’s history, master its installation, appreciate its diagnostic utility, but always remember its limitations. When remote administration or sensitive data is involved, always opt for its robust, encrypted successors. By doing so, you ensure your digital interactions remain both efficient and secure.
aViewFromTheCave is a participant in the Amazon Services LLC Associates Program, an affiliate advertising program designed to provide a means for sites to earn advertising fees by advertising and linking to Amazon.com. Amazon, the Amazon logo, AmazonSupply, and the AmazonSupply logo are trademarks of Amazon.com, Inc. or its affiliates. As an Amazon Associate we earn affiliate commissions from qualifying purchases.