Upgrading your computer’s storage is one of the most impactful changes you can make to breathe new life into an aging system or maximize the performance of a new build. Among the various hardware enhancements, swapping out a traditional Hard Disk Drive (HDD) for a Solid State Drive (SSD) stands out as a fundamental transformation. SSDs offer unparalleled speed, significantly reducing boot times, application loading, and file transfer speeds, leading to a dramatically snappier and more responsive user experience. They also consume less power, generate less heat, and are more durable due to the absence of moving parts.
If you’ve decided to make the leap and invest in an SSD, the next step is installation. While it might seem daunting to open your computer case and tinker with internal components, installing an SSD on your motherboard is a surprisingly straightforward process that most users can accomplish with a little guidance. This comprehensive guide will walk you through every step, from understanding compatibility to post-installation setup, ensuring a smooth and successful upgrade. We’ll demystify the process, empower you with the knowledge, and help you unlock your PC’s full potential.
Understanding Your SSD and Motherboard Compatibility
Before you even think about opening your PC case, the most crucial first step is to ensure that the SSD you’ve purchased, or plan to purchase, is compatible with your motherboard. The world of SSDs has diversified beyond a single standard, with different types offering varying levels of performance and requiring specific connections.
Types of SSDs and Their Connectors
SSDs come in several primary forms, each designed for different connection types and physical spaces within a computer.
-
SATA SSDs (2.5-inch Form Factor): These are the most common and often the most affordable type of SSD. They are physically shaped like traditional 2.5-inch laptop hard drives and connect to your motherboard via a SATA data cable and to your power supply unit (PSU) via a SATA power cable. SATA III (the most common standard) offers theoretical transfer speeds of up to 600 MB/s. While not as fast as NVMe, they are still significantly faster than HDDs and are a great upgrade option for older systems or budget builds. They fit into standard drive bays found in most PC cases.
-
NVMe M.2 SSDs: This newer generation of SSDs represents a significant leap in performance. NVMe (Non-Volatile Memory Express) is a communication protocol specifically designed for SSDs, allowing them to communicate directly with the CPU over the PCIe (Peripheral Component Interconnect Express) bus. This bypasses the SATA controller, dramatically reducing latency and increasing bandwidth. M.2 refers to the physical form factor, which is a small, rectangular stick that slots directly into a dedicated M.2 slot on your motherboard. NVMe M.2 SSDs can achieve speeds several times faster than SATA SSDs, with PCIe Gen 4 drives reaching read/write speeds of 7,000 MB/s or more. They come in various lengths (e.g., 2280 is most common, indicating 22mm width and 80mm length).
-
Add-in Card (AIC) SSDs: Less common for general consumer upgrades but worth mentioning, some high-performance NVMe SSDs come as PCIe expansion cards. These slot directly into a full-sized PCIe slot on your motherboard, similar to a graphics card. They typically offer top-tier performance but require an available PCIe x4 or x16 slot.
Checking Your Motherboard’s Specifications
Once you understand the different types, you need to verify what your motherboard supports. This information is paramount.
-
Consult Your Motherboard Manual: This is your best friend. Your motherboard manual, which came with your PC or can be downloaded from the manufacturer’s website (e.g., ASUS, MSI, Gigabyte, ASRock), will clearly list all available ports and slots. Look for sections detailing SATA ports and M.2 slots.
-
Identify Available SATA Ports: For SATA SSDs, you need an available SATA data port on your motherboard (they look like small, L-shaped connectors) and an available SATA power connector from your PSU. Most motherboards have multiple SATA ports.
-
Locate M.2 Slots and Check Compatibility: If you’re considering an NVMe M.2 SSD, carefully examine your motherboard for an M.2 slot. It typically looks like a small horizontal slot, often with a screw hole nearby. The manual will tell you:
- Number of M.2 Slots: Some motherboards have one, some have two or more.
- Supported Lengths: E.g., 2242, 2260, 2280, 22110. Ensure your SSD’s length matches what the slot supports.
- PCIe Generation: M.2 slots can support PCIe Gen 3, Gen 4, or even Gen 5. While a PCIe Gen 4 SSD will work in a Gen 3 slot, it will be limited to Gen 3 speeds. For optimal performance, match the SSD’s PCIe generation to the motherboard’s slot.
- Keying: M.2 slots have “keys” (notches) to prevent incorrect insertion. Most NVMe SSDs use an ‘M’ key, while SATA M.2 SSDs (less common but exist) use ‘B’ and ‘M’ keys. Ensure your SSD’s keying matches your motherboard’s slot.
- Shared Bandwidth: Be aware that sometimes using an M.2 slot can disable certain SATA ports or PCIe lanes. The manual will detail any such restrictions.
By thoroughly checking these specifications, you’ll be confident in selecting the right SSD and knowing exactly where and how it will connect to your system.
Essential Tools and Preparations Before You Begin
Proper preparation is key to a smooth and safe installation process. Gathering the necessary tools and taking crucial pre-installation steps will prevent headaches and protect your valuable components.
Gathering Your Supplies
Before you even open your computer case, make sure you have everything you need within reach.
- Your New SSD: Whether it’s a 2.5-inch SATA drive or an M.2 NVMe stick.
- Phillips Head Screwdriver: This is the most common type of screwdriver needed for PC components. Ensure it’s magnetized (or use a magnetic tray for screws) to avoid dropping tiny screws into your case.
- Anti-Static Wrist Strap (Recommended): Static electricity is the silent killer of electronic components. An anti-static wrist strap, connected to a grounded metal part of your PC case (like the unpainted frame), will safely dissipate any static charge from your body. Alternatively, frequently touch an unpainted metal part of your case to ground yourself.
- Your Motherboard Manual: As mentioned, this is invaluable for identifying specific ports, screw locations, and any peculiar instructions for your specific board.
- SATA Data Cable (If Installing a SATA SSD): Often comes with new motherboards or sometimes with the SSD itself. If not, they are inexpensive and widely available.
- SATA Power Cable (From Your PSU): These cables extend directly from your power supply. Ensure you have an available one.
- M.2 Standoff and Screw (If Installing an NVMe M.2 SSD): Crucially, the tiny screw and often a small hexagonal standoff required to secure an M.2 drive usually come with your motherboard, not the SSD itself. Check your motherboard box or existing M.2 slots. If you’ve misplaced them, replacements can often be found online.
- Flashlight or Headlamp: Can be very helpful for illuminating dark corners inside your PC case.
- Cable Ties (Optional): For neat cable management once the installation is complete.
Critical Pre-Installation Steps
These steps are non-negotiable for data safety and personal safety.
- Back Up Your Data! This is perhaps the single most important step. While SSD installation is generally safe, unexpected issues can always arise, especially if you’re planning to migrate your operating system. Back up all critical files, documents, photos, and videos to an external drive, cloud storage, or another internal drive. You will thank yourself if anything goes wrong.
- Power Down and Unplug Your PC: Fully shut down your computer. Do not just put it to sleep. Once it’s off, unplug the power cable from the wall outlet and the back of your power supply. Press your PC’s power button a few times after unplugging to discharge any residual power in the system.
- Ground Yourself: As mentioned with the wrist strap, always ground yourself before touching any internal components. This protects sensitive electronics from electrostatic discharge (ESD), which can cause permanent damage. If not using a wrist strap, frequently touch an unpainted metal part of the PC case.
- Clear Your Workspace: Work on a clean, well-lit, and sturdy surface. Remove any clutter that could get in the way or cause you to knock over components. A static-safe mat is ideal, but a clean wooden table will suffice. Avoid working on carpet, which generates a lot of static electricity.
With these preparations complete, you are ready to open your PC case and begin the physical installation.
Step-by-Step Installation Process
Now for the hands-on part. The physical installation process differs slightly depending on whether you’re installing a SATA SSD or an NVMe M.2 SSD. We’ll cover both scenarios.
Installing a SATA SSD (2.5-inch)
This process involves mounting the drive and connecting two cables.
- Open Your PC Case: Most cases have thumb screws or standard Phillips head screws on the rear securing the side panels. Remove the side panel (usually the left one when looking at the front of the case) to access the interior.
- Locate an Available Drive Bay: Modern PC cases typically have dedicated 2.5-inch drive bays or adapters in 3.5-inch bays. These are often trays or cages that slide out. Find a suitable, empty bay.
- Mount the SSD in the Bay:
- If your case has tool-less trays, simply place the SSD in the tray and secure it with the clips.
- If it requires screws, align the SSD with the screw holes in the drive bay or adapter and secure it with the screws provided with your case (not the SSD).
- Slide the tray back into the bay until it clicks into place or secure the bay with its screws.
- Connect the SATA Data Cable: Take one end of the SATA data cable and connect it to the L-shaped port on your SSD. Connect the other end of the SATA data cable to an available SATA port on your motherboard. Refer to your motherboard manual to identify these ports. Try to use lower-numbered ports (e.g., SATA0, SATA1) as some higher-numbered ports might be shared with M.2 slots.
- Connect the SATA Power Cable: Locate an available SATA power connector from your power supply unit (PSU). These are typically flat, wide cables with L-shaped connectors. Connect one to the power port on your SSD. Ensure both data and power cables are firmly seated.
Installing an NVMe M.2 SSD
This installation is generally simpler, involving only one slot and one screw.
- Open Your PC Case: Similar to the SATA installation, remove the side panel to access the motherboard.
- Locate the M.2 Slot on Your Motherboard: M.2 slots are typically found in various locations: between PCIe slots, above or below the primary graphics card slot, or sometimes even on the back of the motherboard in very compact systems. Your manual will pinpoint its exact location.
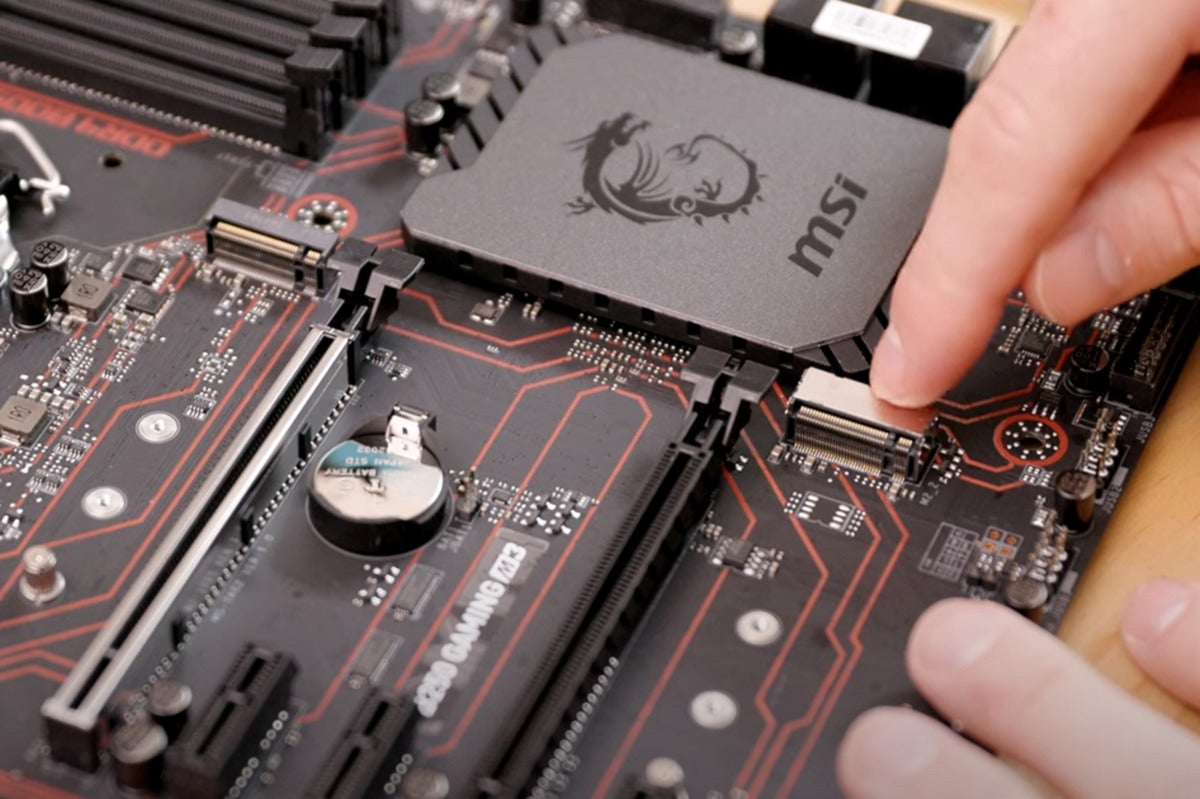
- Prepare the M.2 Slot:
- If your motherboard has a pre-installed M.2 heatsink, you’ll need to remove it first. This usually involves unscrewing it.
- You’ll typically see a small screw (and sometimes a standoff) in one of the M.2 mounting holes. Remove this screw (and standoff if it’s too high for your SSD’s length) and set it aside carefully. If there’s no standoff, your SSD should come with one, or it will be in your motherboard’s accessories box.
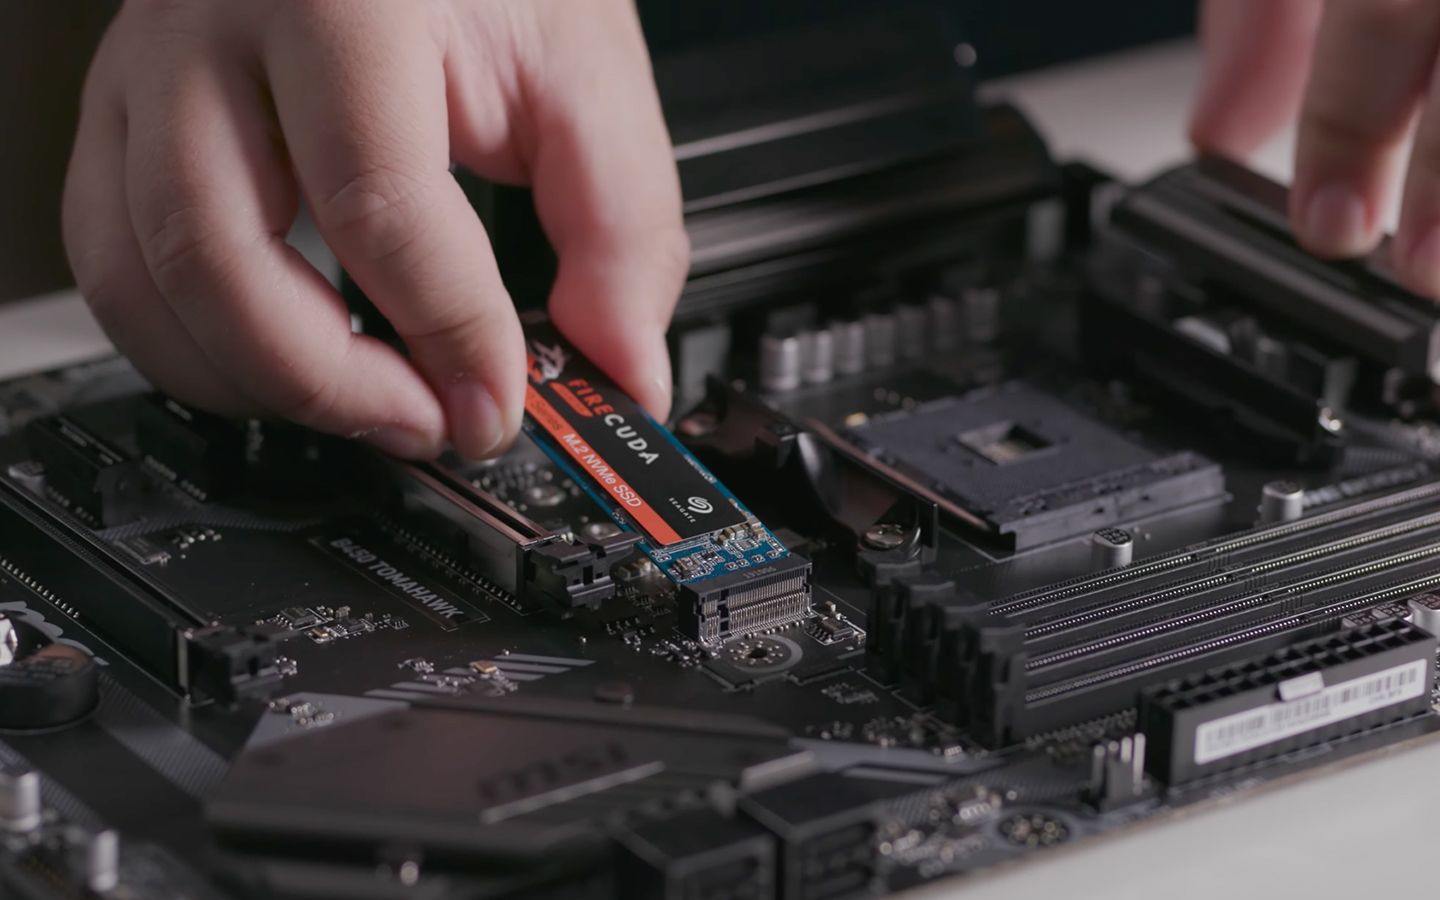
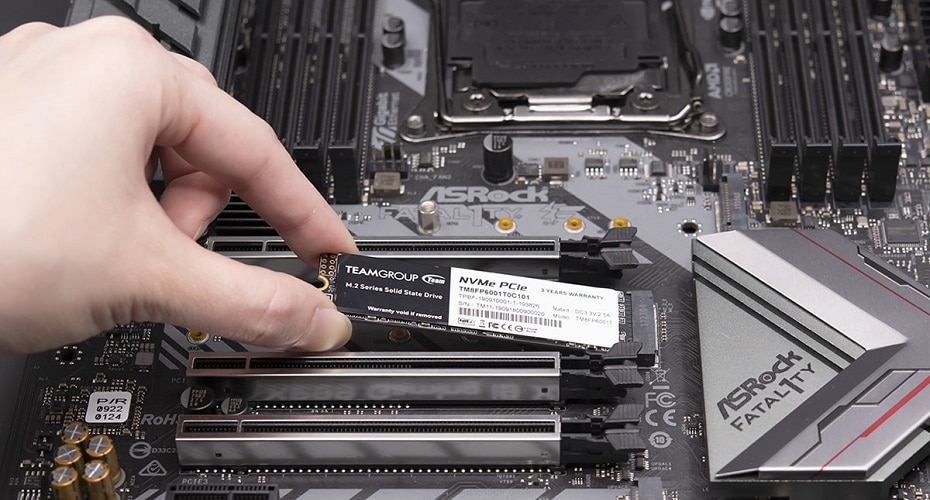
- Gently Insert the M.2 SSD: Hold the M.2 SSD by its edges, aligning the notch on the SSD with the key in the M.2 slot. Insert the SSD into the slot at approximately a 30-degree angle. You should feel it slide in smoothly and seat firmly. Do not force it.
- Secure the M.2 SSD: Once fully seated, the SSD will naturally spring up slightly. Gently push the SSD down towards the motherboard until it’s flat. While holding it down, re-insert the standoff (if needed) and secure the SSD with the small screw you removed earlier, or the one provided with your motherboard/SSD. Do not overtighten.
- Reinstall Heatsink (If Applicable): If your motherboard came with an M.2 heatsink, peel off any protective plastic from the thermal pad (if present) and carefully re-attach the heatsink over the SSD, securing it with its screws. This helps dissipate heat from high-performance NVMe drives.
Once your SSD is physically installed, you can carefully reattach your PC case side panel.
Post-Installation: Setting Up Your New SSD
Physical installation is only half the battle. After the hardware is in place, you need to configure your operating system to recognize and utilize the new drive.
Initial Boot-Up and BIOS/UEFI Configuration
The first boot after installing new hardware is always a moment of truth.
- Close Case and Reconnect Peripherals: Carefully reattach the side panel of your PC case. Reconnect all power cables, monitor cables, keyboard, mouse, and any other peripherals.
- Power On and Enter BIOS/UEFI: Turn on your computer. Immediately start pressing the designated key to enter your system’s BIOS/UEFI setup utility. Common keys include
Del,F2,F10, orF12. Consult your motherboard manual if you’re unsure. - Verify SSD Detection: Once in the BIOS/UEFI, navigate to the storage or boot devices section. Look for your new SSD listed among the detected drives. If it’s not there, double-check all connections (for SATA) or ensure the M.2 drive is properly seated (for NVMe) and review your motherboard manual for any specific M.2 slot settings or shared bandwidth considerations. For NVMe drives, ensure the M.2 slot mode is set correctly (e.g., PCIe mode, not SATA mode if applicable).
- Set Boot Order (If Migrating OS): If you’ve installed an SSD to replace your primary boot drive and plan to migrate your operating system (OS) to it, you’ll eventually need to set the new SSD as the primary boot device in the BIOS/UEFI. For now, if you’re just adding it as a secondary drive, you can exit the BIOS/UEFI without changing the boot order.
Formatting and Partitioning the SSD in Windows/macOS/Linux
Once your operating system boots, the new SSD might not immediately appear in “My Computer” or “Finder.” It needs to be initialized, partitioned, and formatted.
-
For Windows Users:
- Right-click the Start button and select “Disk Management” (or search for it).
- You should see your new SSD listed as “Disk 1,” “Disk 2,” etc., and marked as “Unknown” or “Not Initialized.”
- Right-click on the disk name (not the unallocated space) and select “Initialize Disk.”
- Choose “GPT (GUID Partition Table)” for modern systems (UEFI firmware, drives larger than 2TB) or “MBR (Master Boot Record)” for older systems (BIOS firmware, drives smaller than 2TB). GPT is generally recommended. Click “OK.”
- Now, the disk will show as “Online” but still have “Unallocated” space. Right-click on the unallocated space and select “New Simple Volume.”
- Follow the New Simple Volume Wizard: assign a drive letter, choose the file system (NTFS is standard for Windows), and give it a volume label (e.g., “SSD Games,” “Data Drive”). Leave “Allocation unit size” at “Default.”
- Click “Next” and “Finish.” Your SSD should now appear in File Explorer.
-
For macOS Users:
- Open “Disk Utility” (Applications > Utilities > Disk Utility).
- Select “View” from the menu bar and choose “Show All Devices.”
- Select your new SSD from the sidebar (it will likely be named after its manufacturer and model).
- Click the “Erase” button in the toolbar.
- Choose a name for your SSD, select the “Format” (APFS is recommended for macOS 10.13 High Sierra and later; Mac OS Extended (Journaled) for older versions), and “Scheme” (GUID Partition Map).
- Click “Erase” again to confirm. The SSD will then be available in Finder.
-
For Linux Users:
- Open a terminal and use
lsblkto identify your new SSD (e.g.,/dev/sdb,/dev/nvme0n1). - Use a partitioning tool like
fdiskorgdisk(for GPT) or a graphical tool like GParted. - Example with
gdisk(for GPT):sudo gdisk /dev/sdb(replace/dev/sdbwith your SSD’s identifier). - Create a new partition table (command
o), then create a new partition (commandn), accept defaults for size, and set the partition type (e.g.,8300for Linux filesystem). - Write changes and exit (
w). - Format the partition:
sudo mkfs.ext4 /dev/sdb1(replace/dev/sdb1with your partition). - Create a mount point:
sudo mkdir /mnt/ssd_drive - Mount the drive:
sudo mount /dev/sdb1 /mnt/ssd_drive - For permanent mounting, add an entry to
/etc/fstab.
- Open a terminal and use
Migrating Your Operating System (Optional but Common)
If your new SSD is replacing your old boot drive, you’ll want to migrate your operating system and all its applications to the new, faster drive without a clean install. This process is called disk cloning.
- Choose Cloning Software: Many SSD manufacturers provide their own cloning utilities (e.g., Samsung Data Migration, Western Digital Acronis True Image OEM). Third-party options like Macrium Reflect Free, EaseUS Todo Backup, or Clonezilla are also excellent choices.
- Connect Both Drives: Ensure both your old boot drive and your new SSD are connected to your computer simultaneously. If you only have one M.2 slot, you might need to use an external M.2 enclosure to temporarily connect your new SSD via USB, or install the OS fresh.
- Initiate Cloning:
- Install and launch your chosen cloning software.
- Select your old boot drive as the “source” disk.
- Select your new SSD as the “destination” disk. WARNING: This will erase all data on the destination disk, so ensure it’s the correct drive and that you’ve backed up anything important on it.
- Start the cloning process. This can take anywhere from a few minutes to several hours, depending on the amount of data and the speed of your drives.
- Verify Boot Order: Once cloning is complete, shut down your PC. You might want to disconnect your old HDD to ensure the PC boots directly from the new SSD. Enter BIOS/UEFI and ensure your new SSD is set as the primary boot device. Save changes and exit.
- Test and Format (Optional): Boot into your OS from the new SSD. Verify everything works as expected. If all is well, you can then wipe and reformat your old HDD to use it as a secondary storage drive.
Troubleshooting Common Installation Issues
Even with careful planning, sometimes things don’t go perfectly. Here are some common issues and their solutions:
-
SSD Not Detected in BIOS/UEFI:
- Check all cables (SATA): Ensure data and power cables are firmly seated at both ends.
- Check M.2 seating: For NVMe drives, ensure it’s fully pushed into the slot and secured.
- Shared bandwidth: Consult your motherboard manual. Some M.2 slots share lanes with SATA ports; using the M.2 might disable certain SATA ports. Ensure you’re not trying to use a disabled port.
- BIOS/UEFI settings: Ensure the M.2 slot is enabled and configured for the correct mode (e.g., PCIe for NVMe). Some older motherboards might require specific BIOS updates or settings for NVMe drives.
- Faulty drive/slot: If all else fails, test the SSD in another compatible system or try a different M.2 slot/SATA cable if available.
-
SSD Not Showing in Operating System (but detected in BIOS):
- This is almost always due to the drive not being initialized, partitioned, and formatted. Follow the steps in the “Formatting and Partitioning” section above.
-
Slow Performance:
- Wrong connection type: Is your NVMe SSD in a PCIe Gen 3 slot when it’s a Gen 4 drive? This will cap its speed.
- SATA vs. NVMe: Ensure you’re not expecting NVMe speeds from a SATA drive.
- Drivers: Ensure you have the latest chipset drivers for your motherboard and, for NVMe drives, sometimes specific NVMe drivers from the SSD manufacturer.
- Overheating: High-performance NVMe drives can throttle their speed if they get too hot. Ensure good airflow in your case, and consider an M.2 heatsink if your drive lacks one or if it’s running hot.
-
Physical Installation Errors:
- Loose screws/connectors: Re-check everything.
- Forced components: Never force an SSD into a slot or connector. If it doesn’t slide in easily, re-examine the orientation and ensure it’s compatible.
Conclusion
Congratulations! By following this guide, you should now have successfully installed your SSD and integrated it into your system. The impact of this upgrade will be immediately noticeable, transforming your computing experience with blazing-fast speeds and improved responsiveness. From near-instant boot-ups to rapid application launches, your computer will feel like a brand new machine.
Embracing DIY hardware upgrades, like installing an SSD, not only saves money but also provides a deeper understanding of your computer’s inner workings. It’s a fundamental step for anyone looking to optimize their tech setup, ensuring your system remains efficient and cutting-edge. Enjoy your newly supercharged PC!
aViewFromTheCave is a participant in the Amazon Services LLC Associates Program, an affiliate advertising program designed to provide a means for sites to earn advertising fees by advertising and linking to Amazon.com. Amazon, the Amazon logo, AmazonSupply, and the AmazonSupply logo are trademarks of Amazon.com, Inc. or its affiliates. As an Amazon Associate we earn affiliate commissions from qualifying purchases.