In the rapidly evolving world of technology, few upgrades offer as dramatic and immediate a performance boost to an aging laptop as replacing its traditional hard disk drive (HDD) with a solid-state drive (SSD). This isn’t just a minor tweak; it’s a fundamental transformation that can breathe new life into your machine, making it faster, more responsive, and a pleasure to use again. For many users, particularly those with laptops that are otherwise still capable, an SSD upgrade represents a smart investment, often delaying the need for an expensive new purchase and significantly enhancing productivity.
This comprehensive guide will walk you through every step of installing an SSD in your laptop, from understanding why it’s a worthwhile upgrade to the intricate details of post-installation optimization. We’ll cover everything you need to know, ensuring you can confidently undertake this popular and highly beneficial DIY project, aligning perfectly with the latest tech trends and smart financial planning.
Why Upgrade to an SSD? Unlocking Laptop Performance
The decision to upgrade to an SSD goes beyond simply wanting a “faster computer.” It’s about fundamentally changing how your laptop interacts with its operating system, applications, and data. Traditional HDDs, while offering vast storage capacities at a lower cost, are mechanical devices with spinning platters and read/write heads. This inherent mechanical limitation creates bottlenecks that an SSD, with its flash-based memory, completely bypasses.
The Transformative Power of Solid State Drives
The most noticeable improvement you’ll experience after installing an SSD is the dramatic increase in speed. Your laptop will boot up in seconds, applications will launch almost instantaneously, and file transfers will complete in a fraction of the time they once did. This leap in performance isn’t just convenient; it translates directly into enhanced productivity. Imagine less waiting for your system to respond, smoother multitasking, and quicker access to your most important files and programs. For professionals, this means more time working and less time frustrated by a sluggish machine, contributing directly to better workflow efficiency and overall output. From a technological standpoint, SSDs leverage advanced memory controllers and NAND flash memory to achieve astounding data transfer rates, often 5 to 10 times faster than even high-end HDDs. This technological prowess is what underpins the unparalleled responsiveness.
Beyond Speed: Other Key Benefits
While speed is the headline feature, SSDs bring a host of other advantages that significantly enhance the user experience and the longevity of your device:
- Durability and Reliability: Unlike HDDs, SSDs have no moving parts. This makes them far more resistant to physical shock and vibration. Dropping a laptop with an SSD is less likely to result in data loss or drive failure compared to a laptop with an HDD, where the delicate read/write heads can crash into the platters. This robust design is a huge plus for mobile users and adds a layer of digital security for your valuable data.
- Power Efficiency: SSDs consume less power than HDDs, which translates into longer battery life for your laptop. For users on the go, this extended uptime is a significant benefit, allowing you to work or stream longer without needing to find an outlet. This aligns with broader tech trends towards more energy-efficient and sustainable computing.
- Silent Operation: The absence of moving parts also means SSDs are completely silent. No more whirring or clicking noises emanating from your laptop, leading to a quieter and more pleasant working environment. This subtle improvement can greatly enhance focus and reduce distractions.
- Reduced Heat Production: Lower power consumption also means less heat generation. A cooler laptop typically performs better and can extend the lifespan of other internal components, further solidifying the financial wisdom of this upgrade.
These combined benefits make the SSD upgrade not just a performance boost, but a comprehensive enhancement to your laptop’s overall functionality, durability, and user experience, positioning it as a highly cost-effective investment in your existing technology.
Preparation is Key: Choosing the Right SSD and Gathering Your Tools
Before you even think about opening your laptop, thorough preparation is paramount. This phase involves selecting the correct SSD for your device, gathering the necessary tools, and deciding on a strategy for migrating your existing data. Skipping these crucial steps can lead to compatibility issues, lost data, or an unnecessarily complicated installation.
Understanding SSD Types and Compatibility
The world of SSDs has diversified beyond the initial 2.5-inch SATA form factor. Today, you primarily encounter two main types:
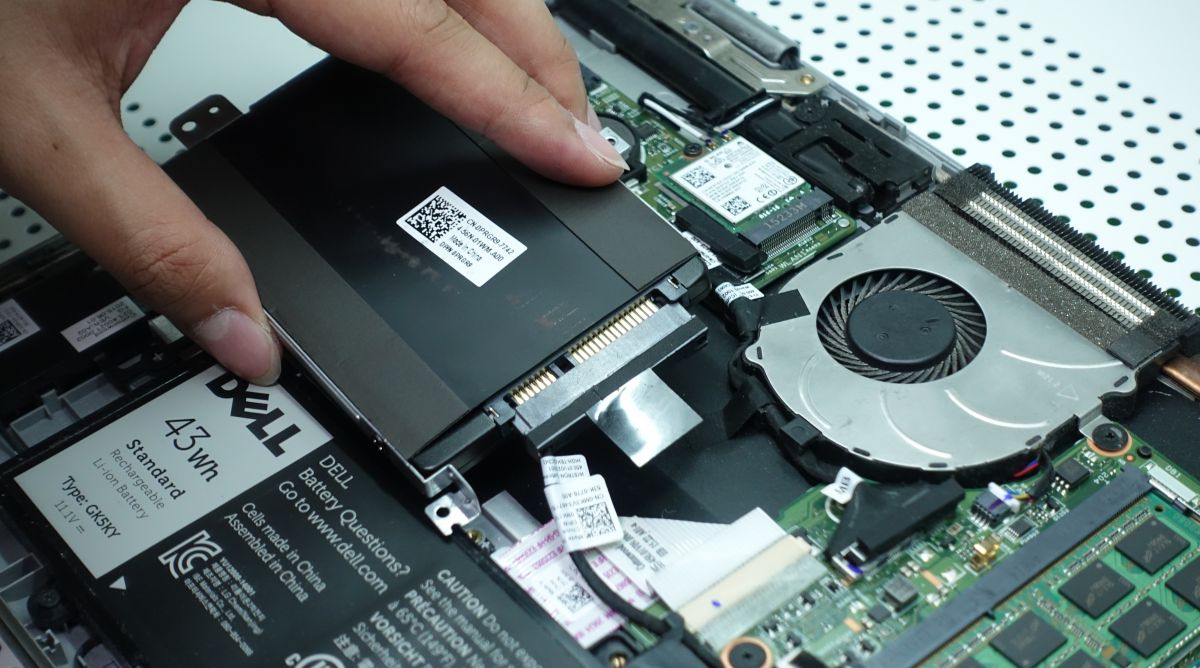
- 2.5-inch SATA SSDs: These are the most common and widely compatible SSDs. They physically resemble traditional laptop HDDs and connect via the same SATA interface. If your laptop currently uses a 2.5-inch HDD, a 2.5-inch SATA SSD is almost certainly a direct replacement. They offer excellent performance improvements over HDDs and are generally more affordable than their NVMe counterparts.
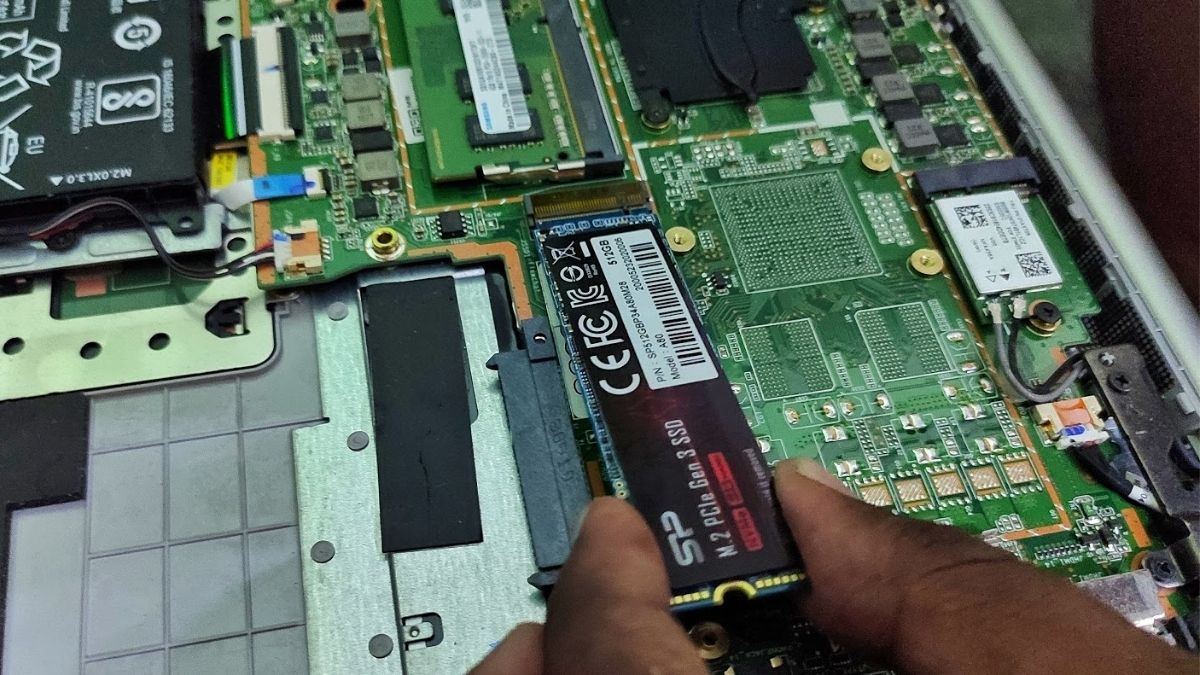
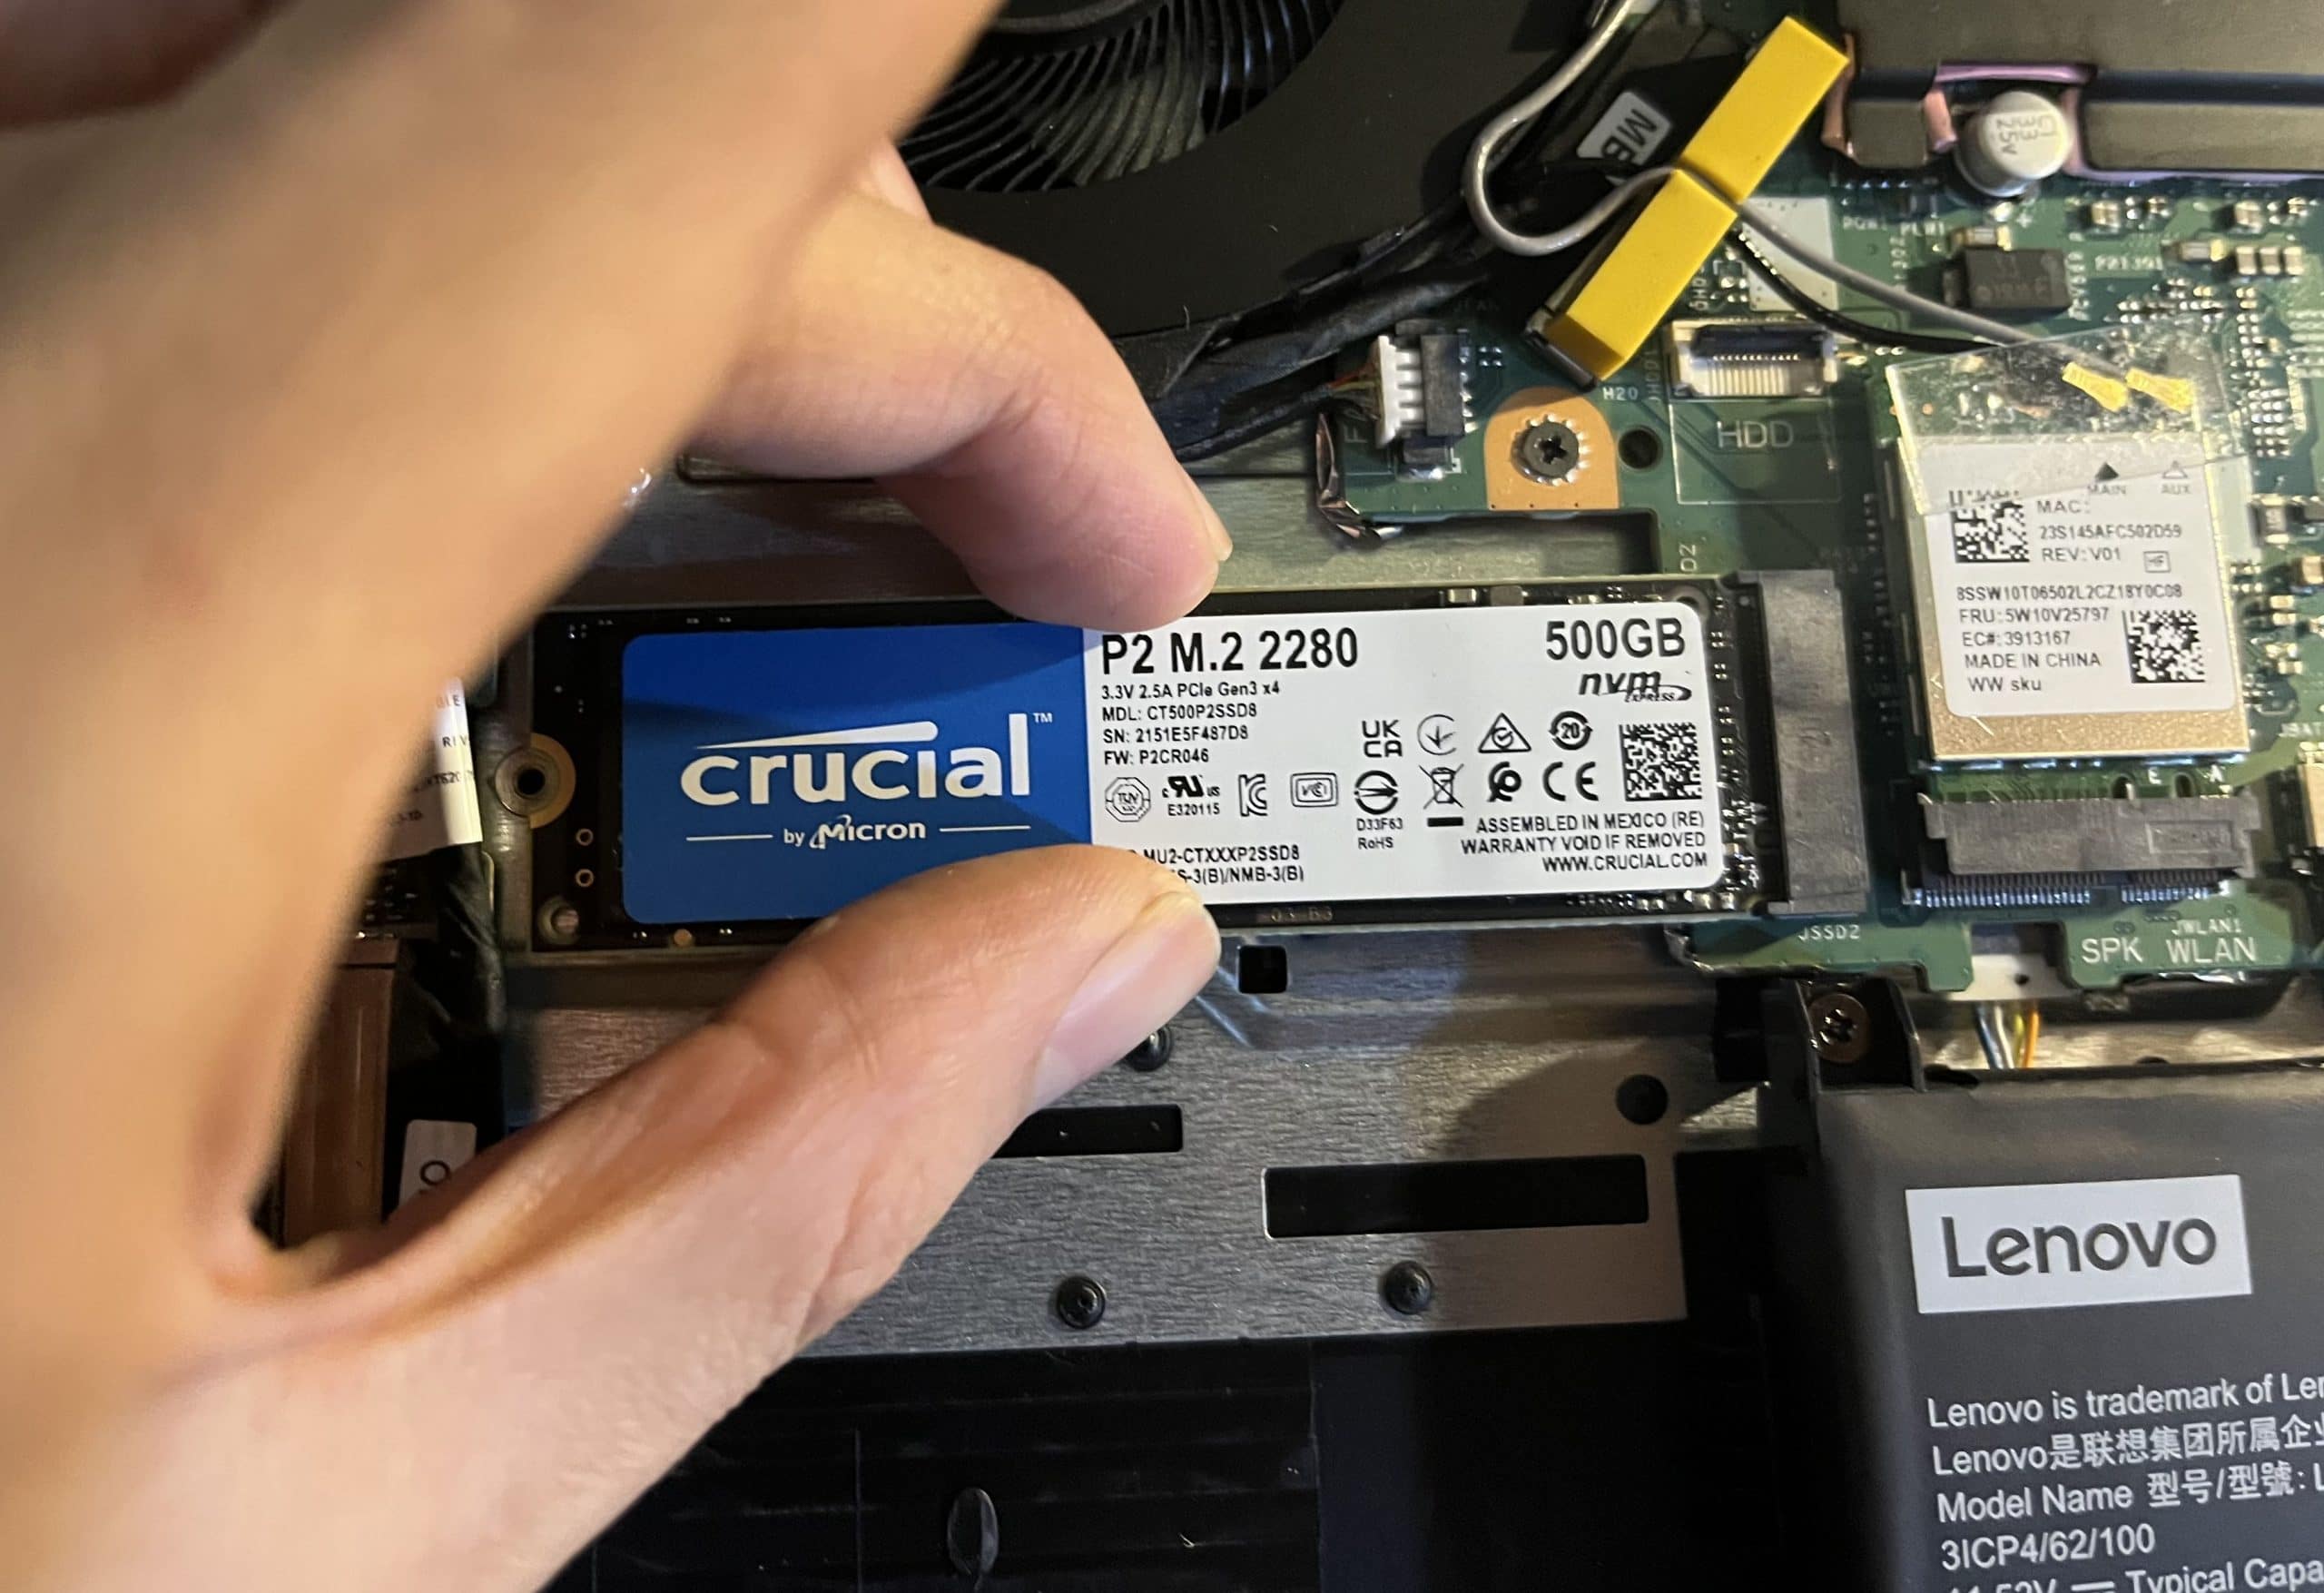
- NVMe M.2 SSDs: These are newer, much smaller (resembling a stick of gum), and significantly faster drives. They connect to an M.2 slot on your laptop’s motherboard and utilize the NVMe (Non-Volatile Memory Express) protocol over the PCIe bus, offering unparalleled speeds. However, not all laptops have an M.2 slot, and even if they do, not all M.2 slots support NVMe (some are SATA M.2).
To determine compatibility:
- Check your laptop’s manual: This is the most reliable source for information on drive types, form factors, and maximum capacities supported.
- Inspect your current drive: If you’re replacing an existing HDD, it’s almost certainly a 2.5-inch SATA drive. If you’re adding an SSD to an empty slot, physically inspect the motherboard for an M.2 slot.
- Use online resources: Websites like Crucial and Kingston offer compatibility scanners where you enter your laptop’s make and model, and they recommend compatible SSDs.
- Consider storage capacity: Balance your storage needs with your budget. While 256GB or 500GB might suffice for basic users, 1TB or more is recommended for professionals or those with large media libraries. Leading brands like Samsung, Crucial, Western Digital, and Kingston offer a wide range of reliable options.
Essential Tools and Pre-Installation Checks
Having the right tools makes the installation process smooth and prevents accidental damage.
- Small Phillips-head screwdriver set: Most laptops use tiny Phillips-head screws. A kit with various sizes is ideal.
- Plastic spudger or guitar pick: Essential for gently prying open plastic laptop cases without scratching or marring the finish. Avoid using metal tools.
- Anti-static wrist strap: Highly recommended to prevent static electricity discharge, which can damage sensitive electronic components.
- External USB enclosure or SATA-to-USB adapter (for cloning): If you plan to clone your existing drive, you’ll need a way to connect the new SSD to your laptop externally before installation.
- USB flash drive (8GB or larger) for clean OS install: If you opt for a fresh operating system installation, you’ll need this to create bootable Windows or Linux media.
- Backup, backup, backup! This cannot be stressed enough. Before starting any hardware upgrade, create a full backup of all your important data to an external drive or cloud service. Accidents happen, and data loss is irreversible. This is a critical digital security practice.
Data Migration Strategies: Clone or Clean Install?
You have two primary options for getting your operating system and data onto the new SSD:
- Cloning Your Existing Drive: This involves creating an exact, sector-by-sector copy of your old drive onto the new SSD.
- Pros: All your programs, settings, and files are transferred exactly as they were. You won’t need to reinstall Windows or any applications.
- Cons: You’ll also copy over any existing bloatware, fragmented files, or system errors from your old drive. The new SSD needs to be at least as large as the data used on your old drive.
- Process: Requires cloning software (e.g., Macrium Reflect Free, EaseUS Todo Backup, or software provided by SSD manufacturers like Samsung Data Migration) and an external connection for the new SSD.
- Clean Installation of the Operating System: This involves installing Windows (or your preferred OS) from scratch onto the new SSD.
- Pros: Provides a completely fresh, optimized operating system with no accumulated junk. It’s often recommended for the best performance.
- Cons: Requires reinstalling all your applications, drivers, and manually transferring your personal files from your backup. It’s more time-consuming initially.
- Process: You’ll need a bootable USB drive with the OS installer and your product key (if applicable).
The choice depends on your preference for convenience versus optimal performance. For most users looking for a hassle-free upgrade, cloning is often the preferred route, provided the old drive is relatively clean. For those seeking maximum speed and a fresh start, a clean install is the way to go.
The Step-by-Step Installation Process
With your SSD selected, tools at hand, and data strategy decided, you’re ready for the physical installation. Remember to proceed with patience and care.
Disassembling Your Laptop with Care
- Power Down and Disconnect: Fully shut down your laptop, unplug the power adapter, and disconnect all peripheral devices (USB drives, external monitors, etc.).
- Remove Battery (if possible): If your laptop has a removable battery, take it out. For laptops with integrated batteries, you’ll need to disconnect the battery connector from the motherboard once the case is open. This is a crucial safety step to prevent electrical shorts.
- Discharge Static Electricity: Wear your anti-static wrist strap. If you don’t have one, touch a grounded metal object (like a radiator) before you start.
- Locate and Remove Screws: Turn your laptop upside down. You’ll see several screws holding the back panel in place. These might be covered by rubber feet or stickers. Carefully remove all screws and keep them organized – some might be different sizes or lengths.
- Gently Pry Open the Case: Use your plastic spudger or guitar pick to carefully pry open the laptop’s back panel. Start from a seam and work your way around, applying gentle, even pressure. Listen for small clicks as the plastic clips release. Do not force it. Once all clips are released, lift the panel away.
The SSD Swap: Precision and Patience
- Locate the Old Drive: Inside, identify your existing HDD or SSD. It’s usually a 2.5-inch rectangular component, often secured within a metal bracket. For M.2 drives, look for a small stick-like component held by a single screw.
- Disconnect the Battery (if integrated): If you couldn’t remove the battery externally, carefully locate its connector on the motherboard and gently disconnect it. This is typically a small, ribbon-like cable.
- Remove the Old Drive:
- 2.5-inch Drive: Unscrew any mounting screws holding the drive or its bracket in place. Carefully slide the drive out of its SATA data and power connector. You may need to transfer the mounting bracket from the old drive to the new SSD.
- M.2 Drive: Remove the single small screw holding the M.2 drive down. The drive will pop up slightly. Gently slide it out of its slot.
- Install the New SSD:
- 2.5-inch SATA SSD: Attach the mounting bracket (if any) to the new SSD. Slide the new SSD into the SATA data and power connector. Secure it with the mounting screws. Ensure it’s firmly seated.
- NVMe M.2 SSD: Gently slide the M.2 SSD into its slot at an angle. Push it down until it’s flat, then secure it with the single mounting screw.
- Reconnect Integrated Battery: If you disconnected the battery, carefully reconnect it to the motherboard.
Reassembly and Initial Boot-up
- Reattach the Back Panel: Carefully align the back panel with the laptop’s chassis. Apply gentle, even pressure around the edges until all the plastic clips snap back into place.
- Replace Screws: Screw all the removed screws back into their respective holes. Do not overtighten them.
- Reconnect Peripherals: Reinstall the external battery (if applicable) and plug in the power adapter.
- First Boot: Power on your laptop. If you cloned your drive, it should ideally boot directly into your familiar operating system. If you plan a clean install, you’ll need to boot from your USB installation media. You might need to access the BIOS/UEFI settings (usually by pressing F2, F10, F12, or DEL during boot-up) to change the boot order to prioritize the new SSD or your USB installer.
Post-Installation: Optimizing Your New SSD Experience
Successfully installing your SSD is a major milestone, but a few additional steps will ensure you get the most out of your upgrade and maintain its performance over time.
Operating System Installation and Driver Updates
- Operating System:
- Cloned Drive: Verify that everything transferred correctly. Check file integrity and application functionality. Your system should feel snappier immediately.
- Clean Install: Follow the on-screen prompts of your operating system installer. Once the OS is installed, the next crucial step is to install all necessary drivers.
- Driver Updates: After a clean install, your laptop might be running on generic drivers.
- Chipset Drivers: Visit your laptop manufacturer’s support website (e.g., Dell, HP, Lenovo, Asus) and download the latest chipset drivers for your specific model. These are vital for proper communication between the SSD and the rest of your system.
- Graphics and Other Drivers: While you’re there, download and install updated graphics, audio, and network drivers.
- SSD Firmware: Some SSD manufacturers release firmware updates that can improve performance and reliability. Check your SSD manufacturer’s website for any available updates and their specific installation instructions.
Essential SSD Maintenance and Longevity Tips
Unlike HDDs, SSDs don’t require defragmentation; in fact, it can reduce their lifespan. Here are key optimization tips:
- Enable TRIM: TRIM is an essential command that helps your operating system tell the SSD which data blocks are no longer in use and can be erased. This ensures the SSD maintains optimal write performance. TRIM is usually enabled by default in modern operating systems (Windows 7 and later, macOS, modern Linux kernels). You can verify its status through your OS’s command prompt.
- Verify AHCI Mode: Advanced Host Controller Interface (AHCI) mode is crucial for SSD performance features like TRIM and hot-swapping. Ensure your BIOS/UEFI is set to AHCI mode (not IDE mode) for the SATA controller. This is usually the default for modern systems, but worth checking.
- Avoid Excessive Writes: While SSDs are incredibly durable, they do have a finite number of write cycles. Avoid constantly writing and rewriting large files unnecessarily. This is a minor concern for most users, but something to be aware of for extremely heavy data users.
- Over-Provisioning: Some SSDs come with a small percentage of their capacity reserved for internal operations, improving performance and longevity. While you typically don’t need to manually configure this, it’s good to know it contributes to the drive’s health.
- Keep Some Free Space: It’s generally recommended to leave at least 10-15% of your SSD’s capacity free. This allows the drive’s internal garbage collection and wear-leveling algorithms to function efficiently, maintaining performance.
Troubleshooting Common Issues
While the process is generally straightforward, you might encounter minor hiccups:
- Laptop Doesn’t Boot:
- Check all internal cable connections, especially the SSD’s SATA or M.2 connection and the battery.
- Access BIOS/UEFI and confirm the new SSD is recognized and is set as the primary boot device.
- If using a clean install, ensure your bootable USB is detected and set as the first boot option.
- SSD Not Recognized by OS:
- In Windows, open Disk Management (right-click Start -> Disk Management). The new SSD might appear as unallocated space. You’ll need to initialize it and create a new partition.
- Ensure all necessary drivers, especially chipset drivers, are installed.
- Performance Not as Expected:
- Verify TRIM and AHCI are enabled.
- Ensure you have the latest drivers from your laptop manufacturer.
- Check for any SSD firmware updates.
By following these guidelines, you’ll not only successfully install your new SSD but also maximize its performance and lifespan, ensuring your laptop continues to deliver a fast, reliable, and highly productive computing experience. This investment in your tech savvy and hardware will pay dividends in your daily digital life, truly globalizing your capabilities.
aViewFromTheCave is a participant in the Amazon Services LLC Associates Program, an affiliate advertising program designed to provide a means for sites to earn advertising fees by advertising and linking to Amazon.com. Amazon, the Amazon logo, AmazonSupply, and the AmazonSupply logo are trademarks of Amazon.com, Inc. or its affiliates. As an Amazon Associate we earn affiliate commissions from qualifying purchases.