Selenium is an indispensable tool for anyone involved in web development, testing, or even automating repetitive online tasks. At its core, Selenium is a suite of tools designed to automate web browsers. This allows developers and testers to write scripts that can interact with web pages just like a human user would, performing actions like clicking buttons, filling forms, and navigating through websites. The primary benefit of using Selenium lies in its ability to significantly speed up the testing process, ensure the reliability of web applications, and unlock new possibilities for web automation beyond traditional testing.
Given the broad spectrum of topics covered by this website, from cutting-edge Tech like AI tools and digital security to strategic Brand building and savvy Money management, understanding how to implement tools like Selenium can offer a powerful advantage. For tech professionals, it’s a fundamental skill for building and validating robust software. For those focused on branding and marketing, understanding web automation can lead to more efficient data collection and analysis. And for individuals and businesses managing their finances, automating tasks can directly translate into saved time and resources, which can then be reinvested into growth or other financial strategies. This article will guide you through the essential steps of installing Selenium, setting you on the path to harnessing its power for your projects.
Understanding Selenium: Beyond Just Installation
Before diving into the installation process, it’s crucial to grasp what Selenium entails and why it’s such a valuable asset in the modern digital landscape. Selenium is not a single program but rather a collection of tools. The most prominent among these is the Selenium WebDriver. WebDriver is an API and set of libraries that allow you to write test scripts in various programming languages (like Java, Python, C#, Ruby, JavaScript) to control web browsers. It’s the engine that drives browser automation.
Beyond WebDriver, Selenium also encompasses Selenium IDE (Integrated Development Environment), a browser extension that allows for recording and playback of user interactions, and Selenium Grid, which enables parallel execution of tests across multiple machines and browsers, dramatically speeding up large-scale testing efforts. For the purposes of this guide, we will focus on setting up Selenium WebDriver, as it forms the foundation for most advanced automation tasks.
The significance of Selenium extends across various domains. In the Tech sector, it’s a cornerstone of Continuous Integration and Continuous Delivery (CI/CD) pipelines, ensuring that software changes are thoroughly tested and deployed efficiently. For Brand professionals, it can be used for competitive analysis, website performance monitoring, and even automating social media interactions (with careful consideration for platform terms of service). Financially, by automating repetitive online tasks, individuals and businesses can save significant amounts of time and money, freeing up resources for investment or other revenue-generating activities. Imagine automating the process of checking competitor pricing, scraping publicly available market data, or even performing preliminary checks on your own website’s functionality after an update – these are all tasks where Selenium can shine.
Setting Up Your Development Environment
To install and use Selenium effectively, you need a properly configured development environment. This involves having a programming language installed, along with the necessary tools to manage its packages and libraries. Since Selenium WebDriver supports multiple programming languages, your choice will depend on your existing skillset or project requirements. Python and Java are among the most popular choices due to their extensive libraries and strong community support.
Choosing Your Programming Language
For this guide, we will primarily use Python as it’s known for its readability and ease of use, making it a popular choice for beginners and experienced developers alike. Python’s extensive ecosystem of libraries also complements Selenium perfectly. If you are already proficient in Java, you can follow similar principles, adapting the commands to Java’s syntax and build tools like Maven or Gradle.
If you choose Python, you’ll need to install it first. You can download the latest version from the official Python website (python.org). During the installation process, it’s highly recommended to check the box that says “Add Python to PATH.” This will make it easier to run Python commands from your terminal or command prompt.
Installing a Package Manager
Once Python is installed, you’ll need a package manager to easily install and manage Selenium and other libraries. For Python, pip is the standard package manager. Pip is usually installed automatically with Python. To ensure it’s installed and up-to-date, open your terminal or command prompt and run:
python -m pip install --upgrade pip
This command will download and install the latest version of pip. Having an up-to-date package manager is crucial for smooth installations and to avoid potential compatibility issues.
For Java developers, build automation tools like Maven or Gradle serve a similar purpose, managing dependencies and project builds. You would typically add Selenium as a dependency in your pom.xml (for Maven) or build.gradle (for Gradle) file.
Installing Selenium WebDriver
The core of your Selenium setup involves installing the Selenium WebDriver library for your chosen programming language and then downloading the appropriate browser drivers.
Installing the Selenium Library
Using pip, installing the Selenium library for Python is remarkably straightforward. Open your terminal or command prompt and execute the following command:
pip install selenium
This command will download and install the latest stable version of the Selenium library for Python. Once this command completes successfully, you’ll have the necessary Python bindings to start writing your Selenium scripts.
If you were using Java with Maven, you would add the following dependency to your pom.xml file:
<dependency>
    <groupId>org.seleniumhq.selenium</groupId>
    <artifactId>selenium-java</artifactId>
    <version>4.x.x</version> <!-- Replace with the latest version -->
</dependency>
Similarly, for Gradle:
implementation 'org.seleniumhq.selenium:selenium-java:4.x.x' // Replace with the latest version
Remember to replace 4.x.x with the current latest version of Selenium WebDriver available. You can find the latest version on the official Selenium website or through your build tool’s repositories.
Downloading Browser Drivers (WebDrivers)
Selenium WebDriver needs to communicate with a browser to automate it. This communication is facilitated by specific “drivers” that act as intermediaries between your Selenium scripts and the browser. Each browser has its own driver. The most common ones are:
- ChromeDriver: For Google Chrome.
- GeckoDriver: For Mozilla Firefox.
- MSEdgeDriver: For Microsoft Edge.
- InternetExplorerDriver: For Internet Explorer (less commonly used now).
- SafariDriver: For Apple Safari.
The process of obtaining and managing these drivers has evolved. In earlier versions of Selenium, you had to manually download the driver executable and place it in a location accessible by your system’s PATH environment variable, or specify its path in your code. However, recent versions of Selenium WebDriver (Selenium 4 onwards) have introduced WebDriver Manager, which automates the downloading and management of these browser drivers.
Using WebDriver Manager (Recommended for Selenium 4+)
WebDriver Manager is a library that simplifies the process of managing browser drivers. It automatically detects the browser version installed on your system and downloads the compatible driver executable.
If you are using Python with Selenium 4+, you can install WebDriver Manager using pip:
pip install webdriver-manager
Once installed, you can use it in your Python script to automatically handle the driver for your desired browser. For example, to use ChromeDriver:
from selenium import webdriver
from selenium.webdriver.chrome.service import Service as ChromeService
from webdriver_manager.chrome import ChromeDriverManager


<p style="text-align:center;"><img class="center-image" src="https://media.geeksforgeeks.org/wp-content/uploads/20191227170655/Screenshot-from-2019-12-26-13-28-471.png" alt=""></p>


# Use WebDriver Manager to automatically download and manage ChromeDriver
driver = webdriver.Chrome(service=ChromeService(ChromeDriverManager().install()))

# Now you can use the 'driver' object to automate Chrome
# For example:
# driver.get("https://www.google.com")
# print(driver.title)
# driver.quit()
The ChromeDriverManager().install() part is where the magic happens. It checks your installed Chrome version, downloads the correct ChromeDriver if it’s not already present, and returns its path.
For Firefox using GeckoDriver:
from selenium import webdriver
from selenium.webdriver.firefox.service import Service as FirefoxService
from webdriver_manager.firefox import GeckoDriverManager

driver = webdriver.Firefox(service=FirefoxService(GeckoDriverManager().install()))
# ... rest of your Firefox automation code
And for Microsoft Edge:
from selenium import webdriver
from selenium.webdriver.edge.service import Service as EdgeService
from webdriver_manager.microsoft import EdgeChromiumDriverManager

driver = webdriver.Edge(service=EdgeService(EdgeChromiumDriverManager().install()))
# ... rest of your Edge automation code
Manual Driver Management (Older Method/Specific Scenarios)
While WebDriver Manager is the preferred and most convenient method, it’s good to be aware of the manual approach, especially if you are working with older Selenium versions or have specific environmental constraints.
- Identify Browser and Version: Determine which browser you want to automate and its exact version installed on your machine.
- Download the Correct Driver:
- ChromeDriver: Visit the official ChromeDriver download page (https://chromedriver.chromium.org/downloads).
- GeckoDriver: Visit the GeckoDriver releases page (https://github.com/mozilla/geckodriver/releases).
- MSEdgeDriver: Visit the Microsoft Edge WebDriver page (https://developer.microsoft.com/en-us/microsoft-edge/tools/webdriver/).
Download the driver executable that matches your operating system (Windows, macOS, Linux) and the architecture (32-bit or 64-bit).
- Place the Driver Executable:
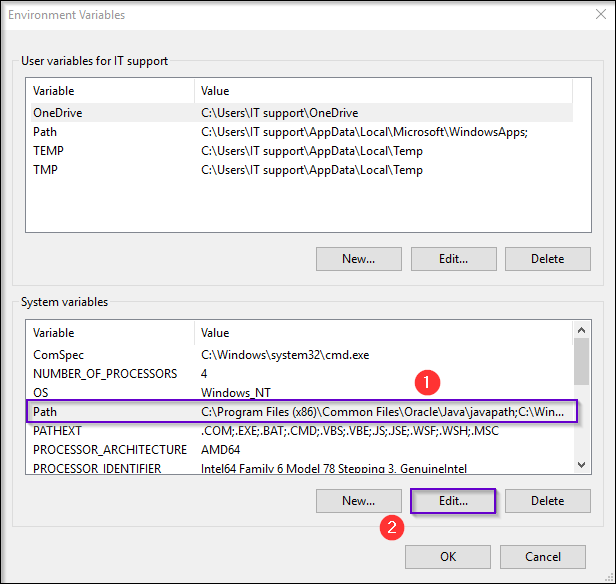
- Add to PATH: The most convenient way is to add the directory containing the driver executable to your system’s PATH environment variable. This allows you to run the driver from anywhere in your terminal.
- Specify Path in Code: Alternatively, you can specify the full path to the driver executable directly in your Selenium script.
For example, in Python, if you downloaded chromedriver.exe and placed it in a folder like C:WebDriver, and you haven’t added it to your PATH, you would initialize the driver like this:
from selenium import webdriver

# Specify the path to the ChromeDriver executable
driver_path = "C:\WebDriver\chromedriver.exe"
driver = webdriver.Chrome(executable_path=driver_path)

# ... rest of your automation code
Note: The executable_path argument is deprecated in newer versions of Selenium. The recommended way is to use Service objects, even for manually managed drivers.
from selenium import webdriver
from selenium.webdriver.chrome.service import Service as ChromeService

# Specify the path to the ChromeDriver executable
driver_path = "C:\WebDriver\chromedriver.exe"
service = ChromeService(executable_path=driver_path)
driver = webdriver.Chrome(service=service)

# ... rest of your automation code
Verifying Your Selenium Installation
After completing the installation steps, it’s essential to verify that everything is set up correctly. This will ensure that you can start using Selenium without encountering unexpected errors.
A Simple Test Script
The best way to verify your installation is to write a small script that launches a browser, navigates to a webpage, and then closes the browser.
Create a new Python file (e.g., test_selenium.py) and paste the following code:
from selenium import webdriver
from selenium.webdriver.chrome.service import Service as ChromeService
from webdriver_manager.chrome import ChromeDriverManager

try:
    # Initialize the Chrome driver using WebDriver Manager
    print("Attempting to initialize Chrome WebDriver...")
    driver = webdriver.Chrome(service=ChromeService(ChromeDriverManager().install()))
    print("WebDriver initialized successfully.")

    # Navigate to a website
    print("Navigating to Google.com...")
    driver.get("https://www.google.com")
    print(f"Page title: {driver.title}")

    # Perform a simple assertion (optional but good practice)
    assert "Google" in driver.title
    print("Title verification successful.")

except Exception as e:
    print(f"An error occurred: {e}")

finally:
    # Close the browser
    if 'driver' in locals() and driver:
        print("Closing the browser...")
        driver.quit()
        print("Browser closed.")

print("nSelenium installation and basic test completed successfully!")
How to Run the Script:
- Save the code as
test_selenium.py. - Open your terminal or command prompt.
- Navigate to the directory where you saved the file.
- Run the script using the command:
python test_selenium.py
If your installation is successful, you should see output in your terminal indicating that the browser was launched, navigated to Google, and then closed. You might also briefly see a Chrome browser window open and then close automatically.

Troubleshooting Common Issues
WebDriverExceptionorNoSuchDriverException: This is the most common error and usually means the browser driver is not found.- WebDriver Manager: Ensure
webdriver-manageris installed and that your browser is installed and accessible. Sometimes, a browser update requires a corresponding driver update. - Manual Installation: Double-check that the driver executable is in your system’s PATH, or that the
executable_pathin your script is correct. Ensure the driver version is compatible with your browser version.
- WebDriver Manager: Ensure
- Version Mismatch: Different versions of Selenium WebDriver, browser drivers, and browsers themselves need to be compatible. Always try to use the latest stable versions or check compatibility matrices.
- Firewall/Antivirus: In rare cases, security software might block the driver from running.
- Browser Not Opening: Verify that the browser you are trying to automate is installed correctly on your system.
By following these steps, you should have a fully functional Selenium WebDriver setup ready for your automation and testing endeavors. This foundational skill can unlock significant efficiencies, whether you’re optimizing your tech development cycles, refining your brand’s online presence, or managing your finances more effectively by automating tedious tasks.
aViewFromTheCave is a participant in the Amazon Services LLC Associates Program, an affiliate advertising program designed to provide a means for sites to earn advertising fees by advertising and linking to Amazon.com. Amazon, the Amazon logo, AmazonSupply, and the AmazonSupply logo are trademarks of Amazon.com, Inc. or its affiliates. As an Amazon Associate we earn affiliate commissions from qualifying purchases.