In the ever-evolving landscape of automotive enhancements, certain accessories stand out for their blend of practicality, aesthetic appeal, and long-term value. Among these, rain guards, also known as window deflectors or vent visors, have carved a significant niche. Far more than just a decorative trim, these sleek additions offer a surprising array of benefits that resonate with the modern car owner – from enhancing comfort and digital security to potentially contributing to a vehicle’s brand image and even its financial efficiency. This comprehensive guide will walk you through the process of installing rain guards, transforming what might seem like a complex task into an empowering DIY project. We’ll delve into the nuances of different types, the essential preparation, and the precise steps to ensure a flawless fit, all while subtly connecting to the broader themes of technological literacy, personal brand enhancement, and smart financial management.

The Unsung Heroes of Automotive Comfort and Tech Protection
Before we dive into the nuts and bolts of installation, let’s explore why rain guards are increasingly becoming a must-have for discerning drivers. Their primary function is straightforward: to allow you to crack open your windows for fresh air, even during inclement weather, without letting rain, snow, or sleet invade your vehicle’s cabin. However, their utility extends far beyond this basic premise, touching upon aspects relevant to technology integration, personal comfort, and even vehicle longevity.
Imagine this scenario: you’re navigating a humid summer day, and the air conditioning is struggling to keep up. Or perhaps you’ve just picked up a takeout order, and its lingering aroma is threatening to become a permanent fixture in your car. With rain guards, you can effortlessly ventilate your vehicle, expelling stale air, heat, and unwanted odors, all while protecting your sensitive in-car electronics from moisture exposure. This is particularly crucial in an age where vehicles are equipped with sophisticated infotainment systems, digital dashboards, and numerous charging ports for our personal gadgets. Protecting these tech investments from water damage or excessive humidity is a silent but significant benefit.
Beyond ventilation, rain guards also play a role in reducing wind noise and glare. The aerodynamic design subtly redirects airflow, leading to a quieter cabin experience, which in turn enhances the clarity of your car’s audio system or hands-free calls. The subtle tinting or design of many rain guards can also help mitigate harsh sunlight, offering a degree of UV protection for your interior and reducing strain on your eyes. From a safety perspective, maintaining clear windows without rain streaks running down the side glass improves visibility, a critical factor for any driver.
From a brand perspective, installing rain guards is a subtle yet effective way to personalize and upgrade your vehicle’s exterior. It signals attention to detail and a proactive approach to vehicle care, elements that contribute positively to your personal brand and the perceived value of your car. It’s an aftermarket accessory that, when chosen and installed correctly, seamlessly integrates with the vehicle’s design, enhancing its overall aesthetic appeal rather than detracting from it.
Why Every Driver Should Consider Rain Guards
The decision to install rain guards isn’t merely about convenience; it’s about smart vehicle management and lifestyle enhancement.
- Optimal Air Circulation: Combat stuffiness, eliminate odors (food, pets, sports gear), and reduce interior condensation without exposing your cabin to the elements. This is especially vital for maintaining air quality and protecting the fabric and electronic components inside.
- Protecting Your Tech & Interior: Direct exposure to rain can damage power window mechanisms, door panel electronics, and even upholstery. Rain guards act as a first line of defense, keeping these vulnerable areas dry. In a world where car interiors are becoming increasingly digitized, this protection is paramount.
- Reduced Glare and Improved Visibility: By deflecting sunlight and rain spray, they contribute to a clearer view of your surroundings, making for a safer and more comfortable drive. This improved visibility is a passive safety feature that complements your vehicle’s active safety systems.
- Fuel Efficiency (Minor but Present): While not their primary function, allowing you to drive with windows slightly open at moderate speeds can sometimes be more fuel-efficient than relying solely on air conditioning, especially during specific climate conditions. This slight reduction in AC load can translate into marginal savings over time, contributing to your personal finance strategy for car ownership.
- Enhanced Aesthetics & Resale Value: A well-maintained vehicle with thoughtful additions like rain guards often presents better on the resale market. It suggests a diligent owner who cares about their investment, which can lead to higher offers. This aligns with maximizing your “money” aspect of vehicle ownership.
- Personalization and Brand Identity: Like a well-chosen gadget or a tailored suit, rain guards can subtly elevate your vehicle’s appearance, reflecting your personality and attention to detail. This contributes to the overall “brand” of your vehicle and, by extension, your own.
Decoding Rain Guard Technology: In-Channel vs. Tape-On
Understanding the different types of rain guards is crucial for selecting the right product for your vehicle and ensuring a successful installation. Broadly, rain guards fall into two main categories, each with its own “tech” and installation methodology: In-Channel and Tape-On.
In-Channel Rain Guards: The Integrated Approach
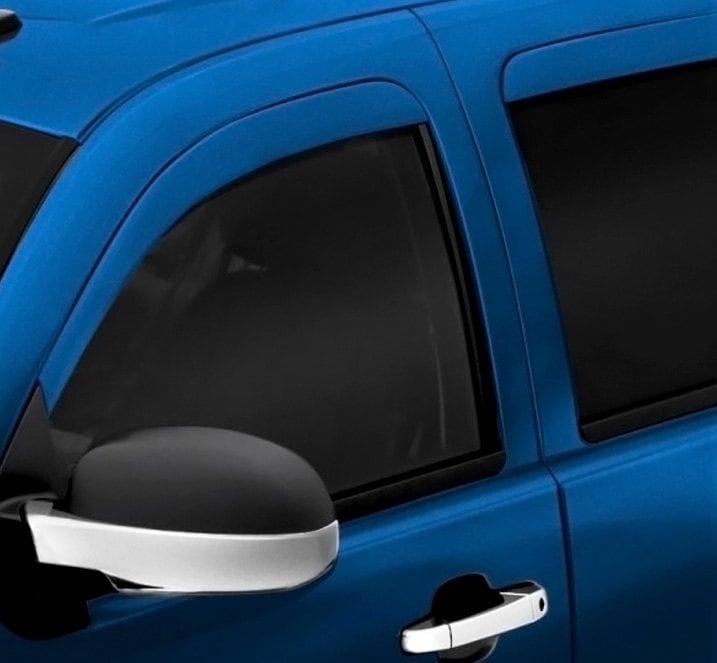
In-channel rain guards represent a more integrated design philosophy. As their name suggests, these deflectors are designed to fit directly into your vehicle’s window channels. This method provides a sleek, factory-installed look, as the outer surface of the rain guard is flush with the vehicle’s exterior, minimizing protrusion.
- Technology & Design: These guards often utilize a combination of durable, flexible acrylic or polycarbonate materials that are custom-molded to fit specific vehicle makes and models. Their design relies on tension and sometimes small clips to secure them within the window frame. The material technology often includes UV inhibitors to prevent fading and maintain structural integrity over time.
- Advantages:
- Sleek Appearance: They offer a streamlined look, as there’s no visible exterior tape or adhesive, making them blend seamlessly with the car’s design – a key consideration for maintaining a vehicle’s brand aesthetic.
- Secure Fit: Once properly installed, they are less prone to being dislodged by high winds or car washes due to their internal mounting.
- Reduced Risk of Paint Damage: No external adhesive means no risk of damaging your car’s paint finish upon removal.
- Disadvantages:
- Installation Nuances: Can sometimes be a bit trickier to install, requiring careful manipulation into the window channel and a “setting period” where windows must remain closed.
- Potential for Window Interference: In rare cases, improper installation or overly thick guards can cause power windows to “bind” or trigger anti-pinch safety features. Modern designs largely mitigate this, showcasing advancements in product engineering.
Tape-On Rain Guards: The Surface Mount Solution
Tape-on rain guards are affixed to the exterior frame of your car’s door, just above the window. This method relies on strong, automotive-grade adhesive tape (typically 3M VHB tape) to secure them in place.
- Technology & Design: These guards are also made from durable acrylic or polycarbonate, custom-fitted for specific vehicles. The critical “tech” here is the adhesive itself – 3M VHB (Very High Bond) tape is an industry standard, engineered to withstand extreme temperatures, moisture, and vibration, ensuring a lasting bond. Some also come with an adhesive promoter to further enhance grip.
- Advantages:
- Easier Installation: Generally considered simpler to install, as it involves cleaning, peeling, and sticking, making it a highly accessible DIY project for even novice enthusiasts.
- No Window Interference: Since they are external, there’s no chance of them interfering with your window’s operation.
- Wider Availability: Often available for a broader range of vehicle models and in various styles.
- Disadvantages:
- Visible Adhesive: The adhesive tape is typically hidden but can be visible from certain angles, which some find less aesthetically pleasing than in-channel models.
- Potential for Paint Damage: While unlikely with proper removal techniques, there’s a slight risk of damaging paint if removed incorrectly, or if low-quality tape is used. Investing in reputable brands mitigates this risk.
- Cleaning: The gap between the guard and the door frame can accumulate dirt, requiring specific cleaning attention.
Regardless of the type, both represent a smart “tech upgrade” for your vehicle, enhancing functionality and comfort. Choosing between them often comes down to personal aesthetic preference, desired ease of installation, and specific vehicle compatibility. Always refer to your vehicle’s manual and the rain guard manufacturer’s instructions for the best fit.
The DIY Tool Kit: Equipping for Success
Embarking on any DIY project requires the right tools and materials. Installing rain guards is no exception. While the process is relatively straightforward, having the correct items at hand ensures efficiency, precision, and a professional finish. This section outlines the essential toolkit, emphasizing how preparation is the cornerstone of a successful installation – a principle that holds true whether you’re working on your car or managing a complex tech project.
Essential Tools and Materials
Gathering these items beforehand will streamline your installation process and prevent frustrating interruptions.
- Your New Rain Guards: Ensure they are specific to your vehicle”s make, model, and year. Double-check for front and rear, and driver/passenger side markings.
- Rubbing Alcohol (Isopropyl Alcohol, 70% or higher): Critical for thoroughly cleaning the adhesion surface. This isn’t just about removing visible dirt; it’s about eliminating invisible oils, waxes, and residues that could compromise the adhesive bond. Think of it as preparing a digital canvas for a high-resolution image – every pixel needs to be clean.
- Clean Microfiber Cloths: Several of them. These are superior to paper towels or cotton rags as they are lint-free and highly absorbent, crucial for a streak-free clean.
- Mild Car Wash Soap and Water: For an initial, more extensive cleaning of the window frame area.
- Adhesive Promoter (Optional but Recommended for Tape-On): A small wipe or pen-like applicator that chemically enhances the bond between the 3M tape and the vehicle surface. It’s a small investment that significantly boosts the longevity and security of tape-on guards, akin to using a primer before painting.
- Scissors or Utility Knife (for Tape-On): Needed to carefully cut or score the adhesive backing, allowing for a controlled peel-and-stick application.
- Masking Tape (for Test Fit): Useful for temporarily holding the guards in place during a test fit, especially for in-channel types.
- Measuring Tape (Optional): Can be helpful for precise alignment, though often visual alignment is sufficient.
- Hair Dryer or Heat Gun (Optional): For cold weather installations. Gentle heat can help warm the adhesive tape, making it more pliable and improving its bonding strength.
The Art of Preparation: Setting the Stage for Perfection
A significant portion of a successful rain guard installation hinges on meticulous preparation. Skipping steps here is the quickest way to a short-lived or poorly adhered product. This is where the “tech” aspect of precision and systematic execution really comes into play.
- Read the Instructions Thoroughly: Every brand and model of rain guard might have slight variations in their recommended installation steps. Always, always start by reading the manufacturer’s guide. This minimizes errors and ensures you adhere to warranty conditions.
- Choose the Right Environment:
- Temperature: Most adhesives, especially 3M VHB tape, perform best when applied in temperatures between 60°F and 100°F (15°C and 38°C). Avoid extreme cold, which makes the adhesive brittle, or extreme heat, which can make it too soft. If installing in colder weather, use a hair dryer to gently warm both the adhesive tape on the guard and the car’s surface.
- Dry Conditions: Ensure the vehicle and ambient environment are completely dry. Moisture is the enemy of adhesive bonding.
- Clean Area: Work in a clean, well-lit area, preferably out of direct sunlight to prevent premature drying of cleaning agents.
- Thorough Cleaning is Non-Negotiable:
- Initial Wash: Begin by washing the exterior window frame areas with car wash soap and water. This removes surface dirt, grime, and environmental contaminants. Rinse thoroughly and dry completely with a microfiber cloth.
- Alcohol Wipe-Down: This is the most crucial cleaning step. Saturate a clean microfiber cloth with rubbing alcohol and vigorously wipe down the entire surface where the rain guard will adhere (for tape-on) or where it will sit within the channel (for in-channel). The alcohol removes waxes, silicones, and unseen residues. Repeat this step with a fresh, alcohol-saturated cloth until no dirt or residue appears on the cloth. Allow the alcohol to fully evaporate.
- Adhesive Promoter (Tape-On Only): If using, apply the adhesive promoter according to its specific instructions to the areas where the tape will make contact. Allow it to flash off (dry) for a few minutes as directed. This step enhances the bond significantly, offering peace of mind regarding the guard’s long-term adhesion.
- Test Fit Each Guard: Before peeling any adhesive or committing to installation, hold each rain guard up to its intended window. This “dry run” allows you to:
- Confirm it’s the correct guard for that window.
- Visualize the exact placement.
- Practice the motion of inserting/applying it.
- For in-channel guards, check for any potential obstructions or tight spots. For tape-on, use masking tape to temporarily hold it in place to ensure perfect alignment. Mark the edges with masking tape if precise alignment points are needed.
By investing time in preparation, you’re not just ensuring a better bond; you’re adopting a methodical approach that minimizes errors and maximizes the lifespan of your automotive enhancement. This discipline is a hallmark of any successful technical endeavor.
Step-by-Step Installation Guide: Bringing Your Vision to Life
With your preparation complete and tools at the ready, it’s time for the actual installation. The process differs slightly depending on whether you have in-channel or tape-on rain guards. We’ll cover both in detail, providing clear, actionable steps that emphasize precision and patience.
Installing Tape-On (External Mount) Rain Guards
This method is generally considered more straightforward, relying on the strength of automotive-grade adhesive.
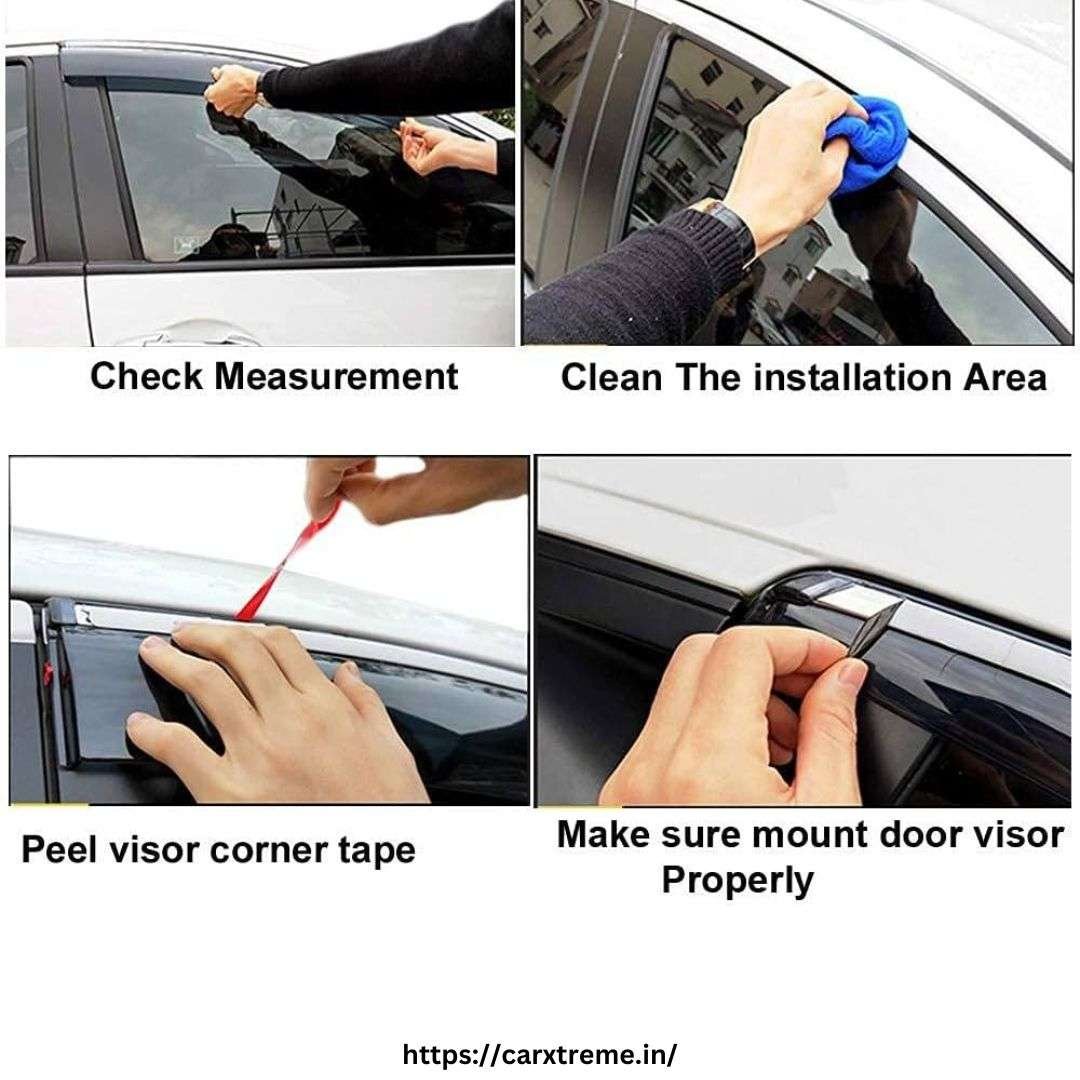
- Prepare the Adhesive Backing: For each rain guard, carefully peel back about 1 to 2 inches (2-5 cm) of the red protective film from each end of the 3M adhesive tape. Do NOT remove the entire backing yet. Let the peeled ends hang freely. This technique allows for precise alignment before committing the full adhesive bond.
- Align the Guard: Carefully position the rain guard onto the window frame, aligning it perfectly with the curves and edges of your door. Use the test fit marks or your visual guide to ensure it’s straight and symmetrically placed. This is the most critical step; take your time. Once the ends are aligned, the rest of the guard should fall into place naturally.
- Begin Adhesion (One Side): Once perfectly aligned, firmly press down on one of the ends where you’ve peeled back the adhesive. Apply steady, firm pressure for about 30 seconds to initiate the bond.
- Gradual Adhesion and Full Backing Removal: While maintaining gentle pressure on the adhered end, slowly and steadily pull the remaining protective backing strip from the opposite end, working your way along the length of the rain guard. As the backing is removed, progressively press the rain guard firmly against the vehicle’s surface. Ensure continuous, even pressure across the entire length.
- Final Firm Press: Once the entire backing is removed and the guard is in place, go over the entire length of the rain guard, applying firm, consistent pressure for at least 60 seconds. Pay extra attention to the edges and ends. This ensures maximum contact and a strong bond between the adhesive and your car’s surface.
- Repeat for All Windows: Follow the same meticulous process for each remaining window.
Installing In-Channel Rain Guards
This method offers a cleaner look but requires a bit more finesse and patience.
- Lower the Window: Roll down the window completely for the door you are working on.
- Insert the Front Edge: Take the rain guard for that window. Start by inserting the front edge (the part closest to the side mirror) into the window channel, sliding it up gently until it seats firmly.
- Flex and Fit: Gently flex the middle of the rain guard outwards, away from the car, and then carefully work the rest of the rain guard into the window channel. You might need to gently bend it a bit to clear the weather stripping. Do not force it.
- Install Retention Clips (If Provided): Many in-channel rain guards come with small metal or plastic clips. If yours does, carefully slide these clips into the channel at the designated points (usually indicated by small indentations or specific instructions). These clips provide additional security and prevent the guard from shifting.
- Secure the Rear Edge: Ensure the entire length of the rain guard is seated snugly within the channel. The rear edge should also be firmly in place.
- Raise the Window Slowly: This is a crucial step for in-channel guards. Slowly and carefully roll the window up until it makes firm contact with the lower edge of the rain guard. The window’s pressure helps to seat the guard securely into the channel and provides the necessary tension.
- “Setting Period” – Keep Windows Closed: This is critical for the rain guard to properly “set.” It is highly recommended to keep the windows closed for a minimum of 24 to 72 hours (refer to the manufacturer’s specific recommendation). This allows the guard to form a secure, permanent fit within the channel and for any clips to settle properly. Opening the window too soon can dislodge the guard or prevent it from seating correctly, leading to rattling or poor performance.
Post-Installation Care and Long-Term Value
Congratulations! You’ve successfully installed your rain guards. However, the process isn’t entirely finished. Proper post-installation care ensures the longevity of your new accessory and maximizes its benefits. This is where the “money” and “brand” aspects of your investment come into play – safeguarding your work and preserving the aesthetic and functional value.
Immediate Post-Installation Tips
- Avoid Car Washes: For tape-on guards, avoid automatic car washes for at least 72 hours (or longer, as per manufacturer recommendation) to allow the adhesive to fully cure and achieve maximum bond strength. Hand washing is fine, but be gentle around the new guards. For in-channel guards, while less critical, it’s still good practice to be mindful during the initial days.
- Window Closure (In-Channel Specific): Reiterate the importance of keeping windows closed for the recommended setting period (24-72 hours). This allows the guard to properly conform to the channel and prevents any premature dislodging.
- Visual Inspection: After the setting period, perform a final visual and tactile inspection of all guards. Ensure they are still securely in place, with no gaps or loose edges.
Maintenance for Longevity
Maintaining your rain guards is straightforward and involves incorporating them into your regular car care routine.
- Regular Cleaning: Just like the rest of your car, rain guards can accumulate dirt and grime. Wash them regularly with mild car soap and water. For in-channel guards, occasionally use a detailing brush or soft cloth to clean any debris that might collect in the small gap between the guard and the window trim. This helps prevent minor scratches on your window glass from trapped grit.
- Avoid Harsh Chemicals: Do not use abrasive cleaners, strong solvents, or waxes containing harsh chemicals on your rain guards, especially those made of acrylic. These can dull the finish, cause discoloration, or degrade the material over time. Stick to car-safe cleaners.
- Inspect for Damage: Periodically check for any cracks, chips, or signs of looseness. Addressing minor issues early can prevent them from escalating. If a tape-on guard starts to lift, you might be able to re-secure it with additional automotive-grade double-sided tape or specialized adhesive, but always ensure the surface is meticulously clean beforehand.
Troubleshooting Common Issues
Even with careful installation, minor issues can sometimes arise. Knowing how to troubleshoot can save you time and potential frustration.
- Rattling (In-Channel Guards): This usually indicates the guard isn’t fully seated in the channel or the retention clips (if used) aren’t properly installed. Roll the window down, firmly re-seat the guard, ensure clips are in place, and then slowly roll the window back up, repeating the setting period.
- Window Binding/Slow Operation (In-Channel Guards): This is rare with modern designs but can occur if the guard is too thick or improperly installed. Try gently flexing the guard in the channel to relieve pressure. If the issue persists, the guard might be incompatible with your window’s anti-pinch safety system, or it may need to be slightly trimmed (if the manufacturer allows and it’s safe to do so) or replaced with a thinner model.
- Lifting/Poor Adhesion (Tape-On Guards): The most common cause is inadequate surface preparation (insufficient cleaning or no adhesive promoter). Clean the lifted area thoroughly with rubbing alcohol, apply adhesive promoter, and then re-apply a fresh strip of automotive-grade VHB tape. Ensure firm pressure during re-application and observe the 72-hour curing time.
- Wind Noise: A slight increase in wind noise can sometimes be expected as you’ve altered the aerodynamics. However, excessive noise might indicate a poor seal or improper alignment. Re-check the fitment.
The Holistic Benefits: Tech, Brand, and Money in Harmony
The installation of rain guards, while seemingly a minor car modification, encapsulates a fascinating interplay of themes central to our modern lives: technology, brand, and money.
From a technology perspective, the rain guards themselves are products of sophisticated material science and aerodynamic design. Their precise fit and durable construction are a testament to modern manufacturing. The DIY installation process itself is an exercise in practical technical skill – meticulous preparation, precise execution, and systematic troubleshooting. It empowers individuals to take control of their vehicle’s enhancements, fostering a sense of accomplishment and technical literacy. Furthermore, by protecting your car’s interior electronics from moisture and facilitating better cabin air quality, rain guards safeguard your digital investments within the vehicle.
In terms of brand, your car is often an extension of your personal or professional identity. A well-maintained vehicle with thoughtful, integrated accessories like rain guards speaks volumes. It conveys attention to detail, a commitment to quality, and a proactive approach to asset management. For businesses, a fleet equipped with such subtle enhancements can reflect a brand’s dedication to employee comfort and the longevity of its assets. The aesthetic improvement offered by sleek rain guards subtly enhances the vehicle’s “brand” appeal, contributing to a polished and professional image.
Finally, the money aspect is clear. Opting for a DIY installation significantly saves costs compared to professional fitting services, allowing you to invest those savings elsewhere. By extending the life of your car’s interior, protecting its electronic components, and potentially boosting its resale value, rain guards represent a shrewd financial decision. They are a relatively inexpensive upgrade that offers disproportionately high returns in terms of comfort, protection, and long-term vehicle health, aligning perfectly with principles of smart personal finance and asset preservation.
In conclusion, installing rain guards is more than just adding an accessory; it’s an investment in comfort, protection, and the overall value of your vehicle. By following this detailed guide, you’re not just affixing a piece of plastic; you’re applying a methodical, tech-informed approach that enhances your vehicle’s brand and wisely manages your automotive investment. Enjoy the fresh air, come rain or shine!
aViewFromTheCave is a participant in the Amazon Services LLC Associates Program, an affiliate advertising program designed to provide a means for sites to earn advertising fees by advertising and linking to Amazon.com. Amazon, the Amazon logo, AmazonSupply, and the AmazonSupply logo are trademarks of Amazon.com, Inc. or its affiliates. As an Amazon Associate we earn affiliate commissions from qualifying purchases.