
In an increasingly digital world, the need for physical documents might seem to be waning, yet printers remain an indispensable tool for homes, small businesses, and large corporations alike. Whether you’re printing important contracts, family photos, school assignments, or marketing materials, the seamless operation of your printer hinges on one critical component: the print driver. Without the correct driver, your computer and printer are effectively speaking different languages, rendering your device useless.
This comprehensive guide will demystify the process of installing print drivers, ensuring your printer setup is efficient, secure, and ready to tackle any task. We’ll delve into why drivers are essential, walk you through the preparation and installation steps across different operating systems, offer solutions to common troubleshooting hurdles, and provide best practices to maintain optimal performance. Mastering print driver installation isn’t just a technical skill; it’s a productivity booster and a fundamental aspect of managing your digital workflow in an increasingly integrated tech landscape.
Understanding Print Drivers: The Essential Software Bridge
Before we dive into the “how-to,” let’s clarify “what” a print driver is and why it holds such a pivotal role in your printing ecosystem.
What Exactly is a Print Driver?
At its core, a print driver is a piece of software that acts as an interpreter between your computer’s operating system (OS) and your printer. Every printer, regardless of its brand or model, has its own unique set of instructions and functionalities. Similarly, every operating system—be it Windows, macOS, Linux, or Chrome OS—has its own way of sending commands and data. The print driver bridges this communication gap.
When you click “Print” on a document, the application (e.g., Microsoft Word, Adobe Photoshop) sends the data to the operating system. The OS then passes this data to the print driver. The driver’s job is to translate that generic print data into specific commands and a format that your particular printer model can understand and execute. It tells the printer how to lay down ink, which trays to use, whether to print in color or black and white, and other crucial settings. Without this translation layer, your computer wouldn’t know how to tell the printer to perform its functions, leading to error messages or no response at all.
Why Drivers are Absolutely Crucial for Your Printer’s Functionality
The importance of print drivers extends beyond mere communication; they dictate the full capabilities and performance of your printer.
- Enabling Basic Functionality: The most obvious reason is that without a driver, your printer simply won’t work. The computer won’t recognize it as a printing device, and you won’t be able to send print jobs.
- Unlocking Advanced Features: Modern printers come packed with features like duplex printing, specific paper tray selections, various print quality modes, scanning (for multifunction devices), and network connectivity options. The print driver is what exposes and allows you to control these advanced functionalities through your computer’s print dialogs and printer utility software. An outdated or generic driver might only offer basic print options, leaving many of your printer’s capabilities untapped.
- Optimizing Performance and Quality: Drivers are often optimized by the manufacturer to deliver the best possible print quality and speed for their specific hardware. They manage ink consumption, paper handling, and print head movements, directly impacting the output quality and efficiency. A poorly matched or generic driver can result in blurry prints, incorrect colors, or slower print speeds.
- Ensuring Compatibility and Stability: As operating systems evolve with new updates and security patches, printer manufacturers regularly release updated drivers to maintain compatibility and stability. Using an outdated driver can lead to frequent errors, crashes, or conflicts with other software, disrupting your workflow and impacting productivity.
- Security Implications: Drivers, like any software, can have vulnerabilities. Manufacturers periodically release driver updates that include security patches to protect against potential threats, especially for network-connected printers. Ensuring your drivers are up-to-date is a small but important step in maintaining your digital security posture.
In essence, the print driver is the brain that connects your computer’s intentions with your printer’s actions. Understanding its role is the first step towards a smooth and efficient printing experience, vital for personal use and crucial for business operations where reliable document output can directly impact deadlines and client satisfaction.
Preparing for Print Driver Installation: Laying the Groundwork
Before you embark on the installation process, a little preparation can save you a lot of time and frustration. Gathering the right information and ensuring your system is ready will make the installation process significantly smoother.
Identifying Your Printer and Operating System
The first and most critical step is to accurately identify your printer and the specifications of your computer.
- Printer Model: Locate the exact brand and model number of your printer. This information is usually found on a label on the printer itself (often on the front, top, back, or bottom), in the printer’s manual, or on its packaging. For example, “HP LaserJet Pro MFP M227fdw” or “Epson EcoTank ET-2760.” Generic names like “HP Printer” are not sufficient. The exact model number is crucial for finding the correct driver.
- Operating System (OS): Determine which operating system your computer is running and its specific version (e.g., Windows 11, Windows 10 64-bit, macOS Sonoma 14, macOS Ventura 13).
- For Windows: Right-click on the “This PC” or “My Computer” icon (or search for “System Information” in the Start menu) and select “Properties.” This will display your Windows version and whether it’s 32-bit or 64-bit.
- For macOS: Click the Apple menu in the top-left corner of the screen and select “About This Mac.” This will show your macOS version.
Understanding these details is paramount because drivers are OS-specific and model-specific. A driver for Windows 10 64-bit will not work for macOS, nor will a driver for an Epson printer work for an HP printer.
Gathering Necessary Resources and Pre-installation Checks
Once you know your printer and OS, you can gather the required resources.
- Internet Connection: For downloading drivers from the manufacturer’s website or relying on Windows/macOS built-in update services, a stable internet connection is essential.
- Printer Cables/Network Information:
- USB Connection: Have a compatible USB cable ready. Ensure both ends are standard USB-A to USB-B (common for printers) or USB-C if your printer supports it.
- Network Connection (Ethernet): If connecting via Ethernet, ensure the printer is plugged into your router/switch with an Ethernet cable.
- Wireless Connection (Wi-Fi): For Wi-Fi printers, you’ll need your Wi-Fi network name (SSID) and password. Some printers allow setup directly on the device’s control panel, while others require a temporary USB connection for initial network configuration.
- Administrator Privileges: To install software, including print drivers, you typically need an administrator account on your computer. Ensure you are logged in with an account that has these permissions, or have the administrator password handy.
- Disabling Antivirus/Firewall (Temporarily, if necessary): While generally not recommended as a first step, in rare cases, overly aggressive antivirus or firewall software might interfere with the driver installation process, especially if the installer tries to make significant system changes or connect to the internet. If you encounter issues, you might temporarily disable them (and remember to re-enable immediately after installation).
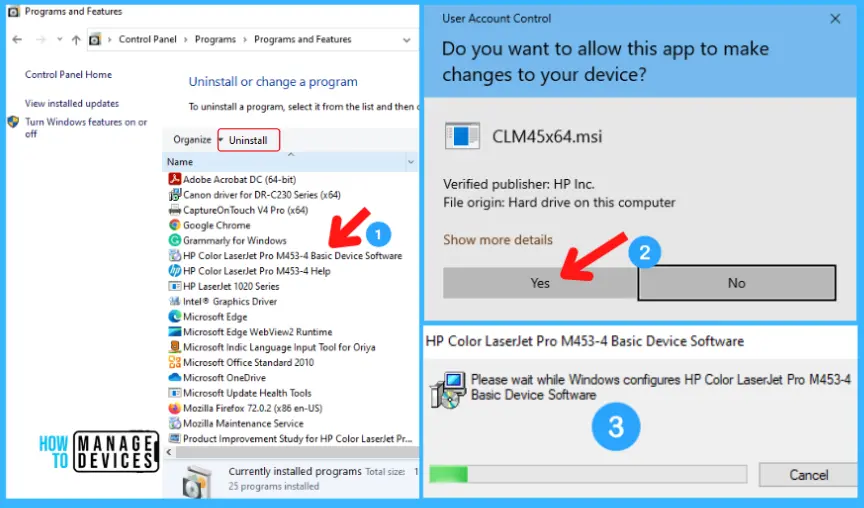
- Uninstalling Old Drivers (if applicable): If you’re replacing an old printer with a new one of the same brand, or if you had issues with a previous driver installation, it’s often a good practice to uninstall any existing drivers for that printer.
- For Windows: Go to “Settings” > “Apps” > “Apps & features,” find any printer-related software, and uninstall it. Then, go to “Settings” > “Bluetooth & devices” > “Printers & scanners,” select the old printer, and click “Remove device.” Finally, search for “Print Management” in the Start menu, go to “All Drivers,” and remove any old drivers associated with the printer.
- For macOS: Go to “System Settings” > “Printers & Scanners,” select the old printer, and click the minus (-) button.
By meticulously going through these preparatory steps, you establish a solid foundation for a successful and trouble-free print driver installation, setting the stage for a productive printing workflow.
Step-by-Step Guide to Installing Print Drivers
With your preparations complete, you’re ready to install the print drivers. The method you choose will largely depend on your operating system and how your printer connects to your computer.
Method 1: Automatic Installation (Plug and Play)
Many modern printers support “Plug and Play,” where your operating system attempts to automatically detect and install the necessary drivers. This is often the easiest method.
For Windows:
- Connect the Printer: Power on your printer. If it’s a USB printer, connect the USB cable to both the printer and your computer. For network printers (Ethernet or Wi-Fi), ensure it’s connected to the network and powered on.
- Allow Automatic Detection: Windows should typically detect the new hardware and attempt to install a suitable driver automatically. You might see a notification indicating “Device setup is complete” or “Installing device driver software.”
- Check in Settings: Go to “Settings” > “Bluetooth & devices” > “Printers & scanners.” Your printer should appear in the list.
- Windows Update (If not automatically detected): If Windows doesn’t find a driver automatically, you can prompt it.
- Go to “Settings” > “Update & Security” (or “Windows Update” in Windows 11) > “View optional updates.”
- Look for “Driver updates” and select any printer-related drivers. Click “Download and install.”
For macOS:
- Connect the Printer: Power on your printer. For USB printers, connect the USB cable. For network printers, ensure it’s connected to the network.
- Add Printer: Go to “System Settings” (or “System Preferences” on older macOS versions) > “Printers & Scanners.”
- Click the Add Button: Click the “+” (plus) button at the bottom of the printer list.
- Select the Printer: macOS will scan for available printers.
- For USB printers, it should appear in the “Default” tab.
- For Wi-Fi/network printers, it should also appear, or you might need to use the “IP” tab if connecting directly via IP address (less common for home users).
- Choose Driver: Once selected, macOS will usually automatically detect the correct driver. If it offers a “Use” or “Print Using” dropdown, select “AirPrint” (if available, for modern network printers) or the specific printer model name.
- Add: Click “Add” to finalize the installation.
Method 2: Manual Installation (Using Manufacturer’s Drivers)
If automatic installation fails, or if you want to ensure you have the full-featured, most up-to-date driver, downloading directly from the manufacturer is the best approach.
Step 1: Download the Driver
- Visit Manufacturer’s Website: Open your web browser and go to the official support website for your printer’s manufacturer (e.g., support.hp.com, epson.com/support, canon.com/support).
- Find Support/Downloads Section: Look for sections like “Support,” “Drivers,” “Downloads,” or “Customer Service.”
- Search for Your Printer: Enter your exact printer model number (e.g., “HP LaserJet Pro MFP M227fdw”) into the search bar.
- Select OS: On the printer’s support page, ensure you select your correct operating system and its bit version (32-bit or 64-bit). The website often tries to detect this automatically, but always double-check.
- Download the Latest Driver: Download the recommended full software package or the basic print driver. The full software package often includes utility tools, scanning software (for MFPs), and diagnostic programs, which are generally useful. Choose the latest version available. Save the installer file to a location you can easily find, like your “Downloads” folder or Desktop.
Step 2: Install the Driver (Windows)
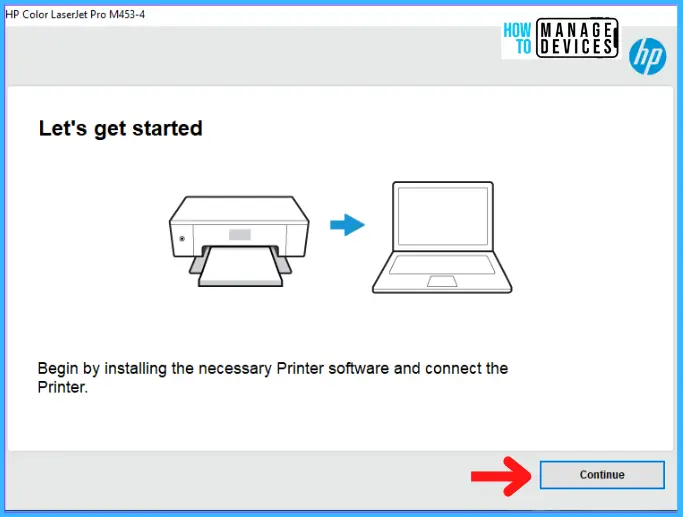
- Disconnect Printer (Optional but Recommended): For USB printers, it’s often recommended to disconnect the USB cable from the computer before running the installer. The installer will prompt you when to reconnect it. For network printers, ensure it’s powered on and connected to the network.
- Run the Installer: Navigate to where you saved the downloaded file (it’s usually an
.exefile). Double-click it to run the installer. - Follow On-Screen Prompts:
- Administrator Privileges: If prompted by User Account Control (UAC), click “Yes” to allow the program to make changes.
- License Agreement: Read and accept the software license agreement.
- Installation Type: Choose “Typical,” “Express,” or “Recommended” for most users. “Custom” allows you to select specific components.
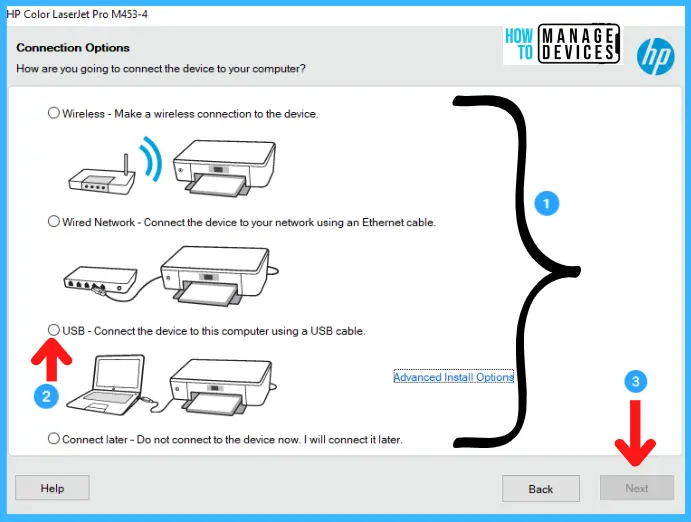
- Connection Type: The installer will ask how your printer is connected (USB, Wireless, Ethernet). Select the appropriate option.
- Connect Printer: If you disconnected your USB printer, the installer will usually tell you exactly when to connect it. Follow these instructions precisely.
- Network Setup: For Wi-Fi printers, the installer might guide you through connecting the printer to your wireless network if it’s not already connected. This may involve temporarily connecting via USB or using the printer’s control panel.
- Complete Installation: Once the installation wizard finishes, click “Finish” or “Close.”
- Verify Installation:
- Go to “Settings” > “Bluetooth & devices” > “Printers & scanners.” Your printer should be listed.
- Right-click on your printer and select “Printer properties” to access advanced settings and print a test page.
- Attempt to print a document from an application like Notepad or Word.
Step 3: Install the Driver (macOS)
For macOS, downloaded drivers are usually provided as a .dmg file.
- Open the DMG: Double-click the downloaded
.dmgfile. This will mount a virtual disk image. - Run the Installer: Inside the mounted disk image, you’ll typically find a
.pkgfile. Double-click it to start the installer. - Follow On-Screen Prompts:
- Administrator Privileges: Enter your macOS administrator password when prompted.
- License Agreement: Agree to the terms.
- Installation Type: Follow the instructions.
- Connect Printer: The installer will guide you on when to ensure the printer is connected and powered on.
- Add Printer to System Settings: The installer might automatically add the printer, or you might need to manually add it via “System Settings” > “Printers & Scanners” (as described in Method 1), selecting your printer from the list and ensuring the correct driver is chosen.
- Complete Installation: Click “Close” after the installation is complete. You can then eject the
.dmgfile by dragging it to the trash or right-clicking it. - Verify Installation:
- Go to “System Settings” > “Printers & Scanners.” Your printer should be listed.
- Select your printer and click “Options & Supplies” to check settings and print a test page.
- Attempt to print a document from any application.
By following these detailed steps, you should be able to successfully install your print drivers and get your printer up and running efficiently.
Troubleshooting Common Print Driver Issues
Even with careful preparation and execution, you might encounter issues during or after print driver installation. Don’t worry; many common problems have straightforward solutions. This section will help you diagnose and resolve the most frequent printer-related headaches.
Printer Not Detected or Offline
This is one of the most common issues. Your computer simply can’t “see” your printer.
- Check Physical Connections:
- Power: Is the printer powered on? Is its power cable securely plugged into an outlet and the printer?
- USB: Is the USB cable securely plugged into both the printer and the computer? Try a different USB port on your computer.
- Network (Ethernet/Wi-Fi): Is the Ethernet cable securely plugged into both the printer and the router/switch? For Wi-Fi, ensure the printer is connected to the correct Wi-Fi network and has a strong signal. You can usually check the Wi-Fi status on the printer’s control panel.
- Restart Everything: Turn off your printer, computer, and router (if it’s a network printer). Wait for about 30 seconds, then power on the router first, then the printer, and finally your computer. This often resolves temporary communication glitches.
- Check Printer Status: Many printers have status lights or a small display panel. Check for any error messages or indicators that might suggest a problem (e.g., “Paper Jam,” “Out of Ink,” “Offline”). Resolve any physical issues first.
- Windows:
- Go to “Settings” > “Bluetooth & devices” > “Printers & scanners.” Ensure the printer is listed and not showing an “Offline” status. If it is, right-click and select “Open print queue,” then “Printer” > “Use Printer Offline” to uncheck it.
- Run the Windows Troubleshooter: Search for “Troubleshoot settings” in the Start menu, then select “Other troubleshooters” and run the “Printer” troubleshooter.
- macOS:
- Go to “System Settings” > “Printers & Scanners.” If your printer is listed but greyed out or shows “Offline,” try removing it (select and click “-“) and then adding it again (“+”).
Driver Not Installing Correctly or Driver Conflicts
Sometimes the driver installation process itself fails, or an existing driver causes problems.
- Re-download the Driver: The downloaded file might be corrupted. Delete it and download a fresh copy from the manufacturer’s official website.
- Ensure Administrator Privileges: Always run driver installers with administrator rights.
- Temporarily Disable Antivirus/Firewall: As mentioned in preparation, these can sometimes interfere. Disable them temporarily during installation and re-enable immediately afterward.
- Clear Print Spooler (Windows): A corrupted print spooler service can prevent drivers from installing or printing.
- Search for “Services” in the Start menu and open it.
- Find “Print Spooler” in the list, right-click it, and select “Stop.”
- Open File Explorer and navigate to
C:WindowsSystem32spoolPRINTERS. Delete all files in this folder (you might need administrator permission). - Go back to the “Services” window, right-click “Print Spooler,” and select “Start.”
- Now try installing the driver again.
- Uninstall Previous Drivers (Thoroughly): If you had a previous driver for the same printer (or a similar one from the same manufacturer), it might be causing conflicts. Perform a thorough uninstall as detailed in the “Preparation” section, including checking Print Management for orphaned drivers.
- Compatibility Mode (Windows): If you’re installing an older driver on a newer OS, right-click the installer
.exefile, go to “Properties” > “Compatibility,” and try running it in compatibility mode for an earlier version of Windows.
Printing Errors (e.g., “Printer Not Responding,” Blank Pages)
The driver might be installed, but printing doesn’t work as expected.
- Print a Test Page: This helps isolate if the problem is application-specific or system-wide.
- Windows: Go to “Settings” > “Bluetooth & devices” > “Printers & scanners,” click your printer, select “Printer properties,” and then “Print Test Page” on the “General” tab.
- macOS: Go to “System Settings” > “Printers & Scanners,” select your printer, click “Options & Supplies,” and look for a “Print Test Page” or “Utility” tab.
- Check Print Queue: Is there a backlog of print jobs?
- Windows: Go to “Settings” > “Bluetooth & devices” > “Printers & scanners,” click your printer, and select “Open print queue.” Cancel any pending jobs.
- macOS: Go to “System Settings” > “Printers & Scanners,” click your printer, and then click “Open Print Queue.” Cancel or delete any jobs.
- Update Firmware: Sometimes, issues aren’t with the driver but with the printer’s internal software (firmware). Check the manufacturer’s website for firmware updates for your specific model and follow their instructions carefully to install them. This often requires connecting the printer via USB.
- Check Ink/Toner and Paper: It sounds obvious, but ensure cartridges aren’t empty, properly seated, and that there’s paper in the tray. Low ink can sometimes cause printing to halt without clear messages.
- Generic vs. Specific Driver: If your OS installed a generic driver (e.g., “Generic PCL 6 Driver”), it might lack full functionality. Manually install the specific driver from the manufacturer’s website.
By systematically addressing these common troubleshooting scenarios, you can often pinpoint and resolve print driver issues, restoring your printer to full functionality and maintaining an efficient workflow. Remember patience and a methodical approach are your best tools here.
Advanced Tips and Best Practices for Printer Drivers
Beyond basic installation and troubleshooting, there are several advanced tips and best practices that can enhance your printer’s performance, extend its lifespan, and maintain the security of your printing environment. Integrating these habits into your tech routine can significantly improve your overall experience.
Keeping Drivers Updated and Secure
Just like any other software on your computer, print drivers are not a “set it and forget it” component. Regular updates are crucial.
- Schedule Regular Checks: Make it a habit to visit your printer manufacturer’s support website every few months. Check for new driver versions, especially after major operating system updates (e.g., Windows 11 updates, new macOS versions). Manufacturers often release critical updates for compatibility and performance.
- Why Updates Matter:
- Performance Improvements: New drivers often contain optimizations that can lead to faster print speeds, better print quality, and more efficient resource utilization.
- Bug Fixes: Updates address known bugs and glitches that might cause printing errors or software crashes.
- Enhanced Features: Manufacturers might add support for new paper types, cloud printing services, or other features through driver updates.
- Security Patches: This is arguably the most critical reason. Networked printers can be vulnerable to security exploits. Driver updates often include patches to close security loopholes, protecting your data and network from potential threats. Outdated drivers are a potential vector for cyberattacks, making security a key “Tech” and even “Money” (in terms of business continuity) consideration.
- Automatic Updates (Use with Caution): While some operating systems or printer software offer automatic driver updates, it’s generally safer to manually verify and install them from the manufacturer’s site. This ensures you’re getting the official, tested version and avoids potential issues with generic or unverified drivers.
Optimizing Printer Settings and Productivity
Once your drivers are installed and up-to-date, delve into the printer settings to customize your experience and boost productivity.
- Default Settings: Access your printer’s preferences (usually through “Settings” > “Printers & scanners” on Windows, or “System Settings” > “Printers & Scanners” on macOS).
- Duplex Printing: If your printer supports it, enable automatic double-sided printing by default to save paper and reduce environmental impact. This is a subtle yet effective “Money” saving tip.
- Color vs. Grayscale: Set grayscale as the default for most documents to save expensive color ink/toner. Only switch to color when necessary.
- Print Quality: For everyday documents, “Draft” or “Normal” quality is often sufficient and faster, saving ink/toner. Use “Best” or “Photo” quality only for high-resolution images.
- Paper Type: Ensure the default paper type matches what you use most often. Incorrect paper type settings can lead to jams or poor print quality.
- Custom Profiles: For specific tasks (e.g., printing photos on glossy paper, printing labels), create custom print profiles. This saves you from adjusting settings every time and ensures consistent results.
- Print Spooling Management (Windows): If you experience frequent print delays or errors, you can adjust spooling settings in the printer’s properties. Changing it from “Start printing immediately” to “Spool print documents so program finishes printing faster” (with “Start printing after last page is spooled” selected) might resolve some issues, especially for large documents.
- Network Printer Sharing: For home or small office environments, consider sharing a printer over your network. This allows multiple computers to use the same physical printer, maximizing resource utilization and enhancing team productivity (relevant for “Brand” and “Money” for small businesses). Ensure proper network security settings are in place.
Security and Maintenance Considerations
A well-maintained and secure printing environment is crucial, especially for businesses or those handling sensitive information.
- Download from Official Sources Only: Always download drivers and firmware from the printer manufacturer’s official website. Avoid third-party driver download sites, as they can host outdated, incorrect, or even malicious software that could compromise your system’s security. This is a fundamental “Digital Security” best practice.
- Regular Printer Cleaning: Refer to your printer’s manual for recommended cleaning procedures. This typically involves cleaning print heads, rollers, and scanning glass (for MFPs) to prevent jams and maintain print quality.
- Consumable Management: Monitor ink/toner levels and replace cartridges promptly. Using genuine manufacturer cartridges can often lead to better print quality and fewer issues, though third-party options can offer cost savings (“Money”).
- Physical Security: If your printer stores print jobs or has internal storage, consider its physical security, especially in shared environments. Some business-class printers offer secure print features where jobs are only released after a user authenticates at the printer.
- Recycle Old Equipment Responsibly: When upgrading or disposing of old printers, ensure any personal data stored on the device is wiped, and recycle it through appropriate e-waste channels.
By adopting these advanced tips and best practices, you move beyond merely installing a driver to truly managing your printing resources effectively. This not only enhances your personal productivity but also contributes to a more secure, efficient, and cost-effective digital ecosystem, aligning perfectly with a tech-savvy approach to managing both your “Tech” tools and your “Money.” A smoothly running printer, supported by well-maintained drivers, is an invaluable asset in today’s interconnected world.
aViewFromTheCave is a participant in the Amazon Services LLC Associates Program, an affiliate advertising program designed to provide a means for sites to earn advertising fees by advertising and linking to Amazon.com. Amazon, the Amazon logo, AmazonSupply, and the AmazonSupply logo are trademarks of Amazon.com, Inc. or its affiliates. As an Amazon Associate we earn affiliate commissions from qualifying purchases.