FL Studio stands as a titan in the realm of Digital Audio Workstations (DAWs), a beloved platform for countless music producers, beatmakers, and audio engineers worldwide. From its intuitive interface to its powerful sequencing capabilities, it offers a robust environment for crafting everything from complex electronic soundscapes to crisp, radio-ready tracks. However, the true magic of FL Studio, and indeed any modern DAW, often lies beyond its native offerings – in the vast, ever-expanding universe of plugins.
Plugins are the secret sauce, the creative catalysts that empower producers to sculpt unique sounds, imbue tracks with professional sheen, and push the boundaries of their artistic vision. Whether you’re chasing the warmth of vintage synthesizers, the punch of a perfectly tuned compressor, or the ethereal shimmer of a custom reverb, third-party plugins are indispensable tools. For newcomers, the process of acquiring, installing, and effectively utilizing these external tools can seem daunting. But fear not; this comprehensive guide will demystify the entire process, transforming you from a hesitant beginner into a confident FL Studio power user. We’ll navigate the technicalities, offer best practices, and even touch upon how mastering these tools not only elevates your sonic output but also bolsters your brand as a producer and potentially unlocks new financial avenues in the music industry.
Understanding FL Studio’s Plugin Ecosystem
Before we dive into the nitty-gritty of installation, it’s crucial to grasp what plugins are, why they’re so important, and how they integrate with your DAW. This foundational knowledge will make the installation process smoother and help you troubleshoot any issues that might arise.
What are VSTs and Why are They Crucial?
The term “VST” stands for Virtual Studio Technology, a software interface standard developed by Steinberg in the late 1990s. Essentially, VST allows software instruments and effects to be integrated into digital audio workstations. Think of them as virtual versions of hardware synthesizers, drum machines, and audio processors, all living within your computer.
There are primarily two types of VST plugins:
- VST Instruments (VSTi): These are virtual synthesizers, samplers, drum machines, and other sound-generating tools. They create sound from scratch or play back samples, providing the melodic and rhythmic backbone of your tracks. Popular examples include Serum, Massive, Kontakt, and Omnisphere.
- VST Effects (VST FX): These plugins process existing audio signals. They include tools like equalizers (EQs), compressors, reverbs, delays, choruses, phasers, and mastering suites. VST FX are vital for shaping sounds, mixing tracks, and adding polish to your entire production.
The existence of VSTs revolutionized music production, democratizing access to professional-grade sound tools. Instead of needing a studio filled with expensive hardware, producers could now achieve similar results with software. For FL Studio users, VSTs are the primary means of expanding your sonic palette beyond the built-in instruments and effects. They are crucial because they offer unparalleled variety, specialized functions, and often superior sound quality, allowing for greater creative expression and a more unique sonic signature.
Native vs. Third-Party Plugins
FL Studio comes equipped with a formidable arsenal of its own native plugins developed by Image-Line. These include powerful synthesizers like Sytrus, Harmless, and Harmor; versatile effects such as Fruity Parametric EQ 2, Fruity Limiter, and Gross Beat; and essential utilities like Edison. These native tools are highly optimized for FL Studio, integrated seamlessly, and capable of producing professional results. Many producers could create entire tracks using only native FL Studio plugins.
However, the world of music production is constantly evolving, and third-party plugins offer an almost infinite expanse of new sounds, unique processing capabilities, and innovative workflows that might not be available natively.
- Third-party synthesizers might offer different synthesis methods (e.g., wavetable, granular, physical modeling) or specialize in certain genres.
- Third-party effects often provide specific sonic characteristics (e.g., analog emulations of classic hardware, advanced reverbs, unique distortion algorithms) that help tracks stand out.
- Specialized tools like vocal tuning software, advanced drum samplers, or complex spectral processors are often exclusively found in the third-party market.
While FL Studio’s native plugins are excellent, incorporating third-party options allows you to differentiate your sound, keep up with industry trends, and truly personalize your production toolkit. This is where your personal “brand” as a producer begins to take shape – by curating a unique collection of tools that define your sound.
System Requirements and Compatibility
Before committing to a new plugin, it’s essential to consider its system requirements and compatibility with your existing setup. Overlooking this step can lead to frustration, crashes, or a non-functional plugin.
Key considerations include:
- Operating System: Ensure the plugin supports your OS (Windows or macOS). FL Studio itself runs on both, but some plugins might be exclusive to one.
- 32-bit vs. 64-bit: Most modern plugins and FL Studio versions are 64-bit. While FL Studio can often “bridge” 32-bit plugins (run them in a separate process), it’s generally recommended to stick to 64-bit plugins for stability and performance. Check if your FL Studio version is 64-bit (which it likely is if it’s a recent version) and aim for 64-bit plugins.
- CPU and RAM: Some plugins, particularly complex synthesizers or high-fidelity reverbs, can be CPU-intensive. Ensure your computer meets the recommended processor speed and RAM requirements to avoid slowdowns or crashes during intense projects.
- Disk Space: While most plugins aren’t massive, some sample-based instruments (like Kontakt libraries) can require many gigabytes, even terabytes, of storage. Plan accordingly.
- FL Studio Version: Occasionally, newer plugins might require a more recent version of FL Studio. Always ensure your DAW is up-to-date for optimal compatibility.
Taking a moment to check these specifications can save you significant time and hassle down the line, ensuring a smooth integration and a stable production environment.
Preparing for Plugin Installation
A well-organized approach to plugin installation is key to maintaining a clean and efficient workflow in your FL Studio projects. Rushing this stage can lead to missing plugins, cluttered lists, and potential headaches in the future.
Choosing the Right Plugin
The sheer volume of available plugins can be overwhelming. Making informed choices is crucial, especially if you’re investing financially.
Here’s how to approach selection:
- Define Your Needs: What sound are you missing? Are you looking for a specific type of synth, a mastering compressor, or a creative effect? Don’t download plugins just because they’re popular; choose based on genuine creative necessity.
- Reputable Sources: Always download plugins from the official developer’s website or trusted marketplaces (e.g., Plugin Boutique, Splice, Native Instruments, Arturia). This ensures you get legitimate, safe software and proper support.
- Free vs. Paid: Many excellent free plugins (freeware) are available and can significantly enhance your toolkit without costing a dime. Paid plugins often offer more advanced features, deeper sound design capabilities, and dedicated customer support. Many paid plugins offer demo versions, which are invaluable for trying before you buy. Use these demos extensively to test compatibility and workflow.
- Reviews and Tutorials: Before downloading or purchasing, watch video reviews, read user testimonials, and check out tutorials. See how others use the plugin and if its features align with your production style.
- Security Considerations: Never download cracked or pirated software. These not only harm developers but also pose significant security risks to your system (malware, viruses) and can lead to instability in your DAW. Investing in legitimate software protects your creativity and your system.
Organizing Your Plugin Folders
This step is arguably one of the most important for a smooth FL Studio experience. A disorganized plugin folder structure is a common source of frustration for producers. FL Studio needs to know where to look for your VST files.
By default, VST plugins often try to install themselves into standard locations, such as:
C:Program FilesVSTPlugins(for 64-bit VSTs on Windows)C:Program Files (x86)VSTPlugins(for 32-bit VSTs on Windows)- For macOS, paths like
/Library/Audio/Plug-Ins/VSTor~/Library/Audio/Plug-Ins/VSTare common.
While you can let plugins install to these default locations, it’s highly recommended to create your own dedicated VST plugin folder (or a few folders) on a drive with ample space. For example:
D:My VST PluginsVST InstrumentsD:My VST PluginsVST Effects
Why create custom folders?
- Centralization: All your plugins are in one place, making them easy to manage, back up, and troubleshoot.
- Consistency: You always know where plugins are being installed, avoiding scattered files.
- Cleanliness: Prevents installers from littering your main program files with unnecessary subfolders.
- Performance: If your C: drive is an SSD and filling up, installing large sample libraries to a separate, larger drive can be beneficial.
When running a plugin installer, pay close attention to the “Installation Path” or “Destination Folder” option. Always direct it to your custom VST folder. If a plugin offers separate installation paths for 32-bit and 64-bit versions, make sure to select the appropriate path (e.g., your 64-bit VST folder for the 64-bit version). Consistency in your organization will save you countless hours of searching and rescanning.
Step-by-Step Installation Process for Third-Party Plugins
With your preparations complete, you’re now ready to install your chosen plugins. The process is generally straightforward but varies slightly depending on whether the plugin comes with an installer or requires manual placement.
Downloading and Running the Installer
Most modern plugins come with a dedicated installer application, which simplifies the process significantly.
- Download the Installer: Obtain the installer file from the official developer’s website. It will typically be an
.exefile for Windows or a.dmgfile for macOS. - Run as Administrator (Windows): On Windows, it’s a good practice to right-click the
.exefile and select “Run as administrator.” This ensures the installer has the necessary permissions to write files to system directories. - Follow On-Screen Prompts: The installer will guide you through several steps:
- Accept License Agreement: Read and agree to the terms and conditions.
- Select Components: Some installers allow you to choose which components to install (e.g., 32-bit VST, 64-bit VST, AAX, AU, standalone application, user manuals, presets). Crucially, ensure you select the 64-bit VST option (and optionally the standalone version if you want to use it outside FL Studio). Deselect formats you don’t need (like AAX if you don’t use Pro Tools, or AU if you’re not on macOS or only using FL Studio on Windows).
- Choose Installation Path: This is the most critical step. When prompted for the “VST Plugin Location” or “Destination Folder,” browse to and select your custom VST plugin folder(s) (e.g.,
D:My VST PluginsVST Instruments). If the installer defaults to a system path (likeC:Program FilesVSTPlugins), override it with your chosen path. - Complete Installation: Once the path is set, click “Install” or “Next” to complete the process. The installer will copy the necessary files to your specified location.
Upon successful completion, the core plugin files (usually .dll for Windows, or .vst/.component for macOS) will reside in your designated VST folder.
Manual Installation (for plugins without an installer)

Some simpler or older plugins, particularly many free ones, don’t come with an installer. Instead, you download a zipped folder containing the plugin files directly.
- Extract the Files: Download the zipped folder, then right-click and choose “Extract All” (Windows) or double-click (macOS) to uncompress its contents.
- Locate Plugin Files: Inside the extracted folder, look for the actual plugin file(s). These are typically
.dllfiles on Windows (e.g.,mycoolsynth.dll) or.vstor.componentfiles on macOS. - Copy to VST Folder: Copy these
.dll(or.vst/.component) files directly into your custom VST plugin folder (e.g.,D:My VST PluginsVST Instruments). Do not copy the entire extracted folder unless the plugin developer specifically instructs you to. You want FL Studio to find the.dllfile directly within one of its scanned paths.
This manual method is less common for commercial plugins but is essential knowledge for integrating some niche or freeware tools.
Opening FL Studio and Scanning for Plugins
Once the plugin files are in the correct location, FL Studio needs to be told to look for them. This involves scanning your plugin directories.
- Open FL Studio: Launch your FL Studio application.
- Access Plugin Manager:
- Go to Options > Manage Plugins (or press F10 for System Settings, then navigate to File Settings and click “Manage plugins” under the “VST plugins extra search folder” section).
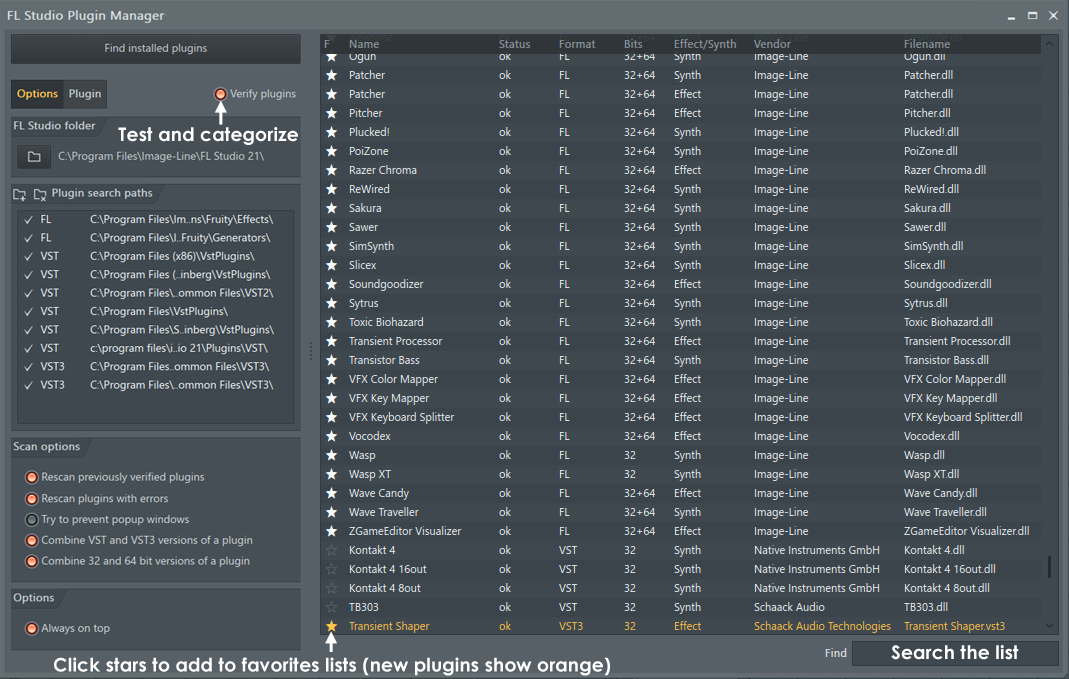
- Add Search Paths: In the Plugin Manager window, you’ll see a list of “Plugin search paths.”
- Ensure your custom VST plugin folder(s) are listed here. If not, click the folder icon with a plus sign (Add path…) and navigate to and select your custom folder (e.g.,
D:My VST PluginsVST Instruments). Repeat for any other custom VST folders you use. - It’s generally a good idea to leave the default Image-Line and system VST paths in place.
- Ensure your custom VST plugin folder(s) are listed here. If not, click the folder icon with a plus sign (Add path…) and navigate to and select your custom folder (e.g.,
- Start the Scan:
- Click the “Find More Plugins” button (or “Start scan” in older versions). FL Studio will now search all specified paths for new plugin files. This process can take a few moments, especially if you have many folders or it’s the first time scanning.
- During the scan, FL Studio analyzes each
.dllfile, identifies it as an instrument or effect, and adds it to its internal database.
- Verify Detection:
- Once the scan is complete, new plugins are often highlighted in a different color (e.g., orange or yellow) in the plugin list.
- You can sort the list by “Type” or “Vendor” to easily find your newly installed plugins.
- Look for the plugin’s name and ensure its “Category” is correctly identified (Generator for instruments, Effect for effects).
Troubleshooting Scan Issues:
- Plugin not showing up: Double-check that your VST folder path is correctly added to the Plugin Manager’s search paths. Ensure the
.dllfile is directly within one of those paths (not nested too deeply). - Failed scan: Sometimes a corrupted or incompatible plugin can cause the scan to hang. Remove the problematic
.dlland rescan. - 32-bit/64-bit mismatch: Ensure you installed the correct bit-version of the plugin for your FL Studio installation. If you have a 64-bit FL Studio and installed a 32-bit plugin, FL Studio should bridge it, but it’s less stable.
Integrating and Managing Your New Plugins in FL Studio
With your plugins successfully scanned, it’s time to put them to work in your projects. FL Studio provides several ways to access and manage your newly acquired tools.
Adding Plugins to Your Project
FL Studio offers multiple intuitive entry points to load instruments and effects:
-
From the Browser (Plugin Database):
- On the left-hand side of FL Studio, open the Browser (if not already open, press F8).
- Navigate to Plugin database > Installed. Here you’ll find
Generators(for instruments) andEffects. - Expand
GeneratorsorEffectsand locate your new plugin by its vendor or name. - Drag and drop the plugin directly onto the Channel Rack (for instruments) or an insert slot in the Mixer (for effects).
- Right-click on a plugin and choose “Open in new channel” (for instruments) or “Add to selected mixer track” (for effects).
- Pro Tip: Once you find a plugin you use frequently, click the small star icon next to its name in the Browser or in the Plugin Picker to “favorite” it. Favorited plugins appear at the top of lists for quick access.
-
From the Channel Rack (for Instruments):
- Click the “Add” button (+) at the bottom of the Channel Rack.
- Select “More plugins…” from the menu. This opens the Plugin Picker.
- In the Plugin Picker, use the search bar or scroll down to find your new instrument plugin. New plugins are often highlighted.
- Click the checkbox next to the plugin name to enable it, then close the Plugin Picker. The plugin will now appear in your Channel Rack.
-
From the Mixer (for Effects):
- Open the Mixer (F9).
- Select an empty insert slot on any mixer track.
- Click the small arrow next to the slot, then navigate to “Select effect > More plugins…”
- Similar to the Channel Rack, this opens the Plugin Picker. Find your new effect plugin, check its box, and it will be loaded onto that mixer insert slot.
Remember to save your project frequently after adding new plugins, especially during the initial stages of a production.
Troubleshooting Common Plugin Issues
Even with careful installation, you might encounter issues. Here’s a guide to common problems and their solutions:
-
Plugin Not Showing Up in FL Studio:
- Rescan: Go to Options > Manage Plugins and click “Find More Plugins.”
- Check Search Paths: Ensure your plugin’s installation directory is listed and enabled in the Plugin Manager’s search paths.
- Bit-Mismatch: Verify if the plugin is 64-bit and your FL Studio is 64-bit. If a 32-bit plugin is installed on 64-bit FL Studio, ensure it’s “bridged” correctly (check the “Bridged” column in Plugin Manager).
- Correct File Type: Ensure you copied the actual
.dll(Windows) or.vst/.component(macOS) file and not just a folder containing it. - Restart FL Studio: Sometimes a full restart can resolve minor detection glitches.
- Refresh Plugin List: In the Plugin Manager, right-click and choose “Refresh plugin list (fast)” or “Refresh plugin list (deep scan).”
-
Plugin Crashing or Freezing FL Studio:
- Update Plugin: Check the developer’s website for the latest version. Bug fixes are common.
- Update FL Studio: Ensure your DAW is also up-to-date.
- System Resources: Complex plugins can be resource-intensive. Close unnecessary applications. Monitor CPU/RAM usage.
- Bridging (32-bit on 64-bit FL Studio): If you’re using a 32-bit plugin, bridging can be less stable. In the Plugin Manager, find the plugin, right-click, and ensure “Bridged” is selected. You can also try “Bridged (separate process)” or “Bridged (generator/effect).”
- Remove Corrupted Plugin: If a specific plugin consistently causes crashes, remove its
.dllfile from your VST folder.
-
Licensing/Activation Issues:
- Many paid plugins require activation after installation. Follow the developer’s instructions (e.g., using a license key, iLok, or other challenge-response systems).
- Ensure your internet connection is active during activation if required.
-
Latency Problems:
- Some plugins (especially those for mastering or precise timing) can introduce latency.
- Adjust your audio interface’s buffer size (Options > Audio Settings) to a lower setting for recording, but increase it for mixing to reduce CPU strain.
- Use FL Studio’s “Plugin Delay Compensation” (PDC) feature on the mixer (right-click on a track header).
Optimizing Performance with Plugins
A powerful plugin collection can also be a drain on your system resources. Here’s how to keep FL Studio running smoothly:
- Freeze/Render Tracks: If an instrument track is finalized, “freeze” or “render” it to an audio clip (right-click channel > “Quick render to audio clip”). This frees up CPU used by the plugin.
- Use Efficient Plugins: Not all plugins are created equal. Some are incredibly CPU-optimized, while others are resource hogs. Learn which ones are which.
- Monitor CPU Usage: Keep an eye on FL Studio’s CPU meter (top left). If it’s spiking, identify the culprit plugin (often visible in the Performance Monitor, accessed via View > Plugin performance monitor).
- Keep Software Updated: Regularly update FL Studio and your plugins. Developers often release performance optimizations and bug fixes.
- Manage Presets and Samples: For sample-based plugins, ensure your sample libraries are on fast drives (SSDs are ideal). Delete unnecessary presets or samples to save space.
Beyond Installation: Leveraging Plugins for Creative Production
Installation is just the first step. The real art lies in using these tools effectively to craft compelling music. This involves exploration, understanding, and experimentation.
Exploring Plugin Presets and Parameters
Most plugins come with a vast array of presets – pre-configured settings that offer instant sounds.
- Start with Presets: Presets are an excellent way to quickly audition a plugin’s capabilities and find sounds that fit your track. They also serve as fantastic learning tools. Analyze how different presets achieve their unique character by examining their parameter settings.
- Understand Parameters: Don’t just stick to presets. Dive into the individual parameters. For a synthesizer, learn what oscillators, filters, envelopes (ADSR), and LFOs do. For an effect, understand attack/release for compressors, decay/predelay for reverbs, or frequency bands for EQs. Experimentation is key to unlocking a plugin’s full potential and developing your unique sound. This direct engagement with the tools is what will define your artistic “brand” over time.
Advanced Plugin Techniques
As you grow more comfortable, you can explore more sophisticated uses of your plugins:
- Side-chain Compression: A fundamental mixing technique where the volume of one sound (e.g., bass) is reduced by the presence of another (e.g., kick drum), creating a “pumping” effect. Many compressor plugins offer side-chain inputs.
- Layering Instruments and Effects: Combine multiple synths to create a thicker, more complex sound, or stack several effects to achieve a unique texture (e.g., a subtle distortion before a large reverb).
- Automation of Plugin Parameters: Virtually every parameter in a plugin can be automated over time in FL Studio. This allows for dynamic changes in sound, creating movement, tension, and release within your track (e.g., automating a filter cutoff, a reverb send, or a delay feedback).
- Using Send/Return Tracks: Instead of loading an effect on every mixer track, use send tracks for reverbs and delays. Send a portion of multiple tracks to a single reverb plugin on a return track, saving CPU and creating a cohesive sonic space.
- Understanding Signal Flow: Grasping how audio signals travel through your plugins and mixer chain is fundamental to effective mixing and sound design.
Mastering these techniques will not only improve the quality of your productions but also enhance your efficiency. The more proficient you become, the more you can streamline your workflow, which directly translates to time saved and, in a professional context, “money” earned.

Conclusion
Installing plugins in FL Studio, while initially seeming like a technical hurdle, is a fundamental skill for any aspiring or professional music producer. By understanding the ecosystem, preparing your system, and following a clear, step-by-step installation process, you unlock an infinite array of creative possibilities. From the warmth of vintage emulations to the cutting-edge of granular synthesis, third-party plugins are the lifeblood of modern music production, offering tools that shape your sound, define your style, and ultimately contribute to your unique artistic voice.
Remember, the journey doesn’t end with installation. The real reward comes from exploring each plugin’s potential, experimenting with its parameters, and integrating it seamlessly into your creative workflow. As you develop your sound, curate your toolkit, and master these technological marvels, you’re not just making music; you’re building your “brand” as an artist. And in the digital age, a strong artistic brand, combined with the technical prowess to execute your vision, can certainly open doors to “money”-making opportunities, whether through licensing, performances, or commercial projects. So go forth, install those plugins, and let your creativity soar!
aViewFromTheCave is a participant in the Amazon Services LLC Associates Program, an affiliate advertising program designed to provide a means for sites to earn advertising fees by advertising and linking to Amazon.com. Amazon, the Amazon logo, AmazonSupply, and the AmazonSupply logo are trademarks of Amazon.com, Inc. or its affiliates. As an Amazon Associate we earn affiliate commissions from qualifying purchases.