The world of technology is constantly evolving, and keeping your devices up-to-date is crucial for optimal performance, security, and access to the latest features. For Mac users, this often means understanding how to install or reinstall their operating system, macOS. Whether you’re setting up a new Mac, upgrading to the latest version, troubleshooting an issue, or even looking to install a different operating system entirely, mastering the process is a valuable skill. This comprehensive guide will walk you through the essential methods of installing macOS on your Mac, covering everything from simple upgrades to clean installations and even more advanced scenarios.

Understanding Your Mac’s Operating System and Installation Options
Before diving into the installation process, it’s important to understand what macOS is and the different ways you can install it. macOS is Apple’s proprietary operating system that powers all Mac computers. It’s known for its user-friendly interface, robust performance, and seamless integration with other Apple devices.
There are several primary scenarios for installing macOS:
- Upgrading an Existing macOS: This is the most common scenario, where you install a newer version of macOS over your current installation. This process typically preserves your applications, settings, and personal files.
- Performing a Clean Install: This involves completely erasing your Mac’s hard drive and installing a fresh copy of macOS. This is often recommended for troubleshooting persistent issues or when selling or giving away your Mac. A clean install ensures no leftover files or configurations interfere with the new system.
- Installing macOS on a New Mac: When you unbox a brand-new Mac, it will come with an operating system pre-installed. However, you’ll go through an initial setup process that’s akin to a clean install.
- Installing macOS on an External Drive: For testing purposes, or to keep a separate operational environment, you might want to install macOS on an external hard drive or SSD.
The method you choose will depend on your specific needs and the current state of your Mac. We’ll explore the most common and recommended approaches.
Method 1: Upgrading to the Latest macOS via Software Update (The Easiest Path)
For most users, upgrading to the latest version of macOS is a straightforward process managed directly through the built-in Software Update feature. This is the recommended method for regular updates and significant version upgrades.
Accessing Software Update
- Click the Apple Menu: In the top-left corner of your screen, click the Apple logo.
- Select “System Settings” (or “System Preferences” on older macOS versions): This will open the main settings panel for your Mac.
- Navigate to “General”: In the sidebar of System Settings, click on “General.”
- Choose “Software Update”: On the right side, you’ll find the “Software Update” option. Click it.
Your Mac will then check for available updates. If a new version of macOS is available, you’ll see information about it, including its size and what it offers.
Initiating the Upgrade
- If an upgrade is available: You’ll see a button that says “Upgrade Now.” Click this to begin downloading and installing the new operating system.
- If only minor updates are available: You might see an “Update Now” button for smaller security or bug fix releases. These are also important to install.
The Installation Process
Once you click “Upgrade Now,” the download will begin. This can take some time depending on your internet speed and the size of the macOS update. After the download is complete, your Mac will prompt you to install.
- Follow On-Screen Prompts: The installer will guide you through the process. You’ll likely need to agree to terms and conditions.
- Restart Required: Your Mac will need to restart to complete the installation. Crucially, do not turn off your Mac during this process. It might restart multiple times.
- Patience is Key: The installation can take anywhere from 30 minutes to a couple of hours. Your screen might go black, show an Apple logo with a progress bar, or display other installation-related screens.
Post-Installation Steps
Once the installation is finished, your Mac will boot into the new version of macOS. You might be prompted to sign in with your Apple ID and complete some initial setup steps. It’s also a good idea to:
- Check for further updates: Sometimes, minor updates are released shortly after a major macOS version.
- Open your most used applications: Ensure they are functioning correctly.
- Review your settings: Some settings might be reset or changed with a new OS version.
Method 2: Performing a Clean Install of macOS (Troubleshooting and Fresh Start)
A clean install is a more thorough approach that wipes your hard drive and installs macOS from scratch. This is an excellent solution for resolving persistent software glitches, performance issues, or when preparing to sell your Mac.
WARNING: A clean install will erase ALL data on your Mac’s internal drive. BACK UP YOUR IMPORTANT DATA before proceeding.
Preparing for a Clean Install
-
Back up Your Data: This is the most critical step. Use Time Machine, cloud storage services (like iCloud Drive, Google Drive, Dropbox), or an external hard drive to back up all your documents, photos, videos, and any other essential files.
-
Gather Necessary Information: Make sure you know your Apple ID and password, as well as any product keys for essential software you’ll need to reinstall.
-
Create a Bootable macOS Installer (Recommended for older Macs or specific needs): While newer Macs can often install macOS via Recovery Mode, creating a bootable USB drive offers more flexibility and reliability, especially if your internet connection is unstable or you need to install on multiple Macs.
- You will need:
- A USB flash drive (at least 16GB, formatted as Mac OS Extended (Journaled)).
- The macOS installer application (downloaded from the App Store).
- You will need:
*   **Steps to create a bootable USB (example for macOS Monterey):**
    *   Open the "Terminal" application (Applications > Utilities > Terminal).
    *   Plug in your USB drive.
    *   Type the following command, replacing `MyVolume` with the name of your USB drive:
        ```bash
        sudo /Applications/Install macOS Monterey.app/Contents/Resources/createinstallmedia --volume /Volumes/MyVolume
        ```
    *   Press Enter. You'll be asked for your administrator password. Type it in (you won't see characters appear) and press Enter.
    *   Confirm you want to erase the drive by typing `Y` and pressing Enter.
    *   The process will take several minutes. Once complete, you'll see a message indicating success.
Booting into macOS Recovery or from the Bootable Installer
There are two main ways to start the clean install process:
Option A: Using macOS Recovery (For Macs with T2 Security Chip or Apple Silicon)
Newer Macs with the T2 Security Chip or Apple Silicon (M1, M2, etc.) can usually perform a clean install directly from macOS Recovery without needing a bootable USB.
- Shut Down Your Mac: Ensure your Mac is completely powered off.
- Boot into macOS Recovery:
- For Intel-based Macs with T2 chip: Press and hold the Power button until you see the startup options window. Then, click Options and then Continue.
- For Macs with Apple Silicon: Press and hold the Power button until you see the startup options window. Then, click Options and then Continue.
- Select Your User Account: You may be asked to select an administrator account and enter its password.
Option B: Booting from the Bootable macOS Installer USB
- Shut Down Your Mac: Ensure your Mac is completely powered off.
- Connect the Bootable USB: Plug the USB installer into your Mac.
- Boot from the USB:
- For Intel-based Macs: Press and hold the Option (⌥) key immediately after turning on your Mac. Release the key when you see the Startup Manager, which displays available bootable drives. Select your USB installer (it might be named “Install macOS [Version Name]”) and press Enter.
- For Macs with Apple Silicon: Press and hold the Power button until you see the startup options window. Select your USB installer and click Continue.
Erasing the Drive and Installing macOS
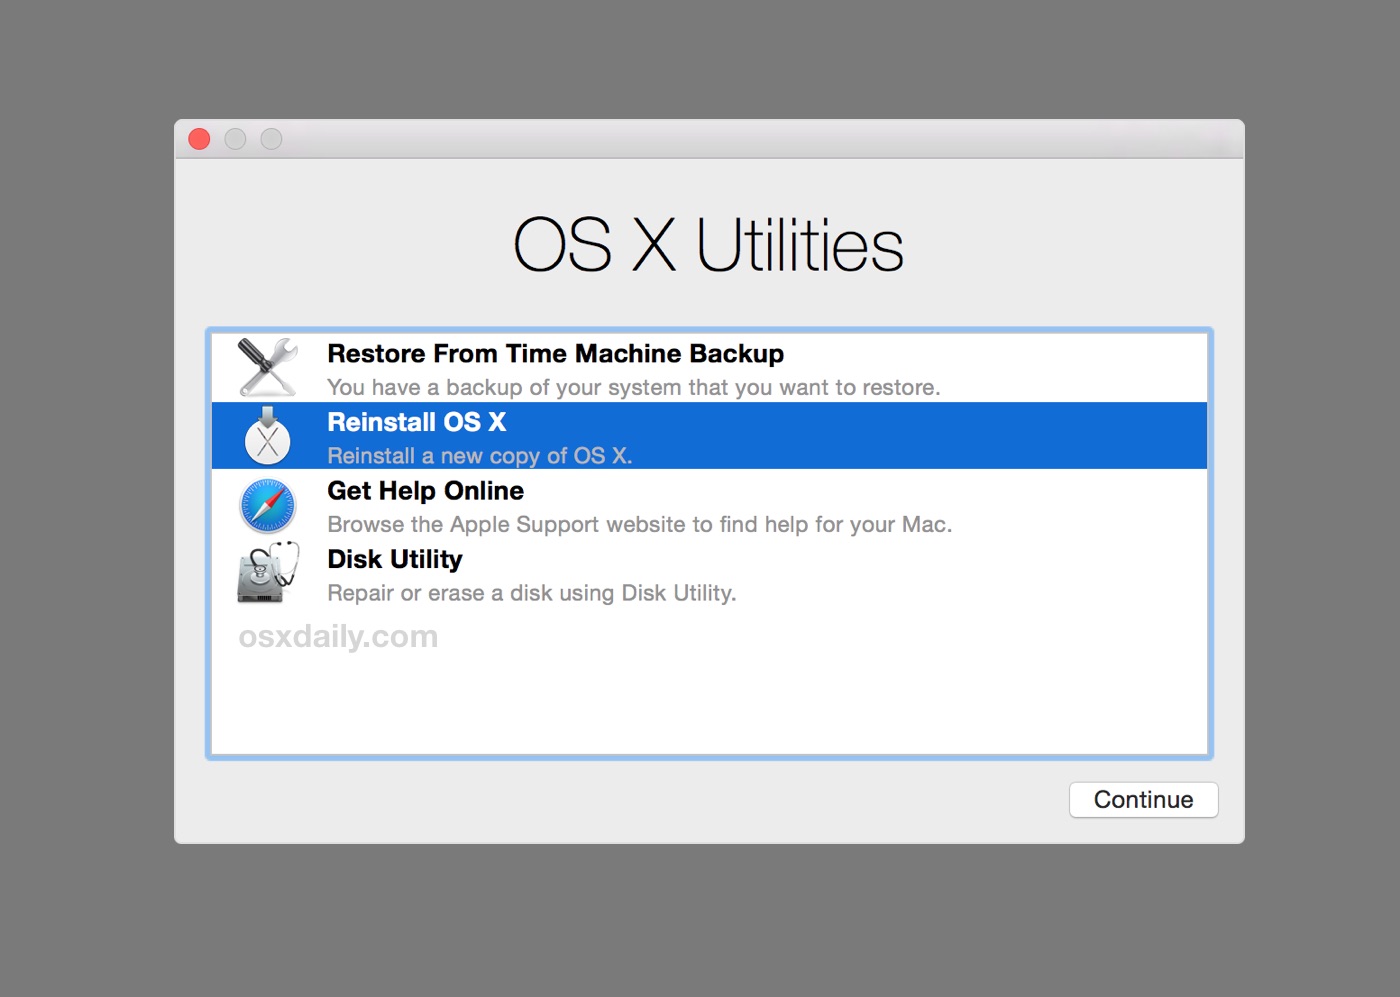
Once you’re in macOS Recovery or have booted from the USB installer, you’ll see a window with several options.
- Open Disk Utility: Select “Disk Utility” and click “Continue.”
- View All Devices: In Disk Utility, go to the “View” menu and select “Show All Devices.”
- Select Your Internal Drive: In the sidebar, select your Mac’s internal hard drive (usually named “Apple SSD AP0512…”) at the top level, not any volumes beneath it.
- Erase the Drive: Click the “Erase” button.
- Name: You can name it “Macintosh HD.”
- Format: Select “APFS” (Apple File System) for modern Macs, or “Mac OS Extended (Journaled)” for older Macs.
- Scheme: Select “GUID Partition Map.”
- Confirm Erase: Click “Erase” to confirm. This will wipe the drive clean. Close Disk Utility when done.
- Install macOS: Back in the main macOS Utilities window, select “Install macOS” (or “Reinstall macOS”) and click “Continue.”
- Follow On-Screen Prompts: The installer will guide you through selecting the “Macintosh HD” (or whatever you named your drive) as the destination. Agree to the terms and conditions, and the installation will begin.
- Restart and Setup: Your Mac will restart multiple times. After the installation, you’ll be presented with the macOS setup assistant, similar to setting up a new Mac. Follow the prompts to set up your region, Wi-Fi, Apple ID, and create a new user account.
Reinstalling Applications and Restoring Data
After completing the clean install and initial setup, you’ll need to:
- Reinstall Applications: Download and install your favorite apps from the App Store or their respective websites.
- Restore Data: Use your Time Machine backup or cloud services to transfer your documents and files back to your Mac.
Method 3: Installing macOS on an External Drive (For Testing or Separate Environments)
Installing macOS on an external drive provides a flexible way to experiment with new macOS versions without affecting your primary system, or to create a dedicated workspace.
Prerequisites
- Fast External Drive: An external SSD is highly recommended for good performance. A USB 3.0 or Thunderbolt connection is ideal.
- Bootable macOS Installer: You’ll need to create a bootable macOS installer on a USB drive, as described in Method 2.
Installation Steps
- Connect External Drive and Bootable USB: Plug both your external drive and the bootable macOS installer into your Mac.
- Boot from the Bootable Installer: Follow the steps in Method 2 (Option B) to boot your Mac from the USB drive.
- Open Disk Utility: Once in the macOS Utilities window, select “Disk Utility” and click “Continue.”
- Format the External Drive:
- In Disk Utility, select your external drive from the sidebar. Ensure you are selecting the drive itself, not any volumes beneath it.
- Click the “Erase” button.
- Name: Give it a descriptive name (e.g., “macOS Test Drive”).
- Format: Choose “APFS” for modern macOS versions.
- Scheme: Select “GUID Partition Map.”
- Click “Erase” and confirm. Close Disk Utility.
- Install macOS: Back in the macOS Utilities window, select “Install macOS” and click “Continue.”
- Choose Destination: When prompted to select a disk, choose your external drive.
- Follow Prompts and Restart: The installation will proceed. Your Mac will restart, and you may need to select the external drive as the boot volume from the Startup Manager (hold Option key during boot) if it doesn’t automatically boot from it.
- Setup Assistant: You’ll go through the standard macOS setup assistant.
Booting from the External Drive
To boot from your external macOS installation:
- Intel Macs: Shut down your Mac, then turn it on while holding the Option (⌥) key. Select your external drive from the Startup Manager.
- Apple Silicon Macs: Shut down your Mac, then press and hold the Power button until the startup options appear. Select your external drive.
You can also set the external drive as the default startup disk in System Settings > General > Startup Disk.
Conclusion: Maintaining Your Mac’s Operating System
Installing or reinstalling macOS is a fundamental skill for any Mac user. Whether you’re embracing the simplicity of Software Update for regular upgrades, opting for a clean install to revitalize your system, or exploring advanced options like external drive installations, understanding these processes empowers you to manage your Mac effectively. Regularly updating your operating system is not just about new features; it’s vital for security patches, performance enhancements, and ensuring compatibility with the latest software and apps. By following these guides, you can confidently install and maintain your Mac’s operating system, keeping your digital life running smoothly and securely.
aViewFromTheCave is a participant in the Amazon Services LLC Associates Program, an affiliate advertising program designed to provide a means for sites to earn advertising fees by advertising and linking to Amazon.com. Amazon, the Amazon logo, AmazonSupply, and the AmazonSupply logo are trademarks of Amazon.com, Inc. or its affiliates. As an Amazon Associate we earn affiliate commissions from qualifying purchases.