In the rapidly evolving landscape of technology, staying ahead requires a robust toolkit and the knowledge to wield it effectively. For web developers, system administrators, and tech enthusiasts alike, Node.js has emerged as an indispensable platform, transforming how server-side applications, APIs, and even desktop tools are built. Its asynchronous, event-driven architecture makes it ideal for highly scalable data-intensive real-time applications, underpinning many of the modern web experiences we interact with daily.
This comprehensive guide delves into the various methods of installing Node.js on a Linux operating system, a preferred environment for many developers due to its flexibility, security, and open-source nature. Whether you’re a seasoned professional looking to optimize your workflow or a newcomer eager to dive into JavaScript beyond the browser, understanding these installation processes is crucial. We’ll explore multiple approaches, from standard package managers to version management tools, ensuring you can choose the method that best suits your specific needs and development strategy. Beyond just installation, we’ll touch upon best practices that align with maintaining a professional tech stack, fostering productivity, and making informed decisions that can even impact your financial efficiency in the long run.

Why Node.js Matters in Today’s Tech Landscape
Node.js is more than just a runtime environment; it’s a paradigm shift for web development. Born out of the desire to unify the development language across the frontend and backend, it allows developers to write server-side applications using JavaScript, the language of the web browser. This consistency significantly streamlines development cycles, reduces context switching, and ultimately leads to more efficient and maintainable codebases. For any individual or organization looking to establish a strong brand in the digital space, choosing tools that enhance agility and performance is paramount, and Node.js perfectly fits this bill.
The Power and Versatility of Node.js
At its core, Node.js is built on Chrome’s V8 JavaScript engine, known for its incredible speed and performance. This makes Node.js exceptionally fast, capable of handling a large number of concurrent connections with minimal overhead – a crucial feature for modern web applications that demand real-time interactivity. Its non-blocking I/O model is a game-changer, allowing applications to perform heavy operations without freezing, thus ensuring a smooth user experience.
The versatility of Node.js extends across a myriad of applications. Beyond traditional web servers, it powers command-line tools, desktop applications (via Electron), real-time chat applications, streaming services, and even Internet of Things (IoT) devices. Its vast ecosystem, facilitated by npm (Node Package Manager), boasts millions of open-source libraries, offering ready-made solutions for almost any development challenge. This rich library support not only accelerates development but also leverages the collective intelligence of a global developer community, offering cost-effective solutions that can be financially beneficial for startups and established businesses alike. Embracing Node.js means embracing a platform that can grow and adapt with your technological needs, a critical aspect of future-proofing your brand and operations in the fast-paced tech world.
Node.js in Modern Web Development and Beyond
In modern web development, Node.js is a cornerstone for building robust and scalable backends. Frameworks like Express.js provide a minimalist and flexible foundation for building web applications and APIs, while Next.js and NestJS offer more opinionated, full-stack solutions. Its ability to handle data-intensive applications efficiently makes it a popular choice for microservices architectures, enabling teams to develop and deploy independent services that communicate seamlessly. This modular approach enhances scalability, resilience, and maintainability, all vital components of a strong tech brand.
Beyond the web, Node.js has made significant inroads into areas such as serverless computing, where its lightweight nature and fast startup times make it an excellent fit for cloud functions (e.g., AWS Lambda, Google Cloud Functions). It’s also increasingly used in tooling and automation, helping developers create custom scripts to automate repetitive tasks, improving productivity and freeing up valuable time for more complex problem-solving. This focus on automation directly translates into financial savings by reducing manual effort and potential human error, solidifying Node.js’s position as a wise investment for any tech-driven endeavor. For businesses building AI tools or complex data processing pipelines, Node.js’s efficiency in handling I/O operations can be a significant advantage, proving its relevance across various bleeding-edge technology trends.
Preparing Your Linux Environment for Node.js
Before embarking on the Node.js installation journey, it’s essential to prepare your Linux environment. A well-configured system ensures a smooth installation process and a stable development experience. This preliminary step, often overlooked, is crucial for maintaining system integrity and avoiding common pitfalls that can derail productivity. Think of it as laying a solid foundation for your digital infrastructure—a critical component of any effective brand strategy in technology.
Essential System Updates and Dependencies
Regardless of your chosen Linux distribution (Ubuntu, Debian, Fedora, CentOS, Arch Linux, etc.), the first step should always be to update your system’s package lists and upgrade existing packages. This ensures you have the latest security patches and dependency versions, which can prevent conflicts during the Node.js installation.
For Debian/Ubuntu-based systems:
sudo apt update
sudo apt upgrade -y
For Red Hat/Fedora-based systems:
sudo dnf update -y
# or for older CentOS/RHEL
sudo yum update -y
After updating, you might need to install essential build tools and dependencies that some Node.js modules or installation methods might require. These typically include build-essential (for Debian/Ubuntu) or Development Tools (for Red Hat/Fedora), curl, and git.
For Debian/Ubuntu:
sudo apt install curl git build-essential -y
For Red Hat/Fedora:
sudo dnf groupinstall "Development Tools" -y
sudo dnf install curl git -y
Having these tools ensures that if you compile Node.js from source, or if npm needs to build native modules for some packages, your system is ready. This preparation step isn’t just about technical readiness; it’s also about adopting a disciplined approach to system management, which is a hallmark of a professional tech operation and contributes to a reliable overall brand image.
Choosing Your Linux Distribution
While the core principles of Node.js installation remain similar across Linux distributions, the specific commands and availability of certain packages can vary. Popular choices like Ubuntu and Fedora offer large community support and up-to-date repositories, making them excellent choices for Node.js development. Enterprise distributions like CentOS and RHEL often prioritize stability, meaning their default repositories might contain older versions of Node.js, necessitating alternative installation methods like NVM or manual compilation if you require the latest features. Your choice of distribution should align with your project’s stability requirements, development team’s familiarity, and the long-term support strategy, all of which are considerations that can impact both operational efficiency and financial outlays.
Comprehensive Installation Methods for Node.js on Linux
Installing Node.js on Linux offers several pathways, each with its own advantages depending on your specific requirements for version control, system integration, and ease of maintenance. Understanding these options empowers you to make an informed decision, optimizing your development environment for maximum productivity and resource efficiency—a key consideration for both individual and business finance in the tech sector.
Method 1: Utilizing Your Distribution’s Package Manager
This is often the simplest and quickest way to install Node.js, especially for new users or those who prioritize system stability over the very latest versions. Most Linux distributions include Node.js and npm in their official repositories.
Pros:
- Easy to install and manage with standard system tools.
- Good for general development where the latest features aren’t critical.
- Managed by your system’s update mechanism.
Cons:
- Often provides older versions of Node.js, sometimes significantly outdated.
- Difficult to switch between different Node.js versions.
Installation Steps:
For Debian/Ubuntu:
sudo apt update
sudo apt install nodejs npm -y
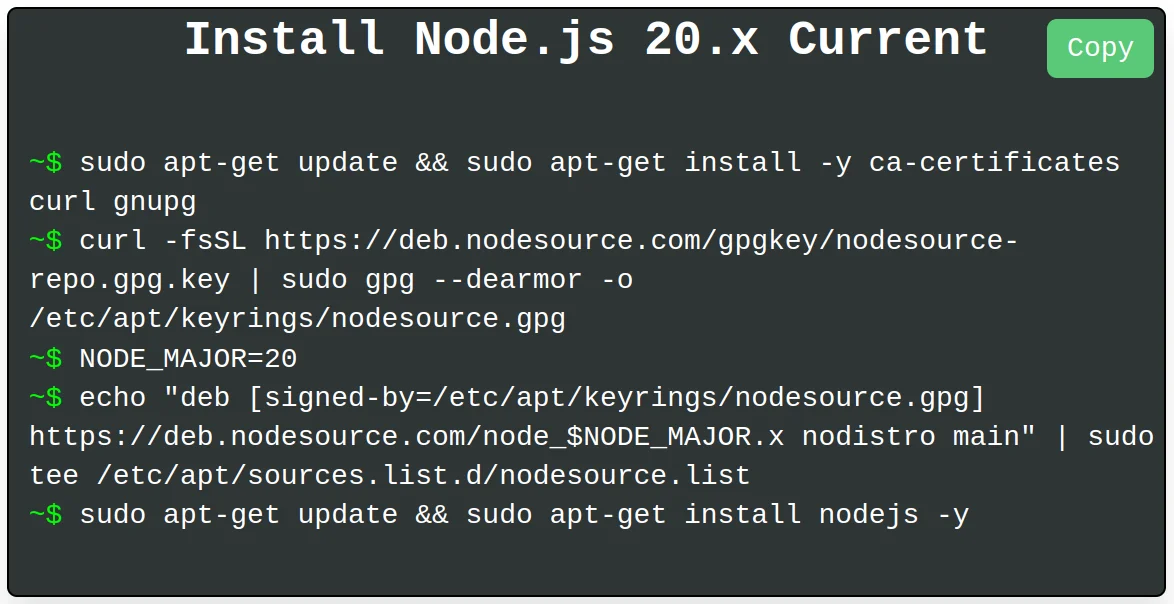
It’s common for the nodejs package in official repositories to be quite old. To get a more recent version, you can use NodeSource repositories. NodeSource provides up-to-date Node.js binaries for various versions (e.g., v18.x, v20.x).
First, import the NodeSource GPG key and add their repository:
curl -fsSL https://deb.nodesource.com/setup_20.x | sudo -E bash -
(Replace 20.x with your desired Node.js version, e.g., 18.x, 22.x).
Then install Node.js and npm:
sudo apt install nodejs -y
Note: npm is usually bundled with the nodejs package when using NodeSource.
For Red Hat/Fedora/CentOS Stream:
sudo dnf install nodejs -y
For older CentOS/RHEL versions, you might need to enable the EPEL (Extra Packages for Enterprise Linux) repository first:
sudo yum install epel-release -y
sudo yum install nodejs npm -y
Similar to Debian/Ubuntu, Red Hat-based distributions also offer more current versions through software collections (SCLs) or by using NodeSource repositories. For example, to install a specific version using SCLs on CentOS/RHEL:
sudo yum install centos-release-scl -y
sudo yum install rh-nodejs20 -y # For Node.js v20
scl enable rh-nodejs20
This method integrates Node.js into your system in a straightforward manner, ideal for environments where consistency and minimal administrative overhead are prioritized. For a business brand, this consistency can mean predictable deployments and easier maintenance, indirectly saving money on operational costs.
Method 2: The Flexibility of Node Version Manager (NVM)
NVM is a powerful command-line tool designed to manage multiple Node.js versions on a single machine. This is the recommended method for most developers, especially those working on various projects that might require different Node.js versions. It provides unparalleled flexibility and prevents version conflicts, which can be a significant productivity booster.
Pros:
- Install multiple Node.js versions and easily switch between them.
- Doesn’t require
sudofor Node.js/npm package installations, enhancing security. - Great for testing applications against different Node.js environments.
- Keeps your system’s global
npmclean.
Cons:
- Requires a bit more setup than package managers.
- Node.js binaries installed via NVM are not globally available to all users by default.
Installation Steps:
-
Install NVM: Use
curlto download and run the NVM installation script. It automatically places NVM in your home directory (~/.nvm).curl -o- https://raw.githubusercontent.com/nvm-sh/nvm/v0.39.7/install.sh | bash(Always check the NVM GitHub page for the latest version number to ensure you’re using the most current install script).
-
Verify NVM Installation: After running the script, close and reopen your terminal, or source your shell’s profile script (
~/.bashrc,~/.zshrc, etc.) to load NVM into your current session:source ~/.bashrc # or ~/.zshrc, ~/.profileThen, verify NVM is installed correctly:
nvm --version -
Install Node.js with NVM: Now you can install any Node.js version.
- To install the latest stable version:
bash

nvm install node
- To install a specific version (e.g., Node.js 20):
bash

nvm install 20
- To install the latest LTS (Long Term Support) version:
bash

nvm install --lts
- To install the latest stable version:
-
Use a Node.js Version:
- To start using an installed version:
bash

nvm use 20 # or nvm use node
- To set a default version that automatically loads in new shell sessions:
bash

nvm alias default 20 # or nvm alias default node
- To start using an installed version:

NVM is an invaluable tool for professional developers, reflecting a commitment to flexible and robust development practices. This flexibility contributes to a developer’s personal brand as adaptable and efficient, and for teams, it translates to faster project transitions and fewer compatibility headaches, ultimately saving money and boosting reputation.
Method 3: Snap Packages for Cross-Distribution Simplicity
Snap is a universal software packaging and deployment system developed by Canonical for operating systems that use the Linux kernel. Snaps are self-contained packages that include all necessary dependencies, ensuring applications run consistently across different Linux distributions. This method offers a sandbox environment for Node.js, which can be beneficial for security.
Pros:
- Universal: Works across many Linux distributions without specific package manager commands.
- Isolated: Runs in a sandboxed environment, preventing conflicts with other system packages.
- Automatic updates: Snaps can automatically update to the latest stable version.
Cons:
- Larger package size due to self-contained nature.
- Can sometimes have slower startup times due to sandboxing.
- Limited version control compared to NVM; typically, you get the latest stable version provided by the snap maintainer.
Installation Steps:
-
Ensure
snapdis installed: Most modern Linux distributions havesnapdpre-installed or easily installable.
For Debian/Ubuntu:sudo apt update sudo apt install snapd -yFor Fedora:
sudo dnf install snapd -y
sudo systemctl enable --now snapd.socket
sudo ln -s /var/lib/snapd/snap /snap
For CentOS/RHEL (requires EPEL):
sudo yum install epel-release -y sudo yum install snapd -y sudo systemctl enable --now snapd.socket sudo ln -s /var/lib/snapd/snap /snap -
Install Node.js via Snap:
bash

sudo snap install node --classic
The--classicflag is required because Node.js needs access to parts of your system outside the typical snap sandbox.
This method is particularly appealing for those who value simplicity and cross-platform compatibility, offering a consistent experience regardless of the underlying Linux flavor. For developers managing multiple systems or teams, Snap can standardize the Node.js environment, reducing technical debt and supporting a unified operational brand, which again, contributes to efficiency and cost savings.
Method 4: Manual Installation for Ultimate Control (From Tarball)
While less common for beginners, manually downloading and installing Node.js from its official website provides the highest level of control over the installation location and version. This method is often preferred by system administrators or power users who require specific configurations or need to install Node.js in non-standard locations.
Pros:
- Complete control over Node.js version and installation path.
- No external dependencies beyond basic system tools.
- Useful for systems without internet access (once the tarball is downloaded).
Cons:
- More involved and prone to manual errors.
- No automatic updates.
- Managing different versions manually can be cumbersome.
- Requires updating your system’s PATH variable manually.
Installation Steps:
-
Download the Node.js Tarball: Visit the official Node.js website (nodejs.org/en/download/releases) and find the Linux Binaries (.tar.xz) for your desired version and architecture (e.g.,
node-v20.11.0-linux-x64.tar.xz).
You can download it usingwgetorcurl:wget https://nodejs.org/dist/v20.11.0/node-v20.11.0-linux-x64.tar.xz(Replace the URL with the actual version you wish to install.)
-
Extract the Tarball:
tar -xvf node-v20.11.0-linux-x64.tar.xz -
Move the Extracted Directory: Move the extracted Node.js directory to a system-wide location, typically
/usr/local.sudo mv node-v20.11.0-linux-x64 /usr/local/lib/nodejs -
Update Your PATH Environment Variable: You need to add the Node.js binary directory to your system’s PATH so that Node.js and npm commands are recognized. Edit your shell’s profile file (e.g.,
~/.bashrc,~/.zshrc, or/etc/profilefor system-wide access).
Add the following line:
bash

export PATH=/usr/local/lib/nodejs/bin:$PATH
Save the file and then source it:
bash

source ~/.bashrc # or your specific profile file
This method is an excellent demonstration of technical prowess and precision, appealing to those who champion a meticulously crafted development environment. While it demands more initial effort, the granular control it offers can be invaluable for specific use cases, aligning with a brand that values bespoke solutions and deep technical understanding.
Verifying Your Node.js Installation and Next Steps
After successfully installing Node.js using any of the methods above, the critical next step is to verify that everything is working as expected. This confirmation ensures that your development environment is correctly configured, allowing you to seamlessly move on to building applications.
Confirming Node.js and npm Availability
Open a new terminal window or tab (to ensure your PATH changes or NVM environment is loaded) and run the following commands:
node -v
npm -v
You should see the installed Node.js version (e.g., v20.11.0) and the npm version (e.g., 10.2.4) printed to your console. If you receive an error like “command not found,” double-check your installation steps, especially the PATH variable if you performed a manual installation, or ensure you’ve sourced your shell configuration if using NVM.
A successful verification confirms that your investment in setting up the development environment has paid off. It’s a small but significant victory in your journey, a testament to effective planning and execution—qualities that resonate with a strong personal and corporate brand.
Essential Post-Installation Checks and Tips
- Global vs. Local npm Packages: Understand the difference. Generally, you should install packages locally within your project using
npm install <package-name>. Global installations (npm install -g <package-name>) are reserved for command-line tools (likenodemon,pm2,create-react-app) that you need access to from anywhere on your system. - npm Permissions: If you encounter permission errors when installing global npm packages, avoid using
sudowithnpm. This can lead to security vulnerabilities and ownership issues. Instead, configure npm to use a different directory for global packages, or use NVM, which handles permissions gracefully. - Keeping Node.js and npm Updated: Regularly update your Node.js and npm installations to benefit from performance improvements, new features, and critical security patches. If using NVM, this is as simple as
nvm install node(to get the latest) ornvm install --lts(for the latest LTS). For package managers, it’ssudo apt update && sudo apt upgradeorsudo dnf update.
These post-installation tips are not just about technical correctness; they are about fostering good development hygiene. A clean, updated, and permission-aware environment minimizes future headaches, saves debugging time (which translates to saving money), and reflects a professional approach to software development.
Best Practices, Troubleshooting, and Maximizing Your Node.js Setup
Beyond simply installing Node.js, adopting best practices and understanding common troubleshooting steps can significantly enhance your development workflow and ensure the stability and security of your applications. This proactive approach strengthens your technical brand and contributes to long-term operational efficiency.
Common Issues and Their Solutions
- “Node.js/npm command not found”: This almost always indicates an issue with your system’s PATH environment variable.
- Solution: For NVM users, ensure
nvmis sourced in your shell’s startup file (e.g.,~/.bashrc,~/.zshrc). Close and reopen your terminal. For manual installations, verify theexport PATHline is correctly added and sourced.
- Solution: For NVM users, ensure
- Permissions Errors with npm: When
npm install -gfails due to permissions.- Solution: Do not use
sudo npm install -gunless absolutely necessary and you understand the risks. The best approach is to use NVM, which handles permissions without root access. Alternatively, configure npm to install global packages in your user directory.
- Solution: Do not use
- Conflicting Node.js Installations: You might have multiple versions installed via different methods (e.g., package manager and NVM).
- Solution: Uninstall versions installed via package managers (
sudo apt remove nodejs npm) if you plan to exclusively use NVM. NVM allows isolated version management without conflicts.
- Solution: Uninstall versions installed via package managers (
npm cache clean --force: If you encounter persistent issues with npm packages or corrupted installations, clearing the npm cache can often resolve it.- Solution:
npm cache clean --forcefollowed by reinstalling packages.
- Solution:
Understanding these common issues and their resolutions saves valuable time and minimizes frustration. For a business, this translates into reduced downtime, faster problem-solving, and a more resilient development pipeline, all contributing to a healthier bottom line.
Elevating Your Development Workflow with Node.js
Once Node.js is installed and verified, the possibilities for enhancing your development workflow are vast.
- Utilize
package.json: Every Node.js project should have apackage.jsonfile to manage dependencies, scripts, and project metadata. It’s the blueprint of your project, essential for collaboration and deployment. - Automate Tasks with npm Scripts: Beyond just installing dependencies,
package.jsonscripts can automate build processes, testing, code linting, and deployment tasks. This boosts productivity and ensures consistency across development environments, which is critical for maintaining a high-quality brand image. - Explore Build Tools and Frameworks: Dive into powerful Node.js tools like Webpack or Vite for bundling, Express.js or NestJS for API development, and React, Angular, or Vue.js for frontend integration (often managed with Node.js-based build tools).
- Embrace Asynchronous Programming: Node.js thrives on its asynchronous, non-blocking nature. Master
async/awaitand Promises to write efficient, readable code that fully leverages Node.js’s capabilities. - Security Best Practices: Regularly audit your npm dependencies for vulnerabilities using tools like
npm audit. Keep your Node.js runtime updated. Employ proper input validation and sanitize data to prevent common web vulnerabilities.
By integrating these practices, you’re not just using Node.js; you’re leveraging it as a strategic asset. This proactive approach to development not only ensures the stability and performance of your applications (a key aspect of your tech brand) but also drives efficiency, which directly impacts project costs and overall financial success. The open-source nature of Node.js and its extensive community means continuous innovation and free access to powerful tools, making it an economically sound choice for any scale of project, from a personal side hustle to a corporate enterprise solution.
Conclusion
Installing Node.js on Linux is a foundational step for anyone looking to engage with modern web development, build powerful backend services, or create efficient command-line tools. We’ve explored various methods, from the simplicity of distribution package managers and the universality of Snap to the flexibility of NVM and the granular control of manual installation. Each method caters to different needs, offering a pathway to success regardless of your experience level or project requirements.
Choosing the right installation method, coupled with diligent verification and the adoption of best practices, lays a robust groundwork for your development endeavors. It ensures not only the smooth operation of your applications but also contributes to a highly productive and secure development environment. In the competitive landscape of technology, maintaining such an environment is crucial for building a reputable personal brand as a developer and for fostering a reliable and innovative corporate identity.
Furthermore, by embracing open-source tools like Node.js, you’re making a financially savvy decision. The access to a vast ecosystem of free libraries and a global community of support minimizes development costs and accelerates time-to-market for projects. This efficiency directly translates into better financial outcomes, whether you’re working on personal projects, scaling a startup, or optimizing operations for a large enterprise.
As you embark on your Node.js journey, remember that learning is a continuous process. Keep exploring its vast capabilities, stay updated with the latest versions and ecosystem developments, and actively participate in the community. Node.js is a powerful ally in building the next generation of digital experiences, and by mastering its installation and best practices, you’re well-equipped to contribute significantly to the ever-evolving world of technology.
aViewFromTheCave is a participant in the Amazon Services LLC Associates Program, an affiliate advertising program designed to provide a means for sites to earn advertising fees by advertising and linking to Amazon.com. Amazon, the Amazon logo, AmazonSupply, and the AmazonSupply logo are trademarks of Amazon.com, Inc. or its affiliates. As an Amazon Associate we earn affiliate commissions from qualifying purchases.