In an era defined by data, the need for robust and reliable storage is paramount. Whether you’re a gamer accumulating vast digital worlds, a content creator rendering high-resolution videos, a professional managing extensive databases, or simply someone whose digital life keeps expanding, running out of storage space is an increasingly common predicament. While cloud solutions offer convenience, local storage remains indispensable for speed, privacy, and sheer volume. Installing a new Hard Disk Drive (HDD) is a cost-effective and empowering way to reclaim control over your digital assets, boost your system’s capacity, and potentially enhance overall productivity.
This comprehensive guide will walk you through every step of installing a new HDD, transforming a potentially daunting task into a straightforward upgrade. We’ll cover everything from the crucial preparatory steps and safety measures to the intricate physical installation and the essential software configurations. By mastering this process, you not only save the expense of professional installation but also gain valuable insights into your computer’s hardware, positioning you firmly within the realm of tech-savvy individuals who truly understand and manage their digital tools. This endeavor aligns perfectly with the ethos of technology mastery, offering both a practical solution and a deeper understanding of your machine’s potential.
Preparing for Your HDD Installation: Essential Prerequisites and Safety Measures
Before you even think about opening your computer case, a thorough preparation phase is critical. This initial stage isn’t just about gathering tools; it’s about understanding your needs, ensuring compatibility, and most importantly, prioritizing safety and data integrity. Overlooking these steps can lead to frustration, component damage, or even irreversible data loss—a costly mistake that savvy users meticulously avoid.
Understanding Your Storage Needs and Choices
The first step in any successful tech upgrade is defining your “why.” Why do you need a new HDD? Are you replacing a failing drive, adding secondary storage for games and media, or building a new system from scratch? Your answers will guide your choice of drive.
While the title specifically refers to HDDs, it’s crucial to understand their place in the modern storage landscape. Hard Disk Drives offer an excellent balance of capacity and cost, making them ideal for bulk storage of large files like video archives, extensive game libraries, or backups. For tasks demanding speed—such as your operating system, frequently used applications, or active projects—Solid State Drives (SSDs) like SATA SSDs or the even faster NVMe SSDs are superior. However, for sheer gigabytes per dollar, HDDs remain king.
When selecting an HDD, consider:
- Capacity: How much storage do you realistically need? Factor in future growth. Common sizes range from 1TB to 18TB or more.
- Form Factor: Most desktop HDDs are 3.5-inch drives. Laptops typically use 2.5-inch drives, though adding a second internal HDD to a laptop is less common unless it has a dedicated bay.
- RPM (Rotations Per Minute): Higher RPMs (e.g., 7200 RPM) generally mean faster performance than lower RPMs (e.g., 5400 RPM), but they also consume more power and can generate more heat and noise.
- Cache Size: A larger cache (e.g., 64MB, 128MB, 256MB) can improve performance by temporarily storing frequently accessed data.
- Interface: Modern HDDs use the SATA (Serial ATA) interface. Ensure your motherboard has available SATA data ports and your power supply unit (PSU) has available SATA power connectors. Most motherboards and PSUs manufactured in the last decade will be compatible.
- Brand Reputation: While specific brand recommendations can vary, researching reviews and opting for reputable manufacturers like Western Digital (WD), Seagate, or Toshiba can provide peace of mind regarding reliability and warranty support. Investing in a trusted brand often pays off in the long run by preventing data loss and unexpected failures.
By thoughtfully assessing these factors, you ensure your investment in new hardware is optimized for your specific needs, preventing both under-provisioning and overspending. This strategic approach to hardware acquisition is a hallmark of intelligent “Money” management within the “Tech” sphere.
Gathering Your Tools and Workspace Setup
A well-prepared workspace and the right tools make all the difference. This minimizes fumbling, reduces the risk of damaging components, and streamlines the entire installation process.
You’ll typically need:
- Screwdrivers: A Philips head screwdriver is usually sufficient for most PC cases and drive mounts. Some cases might require a flathead or Torx.
- Anti-static Wrist Strap: This is arguably the most crucial tool. Static electricity can fatally damage sensitive computer components. An anti-static wrist strap, connected to a grounded metal object (like your PC case’s unpainted metal frame), safely dissipates static charges from your body.
- Flashlight or Headlamp: Internal PC components can be dark and difficult to see clearly.
- Zip Ties or Velcro Cable Ties: For neat cable management, which improves airflow and aesthetics.
- Small Container: To hold screws, preventing them from getting lost.
- Your Computer’s Manuals: Especially for motherboard and case, as they can provide specific details on SATA port locations, drive bay mechanisms, and power connections.
- Clean, Well-Lit Workspace: A spacious, clear desk free from clutter reduces the chance of misplacing screws or tools. Avoid carpeted areas, as they are prone to static buildup.
Critical Pre-Installation Checks
Before physically touching your computer’s internals, these checks are non-negotiable:
- Backup, Backup, Backup: This cannot be stressed enough. If your existing drive contains valuable data, create a full backup to an external drive, network-attached storage (NAS), or cloud service. While installing a new HDD typically doesn’t directly affect existing drives, accidents happen. A sudden power surge, an accidental cable disconnect, or a misstep during installation could compromise your existing data. Data security is paramount, and a robust backup strategy is your ultimate safeguard against unforeseen circumstances and potential financial losses associated with data recovery.
- Power Down Completely: Shut down your computer through the operating system. Do not just put it to sleep. Once shut down, unplug the power cord from the wall outlet and from the back of the PC. This eliminates any risk of electrical shock or component damage.
- Discharge Residual Power: After unplugging, press and hold your PC’s power button for 10-15 seconds. This drains any residual power from the system’s capacitors, ensuring no charge remains that could harm components during handling.
- Ground Yourself: Put on your anti-static wrist strap and connect it to an unpainted metal part of your computer case. If you don’t have a strap, periodically touch a grounded metal object (like a metal water pipe or your PC case) before and during handling internal components to discharge static electricity. This simple step protects your investment in high-tech hardware.
By diligently following these preparatory steps, you establish a secure and efficient environment for your HDD installation, mitigating risks and setting the stage for a successful upgrade.
The Physical Installation: Integrating Your New Drive into Your System
With preparations complete, it’s time to physically integrate your new HDD into your computer. This involves carefully opening the case, mounting the drive securely, and making the necessary power and data connections. Precision and care during this stage are key to ensuring the drive operates correctly and reliably.
Accessing Your Computer’s Interior
Most desktop PC cases are designed for relatively easy access to internal components.
- Lay the Case Down: Carefully lay your PC tower on its side on your clean workspace. This provides better access and prevents components from shifting or falling.
- Remove Side Panel(s): Most cases have thumbscrews or standard screws at the rear that secure the side panels. Unscrew them and gently slide the main side panel (usually the left side when viewed from the front) backward, then lift it off. Some cases might also require removing the right-side panel for better cable management access.
- Locate Drive Bays: Look inside for empty drive bays. For a 3.5-inch HDD, these are typically cages or slots located near the front of the case, often below the optical drive bays (if any). They might be clearly labeled or simply appear as empty sleds or brackets designed to hold a drive. Identify available SATA data ports on your motherboard (often near the RAM slots or on the lower edge) and available SATA power connectors from your power supply (usually bundled with other power cables).
Mounting the Hard Drive
Securing the HDD properly is vital for its longevity and performance. Loose drives can vibrate, creating noise and potentially leading to premature failure.
- Identify Mounting Mechanism: Cases vary widely. Some modern cases feature tool-less drive trays or sleds that snap into place. You might need to attach plastic rails or brackets to the sides of your HDD, which then slide into the bay. Older or more budget-friendly cases require screwing the drive directly into a metal cage.
- Insert the Drive:
- Tool-less Bays: If your case has tool-less trays, gently slide your new HDD into an available tray or sled. Ensure the drive’s connectors (SATA data and power) face towards the interior of the case, away from the front panel. Secure the drive in the tray according to the case’s design (e.g., snapping plastic pins into the screw holes on the drive). Then, slide the tray back into an empty drive bay until it clicks securely into place.
- Screw-in Bays: If you have traditional screw-in bays, slide the HDD into an empty bay. Align the screw holes on the side of the HDD with the corresponding holes in the drive cage. You’ll typically need to secure it with four screws (two on each side). Be careful not to overtighten, as this can strip the screw threads or damage the drive’s casing. Some cases allow for front-facing installation where you slide the drive in from the front and secure it from the side.
- Minimize Vibration: Ensure the drive is firmly mounted. If using screws, check that they are snug. Good mounting reduces operational noise and potential wear on the drive’s mechanical components.
Connecting Power and Data Cables
This is where the drive gets its lifeblood and its communication link to the rest of your system.
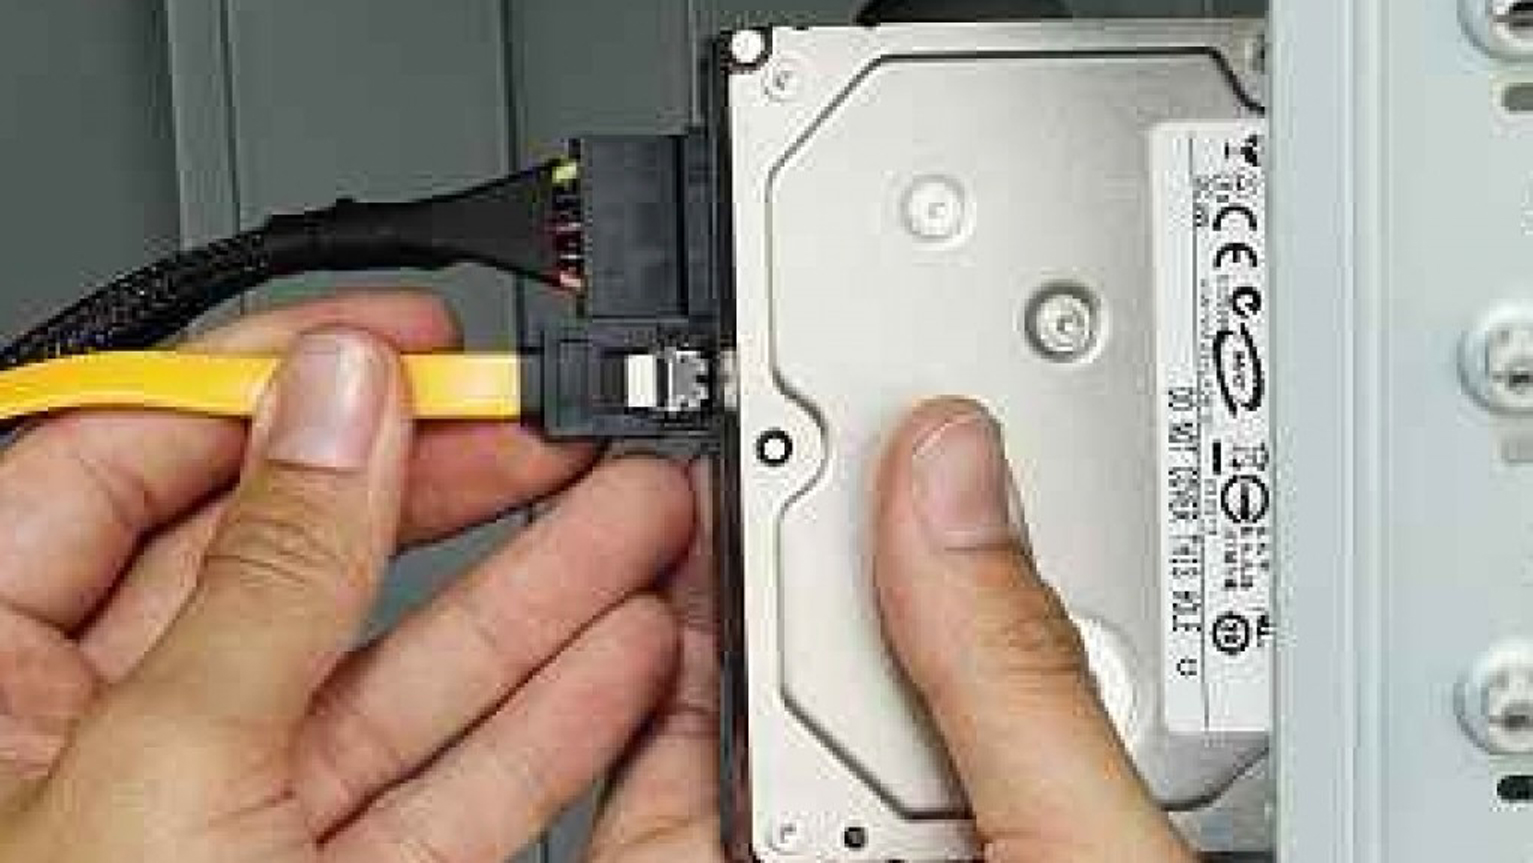
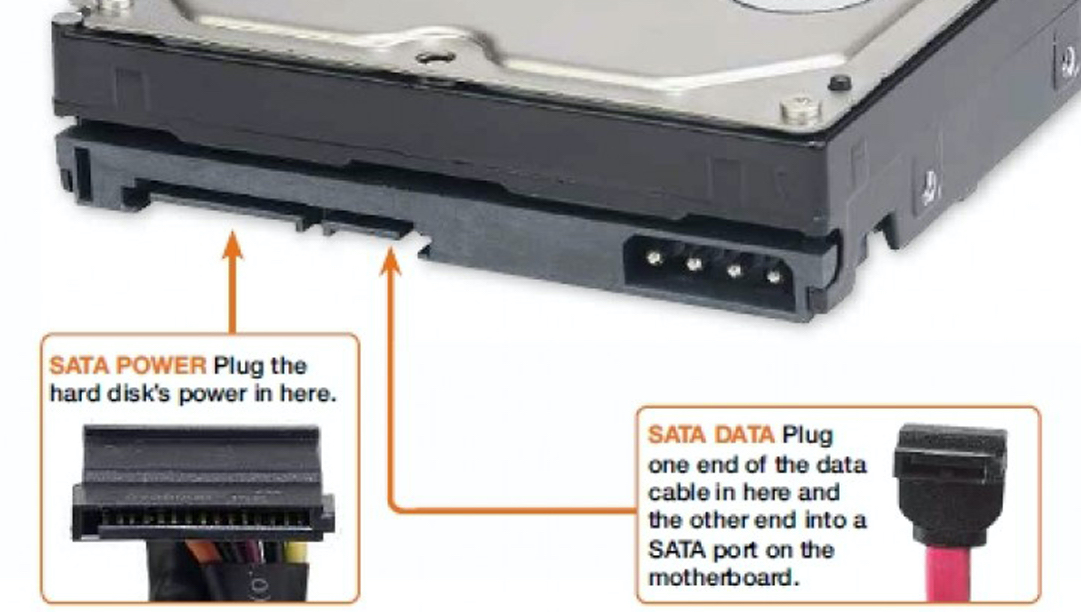
- Connect SATA Data Cable: Take one end of a SATA data cable (usually red, black, or blue, with a flat L-shaped connector) and plug it into the corresponding port on your new HDD. Take the other end and plug it into an available SATA data port on your motherboard. Motherboard SATA ports are often numbered (SATA0, SATA1, etc.). While the order generally doesn’t matter for secondary drives, consistency can aid troubleshooting.
- Connect SATA Power Cable: Locate a SATA power connector coming from your Power Supply Unit (PSU). These are typically flat, wide connectors with five or more wires, also L-shaped. Plug this connector firmly into the power port on your new HDD, adjacent to the data port. Ensure it’s fully seated. If your PSU doesn’t have enough SATA power connectors, you might need a Molex-to-SATA power adapter, though it’s generally best to use direct SATA power if available for better stability.
- Cable Management: This step is often overlooked but contributes significantly to the system’s longevity, cooling, and even its “Brand” aesthetic. Bundle excess cable length using zip ties or Velcro straps and route them discreetly behind the motherboard tray or along the case’s edges. Good cable management improves airflow within the case, preventing heat buildup which can degrade component performance and lifespan. It also makes future upgrades or maintenance much easier and gives your system a professional, clean look.
Once all connections are made and cables are managed, perform a final visual check to ensure everything is securely seated and no cables are obstructing fans or airflow. Then, carefully replace the side panel(s) of your PC case, secure them with screws, and return your computer to its upright position.
Software Configuration: Making Your New HDD Usable
The physical installation is only half the battle. For your operating system to recognize and utilize the new HDD, you need to perform several software-level configurations. This involves checking the BIOS/UEFI, initializing the disk, creating partitions, and formatting it. Without these steps, your newly installed drive will remain an invisible, unusable piece of hardware.
Initial BIOS/UEFI Verification
After the physical installation, the first software check happens at the lowest level of your system: the BIOS (Basic Input/Output System) or its modern successor, UEFI (Unified Extensible Firmware Interface).
- Reconnect Power and Peripherals: Plug your monitor, keyboard, mouse, and the PC’s power cable back in.
- Boot to BIOS/UEFI: Turn on your computer. As it starts up, repeatedly press the designated key to enter the BIOS/UEFI setup. Common keys include
Del,F2,F10,F12, orEsc. Refer to your motherboard manual if unsure. - Verify Drive Detection: Once in the BIOS/UEFI, navigate to the “Storage,” “SATA Configuration,” or “Boot Devices” section. Look for a list of connected drives. Your new HDD should be listed there, usually identified by its model number. If it’s not detected, power down immediately, re-check all power and data cable connections, and then try again. A missed connection is the most common reason for a drive not appearing in the BIOS.
- Save and Exit: If detected, you can simply save your changes (even if none were made) and exit the BIOS/UEFI. Your computer will then boot into your operating system.
Initializing and Partitioning in Windows (or similar OS)
Even if the BIOS/UEFI sees the drive, your operating system won’t recognize it as usable storage until it’s initialized, partitioned, and formatted. We’ll use Windows Disk Management as an example, but the concepts apply to other operating systems as well (e.g., GParted in Linux).
- Open Disk Management: In Windows, press
Win + Xto open the Power User menu, then select “Disk Management.” Alternatively, search for “Disk Management” in the Start Menu. - Initialize the Disk: When Disk Management opens, it should automatically detect an uninitialized disk and prompt you to initialize it. If not, look for a disk marked “Unknown” or “Not Initialized” (often with black unallocated space). Right-click on the disk number (e.g., “Disk 1”) and select “Initialize Disk.”
- Choose Partition Style: You’ll be asked to choose between MBR (Master Boot Record) and GPT (GUID Partition Table).
- MBR: An older standard, supports up to 2TB partitions and up to four primary partitions.
- GPT: The newer, recommended standard, supports drives larger than 2TB and virtually unlimited partitions. Always choose GPT for new drives, especially if they are 2TB or larger.
- Click “OK.” The disk will now be “Online” but still show “Unallocated” space.
- Choose Partition Style: You’ll be asked to choose between MBR (Master Boot Record) and GPT (GUID Partition Table).
- Create a New Simple Volume (Partition): Right-click on the “Unallocated” space on your new disk and select “New Simple Volume.”
- New Simple Volume Wizard: This wizard will guide you through creating a partition.
- Specify Volume Size: You can use the entire disk for one partition or divide it into multiple smaller partitions. For most users adding a secondary storage drive, using the maximum available space for a single partition is common.
- Assign Drive Letter: Choose an available drive letter (e.g., D:, E:, F:).
- Format Partition: This is a crucial step that prepares the drive for data storage.
- File System: Select
NTFS(New Technology File System) for Windows compatibility. If you plan to frequently transfer large files between different operating systems (e.g., macOS, Linux), you might consider exFAT, but NTFS is generally preferred for internal Windows drives. - Allocation Unit Size: Leave this at the default (
Default). - Volume Label: Give your drive a descriptive name (e.g., “Game Storage,” “Media Archive”).
- Perform a quick format: This is usually sufficient. A full format checks for bad sectors but takes much longer.
- File System: Select
- Click “Next” and then “Finish.”
Disk Management will now format the drive. Once complete, your new HDD will appear as a usable drive in “This PC” (or “My Computer”), ready for data.
Advanced Considerations (Optional)
For users with specific needs, there are further steps you might consider:
- Cloning an Existing Drive: If you’re replacing your main OS drive with a new HDD (though an SSD is highly recommended for OS drives), you might want to clone your old drive’s contents to the new one. This typically requires specialized cloning software (e.g., Macrium Reflect Free, EaseUS Todo Backup) and ensures your operating system and all applications are transferred intact.
- Setting up RAID: For advanced users, RAID (Redundant Array of Independent Disks) configurations can be used with multiple HDDs to improve performance (RAID 0), provide data redundancy (RAID 1), or a combination of both (RAID 5, 10). This requires a motherboard that supports RAID and careful setup within the BIOS/UEFI before OS installation. This falls firmly under “Tech” expertise and can offer significant “Productivity” benefits for demanding tasks.
These software configurations are the final puzzle pieces that bring your new hardware to life. By understanding and executing them correctly, you unlock the full potential of your expanded storage, ready to tackle any digital challenge.
Post-Installation & Troubleshooting: Ensuring Smooth Operation
Congratulations, your new HDD is physically installed and configured! However, the journey doesn’t quite end there. It’s prudent to perform some post-installation checks to ensure everything is running optimally. Furthermore, being prepared for potential issues and knowing how to troubleshoot them will save you time and frustration, reinforcing your competence as a tech-savvy user.
Testing Your New Drive
Once your drive appears in File Explorer, it’s a good idea to put it through its paces.
- Transfer Files: Copy a large folder or several large files to the new drive from another location. Observe the transfer speeds. This helps confirm that the data and power connections are stable and that the drive is performing as expected.
- Create Folders and Files: Create some new folders and documents directly on the new drive to ensure basic write operations are working correctly.
- Benchmark Tools (Optional): For those interested in performance metrics, tools like CrystalDiskMark can provide read/write speed benchmarks. While HDDs won’t match SSD speeds, comparing your results to typical performance for your drive model can confirm it’s not underperforming.
- Monitor Drive Health: Keep an eye on your drive’s health using utilities that read SMART (Self-Monitoring, Analysis and Reporting Technology) data. Tools like CrystalDiskInfo can show you crucial information about temperature, error rates, and overall drive status. Healthy drives contribute to system stability and data integrity, safeguarding your “Money” investment.
Common Issues and Solutions
Even with careful installation, problems can arise. Here’s a quick guide to common issues:
- Drive Not Detected in BIOS/UEFI or OS:
- Solution: Power down, unplug, and carefully re-check both the SATA data cable (ensure it’s firmly plugged into both the drive and the motherboard) and the SATA power cable (ensure it’s fully seated into the drive and connected to the PSU). Try a different SATA data port on the motherboard and a different SATA power connector if available.
- Drive Detected but Shows “Unallocated” Space (Windows):
- Solution: This is normal! You simply need to initialize and partition/format the drive using Disk Management, as detailed in the “Software Configuration” section.
- Slow Performance:
- Solution: Ensure you’re using a proper SATA III (6Gbps) cable and that it’s connected to a SATA III port on your motherboard. Check if the drive is set to the correct transfer mode in the BIOS/UEFI (usually AHCI mode). Also, ensure the drive is not excessively full (try to keep at least 10-15% free space for optimal performance) and that it’s not running unusually hot (check with CrystalDiskInfo).
- Clicking Noises or Unresponsive Drive:
- Solution: This can indicate a failing drive. Immediately back up any critical data you might have already placed on it and consider replacing the drive. Do not attempt to recover data from a mechanically failing drive yourself unless you have specialized tools and knowledge; consult a professional data recovery service if the data is irreplaceable (though this can be very expensive, emphasizing the “Money” value of proactive backups).
- Windows Freezes or Crashes After Installation:
- Solution: This is rare for a secondary drive installation but can happen if there’s a conflict or a faulty connection. Try disconnecting the new HDD and booting the PC. If it works fine, systematically recheck connections and possibly try another SATA port. Ensure all drivers (especially chipset drivers for your motherboard) are up to date.
Optimizing Your Storage Strategy
With your new storage online, take a moment to consider how to best utilize it.
- Data Organization: Plan a logical folder structure. For example, use your new HDD for “Games,” “Movies,” “Photos,” “Work Projects,” keeping your primary OS drive lean for system performance. A well-organized drive enhances your “Productivity” and overall digital experience.
- Regular Backups: Reinforce the lesson learned in preparation: continue to back up important data. Consider a 3-2-1 backup strategy (3 copies of data, on 2 different media, with 1 copy offsite). This protects your digital assets, ensuring business continuity or personal peace of mind, directly impacting your “Digital Security.”
- Future Upgrades: Understand that storage needs are dynamic. Keeping an eye on your remaining space and anticipating future needs will allow for timely upgrades without disruption.

Conclusion
Installing a new HDD is a rewarding and highly practical skill that empowers you to manage and expand your digital world effectively. By meticulously following the steps outlined in this guide—from the initial thoughtful preparation and adherence to safety protocols, through the precise physical installation, to the essential software configuration and post-installation checks—you’ve not only added valuable storage to your system but also gained a deeper understanding of your computer’s inner workings.
This hands-on experience transcends mere hardware installation; it embodies the spirit of self-reliance in technology. You’ve embraced a DIY approach that saves “Money” on professional services, enhances your “Tech” proficiency, and cultivates a mindset of proactive digital management. Taking control of your hardware is a powerful aspect of “Personal Branding” in the tech realm, demonstrating capability and understanding. Whether your goal was to create a massive game library, secure invaluable archives, or simply breathe new life into an aging system, you’ve now mastered a fundamental aspect of PC maintenance. Enjoy your expanded digital horizons, backed by the confidence of a job well done.
aViewFromTheCave is a participant in the Amazon Services LLC Associates Program, an affiliate advertising program designed to provide a means for sites to earn advertising fees by advertising and linking to Amazon.com. Amazon, the Amazon logo, AmazonSupply, and the AmazonSupply logo are trademarks of Amazon.com, Inc. or its affiliates. As an Amazon Associate we earn affiliate commissions from qualifying purchases.