In the vast and dynamic world of technology, mastering fundamental tools is paramount for efficiency and productivity. Whether you’re a seasoned system administrator, a budding developer, or simply someone keen to delve deeper into command-line operations, a reliable text editor is an indispensable asset. While graphical user interface (GUI) editors are prevalent, the command line offers unparalleled power, speed, and remote accessibility, often becoming the backbone of robust digital infrastructure. Among the myriad of command-line text editors, Nano stands out for its elegant simplicity and user-friendliness, making it an ideal choice for beginners and a swift, go-to tool for veterans.
This comprehensive guide will walk you through the entire process of installing Nano across various operating systems, from Linux and macOS to Windows, and equip you with the knowledge to harness its basic functionalities. Beyond the technical steps, we’ll explore why Nano is a smart addition to your tech toolkit, how its efficiency can contribute to your personal and professional brand, and how leveraging such open-source tools can offer significant financial advantages by optimizing your workflow and reducing overhead. Dive in to unlock the potential of command-line text editing and streamline your digital life.
Understanding Nano: Simplicity Meets Power in the Terminal
Before we embark on the installation journey, it’s crucial to grasp what Nano is and why it has earned its place as a beloved command-line text editor. Nano is a small, free, and open-source text editor for Unix-like operating systems or environments using a command-line interface. Unlike its more complex counterparts like Vim or Emacs, Nano is designed with an emphasis on ease of use, making it incredibly approachable for newcomers while still providing robust functionality for everyday tasks.
The Power of Simplicity in the Command Line
At its core, Nano’s appeal lies in its straightforward interface. When you open a file with Nano, you’re greeted with a clean screen, displaying the file’s content and a two-line “shortcut bar” at the bottom that lists common commands. This on-screen help eliminates the steep learning curve often associated with other terminal-based editors. For instance, to save a file, you simply press Ctrl+O (which corresponds to ^O shown on the screen, indicating “Write Out”). This intuitive design minimizes the need to memorize complex keybindings, allowing users to become productive almost instantly.
This simplicity doesn’t come at the expense of capability. Nano supports essential features such as syntax highlighting (making code more readable), searching and replacing text, cut-and-paste functionality, and even basic spell checking. For tasks like quickly editing configuration files on a server, scripting small automation routines, or jotting down notes without leaving the terminal, Nano’s lightweight nature and direct controls make it exceptionally efficient. This efficiency translates directly into saved time, a valuable commodity for any tech professional or entrepreneur, subtly enhancing one’s personal brand as someone who prioritizes streamlined operations.
Nano vs. Other Command-Line Editors: A Strategic Choice
The landscape of command-line text editors is diverse, with powerful tools like Vi/Vim and Emacs often lauded for their advanced capabilities and extensibility. However, these editors typically demand a significant time investment to master. Vim, for instance, operates in different modes (normal, insert, visual, command), requiring users to switch between them to perform various actions, which can be daunting for the uninitiated. Emacs, on the other hand, is a highly extensible editor, often described as an operating system in itself, boasting an intricate command set and a Lisp-based extension language.
While Vim and Emacs are invaluable for intensive coding and complex text manipulation, Nano carves out its niche by offering a less intimidating entry point. For tasks that don’t require the full power of these behemoths, Nano provides a faster, more accessible solution. Choosing Nano isn’t about compromising on functionality; it’s a strategic decision to optimize for speed and ease of use in specific contexts. For businesses and startups, adopting user-friendly tools like Nano can reduce training costs and accelerate onboarding for team members who might not be command-line experts, contributing to better financial management and project delivery.
Ideal Use Cases for Nano
Nano shines in several practical scenarios:
- Server Configuration: When SSHing into a remote server, Nano is often the default or easiest editor to use for modifying configuration files (e.g., Apache, Nginx, network settings). Its simplicity reduces the risk of errors during critical server adjustments.
- Quick Script Editing: For writing or tweaking shell scripts, Python scripts, or other small code snippets directly in the terminal, Nano is incredibly fast.
- Basic Note-Taking: It provides a distraction-free environment for quickly capturing ideas or task lists without leaving your terminal session.
- Educational Purposes: For those new to Linux or command-line interfaces, Nano serves as an excellent training tool to understand file editing fundamentals without getting bogged down by complex editor mechanics.
- Emergency Fixes: In situations where you need to make a quick fix on a system and don’t have access to a full-fledged IDE, Nano is a lifesaver.
Integrating Nano into your workflow demonstrates a pragmatic approach to technology, leveraging the right tool for the job – a hallmark of a robust tech personal brand.
Pre-Installation Considerations: Setting the Stage for Success
Before initiating the Nano installation process, a few preparatory steps can ensure a smooth experience. Understanding your system’s current state and potential dependencies is key to avoiding common pitfalls.
System Requirements and Dependencies
Nano is remarkably lightweight and has minimal system requirements. It primarily needs a Unix-like environment or a compatible shell, and typically doesn’t demand significant RAM or CPU resources. Most modern Linux distributions, macOS, and even Windows environments leveraging Windows Subsystem for Linux (WSL) or Git Bash will comfortably run Nano.
The primary “dependency” is often a package manager, which simplifies the installation of software on most operating systems. We’ll be using apt for Debian/Ubuntu, yum or dnf for CentOS/Fedora, pacman for Arch Linux, brew for macOS, and Chocolatey or built-in Linux package managers via WSL for Windows. Ensuring your package manager is up-to-date is a good practice before any software installation.
Checking for Existing Nano Installations
It’s common for many Linux distributions and macOS to come with Nano pre-installed or readily available. Before attempting a fresh installation, it’s wise to check if it’s already on your system. This saves time and prevents potential conflicts.
To check for Nano, simply open your terminal and type:
nano --version
Or, more generically:
which nano
If Nano is installed, the nano --version command will display its version number, while which nano will output the path to the Nano executable (e.g., /usr/bin/nano). If either command returns “command not found” or similar, then you’ll need to proceed with the installation. This quick verification step exemplifies efficient troubleshooting and system awareness, qualities that resonate positively with a professional tech brand.
Step-by-Step Nano Installation Across Platforms
The installation method for Nano varies depending on your operating system. Below, we’ll cover the most common environments, providing clear, actionable commands.
Installing Nano on Linux/Unix-based Systems
Linux distributions typically use a package manager to handle software installations. These managers streamline the process by automatically fetching the correct software version and resolving any dependencies.
Debian/Ubuntu and Derivatives (using apt)
Debian and Ubuntu, along with their numerous derivatives (like Linux Mint, Pop!_OS), use the apt package manager. Nano is almost always available in their default repositories.
-
Update Package Lists: It’s good practice to refresh your local package index to ensure you’re getting the latest available information.
sudo apt updatesudogrants administrative privileges, often required for system-wide changes. -
Install Nano:
bash

sudo apt install nano
The system will prompt you to confirm the installation and download size. Typeyand press Enter.
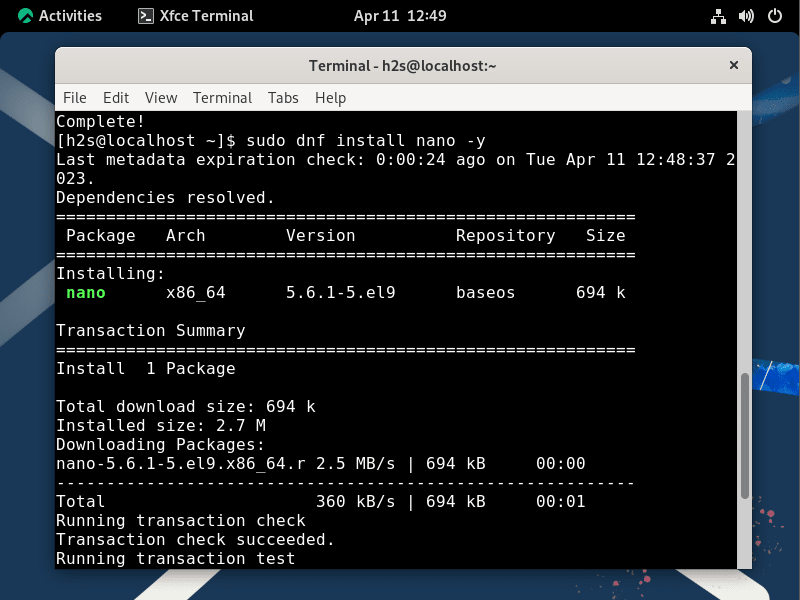
CentOS/Fedora/RHEL and Derivatives (using yum or dnf)
For Red Hat Enterprise Linux (RHEL), CentOS, Fedora, and similar distributions, yum was traditionally used, but dnf has largely replaced it as the default package manager for newer versions.
-
Update System (using
dnforyum):sudo dnf update -y # Or for older systems # sudo yum update -y -
Install Nano (using
dnforyum):
bash

sudo dnf install nano -y

# Or for older systems

# sudo yum install nano -y
The-yflag automatically confirms prompts, useful for scripting but can be omitted if you prefer manual confirmation.
Arch Linux (using pacman)
Arch Linux uses the pacman package manager, known for its speed and simplicity.
-
Synchronize Package Databases:
sudo pacman -Sy -
Install Nano:
bash

sudo pacman -S nano
Installing Nano on macOS (using Homebrew)
macOS is a Unix-like operating system, but it doesn’t have a built-in package manager like apt or dnf. The most popular and recommended way to install command-line tools on macOS is using Homebrew, often referred to as “the missing package manager for macOS.”
-
Install Homebrew (if not already installed):
Open your Terminal.app and paste the following command. Follow the on-screen instructions, which may include installing Apple’s Command Line Tools for Xcode./bin/bash -c "$(curl -fsSL https://raw.githubusercontent.com/Homebrew/install/HEAD/install.sh)" -
Install Nano with Homebrew:
Once Homebrew is installed and configured (you might need to add it to your PATH as instructed after installation), you can install Nano:
bash

brew install nano
Homebrew will fetch and install Nano, along with any necessary dependencies.
Installing Nano on Windows
Windows doesn’t natively support Unix-like command-line tools, but there are several robust methods to bring Nano to your environment.
Option 1: Using Windows Subsystem for Linux (WSL)
WSL allows you to run a full Linux environment directly within Windows, offering the most authentic Linux command-line experience. This is highly recommended for developers and system administrators.
-
Enable WSL:
Open PowerShell or Command Prompt as an administrator and run:wsl --installThis command will enable WSL, download the Ubuntu distribution (default), and install it. You may need to restart your computer.
-
Launch WSL and Install Nano:
After restarting, search for “Ubuntu” in your Start menu and launch it. This will open a Linux terminal. From here, you can install Nano just as you would on a standard Ubuntu system:
bash

sudo apt update

sudo apt install nano
You’ll be prompted to create a Unix username and password the first time you launch Ubuntu.

Option 2: Using Git Bash
Git Bash is a terminal emulator for Windows that provides a Git command-line experience, including a set of Unix-like utilities, thanks to the MinGW-w64 project. Nano is often bundled with Git Bash.
-
Install Git for Windows:
Download and run the installer from the official Git website (https://git-scm.com/download/win). During installation, ensure that the “Use Git and optional Unix tools from the Command Prompt” or “Git Bash Here” options are selected. Nano is usually included in the default installation. -
Verify Nano Installation:
Once Git Bash is installed, open it (search for “Git Bash” in Start menu) and type:
bash

nano --version
If it’s installed, you’ll see the version information. If not, Git Bash might not be the ideal environment for a standalone Nano installation without further configuration or custom MinGW builds, and WSL would be a better choice.
Option 3: Using Chocolatey (Windows Package Manager)
Chocolatey is a popular package manager for Windows, similar to apt or brew, allowing you to install software from the command line.
-
Install Chocolatey (if not already installed):
Open PowerShell as an administrator and run:Set-ExecutionPolicy Bypass -Scope Process -Force; [System.Net.ServicePointManager]::SecurityProtocol = [System.Net.ServicePointManager]::SecurityProtocol -bor 3072; iex ((New-Object System.Net.WebClient).DownloadString('https://community.chocolatey.org/install.ps1'))Refer to the official Chocolatey website (https://chocolatey.org/install) for the most up-to-date installation command.
-
Install Nano with Chocolatey:
Once Chocolatey is installed, you can install Nano by typing:
powershell

choco install nano
Follow any prompts during the installation.
These diverse installation methods demonstrate Nano’s versatility and accessibility, underscoring its value as a cross-platform productivity tool. By providing multiple pathways, users can choose the option that best fits their existing tech stack, fostering a more robust and adaptable digital workflow.
Getting Started with Nano: Basic Usage for Immediate Productivity
With Nano successfully installed, it’s time to unlock its potential. This section covers the essential commands to create, edit, save, and exit files, getting you productive almost instantly.
Opening and Creating Files
To open an existing file or create a new one, simply type nano followed by the filename in your terminal:
nano my_new_script.sh
If my_new_script.sh doesn’t exist, Nano will open an empty buffer for you to start typing. If it does exist, Nano will load its content.
Navigating and Editing Text
Once inside Nano, you can use your arrow keys to move the cursor around the text. Typing is straightforward – just start typing as you would in any other text editor.
Here are some fundamental editing actions and their corresponding Nano shortcuts (displayed at the bottom of the screen):
Ctrl+K(Cut Line): Cuts the current line. Pressing it multiple times cuts multiple lines into a buffer.Ctrl+U(Uncut/Paste): Pastes the content from the cut buffer.Ctrl+A(Go to Start of Line): Moves the cursor to the beginning of the current line.Ctrl+E(Go to End of Line): Moves the cursor to the end of the current line.Ctrl+W(Where Is / Search): Prompts for text to search. After entering text, pressEnter.- To find the next occurrence, press
Alt+W(orEsc+Won some terminals).
- To find the next occurrence, press
Ctrl+(Replace): Prompts for text to search and then for replacement text.
Saving Changes and Exiting Nano
These are perhaps the most crucial commands for any editor.
Ctrl+O(Write Out / Save): This command saves your changes. Nano will display the filename at the bottom and ask for confirmation. PressEnterto save to the current filename, or you can type a new filename to save it under a different name (File > Save As equivalent).Ctrl+X(Exit): This command attempts to exit Nano.- If you have unsaved changes, Nano will ask if you want to save them. Press
Yfor Yes,Nfor No, orCtrl+Cto cancel and return to the editor. - If there are no unsaved changes, Nano exits immediately.
- If you have unsaved changes, Nano will ask if you want to save them. Press
Essential Keyboard Shortcuts (Quick Reference)
| Shortcut | Action |
|---|---|
Ctrl+G |
Get Help |
Ctrl+X |
Exit |
Ctrl+O |
Write Out (Save) |
Ctrl+R |
Read File (Insert File) |
Ctrl+K |
Cut Text (Cut Line) |
Ctrl+U |
Uncut Text (Paste) |
Ctrl+J |
Justify (Format Paragraph) |
Ctrl+T |
Spell Check |
Ctrl+W |
Where Is (Search) |
Ctrl+ |
Replace |
Ctrl+C |
Cur Pos (Current Position) |
Ctrl+A |
Go to Start of Line |
Ctrl+E |
Go to End of Line |
Ctrl+V |
Page Down |
Ctrl+Y |
Page Up |
Alt+A |
Mark Text (Start Selection) |
Alt+^ (or Alt+6) |
Copy Marked Text |
Becoming proficient with these basic shortcuts can significantly boost your productivity in the terminal. The simplicity of Nano means that most users can pick up these commands very quickly, leading to immediate gains in efficiency, which in turn enhances time management and, indirectly, financial productivity by freeing up time for other tasks.
Enhancing Your Nano Experience: Customization and Advanced Tips
While Nano’s default settings are perfectly functional, a little customization can make it even more tailored to your workflow. Advanced features, though simple, can further refine your command-line editing prowess.
Configuring Nano with the .nanorc File
Nano reads configuration options from a file named .nanorc in your home directory (~/.nanorc). If this file doesn’t exist, you can create it using Nano itself:
nano ~/.nanorc
Inside this file, you can specify various settings. Each setting starts with a set command. Here are some popular and useful options:
set autoindent: Automatically indent new lines to match the previous line. Essential for coding.set smartindent: Like autoindent but tries to be smarter about it.set tabsize 4: Sets the width of a tab character to 4 spaces.set tabstospaces: Converts typed tabs into spaces. Highly recommended for consistent code formatting.set linenumbers: Displays line numbers on the left side of the editor. Very useful for debugging or referencing specific lines.set softwrap: Wraps long lines of text instead of letting them scroll off-screen.set constantshow: Always show the current line, column, and character position.include "/usr/share/nano/*.nanorc": Includes system-wide syntax highlighting definitions. Many distributions automatically enable this, but it’s good to ensure it’s present.
A sample .nanorc file might look like this:
set autoindent
set smartindent
set tabsize 4
set tabstospaces
set linenumbers
set softwrap
set constantshow
include "/usr/share/nano/*.nanorc"
After saving your .nanorc file (remember Ctrl+O, then Ctrl+X), these settings will take effect the next time you launch Nano. Customizing your tools demonstrates attention to detail and a commitment to optimizing your environment, reflecting positively on your professional brand in the tech sphere.
Practical Nano Features for Productivity
Beyond basic editing, Nano offers features that further enhance productivity:
- Syntax Highlighting: As mentioned, by including
include "/usr/share/nano/*.nanorc"in your.nanorcand ensuring your system has the relevant syntax files, Nano can color-code different elements of programming languages (e.g., keywords, strings, comments). This drastically improves readability and helps in spotting errors. - Go To Line (
Alt+GorEsc+G): Quickly jump to a specific line number. When working with large files or error messages that reference line numbers, this is invaluable. - Spell Checker (
Ctrl+T): Nano can integrate with an external spell checker (likeaspellorhunspell). While not its primary use, it’s useful for documentation or configuration comments. - Mark Text (
Alt+AorEsc+A): Start marking text for selection. Once marked, you can useCtrl+Kto cut it,Alt+^(orAlt+6) to copy it, orCtrl+Uto paste it. This enables block operations. - File Browser (
Ctrl+RthenCtrl+T): When in “Read File” mode (Ctrl+R), pressingCtrl+Tcan bring up a simple file browser, allowing you to navigate directories and select a file to insert its content.
Troubleshooting Common Nano Issues
While Nano is generally stable, you might encounter minor issues:
- Nano Not Found: Double-check your installation steps for your specific OS. Ensure your PATH environment variable includes the directory where Nano is installed.
- Incorrect Permissions: If you can’t save a file, it’s often a permission issue. If you’re editing system files, remember to use
sudo(e.g.,sudo nano /etc/nginx/nginx.conf). - Garbled Text/Display Issues: This might be a terminal emulator problem or an encoding mismatch. Ensure your terminal is set to UTF-8 encoding. Sometimes, clearing the terminal (
clearcommand) and restarting Nano helps. - Configuration Not Taking Effect: Verify that your
.nanorcfile is correctly named (.nanorc) and located in your home directory (~). Check for typos in the configuration options.
Mastering these tips and tricks elevates your Nano usage from basic editing to a highly efficient command-line workflow. This proficiency can significantly reduce time spent on routine tasks, indirectly leading to cost savings and improved project timelines – a clear financial benefit for individuals and organizations.
The Broader Impact: Nano in Your Tech Ecosystem
The choice and mastery of tools like Nano extend beyond mere technical functionality. They resonate across various facets of your professional life, touching upon productivity, personal branding, and even financial implications.
Boosting Productivity for Developers and Sysadmins
For developers and system administrators, time is a critical resource. Nano’s quick launch time, intuitive interface, and efficiency in handling common text editing tasks directly contribute to higher productivity. Instead of context-switching to a heavy GUI editor or struggling with a complex terminal editor for a simple change, Nano offers an immediate solution. This agility is vital in fast-paced development cycles and urgent server maintenance, minimizing downtime and accelerating problem resolution. A developer or sysadmin who can swiftly navigate and modify files in the command line is perceived as more capable and efficient, bolstering their personal brand.
Cost-Effectiveness and Open Source Advantage
Nano is free and open-source software. This means zero licensing costs, making it an incredibly cost-effective solution for individuals, startups, and enterprises alike. For small businesses or those operating on tight budgets, leveraging open-source tools like Nano for fundamental tasks can lead to significant savings compared to proprietary software solutions. Furthermore, its open-source nature fosters a community of contributors, ensuring continuous improvement, security updates, and widespread compatibility. This financial advantage allows resources to be allocated to other critical areas, directly impacting a company’s bottom line and promoting sustainable growth.
Building a Stronger Digital Workflow
Integrating Nano into a broader digital workflow signifies an embrace of efficient, lightweight tools that prioritize performance and accessibility. This contributes to building a stronger, more resilient digital infrastructure. Whether managing cloud servers, automating deployment scripts, or performing remote diagnostics, a streamlined command-line experience powered by Nano enhances operational efficiency. A company known for its robust and efficient digital operations cultivates a strong corporate brand, instilling confidence in clients and stakeholders. For individuals, proficiency with such tools positions them as adaptable, technically astute, and valuable contributors in the ever-evolving tech landscape.
Conclusion: Empowering Your Command-Line Journey with Nano
The journey through “How to Install Nano” reveals more than just a series of technical commands; it underscores the philosophy of efficient, accessible computing. Nano, with its user-centric design and powerful simplicity, serves as an exemplary gateway to mastering the command line. It demystifies what can often be an intimidating environment, empowering users from all backgrounds to confidently manage, edit, and create files directly within their terminal.
By following this comprehensive guide, you’ve gained the practical knowledge to install Nano across diverse operating systems—from the robust Linux environments and sleek macOS setups to the integrated Windows Subsystem for Linux or the versatile Git Bash on Windows. Furthermore, you’re now equipped with the essential commands to immediately become productive, whether you’re crafting scripts, tweaking server configurations, or simply taking quick notes. The ability to customize Nano through the .nanorc file further ensures that this tool adapts to your unique preferences, making your command-line experience not just functional, but truly enjoyable and efficient.
In the broader context of technology, embracing tools like Nano translates into tangible benefits: enhanced personal productivity, strengthened professional branding through demonstrated technical prowess, and considerable financial advantages stemming from its open-source nature and the time saved through streamlined workflows. As you continue your journey in the digital realm, let Nano be a testament to the power of simplicity, a reliable companion that ensures your command-line operations are always a smooth and efficient experience. Embrace Nano, empower your workflow, and elevate your technical acumen.
aViewFromTheCave is a participant in the Amazon Services LLC Associates Program, an affiliate advertising program designed to provide a means for sites to earn advertising fees by advertising and linking to Amazon.com. Amazon, the Amazon logo, AmazonSupply, and the AmazonSupply logo are trademarks of Amazon.com, Inc. or its affiliates. As an Amazon Associate we earn affiliate commissions from qualifying purchases.