Minecraft, at its core, is a game of endless possibilities. Yet, even the most expansive virtual worlds can benefit from a touch of personalization, new features, and creative enhancements. This is where the vibrant world of modding comes into play, and for the Java Edition, Minecraft Forge stands as the undisputed gateway to this realm of limitless customization. From introducing fantastical creatures and complex machinery to overhauling graphics and user interfaces, mods transform Minecraft from a beloved game into an entirely unique adventure tailored precisely to your preferences.
This comprehensive guide will walk you through every step of installing mods for Forge, ensuring a smooth and enjoyable experience. We’ll delve into the technical underpinnings, highlight best practices for digital security, and even touch upon how this user-driven innovation impacts the broader tech and gaming communities. Whether you’re a seasoned player looking to expand your horizons or a newcomer eager to unlock Minecraft’s full potential, preparing to dive into the world of modded gameplay is an exciting journey that begins right here.
Understanding Minecraft Forge and the Modding Ecosystem
Before we embark on the installation process, it’s crucial to understand what Minecraft Forge is and why it’s so vital to the modding community. This foundational knowledge will not only help you navigate the process more effectively but also appreciate the intricate ecosystem that allows players to continuously reimagine their favorite blocky world.
What is Minecraft Forge?
At its heart, Minecraft Forge is a mod loader. In simpler terms, it’s a piece of software that modifies the base Minecraft game to allow other, smaller modifications (mods) to run alongside it seamlessly. Without Forge, the vast majority of custom mods wouldn’t be able to integrate with Minecraft’s core code, leading to incompatibility and game crashes. Think of Forge as a universal adapter or an operating system for your mods – it provides the necessary framework and APIs (Application Programming Interfaces) that mod developers use to create their content, ensuring that different mods can often coexist and interact without breaking the game.
The development of Forge itself is a testament to the power of community and open-source contributions within the tech world. It’s maintained by a dedicated team of developers, constantly updated to support new Minecraft versions, and widely adopted, making it the de facto standard for Java Edition modding. This widespread adoption has fostered an incredible amount of innovation, allowing creators to push the boundaries of what’s possible within the game. For players, this means access to an unparalleled library of content, turning their initial investment in Minecraft into an exponentially valuable entertainment platform, far beyond its vanilla offerings.
Why Mod Your Minecraft Experience?
The reasons players choose to mod Minecraft are as diverse as the mods themselves, but they generally revolve around enhancing and personalizing the gameplay experience. From a technology standpoint, modding represents the ultimate form of software customization and user empowerment.
- Expanded Content and Gameplay: Mods introduce thousands of new items, blocks, creatures, dimensions, and gameplay mechanics that are simply not present in the vanilla game. Want to build a high-tech factory, explore alien planets, or become a powerful wizard? There’s a mod for that, often many. This vastly extends the game’s replayability and offers fresh challenges even for veterans.
- Performance and Quality of Life Improvements: Not all mods are about adding new content. Many focus on optimizing game performance, improving the user interface, or adding quality-of-life features that make the game smoother and more enjoyable. These can include mini-maps, inventory management tools, improved chunk loading, or visual enhancements like shaders. Such mods directly address common pain points, making the digital experience more efficient and productive.
- Creative Expression and Community Building: For many, modding is a form of creative expression. Players can use mods to build truly unique worlds, design intricate contraptions, or craft specific narratives for their adventures. Furthermore, the act of discovering, discussing, and playing with mods fosters strong online communities. These communities are vital for sharing knowledge, troubleshooting issues, and celebrating the ingenuity of mod developers, many of whom have built significant personal “brands” around their creations and contributions. This vibrant ecosystem, driven by passion rather than direct financial incentive for many creators, showcases the collaborative spirit often found at the intersection of gaming and technology.
By diving into modding, you’re not just playing a game; you’re actively participating in a dynamic, user-driven software development environment that continually evolves and redefines what Minecraft can be.
Essential Preparations Before You Begin
Embarking on your modding journey requires a few critical preparations to ensure a smooth installation and stable gameplay. Skipping these steps can lead to frustration, crashes, or even system instability. Think of this as laying a solid foundation for your personalized Minecraft experience, much like a meticulous project manager prepares all resources before starting a complex build.
Prerequisites for Modding
Before you even think about downloading Forge or any mods, ensure your system meets these fundamental requirements:
- Minecraft Java Edition: This guide specifically pertains to Minecraft Java Edition. Mods and Forge are not compatible with Minecraft Bedrock Edition (available on consoles, mobile, and Windows 10/11 Store). Ensure you own and have installed the Java Edition.
- Java Development Kit (JDK) or Java Runtime Environment (JRE): Minecraft Java Edition runs on Java. Forge, being a Java application itself, also requires a compatible version of Java installed on your system.
- Recommendation: For most recent Minecraft versions (1.17+), you’ll need Java 16 or newer. For older versions (e.g., 1.12.2), Java 8 is typically required. The easiest way to manage this is often through the official Minecraft Launcher, which bundles its own Java version. However, for Forge and mod launchers, having a system-wide Java installation that matches the Minecraft version’s requirements is crucial. You can download the latest Java versions from Oracle or OpenJDK. Make sure to choose the correct architecture (64-bit) for your operating system. Without the correct Java version, Forge will simply fail to run, preventing you from ever getting to the fun part.
- A Clean Minecraft Profile (Optional but Recommended): While not strictly mandatory, it’s highly recommended to start with a fresh, vanilla Minecraft installation or at least a separate game profile for your modded adventures. This helps prevent conflicts with existing game files or other mod loaders you might have installed. The Minecraft Launcher makes creating new profiles very easy, allowing you to switch between vanilla and modded instances without interference. This practice promotes good “digital hygiene” and saves countless hours of troubleshooting.
Installing Minecraft Forge
With the prerequisites in place, the next crucial step is to install Minecraft Forge itself. This process is straightforward but requires attention to detail.
- Identify Your Minecraft Version: The first and most critical step is to know which version of Minecraft you intend to mod. Forge versions are specific to Minecraft versions (e.g., Forge for 1.19.2 will not work with 1.18.1). Launch your vanilla Minecraft and check the version number in the bottom left corner of the main menu if you’re unsure.
- Download Forge:
- Navigate to the official Forge website:
files.minecraftforge.net. Be wary of unofficial sources, as they may bundle malware or outdated versions, compromising your digital security. The official site is the “brand” of trust in the Forge community. - On the left sidebar, select the Minecraft version you wish to mod.
- You’ll typically see two options: “Latest” and “Recommended.” The “Recommended” build is generally the most stable and tested, making it the safest choice for beginners. “Latest” might include newer features but could be less stable.
- Click the “Installer” link to download the
.jarfile. You may be redirected to an AdFocus page; wait for the timer to count down and click “Skip” in the top right corner. Do not click on any other links on this page, as they are often advertisements disguised as download buttons.
- Navigate to the official Forge website:
- Run the Forge Installer:
- Locate the downloaded Forge installer
.jarfile. - Crucial Step: Double-click the
.jarfile. If it opens with an archiving program (like WinRAR or 7-Zip) instead of running, you likely don’t have Java properly configured or installed. Refer back to the Java prerequisite step. You might need to right-click the file, select “Open With,” and choose “Java(TM) Platform SE Binary.” - The Forge Installer window will appear. Select “Install client” (which is the default) and ensure the installation directory points to your
.minecraftfolder (usually%appdata%.minecrafton Windows). If you’ve moved your.minecraftfolder, you’ll need to adjust this path. - Click “OK” to begin the installation. Forge will download necessary files and set up its profile within the Minecraft Launcher.
- Once complete, you’ll receive a message confirming successful installation.
- Locate the downloaded Forge installer
- Verify Forge Installation:
- Open the Minecraft Launcher.
- Look at the dropdown menu next to the “Play” button. You should now see a new profile named “forge” (or similar, sometimes including the Minecraft version number, e.g., “1.19.2-forge-43.2.23”).
- Select this profile and click “Play.” The game will take a bit longer to load than usual as Forge initializes.
- Once loaded, navigate to the main menu. You should see “Minecraft Forge” or similar text in the bottom left corner, possibly along with a “Mods” button. This confirms Forge is successfully installed and ready for mods.
Finding and Installing Your Desired Mods
With Forge successfully running, you’re now ready for the main event: finding and adding mods to revolutionize your Minecraft experience. This stage involves careful selection, an understanding of digital security, and simple file management.
Sourcing Trustworthy Mods
The internet is vast, and with that comes both incredible opportunity and potential risks. When it comes to downloading mods, trustworthy sources are paramount for digital security and avoiding malicious software. Downloading mods from unverified websites can expose your system to viruses, adware, or other harmful programs, potentially costing you money (data recovery, tech support) and peace of mind.
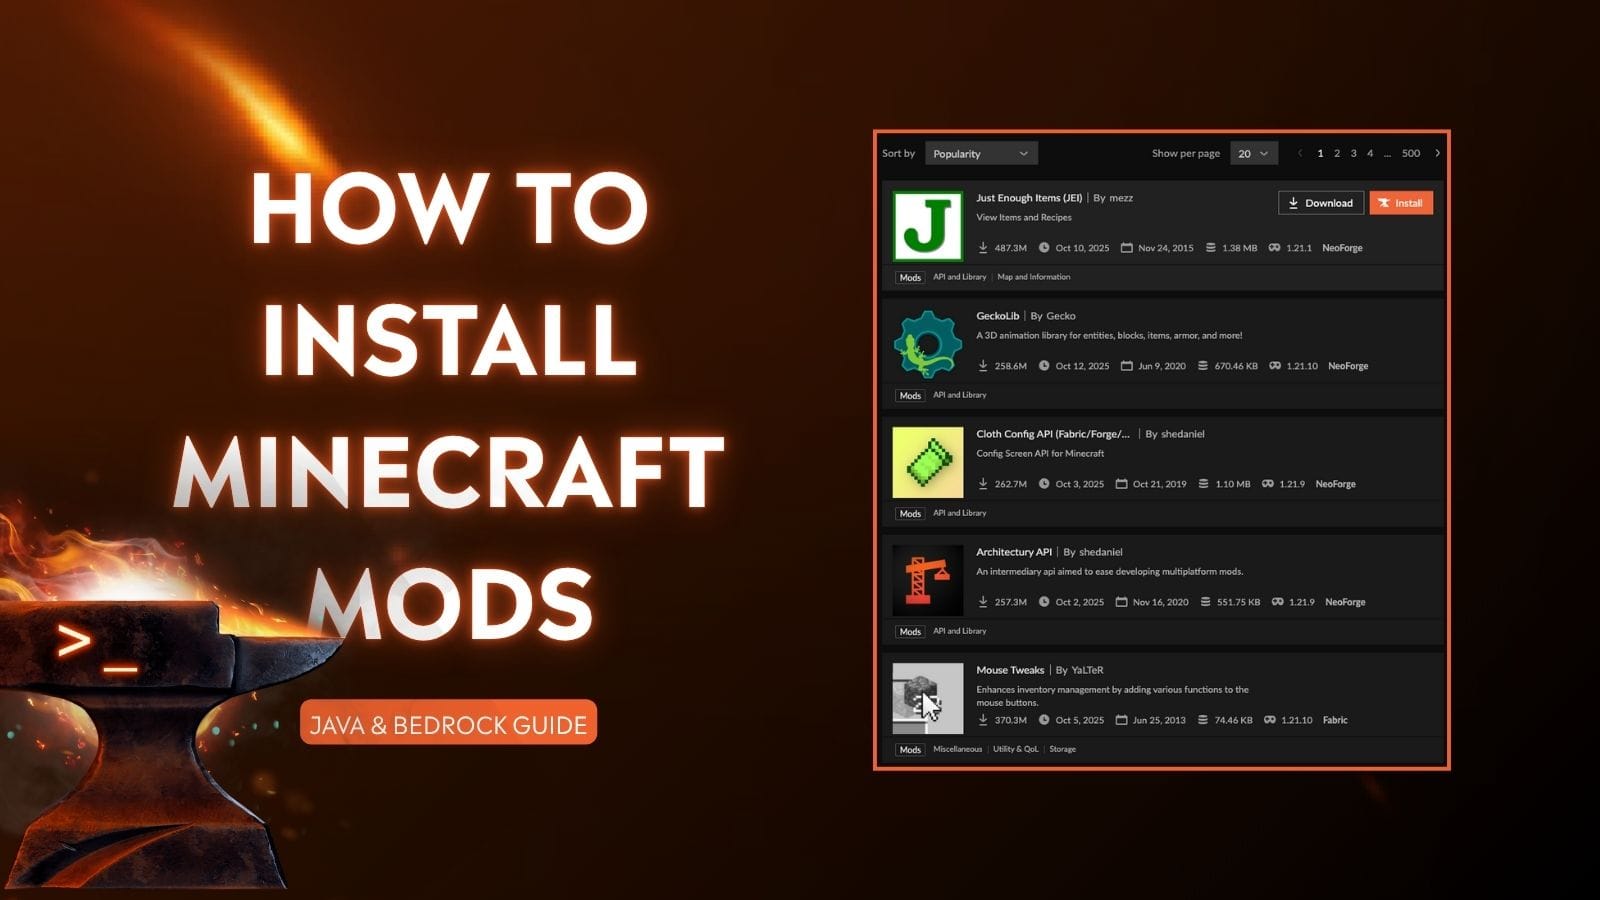
- CurseForge (Recommended Primary Source):
www.curseforge.com- CurseForge is the largest and most reputable platform for Minecraft mods. It hosts thousands of mods, all vetted by their moderation team to ensure safety and functionality.
- It offers excellent search and filtering options, allowing you to easily find mods compatible with your specific Minecraft and Forge versions.
- Many mod developers operate their “brand” through CurseForge, relying on its reputation and community features to distribute their creations. This creates a feedback loop of trust and quality.
- Modrinth:
modrinth.com- A newer, rapidly growing alternative to CurseForge, Modrinth also offers a curated selection of mods, focusing on open-source projects and a user-friendly experience.
- Like CurseForge, it emphasizes safety and provides good filtering options.
- Official Developer Websites/GitHub: Some mod developers prefer to host their mods on their personal websites or GitHub repositories. While these can be reliable, always exercise caution and ensure you’re indeed on the official site, not a deceptive imitation. Cross-reference with information found on CurseForge or Modrinth.
Critical Safety Advice:
- Version Compatibility: Always ensure the mod you download is compatible with both your Minecraft version AND your installed Forge version. A mod designed for Minecraft 1.12.2 will not work on 1.19.2, and vice-versa, leading to crashes. Mod descriptions on CurseForge and Modrinth clearly state compatibility.
- Read Descriptions and Reviews: Before downloading, take a moment to read the mod’s description, check its features, and skim through user reviews or comments. This can provide insights into potential bugs, performance impacts, or known conflicts.
- Avoid Unknown Sources: Never download mods from random forum posts, YouTube video descriptions (unless they link directly to CurseForge/Modrinth/official developer site), or suspicious third-party download sites. The risk of malware is too high. Prioritizing digital security is an often-overlooked aspect of personal technology.
The Mod Installation Process
Once you’ve safely downloaded your desired mods (which will typically be .jar files), installing them is surprisingly simple.
- Locate Your
.minecraftFolder: This is the central hub for all your Minecraft game files.- Windows: Press
Win + R, type%appdata%, and press Enter. Open the.minecraftfolder. - macOS: Open Finder, click “Go” in the menu bar, then “Go to Folder…” Type
~/Library/Application Support/minecraftand press Enter. - Linux: Typically found at
~/.minecraft.
- Windows: Press
- Find or Create the
modsFolder: Inside your.minecraftfolder, you should now see a folder namedmods. Forge creates this folder automatically upon its first successful launch. If it’s not there for any reason, simply create a new folder and name itmods(all lowercase). - Transfer Your Mods:
- Take the downloaded mod
.jarfiles from your Downloads folder. - Drag and drop (or copy and paste) these
.jarfiles directly into themodsfolder. Do not unzip or extract the.jarfiles; they should remain in their original.jarformat.
- Take the downloaded mod
- Launch Minecraft with Forge Profile:
- Open the Minecraft Launcher.
- Ensure the “forge” profile (or your specific modded profile) is selected from the dropdown menu.
- Click “Play.”
The game will now load with Forge, which will detect and load all the .jar files within your mods folder. The initial launch might take longer, especially if you have many mods.
Verifying Your Mods
To confirm that your mods have loaded correctly:
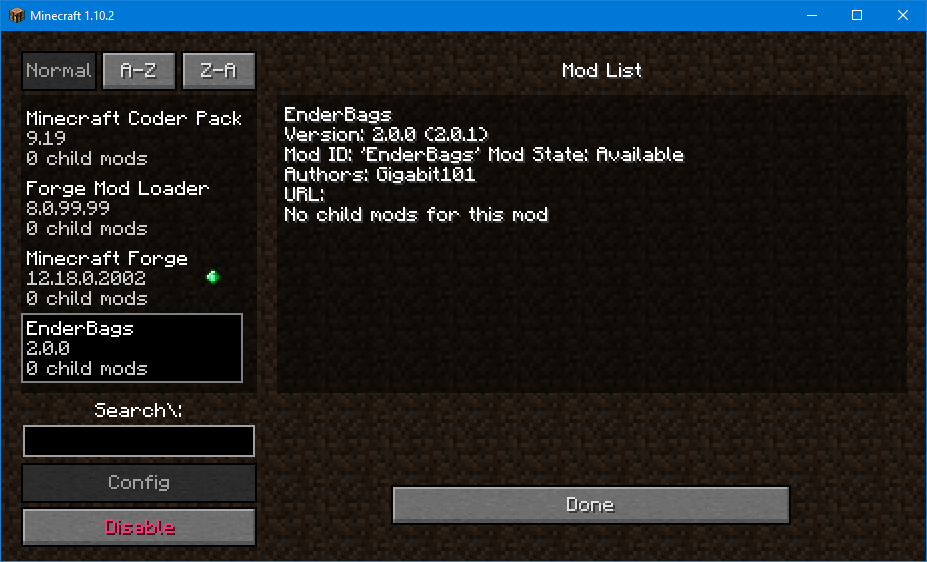
- Once Minecraft has launched and you’re on the main menu, look for a “Mods” button. Click it.
- This screen will display a list of all currently loaded mods. You should see “Minecraft” and “Forge” at the top, followed by all the mods you installed. If a mod isn’t listed, there might be a compatibility issue, or it wasn’t placed correctly in the
modsfolder. - Start a new single-player world (or join a modded server) and check if the modded items, blocks, or features are present and functioning as expected. This hands-on verification is the ultimate test.
Troubleshooting Common Modding Issues
Modding, while rewarding, isn’t always a perfectly smooth process. Issues can arise, from game crashes to performance bottlenecks. Knowing how to troubleshoot effectively is a valuable technical skill that can save you a lot of frustration.
Game Crashes and Conflicts
The most common issue modders face is a game crash, often accompanied by a “crash report.” These reports, while intimidating, contain vital clues.
- Version Incompatibility: This is the leading cause of crashes. Double-check that all your mods are designed for the exact same Minecraft version as your Forge installation. A single incompatible mod can bring everything down.
- Mod Conflicts: Sometimes, two perfectly good mods might not play nice together. They might try to modify the same game code or world generation logic, leading to unexpected behavior or crashes.
- Troubleshooting Strategy (The 50/50 Method): If your game crashes and you suspect a mod conflict, the most effective method is to remove half of your mods from the
modsfolder, then try launching the game. If it launches, the problem mod is in the half you removed. If it still crashes, the problem mod is in the half you kept. Repeat this process, halving the problematic batch each time, until you isolate the culprit. This systematic approach is a cornerstone of debugging in software development.
- Troubleshooting Strategy (The 50/50 Method): If your game crashes and you suspect a mod conflict, the most effective method is to remove half of your mods from the
- Corrupted Mods: Rarely, a mod file itself might be corrupted during download. Try re-downloading the mod from a trusted source.
- Outdated Java: Ensure your Java installation is up to date and compatible with your Minecraft and Forge version. Older Java versions can cause strange crashes or prevent Forge from launching altogether.
When a crash occurs, examine the crash report (usually found in a crash-reports folder within your .minecraft directory). While complex, often the first few lines or the “at” stack trace can point to a specific mod or game component causing the issue. Online search engines (Google, DuckDuckGo) can be your best friend here; paste relevant error messages to find solutions shared by other modders.
Performance Optimization
Adding many mods can significantly increase the demand on your computer’s resources, potentially leading to lag or low frame rates. This is where system optimization, a key aspect of managing any digital environment, comes into play.
- Allocate More RAM (Memory): Minecraft, especially modded Minecraft, loves RAM. The default allocation is often too low for heavily modded instances.
- How to: Open the Minecraft Launcher, go to “Installations,” hover over your Forge profile, and click the three dots (
...). Select “Edit.” Click “More Options.” Find “JVM Arguments” (Java Virtual Machine arguments). - The argument will typically look like
-Xmx2G. The2Gmeans 2 Gigabytes. Change this to4G,6G, or even8Gdepending on your total system RAM (never allocate more than half of your total RAM, and ensure you leave enough for your operating system and other applications). For example, if you have 16GB of RAM, allocating-Xmx8Gis a reasonable starting point for heavy mod packs.
- How to: Open the Minecraft Launcher, go to “Installations,” hover over your Forge profile, and click the three dots (
- Reduce Mod Count: The simplest solution to performance issues is to use fewer mods. Prioritize your favorites and remove those you rarely use.
- Install Performance-Enhancing Mods: Some mods are specifically designed to improve performance. Examples include:
- OptiFine: While not a “Forge mod” in the traditional sense (it’s a client-side optimization that can work with Forge, but needs careful installation), OptiFine offers significant FPS boosts, shader support, and fine-grained graphics settings. Be aware of its specific installation process and compatibility with other mods.
- Sodium (for Fabric, but similar principles exist for Forge): Though Sodium is for the Fabric mod loader, there are Forge equivalents like Rubidium (a Sodium port for Forge) or Magnesium (another alternative) that aim to provide similar performance gains. Research performance mods for your specific Minecraft/Forge version.
- Update Graphics Drivers: Ensure your graphics card drivers are up to date. Outdated drivers can lead to poor performance and graphical glitches in any demanding application, including modded Minecraft. This is a fundamental aspect of maintaining healthy computing hardware.
By understanding common pitfalls and employing systematic troubleshooting and optimization techniques, you can ensure your modded Minecraft experience remains as enjoyable and stable as possible. This proactive approach not only benefits your gameplay but also sharpens your overall technical problem-solving skills.
Elevating Your Minecraft Journey with Mods
Beyond simply installing them, mods open up entirely new dimensions for how you interact with Minecraft, fostering community and even hinting at future trends in digital entertainment.
Beyond Single Player: Modded Servers
The true potential of many mods shines brightest in a multiplayer environment. Modded servers allow groups of friends or vast communities to share a common, enhanced Minecraft experience. This communal aspect amplifies the “brand” identity of popular mod packs or specific server configurations, creating unique online havens for players.
- Joining Modded Servers: To join a modded server, you’ll need to have the exact same set of mods installed as the server. Many modded server communities provide pre-packaged “mod packs” (often distributed via launchers like the CurseForge App, ATLauncher, or FTB App) that automatically install the correct Forge version and all necessary mods, simplifying the process greatly. This streamlines the technical barrier to entry, allowing players to focus on the collaborative gaming experience.
- Hosting Your Own Modded Server: For those with a more technical inclination, hosting your own modded server involves installing Forge on a server instance and then adding the desired mods. This provides ultimate control over your multiplayer experience but requires more technical know-how and potentially dedicated hardware or cloud hosting, tying into aspects of IT infrastructure and cost management.
Modded servers transform Minecraft into an ever-evolving social platform, where shared creativity and challenges are at the forefront, building stronger communities around custom content.
The Future of Minecraft Modding
The world of Minecraft modding is far from stagnant; it’s a dynamic and evolving landscape driven by community ingenuity and technological advancements.
- Continuous Innovation: Mod developers consistently push the boundaries, leveraging new programming techniques and game mechanics. We see increasingly sophisticated mods that rival professional game expansions in complexity and quality. This spirit of innovation keeps the game fresh and engaging for millions.
- Integration with New Technologies: As Minecraft evolves and new hardware emerges, modding adapts. We’re seeing more mods that leverage advanced rendering techniques, integrate with external APIs, or even experiment with AI elements to create more immersive and dynamic worlds. This reflects broader technology trends within the gaming industry.
- Community and Open Source: The strength of modding lies in its open-source nature and passionate community. Developers often collaborate, share code, and provide extensive support, showcasing a powerful model of crowd-sourced development. This fosters a sense of shared ownership and continuous improvement, where the “brand” of a mod or mod pack is built on collective effort and community endorsement.
- Value and Economic Impact (Indirect): While most mods are free, the modding ecosystem adds immense value to Minecraft. It significantly extends the lifespan and appeal of the game, increasing its value proposition to consumers. This indirectly contributes to the continued success and “money-making” potential of the base game by keeping its player base engaged and growing. Furthermore, some prominent mod developers receive support through platforms like Patreon, allowing them to turn their passion into a form of online income, demonstrating a subtle intersection of technology and personal finance within this hobbyist sphere.
In conclusion, installing mods for Forge is much more than a technical procedure; it’s an entry point into a vibrant subculture of creativity, problem-solving, and community building that continuously redefines the boundaries of a beloved game. By following the steps outlined in this guide, you’re not just customizing a game; you’re engaging with a powerful example of user-driven innovation and becoming part of a global phenomenon that keeps Minecraft forever young and endlessly exciting. Embrace the journey, experiment responsibly, and enjoy the limitless possibilities that modded Minecraft offers.
aViewFromTheCave is a participant in the Amazon Services LLC Associates Program, an affiliate advertising program designed to provide a means for sites to earn advertising fees by advertising and linking to Amazon.com. Amazon, the Amazon logo, AmazonSupply, and the AmazonSupply logo are trademarks of Amazon.com, Inc. or its affiliates. As an Amazon Associate we earn affiliate commissions from qualifying purchases.