
Minecraft, in its vanilla form, is a phenomenon – a sandbox world where creativity knows no bounds. Yet, for millions of players, the blocky landscapes and familiar mechanics eventually give way to a thirst for more. This is where modpacks enter the scene, transforming the beloved game into an entirely new experience. From intricate technological advancements and magical realms to challenging survival scenarios and massive content overhauls, modpacks expand Minecraft’s universe exponentially. This guide, tailored for tech enthusiasts and casual gamers alike, will walk you through the process of installing Minecraft modpacks, ensuring a smooth and enjoyable journey into the vast world of custom content.

As a website deeply rooted in Tech, we understand the appeal of customizing software, extending functionalities, and harnessing community-driven innovations. Minecraft modding perfectly embodies these principles, allowing users to tweak, enhance, and even redefine their digital playground. While the concept might seem daunting to newcomers, the process has become significantly more accessible over the years, thanks to dedicated launchers and robust community support. We’ll explore both the streamlined, beginner-friendly methods and the more intricate, manual installations, empowering you to choose the path that best suits your technical comfort level.
Understanding the Modpack Ecosystem: Why Venture Beyond Vanilla?
Before diving into the installation mechanics, it’s crucial to grasp what modpacks are and why they have become such a cornerstone of the Minecraft community. They represent a curated collection of individual modifications (mods) bundled together, often with pre-configured settings, resource packs, and shaders, designed to deliver a cohesive gameplay experience.
The Allure of Custom Content: Redefining Minecraft’s Horizons
Why opt for a modpack when you can play the standard game? The reasons are as diverse as the modpacks themselves:
- Expanded Gameplay: Modpacks introduce countless new items, blocks, creatures, dimensions, and game mechanics. Imagine building automated factories with advanced machinery, venturing into alien planets, or mastering complex magic systems – all within the Minecraft engine.
- Enhanced Challenges: Many modpacks are designed to increase difficulty, adding new survival elements, challenging bosses, or progression gates that require strategic planning and resource management.
- Quality of Life Improvements: Mods often address common frustrations or introduce conveniences, from improved inventories and mapping systems to optimized performance and graphical enhancements.
- Thematic Experiences: Modpacks frequently revolve around specific themes, such as “tech,” “magic,” “exploration,” or “hardcore survival,” offering a focused and immersive journey that vanilla Minecraft cannot provide.
- Community and Creativity: Modpacks are a testament to the incredible creativity and collaborative spirit of the modding community, constantly pushing the boundaries of what’s possible within the game.
Key Components of a Modpack: More Than Just Mods
While “modpack” implies a collection of mods, there’s often more under the hood. Understanding these components can help demystify the installation process:
- Mods (.jar files): These are the core modifications that add new content and features. They are typically placed in the
modsfolder. - Mod Loader (Forge/Fabric): A foundational piece of software that allows Minecraft to load and run mods. Modpacks are almost exclusively built on either Minecraft Forge or Fabric.
- Configuration Files (.cfg, .json): These files dictate how individual mods and the modpack as a whole behave, often pre-configured by the modpack creator to ensure compatibility and a balanced experience.
- Resource Packs/Texture Packs: Sometimes included to change the visual appearance of blocks, items, and environments, aligning with the modpack’s theme.
- Shader Packs: Optional additions that significantly enhance graphics with dynamic lighting, realistic water, and atmospheric effects, though they require more powerful hardware.
- Scripts: For highly customized modpacks, scripts (e.g., KubeJS, CraftTweaker) might alter crafting recipes, add custom quests, or modify game progression.
Preparing Your System for Modpack Adventures: Essential Prerequisites
Before you download your first modpack, a few preparatory steps will ensure a smoother installation and a more enjoyable gaming experience. These are fundamental for any software installation on your system, especially one that involves third-party modifications.
The Foundation: Ensuring You Have Java and Minecraft
Minecraft Java Edition is built on Java, and so are most of its mods. Having the correct version of Java installed and accessible to your system is paramount.
- Minecraft Java Edition: Naturally, you’ll need a legitimate copy of Minecraft Java Edition. Modpacks are exclusively designed for this version, not Bedrock Edition (available on consoles and Windows 10/11 Store).
- Java Runtime Environment (JRE): Most modern modpacks require Java 8 or Java 17. The Minecraft Launcher often bundles its own Java version, but for modded instances or external launchers, it’s good practice to have the appropriate JRE installed system-wide.
- Check Your Java Version: You can typically do this via the command prompt (
java -version). - Download Java: If you need to update or install Java, reliable sources include Adoptium (for OpenJDK) or Oracle. Ensure you download the correct architecture (64-bit) for your operating system.
- Check Your Java Version: You can typically do this via the command prompt (
System Requirements: Powering Your Pixelated Paradise
Modpacks, especially large ones, are significantly more demanding on your hardware than vanilla Minecraft. Ignoring system requirements is a common source of frustration.
- RAM (Random Access Memory): This is perhaps the most critical factor. Vanilla Minecraft can run on 2-4 GB of RAM, but modpacks often require 6-8 GB minimum, with some expert-level packs recommending 10-12 GB or even more. Ensure your system has sufficient RAM available, and you’re prepared to allocate a good portion of it to Minecraft.
- CPU (Processor): A modern multi-core processor (Intel i5/Ryzen 5 or equivalent, or better) is highly recommended. Minecraft, even modded, tends to be CPU-intensive.
- GPU (Graphics Card): While Minecraft isn’t renowned for cutting-edge graphics, a dedicated graphics card (NVIDIA GTX 10-series/AMD RX 500-series or equivalent, or better) will significantly improve performance, especially with shaders or visually intensive mods.
- Storage: Modpacks can be large, sometimes taking up several gigabytes. Ensure you have ample free space on a fast drive (SSD recommended) for installation and world saves.
Pro-Tip: Always check the specific modpack’s recommended system requirements on its download page. This will save you from potential headaches down the line.
Streamlined Installation: Leveraging Dedicated Modpack Launchers
For most users, dedicated modpack launchers offer the easiest, most reliable, and most recommended method for installing and managing modpacks. These applications simplify the entire process, from downloading and installing to updating and launching. They act as sophisticated software managers specifically for Minecraft mods, handling dependencies and version control with ease.
CurseForge: The Industry Standard for Easy Modpack Management
CurseForge is by far the most popular and widely supported platform for Minecraft mods and modpacks. Its dedicated desktop application makes installation a breeze.
- Why CurseForge?
- Vast Library: Hosts thousands of modpacks, from small, focused experiences to massive content overhauls.
- One-Click Installation: Simplifies the process to a few clicks.
- Automatic Updates: Keeps your modpacks updated without manual intervention.
- Instance Management: Allows you to manage multiple modpack installations, each with its own settings and saves, independently.
- Dependency Resolution: Automatically downloads and installs required mod loaders (Forge/Fabric) and other core dependencies.
Other Popular Launchers: ATLauncher and FTB App
While CurseForge dominates, other excellent launchers cater to specific communities or offer unique features:
- ATLauncher: Known for its user-friendly interface and support for modpacks not always found on CurseForge, especially older or niche packs. It offers robust instance management and easy server setup.
- FTB App (Feed The Beast): The official launcher for the renowned Feed The Beast modpack series, which pioneered many large-scale modpack concepts. It also hosts many other packs and offers a clean interface.
Step-by-Step Guide: Installing a Modpack via a Launcher (CurseForge Example)
This process is remarkably similar across most dedicated launchers. We’ll use CurseForge as our primary example.
-
Download and Install the Launcher:
- Navigate to the official CurseForge website (curseforge.com).
- Download the desktop application for your operating system (Windows/macOS).
- Run the installer and follow the on-screen prompts.
-
Connect to Your Minecraft Account:
- Once installed, open the CurseForge launcher.
- You’ll likely be prompted to connect your Minecraft account. This usually involves linking your Mojang or Microsoft account credentials. This step is crucial for the launcher to verify your game ownership and launch Minecraft.
-
Browse and Select a Modpack:
- In the CurseForge app, select “Minecraft” from the list of games.
- You’ll see a browse section featuring popular, trending, and newly released modpacks.
- You can use the search bar or filters to find a specific modpack (e.g., “All the Mods 9,” “Valhelsia,” “Vault Hunters”).
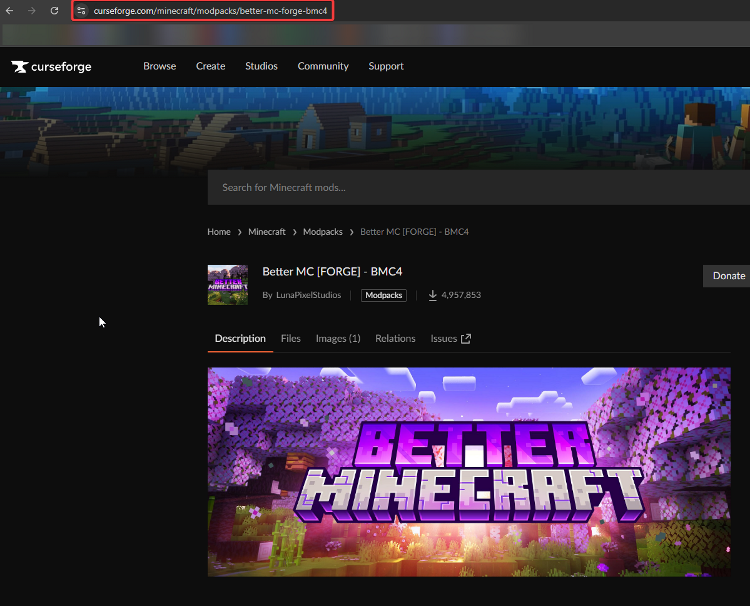
- Click on a modpack to view its details page, which includes descriptions, screenshots, and system requirements.
-
Install the Modpack:
- On the modpack’s detail page, click the prominent “Install” button.
- The launcher will begin downloading all necessary files: the mod loader (Forge/Fabric), all individual mods, configuration files, and any included resource packs. This process can take a few minutes to an hour, depending on the modpack’s size and your internet speed.
- Once installed, the modpack will appear under your “My Modpacks” section.
-
Configure RAM Allocation (Crucial Step):
- Before launching, it’s vital to allocate sufficient RAM.
- In the CurseForge app, hover over your installed modpack and click the three-dot menu, then select “Profile Options.”
- Uncheck “Use system memory settings” and adjust the “Allocated Memory” slider to the recommended amount for your modpack (e.g., 6-8 GB for many popular packs). Do not allocate more than ~70-80% of your total system RAM. For example, if you have 16 GB of RAM, allocating 8-12 GB is generally safe.
-
Launch and Play:
- Click the “Play” button next to your installed modpack.
- This will open the standard Minecraft Launcher, pre-configured to launch your modpack instance.
- Click “Play” in the Minecraft Launcher. The initial load might take a very long time (5-30 minutes) as all mods are loaded and initialized. Be patient!
- Once loaded, you’ll be at the Minecraft main menu, ready to start a new world or load an existing one (though it’s highly recommended to start fresh with a modpack).
The Advanced Route: Manual Modpack Installation with Forge or Fabric
While launchers simplify things, there are scenarios where manual installation is necessary or preferred. This method offers greater control but demands a deeper understanding of file structures and potential troubleshooting. It’s often used for:
- Niche modpacks not listed on popular launchers.
- Creating highly customized, personal modpack compilations.
- Playing older, less-supported modpacks.
- When a launcher is causing issues or you prefer a lightweight setup.
This method typically involves installing a mod loader (Forge or Fabric) and then manually placing mod files and configuration into the correct directories.
Installing Minecraft Forge or Fabric: The Modding Backbone
Forge and Fabric are the two primary mod loaders for Minecraft Java Edition. A modpack will usually specify which one it requires.
-
Download the Mod Loader Installer:
- Minecraft Forge: Go to files.minecraftforge.net. Select the Minecraft version compatible with your desired modpack (e.g., 1.12.2, 1.16.5, 1.18.2, 1.19.2, 1.20.1). Download the “Recommended Installer” (or “Latest Installer” if the recommended isn’t available).
- Fabric Loader: Go to fabricmc.net/use. Download the universal
.jarinstaller.
-
Run the Installer:
- Locate the downloaded
.jarfile. Double-click it. - For Forge: Select “Install client,” ensure the install location is your default
.minecraftfolder (or specify if you use a custom one), and click “OK.” - For Fabric: The Fabric installer offers “Client” or “Server.” Select “Client,” choose the desired Minecraft version and Fabric Loader version, then click “Install.”
- A confirmation message will appear upon successful installation.
- Locate the downloaded
-
Verify Installation:
- Open the vanilla Minecraft Launcher.
- You should now see a new profile in the installations tab named “forge” or “fabric-loader-[version].” Select this profile. This profile points to a Minecraft instance ready to load mods.
Locating and Preparing Your Minecraft Directory
Minecraft stores all its game files, including saves, resource packs, and mods, in a special directory.
-
Locating the
.minecraftFolder:- Open the Minecraft Launcher.
- Go to the “Installations” tab.
- Hover over any installation (e.g., your newly created Forge/Fabric profile).
- Click the folder icon that appears. This will open your
.minecraftdirectory. - Alternatively, on Windows, type
%appdata%in the Run dialog (Win+R) and press Enter, then open the.minecraftfolder. On macOS, navigate to~/Library/Application Support/minecraft.
-
Creating a Dedicated Instance Folder (Recommended for Manual Installs):
- To keep your modpacks organized and prevent conflicts, it’s best to create a separate “game directory” for each manual modpack.
- Inside your
.minecraftfolder (or anywhere else convenient, likeDocuments/Minecraft Modpacks), create a new folder, giving it a descriptive name (e.g.,MyCustomModpack-1.16.5).
Extracting and Configuring Your Modpack Files
Manual modpacks are typically distributed as a .zip or .rar archive containing all the necessary files.
-
Download the Modpack Archive:
- Obtain the modpack’s
.zipfile from its source (e.g., CurseForge project page, Modrinth, a forum post). - Crucial Note: Many CurseForge modpacks are primarily designed for installation via their launcher. If you download the “server pack” or “manual download” option, ensure it contains the client-side mods and configs.
- Obtain the modpack’s
-
Extract the Archive:
- Use a file archiver like 7-Zip or WinRAR to extract the contents of the downloaded
.zipfile. - Carefully read any instructions provided by the modpack creator. Sometimes you need to extract directly into your new instance folder, other times you might need to copy specific folders (like
mods,config,scripts) from within the extracted archive. - Generally, you will extract or copy the
mods,config,scripts(if present), and any other custom folders into your newly created dedicated instance folder. - Ensure there’s a
modsfolder within your instance directory, containing all the.jarfiles for the individual mods.
- Use a file archiver like 7-Zip or WinRAR to extract the contents of the downloaded
Launching Your Manually Installed Modpack
Now you need to tell the Minecraft Launcher to use your new modpack instance.
-
Create a New Installation Profile:
- Open the Minecraft Launcher.
- Go to the “Installations” tab.
- Click “New Installation.”
- Name: Give it a clear name (e.g., “My Custom Modpack 1.16.5”).
- Game Directory: Click “Browse” and navigate to the dedicated instance folder you created earlier (e.g.,
Documents/Minecraft Modpacks/MyCustomModpack-1.16.5). This is the most critical step. - Version: From the dropdown, select the Forge or Fabric profile you installed earlier that matches your modpack’s Minecraft version (e.g., “release 1.16.5-forge-36.2.34” or “fabric-loader-0.14.21-1.19.2”).
- More Options (JVM Arguments): Click this dropdown.
- Locate the
Xmxvalue (e.g.,-Xmx2G). This controls RAM allocation. Change2Gto your desired amount (e.g.,6G,8G). Remember the 70-80% rule for your total system RAM. - Optionally, you can also add performance-enhancing JVM arguments here if you know what you’re doing (e.g., garbage collector settings).
- Locate the
- Click “Create.”
-
Launch the Modpack:
- Go back to the “Play” tab in the Minecraft Launcher.
- Select your newly created installation profile from the dropdown menu.
- Click “Play.”
- As with launcher-based installs, the first launch can take a long time. Be patient.
Troubleshooting Common Pitfalls and Optimizing Performance
Even with careful installation, modpacks can sometimes be temperamental. Here’s how to address common issues and ensure a smooth experience. This aligns with our digital security and productivity focus, as efficient troubleshooting minimizes downtime and maximizes playtime.
Addressing Out-of-Memory Errors: Allocating More RAM
This is by far the most frequent issue with modpacks.
- Symptoms: “Out of Memory!” crash message, game freezing, extremely slow loading, or the game simply closing without an error.
- Solution: Increase the allocated RAM for your modpack instance.
- For Launcher Installs (e.g., CurseForge): Go to the modpack’s profile options and adjust the RAM slider.
- For Manual Installs: Edit the “JVM Arguments” in your custom profile within the Minecraft Launcher, changing the
-Xmxvalue.
- Important: Never allocate more RAM than your system physically has, and avoid allocating more than 70-80% of your total RAM, as your operating system needs memory too. If you have 8GB of RAM, allocating 6GB is a good maximum for a modpack; if you have 16GB, 8-12GB is reasonable.
Diagnosing Crashes and Performance Lags
Crashes and poor performance can stem from various sources.
-
Game Crashes:
- Look at the Crash Report: When Minecraft crashes, it often generates a
.txtfile in your modpack’s instance folder (usually in acrash-reportssubfolder). The beginning of this file often points to the culprit (e.g., a specific mod, an error code, or an out-of-memory condition). - Conflicting Mods: If you’ve manually added mods, some might be incompatible. Try removing recently added mods one by one.
- Outdated Drivers: Ensure your graphics card drivers are up-to-date.
- Java Version Mismatch: Double-check that you’re using the correct Java version for your modpack and mod loader.
- Corrupted Files: Re-installing the modpack (or specific mods) can sometimes fix corrupted files.
- Look at the Crash Report: When Minecraft crashes, it often generates a
-
Performance Lag:
- Reduce Graphics Settings: Lower render distance, disable fancy graphics, reduce particle effects, and turn off V-Sync.
- Disable Shaders: If you’re using shaders, disable them. They are very resource-intensive.
- Install Performance Mods: Mods like OptiFine (for Forge) or Sodium/Lithium/Phosphor (for Fabric) can drastically improve FPS.
- Check Background Processes: Close unnecessary applications running in the background.
- Monitor Resources: Use Task Manager (Windows) or Activity Monitor (macOS) to see if your CPU, GPU, or RAM are maxing out. This helps pinpoint the bottleneck.
Essential Tips for a Smooth Modding Experience
- Always Backup Your Worlds: Before installing a new modpack or updating an existing one, copy your save folders to a safe location. Modpacks can drastically change world generation and block IDs, making old saves incompatible or corrupted.
- Read Modpack Descriptions: Pay attention to recommended Java versions, system requirements, and any specific installation instructions.
- Start Small: If you’re new to modding, begin with smaller, well-known modpacks to get a feel for the process before tackling massive expert packs.
- Keep Mod Loaders Updated: Ensure your Forge or Fabric version is compatible with your chosen modpack and Minecraft version.
- Don’t Mix Mod Loaders: A single Minecraft instance cannot run both Forge and Fabric mods simultaneously.
- Join Modpack Communities: Discord servers and forums for popular modpacks are invaluable resources for help and troubleshooting.
Installing Minecraft modpacks opens up an exciting new dimension of gameplay, offering countless hours of exploration, creation, and challenge beyond the vanilla experience. While it requires a bit more technical finesse than launching the base game, the advent of user-friendly launchers has democratized the process, making it accessible to a wider audience. By understanding the components, following the installation steps carefully, and knowing how to troubleshoot common issues, you’re well-equipped to embark on your next grand adventure in a truly personalized Minecraft world. So, choose your modpack, allocate your RAM, and prepare to redefine your Minecraft journey!
aViewFromTheCave is a participant in the Amazon Services LLC Associates Program, an affiliate advertising program designed to provide a means for sites to earn advertising fees by advertising and linking to Amazon.com. Amazon, the Amazon logo, AmazonSupply, and the AmazonSupply logo are trademarks of Amazon.com, Inc. or its affiliates. As an Amazon Associate we earn affiliate commissions from qualifying purchases.