In the ever-evolving landscape of technology, a computer’s performance hinges on a delicate balance of components. While processors and graphics cards often grab the headlines, Random Access Memory (RAM) plays an equally vital, yet often underestimated, role in your system’s responsiveness and multitasking capabilities. If you’ve found your PC slowing down, struggling with multiple applications, or lagging during intensive tasks like gaming or video editing, a RAM upgrade is often the most cost-effective and impactful solution. Far from being a daunting task, installing new memory is a relatively straightforward process that even novice PC users can accomplish with the right guidance.
This comprehensive guide will walk you through every step of upgrading your PC’s memory, from understanding its function and choosing the right modules to the physical installation and post-setup verification. By the end of this tutorial, you’ll not only have a faster, more efficient computer but also a deeper understanding of its inner workings, empowering you to tackle future upgrades with confidence. Let’s dive in and unlock your PC’s full potential.
Understanding RAM and Why an Upgrade Matters
Before you grab a screwdriver, it’s crucial to understand what RAM is, how it functions within your system, and the tell-tale signs that indicate an upgrade is in order. This foundational knowledge will ensure you make informed decisions and appreciate the significant performance boost your new modules will provide.
What is RAM and How Does It Work?
RAM, or Random Access Memory, is your computer’s short-term memory. Unlike your hard drive (HDD) or solid-state drive (SSD), which store data long-term, RAM provides extremely fast access to data that your CPU is actively using. When you open an application, load a game, or even browse the web, your operating system and the relevant data are temporarily loaded into RAM. This allows the CPU to fetch information almost instantaneously, dramatically speeding up operations compared to constantly accessing the much slower storage drives. The more RAM you have, the more applications and data your PC can juggle simultaneously without having to offload data back to slower storage, which causes frustrating slowdowns known as “swapping.”
Identifying the Signs You Need More RAM
Your PC often tells you when it’s feeling the strain. Recognizing these symptoms is the first step toward a smoother computing experience.
- Persistent Slowdowns and Lag: This is the most common indicator. If opening applications takes an eternity, switching between tabs in your web browser feels like wading through treacle, or your overall system responsiveness is poor, inadequate RAM is a likely culprit.
- Frequent Freezing and Crashing: When your PC runs out of available RAM, it can become unstable, leading to application freezes, the infamous “blue screen of death” (BSOD) on Windows, or complete system crashes.
- Slow Application Loading Times: While storage speed plays a role, if even simple programs take an unusually long time to launch, it could be because your system is struggling to load them into insufficient RAM.
- “Out of Memory” Errors: Some applications, especially demanding ones like video editing software, CAD programs, or modern games, will explicitly warn you if they don’t have enough RAM to operate effectively.
- Poor Multitasking Performance: If you struggle to run several applications simultaneously – for example, a web browser with many tabs, a video editor, and a chat application – without significant performance degradation, more RAM will vastly improve your experience.
The Performance Benefits of a RAM Upgrade
Investing in more or faster RAM can yield a surprisingly substantial return on investment in terms of user experience:
- Snappier System Responsiveness: Your operating system will feel more fluid, applications will launch quicker, and general navigation will be significantly smoother.
- Enhanced Multitasking: You’ll be able to run more programs concurrently without your PC grinding to a halt, making you more productive and efficient.
- Improved Gaming Performance: While RAM isn’t the sole determinant of gaming performance, having enough of it prevents stutters and lag, especially in open-world games or those with complex textures. Faster RAM can also provide a measurable boost to frame rates.
- Faster Content Creation: Video editors, graphic designers, and 3D artists will notice massive improvements in rendering times, preview playback, and overall workflow efficiency.
- Future-Proofing (to an extent): While technology constantly evolves, an adequate amount of RAM ensures your system remains capable for current and near-future software demands, delaying the need for a full PC replacement.
Preparing for Your RAM Installation: The Crucial Pre-Steps
Successful RAM installation isn’t just about plugging in sticks; it begins long before you open your PC case. Proper preparation, especially understanding compatibility and ensuring safety, is paramount to a smooth and error-free upgrade. Skipping these steps can lead to frustration, component damage, or even an incompatible purchase.
Compatibility is Key: Choosing the Right RAM
This is arguably the most critical step. PC memory isn’t universal; there are several specifications you must match to your motherboard.
- DDR Generation (DDR4, DDR5, etc.): This is non-negotiable. Your motherboard supports a specific generation (e.g., DDR4 or DDR5). You cannot mix generations. Check your motherboard manual or use CPU-Z software (under the SPD tab) to find out what you currently have.
- Form Factor (DIMM vs. SO-DIMM):
- DIMM (Dual In-line Memory Module): This is the standard, longer stick used in desktop PCs and servers.
- SO-DIMM (Small Outline Dual In-line Memory Module): This is a smaller form factor used in laptops and compact PCs. Ensure you buy the correct one for your system.
- Speed (MHz): RAM speed is measured in megahertz (e.g., 3200MHz, 3600MHz). Your motherboard has a maximum supported speed. While you can install faster RAM, it will only run at the fastest speed supported by your motherboard or CPU’s memory controller (whichever is lower). For optimal performance, especially with AMD Ryzen CPUs, aim for RAM speeds that your CPU and motherboard can fully utilize, often around 3200MHz to 3600MHz for DDR4. If you’re mixing new RAM with old, the new RAM will downclock to match the slowest stick’s speed.
- Capacity (GB): This is the amount of memory (e.g., 8GB, 16GB, 32GB). Modern systems generally benefit from at least 16GB for general use, and 32GB or more for demanding tasks. Check your motherboard’s maximum supported capacity.
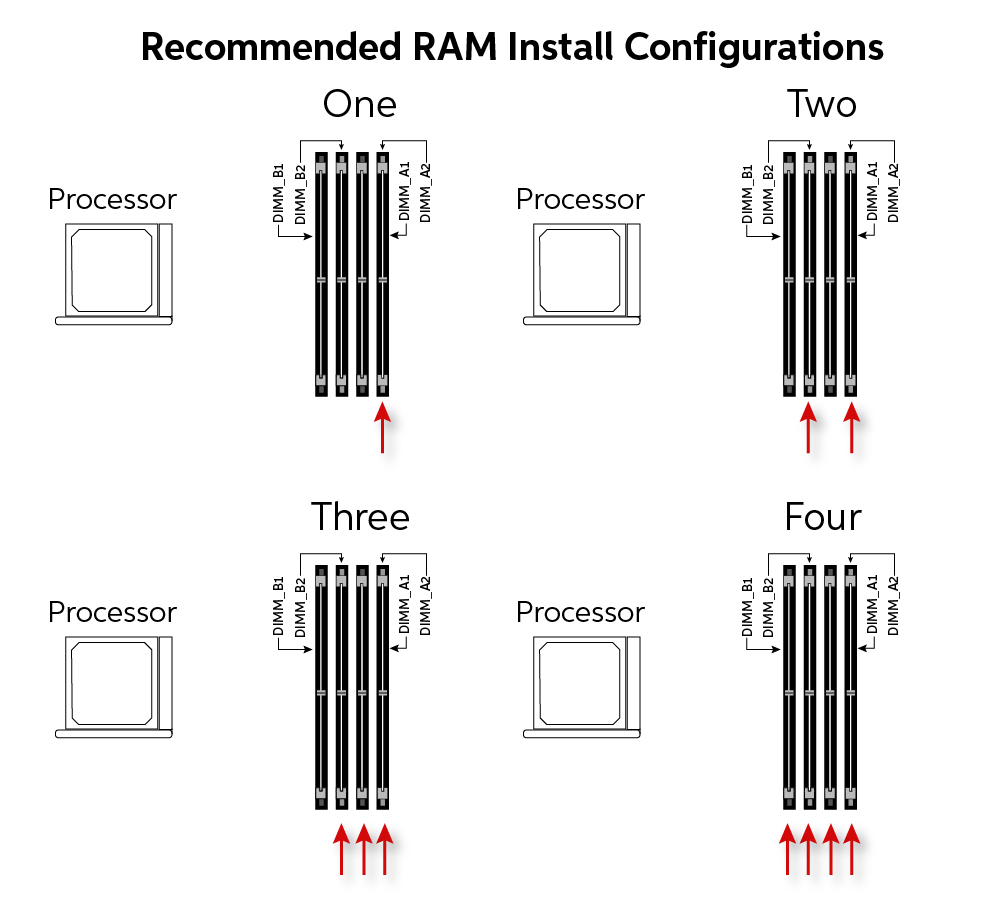
- Number of Modules and Channels: Most modern motherboards support “dual-channel” or “quad-channel” memory configurations. For dual-channel, you should install RAM in pairs (e.g., two 8GB sticks rather than one 16GB stick) into specific slots (usually indicated in your motherboard manual) for optimal performance.
- Latency (CL): This is the CAS Latency, a measure of how many clock cycles it takes for the RAM to respond to a request. Lower CL numbers are generally better, especially at higher speeds. While less critical than generation or speed, it’s worth considering if you’re an enthusiast aiming for every bit of performance.
How to Check Your PC’s Current RAM and Motherboard Specs:
- Task Manager (Windows): Open Task Manager (Ctrl+Shift+Esc), go to the “Performance” tab, then click “Memory.” It will show you the total capacity, speed, and how many slots are used.
- System Information (Windows): Search for “System Information” in the Start menu. Look for “Installed Physical Memory (RAM)” and your “BaseBoard Manufacturer/Product.”
- CPU-Z Software: This free utility provides detailed information about your CPU, motherboard, and RAM, including generation, speed, timings, and even part numbers. It’s an indispensable tool for compatibility checks.
- Motherboard Manual: The most authoritative source. It details supported RAM types, speeds, capacities, and recommended slot configurations.
Gathering Your Tools and Ensuring Safety
Once you’ve acquired the correct RAM, it’s time to prepare your workspace.
- Phillips Head Screwdriver: Most PC cases use Phillips head screws.
- Anti-Static Wrist Strap (Recommended): Static electricity is the silent killer of electronic components. An anti-static wrist strap, clipped to an unpainted metal part of your PC case, safely grounds you, preventing accidental static discharge.
- Clean, Flat Workspace: Ensure you have enough room to work comfortably and that your work surface is clear of clutter and static-generating materials like carpets.
- Good Lighting: Adequate lighting will help you see the small components and latches clearly.
Safety First:
- Power Down and Unplug: Always, always, ALWAYS completely shut down your PC and disconnect it from the wall outlet before opening the case or touching any internal components.
- Discharge Residual Power: After unplugging, press and hold the power button on your PC for 10-15 seconds. This drains any residual power stored in the capacitors, further protecting you and your components.
- Ground Yourself: If you don’t have an anti-static wrist strap, periodically touch an unpainted metal part of your PC case while it’s still plugged into the wall (but turned off) to discharge any static buildup from your body. Do this frequently as you work. Avoid touching the gold contacts on the RAM modules.
Essential Pre-Installation Checks and Backups
While installing RAM rarely requires a software backup, it’s always good practice to ensure your system is stable before making hardware changes.
- Verify System Stability: Ensure your current PC is booting and functioning normally before starting the upgrade.
- Document Existing Setup: Take photos of your current RAM configuration, including which slots are populated and the orientation of the modules. This can be helpful for reference if you encounter issues or need to revert.
- Review Motherboard Manual: Familiarize yourself with the layout of your motherboard, specifically the RAM slots and their retention clips. The manual will also show the preferred slots for dual-channel memory if you’re installing a pair.
Step-by-Step Guide to Installing Your New RAM Modules
With preparation complete, it’s time for the hands-on part of the process. Follow these steps carefully to ensure a smooth and successful installation.
Opening Your PC Case and Locating RAM Slots
- Lay the PC Down: Gently lay your desktop PC on its side on your clean, flat workspace. This provides easy access to the components.
- Remove the Side Panel: Most PC cases have thumbscrews or regular screws on the rear panel. Unscrew these and slide or pivot the side panel off. Identify the side that exposes the motherboard and components.
- Identify RAM Slots: The RAM slots are long, narrow slots typically located next to the CPU socket (which is usually covered by a large heatsink and fan). They often have clips on one or both ends. Desktop motherboards usually have 2 or 4 RAM slots. Note which slots are currently populated. If you’re using a laptop, the process of opening the case and accessing the RAM slots will differ significantly depending on the model, often requiring removal of the bottom panel and possibly other components.
Removing Old RAM (If Applicable)
If you’re replacing existing RAM modules, you’ll need to remove them first. If you’re adding new RAM to empty slots, you can skip this step.
- Open the Retention Clips: On each end of the RAM slot, there will be a small clip. Push these clips outwards simultaneously. This will cause the RAM stick to pop up slightly.
- Gently Pull Out the Module: Once the clips are open and the stick has lifted, gently pull the RAM module straight out of the slot. Avoid twisting or bending it. Place the old RAM in an anti-static bag or a safe place.
- Repeat for All Old Modules: If you have multiple sticks to remove, repeat the process for each one.
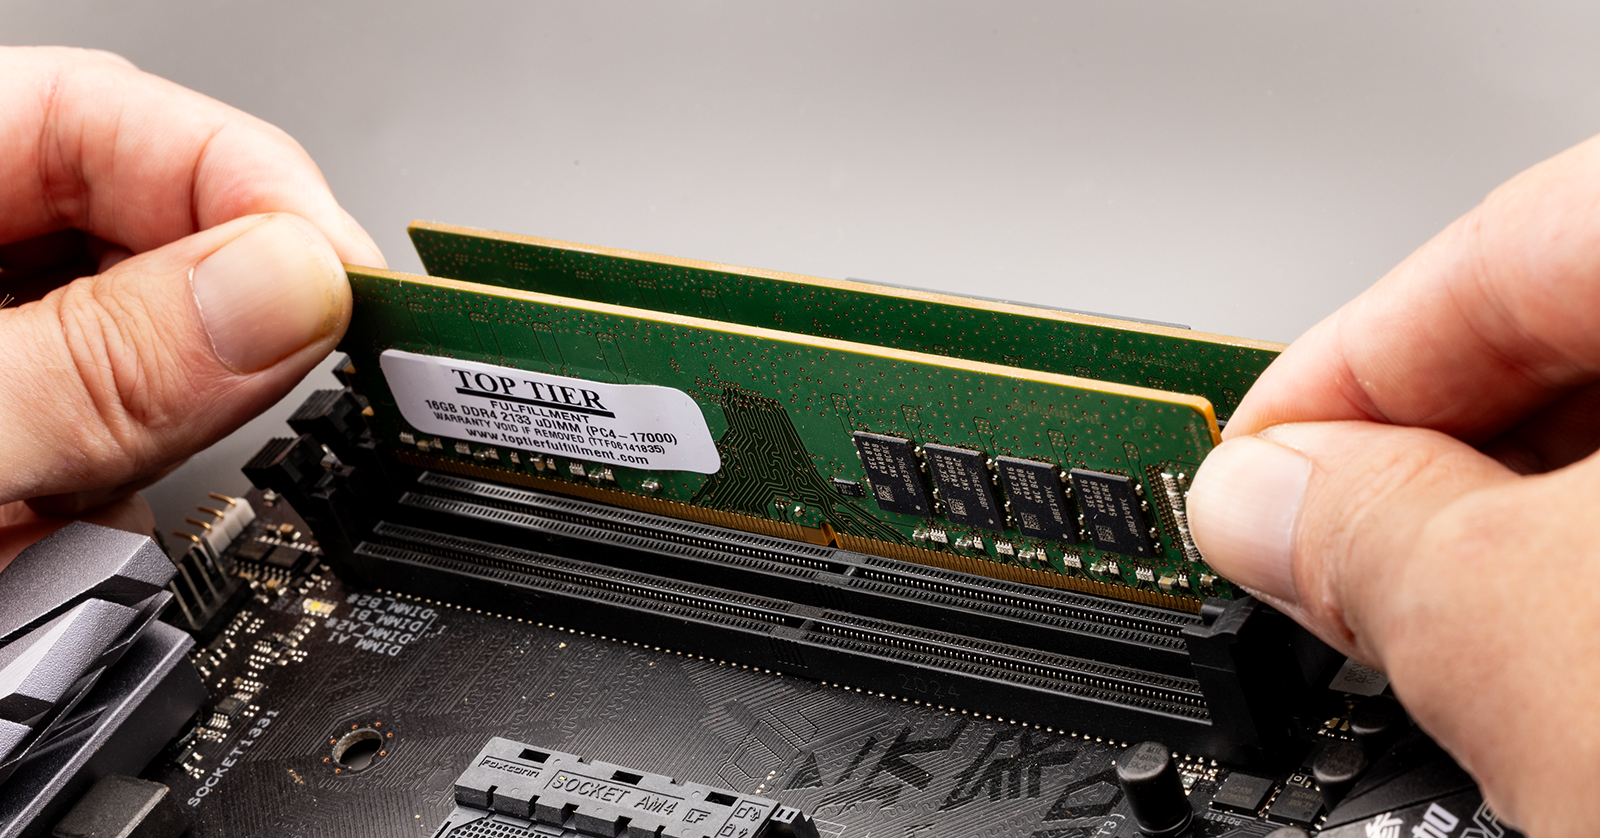
Inserting the New RAM Modules
This is the moment of truth. Handle the new RAM modules carefully, only touching them by the edges to avoid contact with the gold pins or circuit board components.
- Align the Notch: Look at your new RAM module. You’ll notice a small notch or cutout in the row of gold pins. This notch must align perfectly with a corresponding ridge in the RAM slot. This ensures you insert the RAM in the correct orientation. Do not force the module if it doesn’t align – it means it’s backwards or the wrong generation.
- Open the Retention Clips (if closed): Ensure both clips on the RAM slot are fully open.
- Position the Module: Place the RAM module directly over the slot, aligning the notch.
- Apply Even Pressure: Using both thumbs (one on each end of the RAM module), press down firmly and evenly on the module. You should feel it slide into the slot.
- Listen for the Click: As the module seats correctly, the retention clips on either side should snap back into place, locking the RAM module securely. If they don’t click automatically, gently push the clips inwards until they lock.
- Verify Seating: Double-check that both clips are fully closed and that the RAM module is level and firmly seated in the slot, with no gold contacts visible.
- Repeat for All New Modules: If you’re installing multiple RAM sticks, repeat these steps for each module, paying attention to your motherboard manual for the correct dual-channel (or quad-channel) slot configuration. Typically, this involves skipping a slot between modules (e.g., using slots 2 and 4, or 1 and 3).
Securing Your PC Case
Once all new RAM modules are securely installed:
- Replace the Side Panel: Carefully slide or pivot the side panel back into place.
- Secure the Screws: Fasten the thumbscrews or regular screws to secure the side panel.
- Reconnect Peripherals: Reconnect all cables (power, monitor, keyboard, mouse, etc.) to your PC.
Post-Installation: Verifying and Troubleshooting
The physical installation is done, but the job isn’t complete until you’ve verified that your PC recognizes the new memory and is running optimally.
Powering On and Confirming RAM Recognition
- Initial Boot: Press the power button. Your PC might take a little longer than usual to boot for the very first time after a RAM change. This is normal, as the system performs a memory check. If it boots successfully, you’re halfway there!
- Check in BIOS/UEFI: As your PC starts, repeatedly press the designated key (often Del, F2, F10, or F12) to enter your system’s BIOS/UEFI settings. Look for a section that displays system information or memory details. It should show the total installed RAM capacity. This is the most reliable way to confirm the hardware is recognized.
- Verify in Operating System:
- Windows: Once logged in, right-click on the Start button, select “System,” and look for “Installed RAM.” Alternatively, open Task Manager (Ctrl+Shift+Esc), go to the “Performance” tab, and click “Memory.” It should display the total amount of RAM.
- macOS: Click the Apple menu, select “About This Mac,” and look for “Memory.”
- Linux: Open a terminal and type
free -horsudo dmidecode --type 17.
If the displayed RAM matches the total capacity you installed, congratulations! Your upgrade was successful.
Common Troubleshooting Scenarios
Even with careful planning, issues can arise. Don’t panic; most problems have straightforward solutions.
- PC Does Not Boot (Black Screen or Beeps):
- No Display: If your PC powers on but nothing appears on screen, or you hear a series of beeps, this is often an indicator of poorly seated RAM.
- Beep Codes: Motherboards use “beep codes” to signal hardware problems. Consult your motherboard manual to interpret the specific pattern of beeps. Often, a repeating pattern indicates a memory issue.
- Solution: Power down and unplug the PC. Reopen the case and ensure all RAM modules are fully seated and their clips are locked. Try removing one stick and booting, then swapping it with another if you have multiple modules, to identify a potentially faulty stick or slot.
- Incorrect RAM Capacity Shown:
- If your system boots but only shows a fraction of the installed RAM (e.g., 8GB instead of 16GB), it means one or more modules are not being recognized or are faulty.
- Solution: Power down and re-seat the RAM modules. Try booting with one module at a time in different slots to identify a specific faulty module or slot. Ensure you’ve installed modules into the correct dual-channel slots if applicable.
- System Instability After Boot:
- If your PC boots but then experiences frequent crashes, freezes, or blue screens, this could indicate a compatibility issue (even if the RAM is recognized) or a faulty module.
- Solution: Run a memory diagnostic tool (Windows Memory Diagnostic Tool or MemTest86 for a more thorough check). If errors are found, identify and replace the faulty module. Ensure your BIOS/UEFI is up to date, as updates often improve RAM compatibility.
Maximizing Your New RAM’s Potential
For enthusiasts, there’s one more step to ensure you’re getting the most out of your new, faster RAM:
- Enable XMP/DOCP (Extreme Memory Profile/Direct Overclock Profile): Out of the box, many RAM modules default to a conservative JEDEC speed (e.g., 2133MHz or 2400MHz) regardless of their advertised speed. To run your RAM at its advertised higher speed (e.g., 3200MHz), you need to enable the XMP (Intel) or DOCP (AMD) profile in your motherboard’s BIOS/UEFI settings. This profile contains the manufacturer-recommended speed, timings, and voltage settings. After enabling, save and exit the BIOS. Your system should then boot with the RAM running at its full, advertised speed.

Conclusion
Upgrading your PC’s memory is one of the most impactful and satisfying hardware upgrades you can perform. It breathes new life into an aging system, enhancing its responsiveness, multitasking prowess, and overall efficiency without breaking the bank. By carefully following the steps outlined in this guide – from understanding compatibility and preparing your workspace to the physical installation and post-setup verification – you’ll successfully boost your computer’s performance.
Remember, technology is constantly evolving, but the fundamental principles of hardware interaction remain consistent. This successful upgrade not only delivers a tangible improvement to your daily computing experience but also builds your confidence in exploring and understanding the sophisticated machines we rely on. Enjoy your faster, more capable PC, and know that you’ve mastered a key aspect of PC maintenance and optimization.
aViewFromTheCave is a participant in the Amazon Services LLC Associates Program, an affiliate advertising program designed to provide a means for sites to earn advertising fees by advertising and linking to Amazon.com. Amazon, the Amazon logo, AmazonSupply, and the AmazonSupply logo are trademarks of Amazon.com, Inc. or its affiliates. As an Amazon Associate we earn affiliate commissions from qualifying purchases.