In an era defined by rapid technological advancements, keeping your laptop performing at its peak is not just a luxury—it’s often a necessity for productivity, creativity, and entertainment. Over time, even the most capable machines can start to feel sluggish as software demands increase and multitasking becomes more intense. While the immediate thought might be to invest in a brand-new device, there’s a significantly more cost-effective and empowering solution for many users: upgrading your laptop’s Random Access Memory (RAM).
This guide will walk you through the entire process of installing new RAM in your laptop, transforming it from a daunting technical task into an achievable DIY project. We’ll cover everything from understanding why an upgrade is beneficial to selecting the right modules, preparing your workspace, and executing the installation with confidence. By the end, you’ll not only have a faster, more responsive laptop but also a deeper understanding of your machine’s internal workings and the satisfaction of having enhanced its capabilities yourself. This isn’t just a tech tutorial; it’s a strategic move to optimize your digital life and make a smart financial decision in the process.

Why Upgrade Your Laptop’s RAM? Unlocking Peak Performance and Value
Before diving into the mechanics, it’s crucial to understand the profound impact a RAM upgrade can have on your laptop’s performance and longevity. RAM acts as your computer’s short-term memory, holding data that the CPU needs to access quickly. The more RAM you have, the more applications and tasks your laptop can handle simultaneously without slowing down.
The Tangible Benefits of More RAM
Imagine juggling multiple applications, browser tabs, and large files. If your RAM is insufficient, your laptop constantly has to swap data between RAM and the slower hard drive (known as “paging” or “swapping”), leading to frustrating delays, stuttering, and application crashes. A RAM upgrade directly addresses these bottlenecks, providing a smoother, more responsive computing experience across the board.
- Enhanced Multitasking: Run more applications simultaneously—think design software, video editors, multiple browser windows, and communication tools—without performance hits. Your transitions between tasks will be instantaneous, making your workflow significantly more efficient.
- Improved Software Performance: Demanding applications, particularly those for graphic design, video editing, 3D rendering, and even complex data analysis, thrive on ample RAM. With more memory, these programs can load larger files, process data faster, and render complex projects in less time.
- Faster Gaming: While the GPU is paramount for gaming, sufficient RAM ensures that game assets load quickly and smoothly, preventing stuttering and improving frame rates, especially in open-world or graphically intensive titles.
- Smoother Web Browsing: Modern web browsers, especially with numerous tabs open, are notorious RAM consumers. An upgrade allows you to browse the web with greater fluidity, reducing page load times and improving responsiveness.
- Increased Productivity: Reduced waiting times and fewer system freezes directly translate to higher productivity. You spend less time staring at loading screens and more time getting work done, fostering a more pleasant and efficient user experience.
A Cost-Effective Performance Boost
From a financial perspective, a RAM upgrade often represents one of the best investments you can make in your existing technology. Laptops, particularly high-end models, can be significant purchases. The idea of replacing a perfectly functional machine simply because it feels a bit sluggish can be hard to justify, both economically and environmentally.
- Extending Laptop Lifespan: Instead of spending hundreds or even thousands on a new laptop, a relatively inexpensive RAM upgrade (often costing under $100 for a significant boost) can breathe new life into an aging machine. This extends its usable lifespan by several years, delaying the need for a costly replacement. It’s a smart financial play that yields a high return on investment.
- Superior Value Proposition: Compared to other potential upgrades (like a CPU or GPU, which are often soldered to laptop motherboards and impossible to change), RAM is typically user-replaceable and offers the most noticeable performance improvement for your dollar. It’s a low-risk, high-reward upgrade.
- Environmental Responsibility: Opting to upgrade rather than replace also aligns with sustainable practices, reducing electronic waste and maximizing the utility of manufactured goods.
By understanding these benefits, you’re not just performing a technical task; you’re making a strategic decision to enhance your digital productivity, improve your daily computing experience, and make a financially savvy move to get more out of your current assets.
Preparing for Your RAM Upgrade: Essential Knowledge and Tools
Before you even think about unscrewing panels, thorough preparation is paramount. This phase involves understanding the type of RAM your laptop uses, determining compatibility, and gathering the necessary tools and safety equipment. Skipping these crucial steps can lead to frustration, incompatibility issues, or even damage to your valuable hardware.
Understanding Laptop RAM: Types, Speeds, and Compatibility
The most critical aspect of preparation is identifying the correct RAM for your laptop. Not all RAM is created equal, and installing an incompatible module will either prevent your laptop from booting or lead to instability.
- SODIMM vs. DIMM: Laptops use Small Outline Dual In-line Memory Modules (SODIMMs), which are physically smaller than the DIMMs used in desktop computers. Ensure you purchase SODIMM modules.
- DDR Generations (DDR3, DDR4, DDR5): RAM generations are not backward or forward compatible. A laptop designed for DDR4 RAM will not accept DDR3 or DDR5, as the physical notches on the modules are different. You must match the generation. Most modern laptops use DDR4 or DDR5.
- Speed (MHz): RAM speed is measured in Megahertz (MHz) and indicates how many cycles per second the RAM can perform. While your laptop will generally only utilize RAM up to its motherboard’s supported speed, it’s generally safe to install faster RAM; it will simply clock down to the maximum supported speed. However, for optimal performance, aim to match the speed of your existing RAM or the maximum speed supported by your laptop’s motherboard and CPU. Mismatched speeds can sometimes lead to the system defaulting to the slowest module’s speed.
- Capacity (GB): This is the amount of memory. Common capacities for SODIMMs are 4GB, 8GB, 16GB, and 32GB. Most laptops have two RAM slots, allowing for configurations like 8GB (4GBx2), 16GB (8GBx2), or even 32GB (16GBx2).
- Latency (CL): This refers to the delay between when a command is entered and when it is executed. Lower CL numbers are better. While less critical than generation and speed, matching or getting lower latency modules can offer minor performance gains.
How to Check Your Current RAM and Laptop Compatibility:
- Windows Task Manager: Press
Ctrl + Shift + Esc, go to the “Performance” tab, select “Memory.” It will show total RAM, speed, and sometimes even the form factor. - System Information Tool (Windows): Search for “System Information,” then look under “System Summary” for “Installed Physical Memory (RAM)” and “Memory Type.”
- Third-Party Tools: Software like CPU-Z provides detailed information about your CPU, motherboard, and RAM (type, speed, timings).
- Crucial System Scanner: Websites like Crucial.com offer a system scanner tool that automatically detects your laptop’s specifications and recommends compatible RAM upgrades. This is often the safest and easiest method.
- Laptop Manufacturer’s Documentation: Consult your laptop’s manual or the manufacturer’s support website (e.g., Dell Support, HP Support, Lenovo Support) for your specific model. They will list compatible RAM types, maximum capacities, and even provide instructions on how to install it.
Once you have this information, you can confidently purchase the correct SODIMM module(s). It’s often recommended to buy RAM from reputable brands such as Kingston, Crucial, Samsung, Corsair, or G.Skill to ensure reliability and compatibility.
Gathering Your Arsenal: Tools and Safety Precautions
Working inside a laptop requires a few basic tools and a strong emphasis on safety to protect both yourself and your valuable hardware.
Essential Tools:
- Small Phillips-head screwdriver set: Most laptops use small Phillips screws, sometimes of varying sizes. A precision screwdriver set with interchangeable bits is ideal.
- Plastic spudger or guitar pick: Useful for prying open plastic clips or separating case panels without scratching or damaging the plastic. Avoid using metal tools for prying.
- Anti-static wrist strap (highly recommended): This is your best defense against electrostatic discharge (ESD), which can permanently damage sensitive electronic components like RAM modules and motherboards. Connect it to a grounded metal object.
- Can of compressed air (optional but useful): For clearing dust from inside the laptop before reassembly.
- Clean, well-lit workspace: A clutter-free table with good lighting will make the process easier and reduce the chance of losing tiny screws.
Safety Precautions:
- Disconnect Power: Always, always, ALWAYS unplug your laptop from the power adapter. If your laptop has a removable battery, remove it. For non-removable batteries, there’s usually a step to disconnect the internal battery cable from the motherboard once you open the case. This is crucial to prevent electrical shorts and protect yourself.
- Discharge Static Electricity: Before touching any internal components, ground yourself. The anti-static wrist strap is the best method. If you don’t have one, regularly touch an unpainted metal object (like a radiator or the metal chassis of a desktop PC) to discharge any static buildup from your body. Avoid working on carpeted floors.
- Handle Components Carefully: Always hold RAM modules by their edges, avoiding contact with the gold connectors or the chips themselves. Finger oils can interfere with conductivity or cause corrosion over time.
- Keep Track of Screws: Laptop screws are tiny and often differ in length and type. Use a magnetic mat, an egg carton, or small containers to organize them by location as you remove them. This will prevent damage during reassembly if a longer screw is mistakenly inserted into a shorter screw hole.
- Be Gentle: Laptop components are delicate. Never force anything. If a part isn’t moving easily, double-check if there’s a hidden screw or clip preventing its movement.
By taking the time to understand your RAM requirements and prepare your workspace safely, you set yourself up for a successful and stress-free upgrade. This meticulous approach not only ensures the integrity of your hardware but also builds confidence in your technical abilities.
The Step-by-Step RAM Installation Process
With your new RAM in hand and your workspace prepared, it’s time for the main event. This section will guide you through the physical installation process, from gaining access to your laptop’s internals to securing the new modules and verifying your work. Patience and careful adherence to these steps are key.
Accessing Your Laptop’s RAM Slots
The first hurdle is getting inside your laptop. The exact method varies significantly between models, but the general principle remains the same: identify and remove the access panel or the entire bottom cover.
- Power Down and Disconnect: Ensure your laptop is completely powered off, not just in sleep mode. Disconnect the power adapter and, if applicable, remove the external battery.
- Flip and Unscrew: Carefully flip your laptop over onto a soft, clean surface (like an anti-static mat or a microfiber cloth) to protect the screen and lid. Locate all the screws holding the bottom panel or access doors in place. Some screws might be hidden under rubber feet or stickers. Remove them and keep them organized.
- Remove the Bottom Panel:
- Dedicated RAM Access Panel: Some older or more user-friendly laptops have a small, dedicated panel over the RAM slots. Gently pry this open with your plastic spudger after removing its screws.
- Full Bottom Cover: More commonly, you’ll need to remove the entire bottom cover. After unscrewing, carefully use your plastic spudger to pry along the seams of the laptop, releasing any plastic clips that hold the cover in place. Work slowly and gently to avoid breaking clips or scratching the chassis. Once all clips are released, lift the cover off.
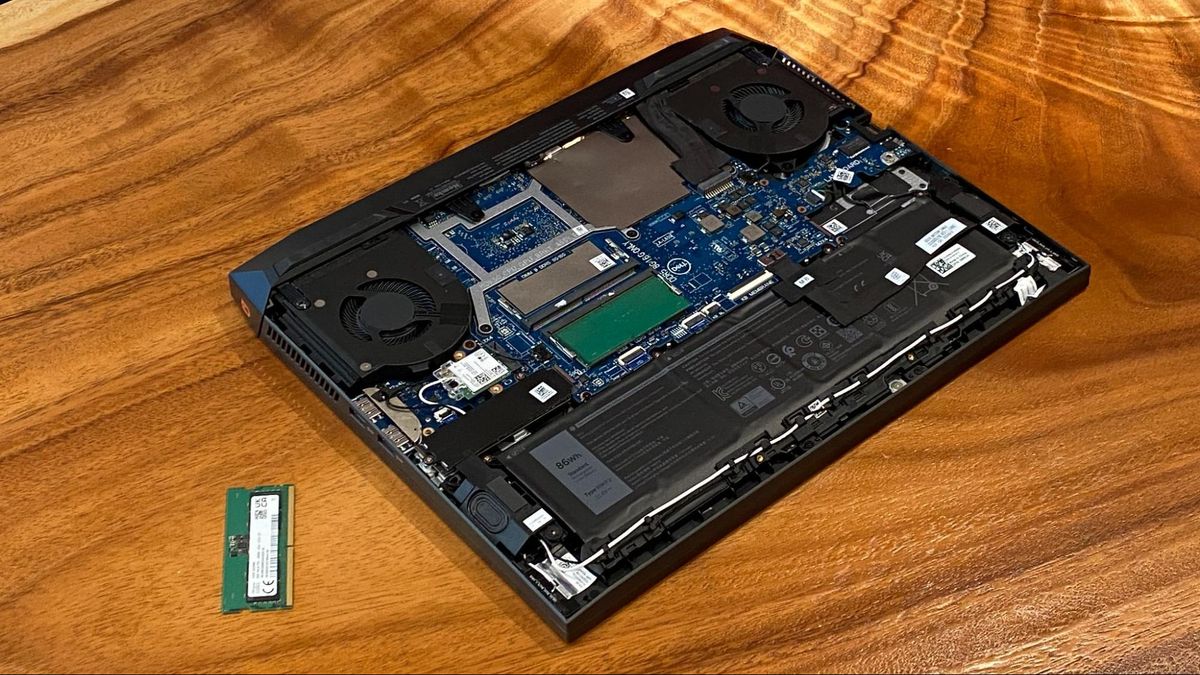
- Locate the RAM Slots: Once inside, identify the RAM modules. They usually look like small green circuit boards plugged into horizontal slots. Modern laptops typically have two SODIMM slots, though some ultra-compact models may have RAM soldered directly to the motherboard or only one accessible slot.
- Disconnect Internal Battery (If Applicable): For laptops where the entire bottom cover is removed and the battery is internal, it’s highly recommended to disconnect the battery cable from the motherboard at this stage. This completely de-energizes the system and provides an additional layer of safety against accidental shorts. The connector usually just pulls straight out, but consult your laptop’s specific service manual if unsure.
Swapping Out or Adding New RAM Modules
Now that you have access, you can proceed with the actual module replacement or addition.
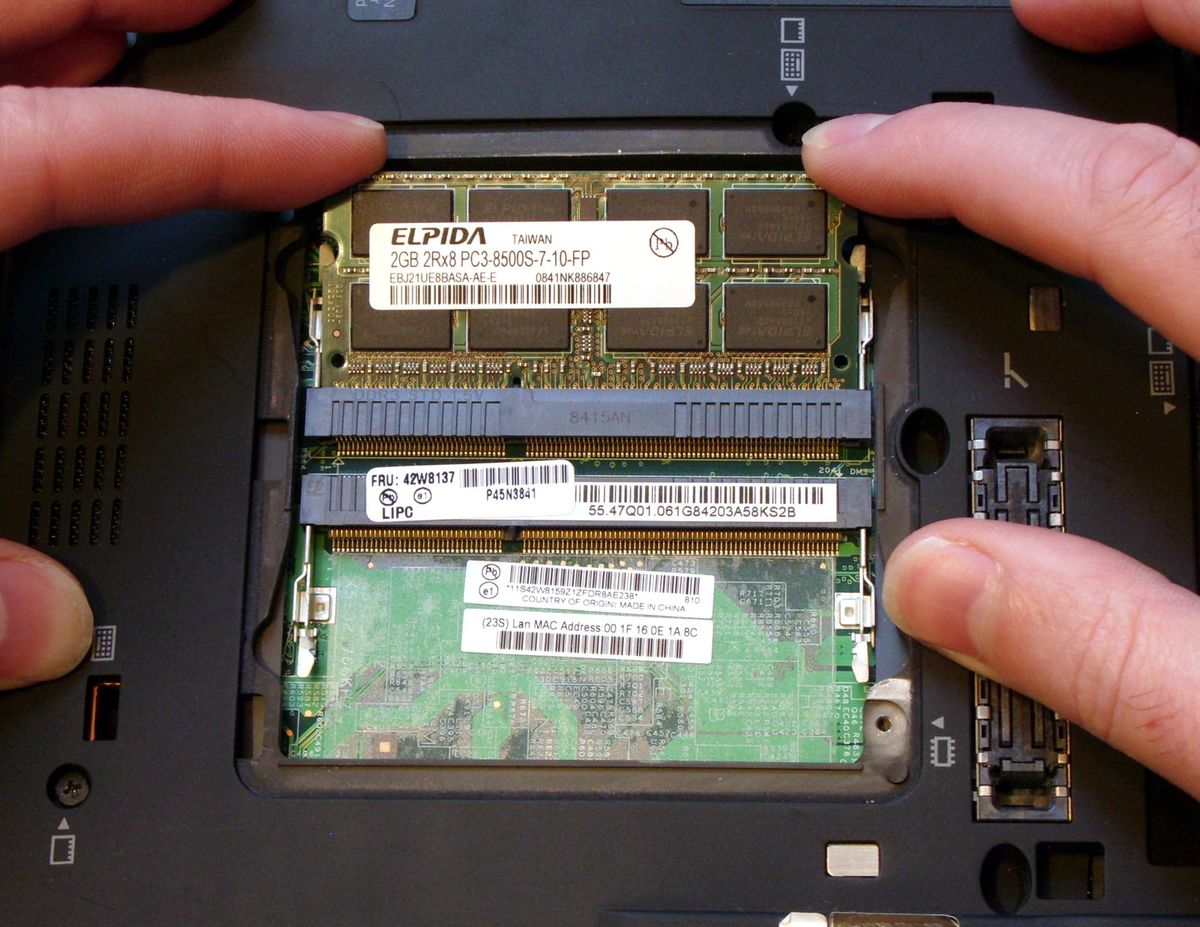
- Release Existing RAM (If Upgrading/Replacing): If you’re replacing existing RAM, gently push the two small metal clips on either side of the RAM module outwards. The module should pop up at a slight angle.
- Remove Old RAM: Once angled, you can gently slide the old RAM module out of its slot. Store it in an anti-static bag if you plan to keep it or sell it.
- Insert New RAM:
- Take your new SODIMM module out of its anti-static packaging, holding it by its edges.
- Align the notch on the RAM module with the corresponding notch in the RAM slot. This is crucial for correct orientation. Do not force it.
- Insert the module into the slot at a 30-45-degree angle. Push it firmly but gently until the gold contacts are almost fully hidden within the slot.
- Gently push the module down until it clicks into place. The two metal clips on the sides should snap inwards and secure the module horizontally. If they don’t click, the module might not be fully seated; lift it slightly and push down again.
- Repeat for Second Slot (If Applicable): If you are installing two modules, repeat the process for the second slot. Ensure both modules are securely seated.
Reassembly and Initial Power-Up
With the new RAM modules in place, it’s time to close up your laptop and test the upgrade.
- Reconnect Internal Battery (If Disconnected): If you disconnected the internal battery cable, carefully plug it back into its socket on the motherboard. Ensure it’s firmly seated.
- Replace Bottom Cover/Access Panel: Carefully position the bottom cover or access panel back onto the laptop. Align any clips and gently press around the edges until they snap into place.
- Re-insert Screws: Put all the screws back into their original locations. Do not overtighten them, as this can strip the plastic.
- Re-insert External Battery (If Applicable) and Connect Power: Flip your laptop back over. If you removed an external battery, re-insert it. Plug in the power adapter.
- Power On and Verify: Press the power button. The first boot after a RAM upgrade might take slightly longer than usual as the system registers the new memory. If the laptop boots successfully, congratulations!
- Verify in Operating System: Once logged into Windows, open Task Manager (Ctrl + Shift + Esc) and go to the “Performance” tab, then “Memory.” You should see the updated total RAM capacity. For example, if you upgraded from 8GB to 16GB, it should now display 16GB. On macOS, go to Apple Menu > About This Mac.
If your laptop doesn’t power on, or if you encounter a black screen or beeping codes, don’t panic. Proceed to the troubleshooting section.
Post-Installation and Troubleshooting
Even with careful execution, sometimes things don’t go perfectly. Knowing how to verify your installation and troubleshoot common issues will save you time and stress.
Verifying Your New RAM
As mentioned, checking your system’s memory information is the primary way to confirm a successful upgrade.
- Windows: Open Task Manager (
Ctrl + Shift + Esc), click the “Performance” tab, then select “Memory.” It should display the correct total amount of RAM. You can also use the System Information tool by typing “msinfo32” in the Run dialog (Win + R). - macOS: Click the Apple menu (top-left corner) and select “About This Mac.” The overview tab will show “Memory” with the new total.
- Linux: Open a terminal and type
free -horsudo dmidecode --type 17.
If the reported RAM matches your installed modules, you’re all set! Enjoy your revitalized laptop.
Common Issues and Quick Fixes
If your laptop doesn’t boot, displays a black screen, or emits a series of beeps (BIOS beep codes often indicate hardware issues), here are some common troubleshooting steps:
- Check RAM Seating: The most frequent issue is improperly seated RAM.
- Power down, disconnect all power, open the laptop.
- Gently remove and re-insert the new RAM modules, ensuring they are firmly seated and the side clips have clicked into place. Push down on both ends of the module until it’s perfectly flat and secure.
- Try booting with only one new RAM stick at a time, if you installed two, to isolate a potentially faulty module.
- If you’re upgrading from existing RAM, try re-installing your old RAM modules to confirm the laptop still boots with them. This helps determine if the issue is with the new RAM or something else.
- Clear CMOS/Reset BIOS: Sometimes the BIOS needs to be reset to recognize new hardware.
- Power down, disconnect all power, open the laptop.
- Disconnect the main internal battery.
- Press and hold the power button for 15-30 seconds to drain any residual power from capacitors.
- If you can locate a tiny CMOS battery (a coin-cell battery), carefully remove it for a few minutes, then replace it.
- Reconnect the main battery and try booting.
- Check for Compatibility Issues: Double-check your RAM purchase against your laptop’s specifications.
- Is it the correct DDR generation (e.g., DDR4, not DDR3)?
- Is it SODIMM?
- Does your laptop support the capacity you installed (e.g., some older laptops have a maximum RAM limit)?
- Did you match the required voltage (e.g., 1.2V for DDR4, 1.35V for DDR3L)? Incorrect voltage can cause instability or prevent booting.
- Inspect for Damage: Briefly examine the motherboard around the RAM slots and the RAM modules themselves for any visible damage, bent pins, or debris.
- Remove and Re-connect Internal Battery: Ensure the internal battery cable (if you disconnected it) is securely plugged back into the motherboard. A loose connection can prevent power to the system.
If after these steps your laptop still isn’t working, it’s possible you have a faulty RAM module (though rare from reputable brands), or there might be a more complex underlying issue. At this point, you might consider contacting the RAM manufacturer for an RMA or seeking professional technical assistance. Remember, while a RAM upgrade is generally straightforward, it involves handling delicate electronics, and there’s always a slight risk of unforeseen complications.
Conclusion: Revitalize Your Laptop, Extend Its Lifespan
Upgrading your laptop’s RAM is one of the most impactful and accessible hardware enhancements you can undertake. It’s a prime example of a ‘tech smart’ decision that aligns perfectly with a ‘money smart’ philosophy. Instead of succumbing to the pressure of constant upgrades and buying new hardware every few years, you empower yourself to extend the life and improve the performance of your existing investment.
The process, while requiring careful attention to detail and adherence to safety protocols, is well within the capabilities of most users. By following this comprehensive guide, you’ve gained the knowledge to identify the right components, prepare your workspace, execute the installation, and troubleshoot any minor hiccups along the way.
You’ve not only boosted your laptop’s speed, multitasking capabilities, and overall responsiveness for demanding applications, gaming, or everyday productivity, but you’ve also made a financially astute choice. This DIY upgrade significantly postpones the need for a costly new laptop purchase, offering an exceptional return on investment. Furthermore, you’ve contributed to reducing e-waste by maximizing the utility of your current device.
So, power up your newly upgraded machine and experience the tangible difference. Enjoy smoother workflows, faster loading times, and the profound satisfaction that comes from mastering a valuable tech skill and breathing new life into your trusted companion. Your laptop, and your wallet, will thank you.
aViewFromTheCave is a participant in the Amazon Services LLC Associates Program, an affiliate advertising program designed to provide a means for sites to earn advertising fees by advertising and linking to Amazon.com. Amazon, the Amazon logo, AmazonSupply, and the AmazonSupply logo are trademarks of Amazon.com, Inc. or its affiliates. As an Amazon Associate we earn affiliate commissions from qualifying purchases.