In today’s rapidly evolving technological landscape, interactive computing environments have become indispensable tools for data scientists, developers, educators, and researchers alike. Among these, Jupyter Notebook stands out as a powerful open-source web application that allows you to create and share documents containing live code, equations, visualizations, and narrative text. It’s an essential component in the modern “Tech” toolkit, enabling users to prototype ideas, perform data analysis, develop machine learning models, and even teach programming concepts with unparalleled ease and interactivity.
For those working within the Windows ecosystem, getting Jupyter Notebook set up might seem like a daunting task at first glance, but with the right guidance, it’s a straightforward process that will unlock a world of possibilities for your projects. This comprehensive guide will walk you through the installation, initial setup, and basic usage of Jupyter Notebook on your Windows machine, ensuring you’re ready to dive into interactive computing without a hitch. Whether you’re a seasoned developer looking for an efficient environment or a beginner eager to explore the realms of data science, mastering Jupyter Notebook installation is your first step towards enhanced productivity and deeper insights.

The Indispensable Tool: Understanding Jupyter Notebook
Before we delve into the mechanics of installation, it’s crucial to understand what Jupyter Notebook is and why it has become such a pivotal tool across various disciplines. At its core, Jupyter Notebook provides an interactive, web-based environment where you can combine executable code, rich text elements (like markdown, equations, and images), and the output of your code (such as plots and tables) into a single, cohesive document. This unique blend makes it ideal for a multitude of tasks:
- Data Cleaning and Transformation: Perform complex data manipulations step-by-step, with immediate visual feedback on the results.
- Numerical Simulation: Run simulations and analyze outcomes interactively, making it easier to adjust parameters and observe changes.
- Statistical Modeling: Build and test statistical models, visualizing distributions and fitting results directly within the notebook.
- Machine Learning: Develop, train, and evaluate machine learning models, observing model performance with integrated visualizations.
- Data Visualization: Generate insightful charts and graphs from your data, presenting them alongside the code that produced them.
- Teaching and Learning: Explain concepts, demonstrate code, and allow students to experiment directly within the provided context.
- Collaborative Work: Share notebooks with colleagues, who can then replicate your analysis, experiment with your code, or build upon your work.
The “Jupyter” name itself is an acronym for Julia, Python, and R—the three foundational programming languages it was initially designed to support. However, its modular architecture, built on the IPython kernel, has since expanded to support over 100 different programming languages, making it incredibly versatile. This interactive and shareable document format fosters a culture of reproducible research and transparent development, aligning perfectly with the demands of modern technological workflows. Its capability to integrate code, comments, and results seamlessly elevates it beyond a mere code editor, positioning it as a dynamic canvas for exploration and discovery.
Setting the Stage: Prerequisites for Installation
Before you can install Jupyter Notebook, you need to ensure your Windows system has the necessary foundational components. The primary requirement is Python, as Jupyter Notebook is fundamentally a Python application.
Python: The Foundation
Python is the programming language that powers Jupyter Notebook, and therefore, it must be installed on your system. Most of the packages and libraries you’ll use within Jupyter, especially for data science, are written in Python.
How to check if Python is installed:
Open the Command Prompt or PowerShell (you can do this by typing cmd or powershell into the Windows search bar and pressing Enter). In the terminal window, type:
python --version
or
py --version
If Python is installed, you’ll see a version number (e.g., Python 3.9.7). If you receive an error message like 'python' is not recognized as an internal or external command, then Python is not installed or not added to your system’s PATH environment variable.
Installing Python if not present:
- Download Python: Visit the official Python website (python.org). Download the latest stable version of Python 3 for Windows (e.g., “Windows installer (64-bit)”).
- Run the Installer: Double-click the downloaded
.exefile. - Crucial Step: On the first screen of the installer, make sure to check the box that says “Add Python X.Y to PATH” (where X.Y is your Python version). This is vital because it allows you to run Python and
pipcommands directly from any Command Prompt window. - Install Now: Click “Install Now” to proceed with the default installation. You can choose “Customize installation” if you want to change the installation path or components, but for most users, the default is fine.
- Verify Installation: After the installation completes, close and reopen your Command Prompt or PowerShell, then re-run
python --versionto confirm.
Pip: Python’s Package Installer
pip is Python’s package management system, used to install and manage software packages written in Python. When you install Python following the recommended steps, pip is usually included by default. Jupyter Notebook itself is a Python package, which is why pip is essential for its installation, particularly if you’re not using Anaconda.
Verifying Pip Installation:
Open your Command Prompt or PowerShell and type:
pip --version
You should see a version number like pip 21.2.4. If you encounter an error, it might indicate an issue with your Python installation or PATH configuration. Reinstalling Python with the “Add Python to PATH” option checked is often the simplest fix.
Virtual Environments (Recommended):
While not strictly a prerequisite, it’s highly recommended to use a virtual environment for your Python projects, including Jupyter Notebook. A virtual environment is an isolated Python environment that allows you to install packages for a specific project without interfering with other projects or your system’s global Python installation. This prevents dependency conflicts and keeps your project dependencies tidy.
- To create a virtual environment (e.g., named
myenv):
python -m venv myenv - To activate it:
.myenvScriptsactivate(on Windows PowerShell)
myenvScriptsactivate(on Windows Command Prompt)
Once activated, your terminal prompt will typically show (myenv) at the beginning, indicating that you are now working within that isolated environment. Any packages installed via pip will reside only within myenv.
Step-by-Step Installation Methods
There are primarily two popular methods to install Jupyter Notebook on Windows: using Anaconda (recommended for beginners and data scientists) or using Pip (for those with existing Python setups or who prefer a leaner installation).
Method 1: The All-in-One Solution – Installing with Anaconda
Anaconda is a widely popular open-source distribution that includes Python, conda (a package and environment manager), and a vast collection of scientific computing libraries, all pre-bundled. It’s especially recommended for data scientists, machine learning engineers, and beginners because it simplifies environment management and comes with Jupyter Notebook and many other essential packages (like NumPy, pandas, scikit-learn) already installed.
Who is it for?
Beginners, data scientists, machine learning practitioners, or anyone who wants a hassle-free setup with minimal configuration.
Detailed steps:
-
Download Anaconda Individual Edition:
- Go to the official Anaconda website: anaconda.com/products/individual.
- Scroll down to the “Anaconda Installers” section.
- Download the “64-Bit Graphical Installer” for Windows. The file size is substantial (several hundred MB) because it includes Python and many libraries.
-
Run the Installer:
- Locate the downloaded
.exefile (e.g.,Anaconda3-2023.07-Windows-x86_64.exe) and double-click it to start the installation. - Click “Next” on the welcome screen.
- Agree to the license terms.
- Choose “Just Me” for the installation type unless you have a specific reason to install it for “All Users” (which requires administrator privileges).
- Choose your installation location. The default path (e.g.,
C:UsersYourUseranaconda3) is usually fine. Ensure you have enough disk space. - Crucial Step: On the “Advanced Installation Options” screen, it’s generally recommended to leave “Add Anaconda3 to my PATH environment variable” unchecked. While this might seem counter-intuitive compared to Python’s
PATHrecommendation, Anaconda is designed to be managed primarily through its “Anaconda Prompt” or “Anaconda Navigator,” which handlePATHsettings automatically for isolated environments. Checking it can sometimes lead to conflicts with existing Python installations. However, ensure “Register Anaconda3 as my default Python 3.X” is checked. - Click “Install” and wait for the installation to complete. This may take several minutes.
- Locate the downloaded
-
Verify Installation:
- Once the installation is finished, close any open Command Prompt windows.
- Search for “Anaconda Prompt” in your Windows search bar and open it. This special terminal automatically configures your environment to use Anaconda’s Python.
- In the Anaconda Prompt, type:
conda --version
You should see the installed Conda version. - Then, type:
python --version
This should show the Python version bundled with Anaconda.
- Launch Jupyter Notebook:
- Option A: Via Anaconda Navigator (Graphical User Interface)
- Search for “Anaconda Navigator” in your Windows search bar and open it.
- Once Navigator loads (it might take a moment), you’ll see a dashboard with various applications. Find “Jupyter Notebook” and click the “Launch” button beneath it. This will start a local Jupyter server and open your default web browser to the Jupyter dashboard.
- Option B: Via Anaconda Prompt (Command Line)
- Open “Anaconda Prompt.”
- Type:
jupyter notebook - Press Enter. This command will start the Jupyter server, and your default web browser will automatically open to the Jupyter dashboard. Keep the Anaconda Prompt window open, as closing it will shut down the Jupyter server.
- Option A: Via Anaconda Navigator (Graphical User Interface)
Method 2: The Lean Approach – Installing with Pip
This method is suitable if you already have a Python installation on your system and prefer a more minimalist setup, or if you want to install Jupyter Notebook into a specific virtual environment without the overhead of the entire Anaconda distribution.
Who is it for?
Users who have an existing Python setup, prefer managing packages manually, are working within virtual environments, or want to conserve disk space.
Detailed steps:
-
Open Command Prompt or PowerShell:
- Search for
cmdorpowershellin the Windows search bar and open it.
- Search for
-
Optional but Recommended: Create and Activate a Virtual Environment:
- Navigate to your desired project directory (e.g.,
cd C:UsersYourUserDocumentsJupyterProjects). - Create a virtual environment:
python -m venv jupyter_env(you can namejupyter_envanything you like). - Activate the virtual environment:
- For PowerShell:
.jupyter_envScriptsactivate - For Command Prompt:
jupyter_envScriptsactivate
- For PowerShell:
- Your prompt should now display
(jupyter_env)at the beginning, confirming activation.
- Navigate to your desired project directory (e.g.,
-
Install Jupyter Notebook:
- With your virtual environment activated (or if you choose to install globally, just in your regular Command Prompt/PowerShell), type the following command:
pip install jupyter - Press Enter.
pipwill download Jupyter Notebook and all its necessary dependencies (likeipykernel,notebook,traitlets, etc.). This process may take a few minutes depending on your internet connection.
- With your virtual environment activated (or if you choose to install globally, just in your regular Command Prompt/PowerShell), type the following command:
-
Verify Installation:
- After the installation completes, you can check if Jupyter is installed by typing:
jupyter --version
You should see the installed Jupyter version.
- After the installation completes, you can check if Jupyter is installed by typing:
-
Launch Jupyter Notebook:
- In the same Command Prompt or PowerShell window (with the virtual environment activated, if applicable), type:
jupyter notebook - Press Enter. Similar to the Anaconda method, this command will start a local server, and your default web browser will open to the Jupyter dashboard. Keep this terminal window open as long as you’re using Jupyter Notebook.
- In the same Command Prompt or PowerShell window (with the virtual environment activated, if applicable), type:
Navigating and Utilizing Jupyter Notebook
Once Jupyter Notebook is installed and launched, you’ll be presented with its intuitive web-based interface. This section will guide you through starting your first session and interacting with notebooks.
Launching Your First Notebook Session
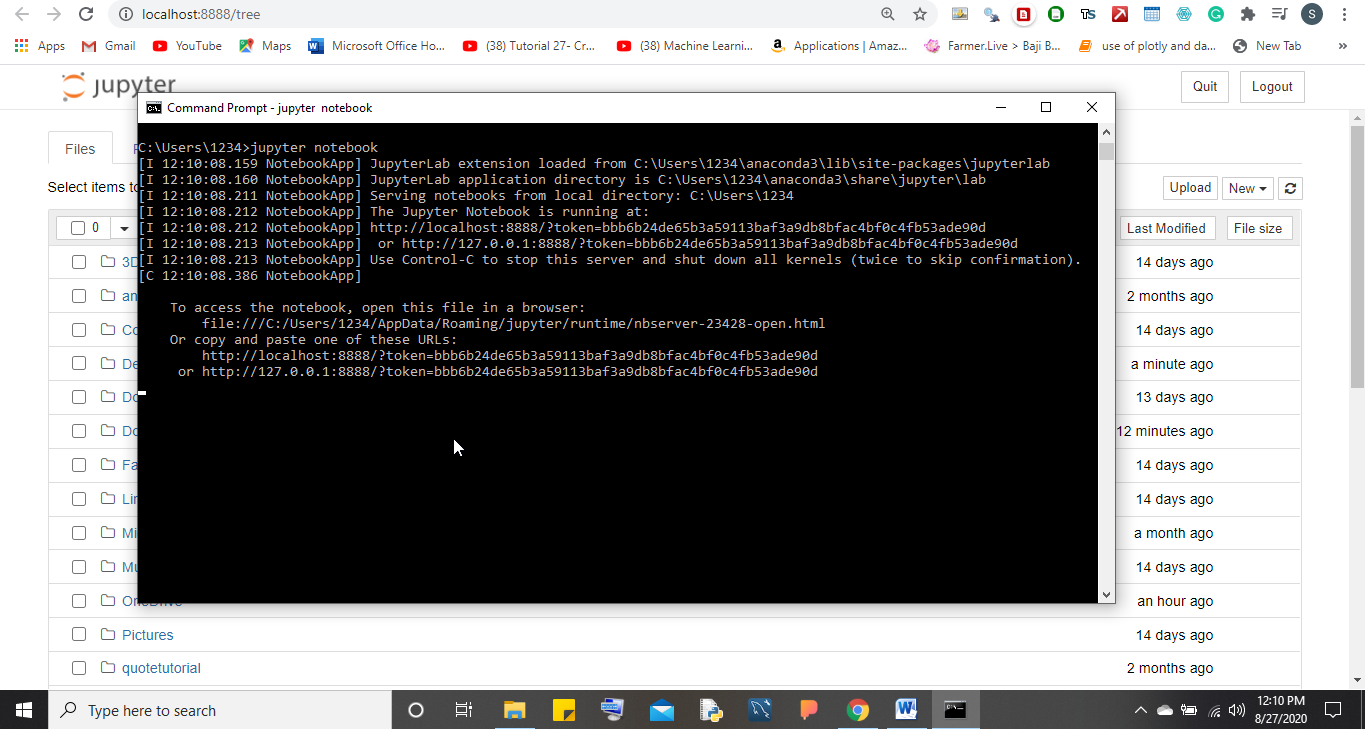
When you run the jupyter notebook command, several things happen:
- Local Server Starts: Jupyter starts a local web server on your computer, typically listening on port
8888. You’ll see server logs in your terminal window. - Browser Opens: Your default web browser automatically opens to
http://localhost:8888/tree(or a similar address if port 8888 is already in use). This is the Jupyter Dashboard. - Dashboard Interface: The dashboard acts as a file browser, showing the files and folders in the directory where you launched Jupyter Notebook. From here, you can navigate your file system, open existing notebooks, or create new ones.
Creating and Interacting with Notebooks
The Jupyter Dashboard is your control center. To create a new notebook:
- Click the “New” button in the top-right corner of the dashboard.
- From the dropdown menu, select the desired kernel (e.g., “Python 3”). This will open a new tab in your browser with an empty Jupyter Notebook.
Understanding Notebook Components:
A Jupyter Notebook consists of a sequence of “cells.” There are two primary types of cells:
- Code Cells: These are where you write and execute your programming code (e.g., Python code). The output of the code (e.g., print statements, error messages, plots) appears directly below the cell.
- Markdown Cells: These are used for writing descriptive text, explanations, headings, lists, images, and mathematical equations using Markdown syntax. They allow you to document your work effectively, making your notebooks readable and understandable.
Interacting with Cells:
- Entering Code/Text: Click on a cell to select it. If it’s a code cell, type your code. If it’s a Markdown cell, type your text using Markdown syntax.
- Changing Cell Type: With a cell selected, you can change its type using the dropdown menu in the toolbar (e.g., “Code,” “Markdown”).
- Executing Cells: To run a code cell or render a Markdown cell, select the cell and press
Shift + Enter. The code will execute, and the output will display below. For Markdown, the text will be formatted. - Adding/Deleting Cells:
- Use the
+button in the toolbar to add a new cell below the current one. - Use the scissors icon to cut a cell, or
dd(doubled) as a shortcut in command mode.
- Use the
- Saving Your Notebook: Jupyter Notebooks are automatically saved periodically, but you can manually save by clicking the floppy disk icon in the toolbar or pressing
Ctrl + S. Notebooks are saved with a.ipynbextension. - Shutting Down: To close a notebook, simply close its browser tab. However, the kernel (the engine running your code) might still be active in the background. To completely shut down the kernel, go back to the Jupyter Dashboard, select the running notebook (indicated by a green icon), and click the “Shutdown” button. To stop the entire Jupyter server, go back to the terminal where you launched
jupyter notebookand pressCtrl + Ctwice.
Troubleshooting Common Issues and Optimizing Your Workflow
While Jupyter Notebook installation is generally smooth, you might encounter a few common issues. Knowing how to troubleshoot them and optimize your workflow can save you significant time.
Resolving Installation and Launch Problems
- “Jupyter is not recognized as an internal or external command”: This error almost always points to an issue with your system’s
PATHenvironment variable.- Anaconda: Ensure you’re opening “Anaconda Prompt” or launching via “Anaconda Navigator,” as these handle the
PATHcorrectly. If you manually added Anaconda toPATHduring installation, try removing it and relying on the dedicated Anaconda tools. - Pip: Revisit the Python installation steps and ensure “Add Python to PATH” was checked. If not, you may need to reinstall Python or manually add the Python Scripts directory (e.g.,
C:UsersYourUserAppDataLocalProgramsPythonPython39Scripts) to yourPATH.
- Anaconda: Ensure you’re opening “Anaconda Prompt” or launching via “Anaconda Navigator,” as these handle the
- Port already in use: If port
8888(the default) is already being used by another application, Jupyter will try to open on the next available port (e.g.,8889). You’ll see this in the terminal output. If you specifically need to use a different port, you can launch Jupyter with:
jupyter notebook --port=xxxx(replacexxxxwith your desired port number). - Permissions errors: If you’re encountering permission denied errors during installation or when trying to save notebooks, try running your Command Prompt/PowerShell or Anaconda Prompt as an administrator (right-click and select “Run as administrator”).
- Dependency Conflicts: This is where virtual environments truly shine. If you install multiple Python packages globally, they might have conflicting requirements. Using a virtual environment ensures that packages for one project don’t clash with another. If you’re facing persistent issues, try creating a fresh virtual environment and installing Jupyter within it.
Enhancing Productivity with Jupyter Notebook
Once you’re comfortable with the basics, explore these tips to make your Jupyter experience even more powerful and efficient:
- Keyboard Shortcuts: Jupyter Notebook has extensive keyboard shortcuts that can dramatically speed up your workflow. Press
H(in command mode, not edit mode) to view a list of shortcuts. Some essential ones:A: Insert cell aboveB: Insert cell belowDD: Delete selected cellM: Change cell to MarkdownY: Change cell to CodeShift + Enter: Run cellEsc: Enter command modeEnter: Enter edit mode
- Jupyter Extensions (
nbextensions): These are community-contributed extensions that add extra functionality to your notebooks. They can include features like a table of contents, code formatter, collapsible headings, spell checker, and more. You’ll typically install them viapip install jupyter_contrib_nbextensionsand then activate them through the Jupyter environment. - Installing Additional Kernels: While primarily known for Python, Jupyter supports kernels for many other languages (R, Julia, Node.js, etc.). If you work with multiple languages, you can install their respective kernels to use them within Jupyter Notebooks, making it a true polyglot environment. For example, to install the R kernel, you’d typically install
IRkernelwithin R, then runIRkernel::installspec()in R. - Organizing Your Notebooks: Keep your project folders tidy. Create separate directories for data, notebooks, output, and supporting scripts. Use meaningful filenames for your notebooks.
- Documenting Your Work: Leverage Markdown cells not just for headings but for explaining your code, outlining your methodology, interpreting results, and noting any assumptions or future steps. Well-documented notebooks are invaluable for collaboration and future reference.

Conclusion: Empowering Your Tech Journey with Jupyter Notebook
The ability to seamlessly integrate code, text, and visualizations makes Jupyter Notebook an incredibly potent tool in the arsenal of anyone involved in technology, from software development and data analysis to educational content creation. Installing Jupyter Notebook on Windows, whether through the comprehensive Anaconda distribution or the lean Pip method, is a foundational step toward unlocking a more interactive, efficient, and reproducible workflow.
By following the steps outlined in this guide, you’ve not only set up a powerful computing environment but also taken a significant stride in enhancing your digital skills and productivity. Jupyter Notebook is more than just an application; it’s a dynamic canvas for innovation, a powerful learning platform, and a conduit for sharing knowledge in the ever-expanding world of tech. Dive in, experiment, and let Jupyter Notebook empower your journey of exploration and discovery. The interactive nature of this tool will undoubtedly accelerate your learning and development, proving to be an invaluable asset in your continuous pursuit of technological excellence.
aViewFromTheCave is a participant in the Amazon Services LLC Associates Program, an affiliate advertising program designed to provide a means for sites to earn advertising fees by advertising and linking to Amazon.com. Amazon, the Amazon logo, AmazonSupply, and the AmazonSupply logo are trademarks of Amazon.com, Inc. or its affiliates. As an Amazon Associate we earn affiliate commissions from qualifying purchases.