In the modern computing landscape, the physical optical drive—the once-ubiquitous CD, DVD, and Blu-ray slot—has largely vanished from laptops and desktop towers alike. However, the need to distribute large software suites, operating systems, and complex digital archives remains. This is where the ISO file comes into play. Often referred to as a “disk image,” an ISO file is a perfect digital clone of an entire optical disc.
While the concept of a disk image might seem intimidating to casual users, understanding how to “install” or utilize ISO software is a fundamental skill in the tech world. Whether you are upgrading an operating system, running legacy software, or setting up a virtual machine, mastering the ISO format ensures you can handle digital media with the precision of an IT professional.
Understanding ISO Files: The Digital Blueprint of Physical Media
Before diving into the “how-to,” it is essential to understand what an ISO file actually is. Named after the ISO 9660 file system used with CD-ROM media, an ISO file (.iso) is a single file that contains every bit of data from every sector of an optical disc.
What is an ISO File?
Unlike a ZIP or RAR file, which compresses files to save space, an ISO is an uncompressed “image” of the disc. It contains the data files, the file system metadata, and the boot code necessary for the software to run or install correctly. Think of it as a digital blueprint; it doesn’t just hold the parts of a house; it holds the layout and the foundation instructions as well.
Common Use Cases for ISOs
ISOs are primarily used for distributing large programs over the internet. Their most common applications include:
- Operating System Installations: Windows, Linux, and macOS installers are almost exclusively distributed as ISOs.
- Software Suites: Complex programs like CAD software or older creative suites often come as ISOs to preserve the installation hierarchy.
- Gaming: Emulators use ISOs (often called ROMs in other contexts) to run games originally released on physical discs.
- System Recovery: Bootable recovery tools used to repair crashed computers are usually packaged as ISO files.
Methods for “Installing” ISO Software
When people speak of “installing” an ISO, they are usually referring to one of three processes: mounting the file as a virtual drive, extracting the contents, or creating bootable media. The method you choose depends entirely on what the software inside the ISO is intended to do.
Mounting via Built-in OS Tools
Mounting is the most common way to access ISO content. When you mount an ISO, your operating system creates a “Virtual Drive” that tricks your computer into thinking a physical disc has been inserted into a non-existent DVD drive.
In Windows 10 and 11, this process is incredibly streamlined. You simply right-click the file and select “Mount.” A new drive letter (like E: or F:) will appear in “This PC,” and you can run the setup.exe file inside just as you would with a physical disc. macOS users have a similar experience; double-clicking a .dmg or .iso file mounts it to the desktop as a virtual volume.
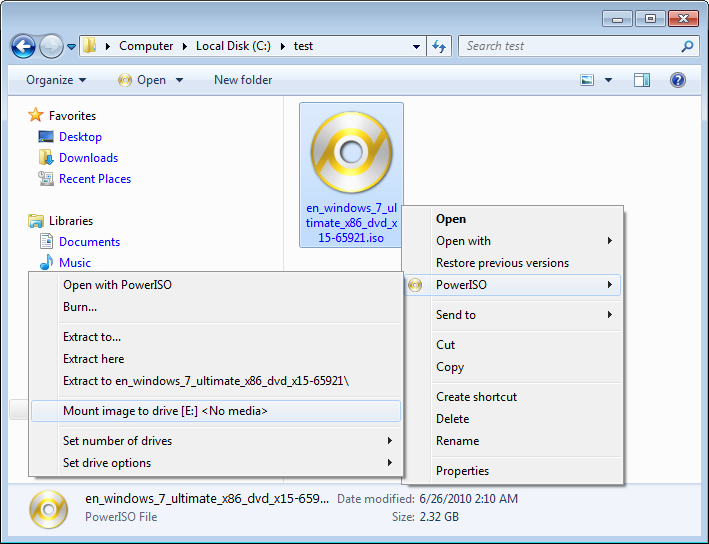
Using Third-Party Virtual Drive Software
While modern operating systems have built-in mounting tools, power users and those on older systems (like Windows 7) may require third-party utilities. Software such as WinCDEmu, Daemon Tools, or PowerISO offers advanced features that the built-in Windows explorer lacks. These features include the ability to mount multiple ISOs simultaneously, support for obscure image formats (like .BIN/.CUE or .NRG), and the ability to bypass certain legacy copy protections.
Extracting ISO Contents
If you only need a few files from the ISO and don’t need to “run” the disc environment, you can treat an ISO like a folder. Using decompression tools like 7-Zip or WinRAR, you can right-click the ISO and select “Extract files.” This is particularly useful when you need to inspect the contents of an installer or move specific assets into another directory without the overhead of mounting a virtual drive.
Creating Bootable Media for OS Installation

If your goal is to install an operating system like Windows 11 or a Linux distribution (such as Ubuntu) onto a computer, simply mounting the ISO won’t work. You need the computer to recognize the software before the main operating system even loads. This requires creating a bootable USB drive.
Using Rufus for Windows and Linux
For Windows users, Rufus is the gold standard for creating bootable media. It is a lightweight, open-source utility that formats a USB flash drive and “burns” the ISO content onto it in a way that the motherboard’s BIOS or UEFI can recognize.
- Plug in a USB drive (8GB or larger).
- Open Rufus and select the USB drive under “Device.”
- Click “Select” and navigate to your ISO file.
- Choose the Partition Scheme (GPT is standard for modern UEFI computers; MBR is for older systems).
- Click “Start.”
Once finished, you can plug this USB into any computer, enter the Boot Menu, and begin the installation process for the software contained within the ISO.
Cross-Platform Solutions: BalenaEtcher
If you are working across different operating systems, BalenaEtcher provides a simplified, visual interface for flashing ISOs to SD cards or USB drives. It is particularly popular in the Raspberry Pi and Linux communities because it validates the drive after flashing, ensuring that no data corruption occurred during the “burning” process.
Step-by-Step: Installing Software from a Mounted ISO
Once you have successfully mounted your ISO file using the methods described above, the actual installation of the software follows a standard procedure. Here is the logical flow for a successful installation:
Initializing the Setup
Navigate to the “Virtual Drive” in your file explorer. Look for a file named setup.exe, install.exe, or autorun.inf. Double-clicking these files initiates the installation wizard. If you are on a Mac, you will typically see a window pop up with the application icon and an arrow pointing to the “Applications” folder; simply drag the icon to install.
Handling “Locked” or “In-Use” ISOs
One common hurdle when installing ISO software is the “File in use” error. This happens if you try to delete or move the ISO while it is still mounted. To safely finish the process, once the software installation is complete, you must “Eject” the virtual drive. In Windows, right-click the virtual drive in “This PC” and select “Eject.” This unmounts the ISO and frees up system resources.
Best Practices, Security, and Troubleshooting
Because ISO files are “containers,” they can occasionally be used to hide malicious software. Furthermore, because they represent large amounts of data, file corruption is a common issue. Following tech-sector best practices will save you time and protect your digital environment.
Verifying File Integrity with Checksums
When downloading a large ISO, such as a Windows 11 disk image, the source website often provides a “SHA-256” or “MD5” hash. This is a unique string of characters that acts as a digital fingerprint. After downloading the ISO, use a tool like HashCheck or the built-in PowerShell command Get-FileHash to ensure your file’s fingerprint matches the source. If they don’t match, the download was corrupted or tampered with, and “installing” it could lead to system instability.
Troubleshooting Common ISO Errors
- “The Disk Image File is Corrupted”: This error often occurs in Windows if the file wasn’t fully downloaded or if there are issues with the system’s sparse file handling. Try re-downloading the file or using 7-Zip to see if the contents are accessible.
- Permission Denied: Some ISOs require administrative privileges to mount, especially if they are located in protected system folders. Move the ISO to your “Downloads” or “Desktop” folder before mounting.
- Virtual Drive Limit: Some third-party tools limit the number of virtual drives you can have at once. If you cannot mount a new ISO, check to see if you have several others already mounted and eject them.

Security Protocols
Never download ISO files from untrusted third-party “mirror” sites unless you can verify the checksum. Because ISOs can contain boot-level code, a compromised ISO can install a rootkit or boot-sector virus that is incredibly difficult to remove. Always prioritize official sources (like Microsoft’s official download page or reputable Linux distro mirrors).
By treating ISO files as versatile digital containers and using the right tools—whether built-in OS features or specialized utilities like Rufus—you can manage software installations with efficiency and security. As physical media continues to fade into history, the ability to manipulate these virtual clones remains a cornerstone of digital literacy in the technology era.
aViewFromTheCave is a participant in the Amazon Services LLC Associates Program, an affiliate advertising program designed to provide a means for sites to earn advertising fees by advertising and linking to Amazon.com. Amazon, the Amazon logo, AmazonSupply, and the AmazonSupply logo are trademarks of Amazon.com, Inc. or its affiliates. As an Amazon Associate we earn affiliate commissions from qualifying purchases.