In the realm of modern interior design and custom cabinetry, the hidden hinge stands as a silent testament to elegance, functionality, and meticulous craftsmanship. Also known as concealed hinges or Euro hinges, these clever pieces of hardware allow cabinet doors and furniture panels to swing open smoothly while maintaining an uninterrupted, sleek aesthetic when closed. Gone are the days of visible hinge knuckles disrupting the clean lines of your kitchen, bathroom, or bespoke furniture. Instead, hidden hinges offer a seamless look that elevates the overall appeal of any space, making them a cornerstone of contemporary design.
Whether you’re embarking on a complete kitchen overhaul, building custom furniture from scratch, or simply looking to upgrade existing cabinets, mastering the installation of hidden hinges is an invaluable skill. It’s a task that marries precision with practicality, offering both the satisfaction of a DIY accomplishment and the benefit of a professional-grade finish. This comprehensive guide will walk you through every step of the process, from understanding the different types of hinges to fine-tuning the final alignment, ensuring your project achieves that coveted flawless appearance. Prepare to transform your spaces with the understated sophistication only hidden hinges can provide.
Understanding Hidden Hinges: The Foundation of Seamless Design
Before diving into the practicalities of installation, it’s crucial to grasp the fundamentals of hidden hinges. Their design and functionality are what allow for their unique aesthetic contribution, and understanding these aspects will inform your choices and ensure a successful project.
Hidden hinges, predominantly used in contemporary cabinetry, are characterized by their two main parts: the “cup” (or boss) that mortises into the door, and the “arm” that connects to a “mounting plate” attached to the cabinet frame. This ingenious design keeps the hinge mechanisms out of sight when the door is closed, creating a clean, minimalist look that aligns perfectly with modern design sensibilities. For those passionate about home aesthetics and the subtle details that elevate a space’s ‘brand,’ choosing hidden hinges is a clear signal of quality and refined taste.
Types of Hidden Hinges and Their Applications
The versatility of hidden hinges comes from their various configurations, primarily defined by how the door overlays the cabinet frame. Selecting the correct type is paramount for achieving the desired look and functionality.
- Full Overlay Hinges: These are the most common type. A full overlay door completely covers the cabinet opening and rests flush against the cabinet frame when closed. This creates a continuous, unbroken line of cabinetry, ideal for sleek, contemporary designs. This is often the go-to for designers aiming for a high-end, bespoke ‘brand’ appearance in kitchen or bathroom remodels.
- Half Overlay Hinges: Used when two doors share a single cabinet partition, with each door covering half of the partition. This setup is common in larger cabinet units where multiple doors are aligned side-by-side, each requiring its own hinge and sharing the central stile.
- Inset Hinges: Unlike overlay hinges, inset doors sit inside the cabinet frame, flush with the face of the cabinet. This creates a classic, furniture-like look where the cabinet frame is fully visible around the door. While more challenging to install due to the need for precise alignment, inset hinges offer a sophisticated, traditional ‘brand’ aesthetic often found in bespoke furniture pieces.
- Specialty Hinges: Beyond the primary types, there are also specific hinges for particular applications, such as corner cabinet hinges (for blind corners or bi-fold doors), soft-close hinges (which integrate a damping mechanism to prevent slamming, enhancing user experience and prolonging cabinet life – a subtle ‘tech’ upgrade), and push-to-open hinges (for handle-less designs).
Why Choose Hidden Hinges?
The appeal of hidden hinges extends far beyond their discreet appearance:
- Aesthetics: As mentioned, they offer a clean, uninterrupted look that is highly sought after in modern design. This aesthetic choice significantly impacts the perceived ‘brand’ value of your space or furniture.
- Adjustability: A major functional advantage. Most hidden hinges come with multiple adjustment screws that allow for precise alignment of doors in three dimensions: depth (in/out), side-to-side, and height (up/down). This ‘tech’ feature ensures perfect door gaps and alignment, even compensating for minor imperfections in cabinet construction.
- Durability and Smooth Operation: Manufactured from robust materials, hidden hinges are designed for longevity and smooth, reliable operation over thousands of cycles.
- Soft-Close Functionality: Many modern hidden hinges incorporate a soft-close mechanism, preventing doors from slamming shut. This not only adds a touch of luxury but also reduces wear and tear, making your cabinets feel more substantial and high-end. It’s a small but impactful ‘tech’ enhancement.
Understanding these foundational aspects ensures you select the correct hinges for your project and appreciate the engineering that goes into creating that seamless, high-quality finish.
Gathering Your Arsenal: Tools and Materials for a Flawless Installation
Successful hidden hinge installation hinges (pun intended!) on having the right tools and materials at hand. Precision is paramount, and the correct equipment ensures not only accuracy but also safety and efficiency. For any DIY enthusiast, investing in quality tools is a ‘money’ wise decision in the long run, saving you from costly mistakes and enabling future projects.
Essential Tools for Precision and Performance
Building a robust toolkit for home projects is a form of ‘tech’ investment that empowers you. Here are the must-have items for hidden hinge installation:
- Cordless Drill: A versatile workhorse for drilling pilot holes and driving screws. Opt for a model with good battery life and variable speed control for delicate work.
- Forstner Bit (35mm): This is the star of the show for hidden hinge installation. A 35mm Forstner bit is specifically designed to drill the flat-bottomed, smooth-sided hole required for the hinge cup. Ensure it’s sharp for clean cuts. This specialized ‘tech’ tool is non-negotiable.
- Measuring Tape or Ruler: For accurate marking and placement of hinges. A good quality, retractable metal tape measure is a fundamental tool for any project.
- Pencil: For marking hinge locations and pilot holes. A carpenter’s pencil or a fine-tip mechanical pencil works best for clear, visible marks.
- Screwdriver Set (Phillips Head): While a drill can drive screws, manual screwdrivers are often better for final tightening to avoid over-tightening or stripping screws, especially with delicate cabinet materials.
- Clamps: Essential for holding the door panel securely while drilling the hinge cup holes. They prevent movement and ensure precise drilling, significantly reducing the risk of errors. Bar clamps or C-clamps are ideal.
- Safety Glasses: Always wear eye protection when operating power tools, especially when drilling wood, to shield against flying debris.
- Drill Press (Optional but Recommended): For ultimate precision when drilling hinge cup holes, a drill press offers unmatched stability and control over depth and angle. If you frequently undertake woodworking projects, this ‘tech’ gadget is a worthwhile ‘money’ investment.
- Hinge Drilling Jig (Optional but Highly Recommended): These specialized jigs (often plastic templates) guide your Forstner bit, ensuring perfect spacing from the edge of the door and consistent depth. They are relatively inexpensive and drastically improve accuracy, making the process much easier for beginners and seasoned DIYers alike. This ‘tech’ accessory simplifies a critical step.
- Combination Square or Marking Gauge: For drawing perfectly square lines and consistently marking distances from the edge of the door.
- Level: To ensure the cabinet carcass or frame is perfectly level before attaching doors, especially important for large installations to prevent alignment issues later.
Materials You’ll Need
Having the correct components ensures a smooth build and a lasting finish.
- Hidden Hinges: Purchase the correct type (full overlay, half overlay, inset) and quantity for your project. Remember to account for the weight and height of your doors—typically two hinges for doors up to 40 inches tall, and three or more for taller or heavier doors. Check if they include soft-close features if desired.
- Screws: Most hinges come with their own screws, which are specifically designed for the hinge and for attaching to wood or particle board. Always use the provided screws unless you have a specific reason to replace them (e.g., using slightly longer screws for better hold in certain materials, or decorative screws if they will be visible).
- Door Panels: The doors you intend to hang. Ensure they are correctly sized for your cabinet openings.
- Cabinet Carcass/Frame: The structure to which the doors will be attached. Ensure it is stable, square, and plumb.
- Scrap Wood: Useful for testing drill depth and for backing up the door panel when drilling to prevent tear-out on the underside.
By meticulously preparing your workspace with these tools and materials, you lay a solid foundation for a successful and frustration-free hidden hinge installation. This methodical approach is a hallmark of good ‘productivity’ in any ‘tech’ or DIY endeavor.
The Step-by-Step Installation Process: Precision is Key
The heart of installing hidden hinges lies in precision and careful execution. Each step builds upon the last, culminating in perfectly aligned and smoothly operating doors. Take your time, double-check measurements, and remember that patience is your greatest tool.
Step 1: Planning and Measurement – Defining Hinge Placement
Accurate marking is arguably the most critical step. Errors here can cascade into significant alignment problems later.
- Determine Hinge Quantity:
- For doors up to 40 inches (approx. 100 cm) in height and standard weight, two hinges are usually sufficient.
- For doors between 40-60 inches (100-150 cm) or heavier doors, use three hinges.
- For doors taller than 60 inches or very heavy doors, consider four or more hinges, spacing them evenly.
- Mark Hinge Locations on the Door:
- Top and Bottom Hinges: A general rule of thumb is to place the center of the hinge cup 2 to 4 inches (5 to 10 cm) from the top and bottom edges of the door. This spacing provides good leverage and stability. For consistency, choose a specific distance (e.g., 3 inches) and stick to it for all doors.
- Middle Hinges (if applicable): If you’re using three or more hinges, space the additional hinges evenly between the top and bottom hinges.
- Edge Distance: Measure and mark the distance from the edge of the door to the center of where the hinge cup will be drilled. This is typically 3/16 to 1/4 inch (5-6mm) for full overlay and half overlay hinges, but always check your hinge manufacturer’s specifications as this can vary. This critical measurement determines how much the door overlaps the cabinet frame. Use a combination square or a hinge drilling jig for consistent marking.
- Draw Crosshairs: At each marked hinge location, draw clear crosshairs (a small ‘X’) indicating the exact center point where the Forstner bit will penetrate.

Step 2: Drilling the Hinge Cup Holes
This is where the specialized Forstner bit comes into play. Accuracy here is paramount; drilling too shallow means the hinge won’t sit flush, too deep means you risk drilling through the door.
- Set Up Your Workspace: Place the door panel face-down on a stable, flat surface. Use clamps to secure the door firmly to prevent movement during drilling. Place a piece of scrap wood underneath the door where you will be drilling to prevent tear-out on the underside as the bit exits.
- Set Drill Depth: This is crucial. Measure the depth of the hinge cup (usually around 1/2 inch or 12.5mm, but measure your specific hinge). Mark this depth on your Forstner bit with tape, or use a drill stop collar. If using a drill press, set its depth stop. Test the depth on a scrap piece of wood first.
- Drill the Hinge Cup Holes:
- With a Hand Drill: Align the tip of the Forstner bit precisely with your marked crosshairs. Hold the drill perfectly perpendicular to the door surface. Apply steady, even pressure, allowing the bit to do the work. Periodically lift the bit to clear wood chips and prevent overheating. Drill slowly and carefully to your predetermined depth.
- With a Hinge Drilling Jig: If using a jig, attach it to the door according to its instructions, aligning it with your markings. The jig will guide the Forstner bit, ensuring correct depth and position.
- With a Drill Press: Position the door and align the crosshairs with the drill bit. Secure the door to the drill press table with clamps. Lower the bit slowly and steadily to the set depth. The drill press offers the most consistent and accurate results.
- Clean the Holes: Once drilled, clear out any wood chips or sawdust from the hinge cup holes to ensure the hinges sit perfectly flush.
Step 3: Attaching the Hinges to the Door
With the holes drilled, attaching the hinge cups to the door is straightforward.
- Insert Hinge Cups: Place each hinge cup firmly into its corresponding drilled hole. Ensure the hinge arm is oriented correctly—it should typically point towards the center of the door’s edge.
- Align and Mark Pilot Holes: Press the hinge cup firmly into place. The hinge often has small nubs that fit snugly into the hole. The two screw holes on either side of the cup need to be marked. Using an awl or a small drill bit (smaller than the screw’s diameter), create pilot holes for the screws. Pilot holes prevent the wood from splitting, especially in particle board or hardwoods, and make driving screws easier.
- Secure with Screws: Using your drill or screwdriver, drive the provided screws into the pilot holes to secure the hinge to the door. Avoid overtightening, which can strip the screws or damage the wood.
Step 4: Installing Mounting Plates on the Cabinet Carcass
Now, you shift your attention to the cabinet frame, where the mounting plates will attach. This step requires precision in determining the correct offset.
- Determine Mounting Plate Position:
- Crucial Step: This depends entirely on your hinge type (full overlay, half overlay, inset) and the overlay amount the hinge is designed for. Your hinge instructions will specify the required setback from the inside edge of the cabinet opening. For example, a common full overlay hinge might require the front edge of the mounting plate to be set back 37mm (approx. 1 1/2 inches) from the edge of the face frame or cabinet side.
- Using a Spacer: The easiest way to achieve consistent results is to use a spacer. Take a piece of scrap wood cut to the exact depth required for the mounting plate setback. Hold this spacer against the inside edge of the cabinet opening.
- Mark Pilot Holes: Position the mounting plate against the spacer, ensuring it’s centered vertically with where the hinge arm will connect. Mark the two screw holes on the cabinet frame.
- Pre-drill Pilot Holes: As with the door, pre-drill pilot holes for the mounting plate screws. This is especially important for cabinet frames made of particle board or MDF to prevent splitting.
- Secure Mounting Plates: Attach the mounting plates to the cabinet frame using the provided screws. Ensure they are straight and level. Repeat for all hinge locations.
Step 5: Mounting the Door to the Cabinet
The moment of truth: attaching the door to the cabinet.
- Align and Connect: With an assistant (especially for larger doors), hold the door up to the cabinet frame. Align the hinge arms on the door with the mounting plates on the cabinet.
- Engage the Hinges: Most modern hidden hinges feature a quick-release mechanism or simply slide and click into place onto the mounting plate. Some older or simpler hinges may require two screws to be tightened on the mounting plate to secure the hinge arm. Ensure a firm connection.
- Test Movement: Gently open and close the door to ensure it swings freely and doesn’t bind. Don’t worry about perfect alignment just yet; that’s the next step.
Fine-Tuning and Troubleshooting: Achieving Perfect Alignment
With the doors hung, the final stage involves the magic of adjustment. This is where hidden hinges truly shine, offering unparalleled flexibility to achieve perfectly even gaps and flush surfaces, transforming a good installation into a professional one. This ‘tech’ feature is what allows for such a high standard of finish, elevating the ‘brand’ of your entire project.
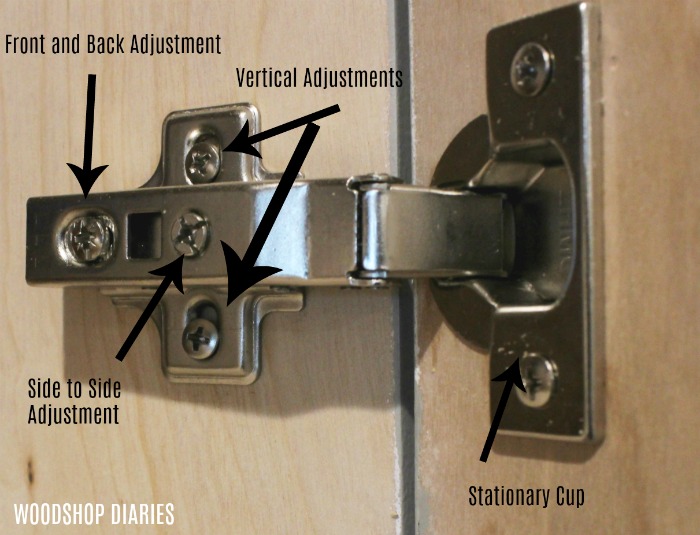
Adjusting Hidden Hinges
Hidden hinges typically have two or three adjustment screws, each controlling a specific aspect of the door’s position. Familiarize yourself with these screws before starting.
-
Side-to-Side Adjustment (Lateral Adjustment):
- Purpose: This screw moves the door left or right, allowing you to close gaps between adjacent doors, ensure even spacing from the cabinet sides, or correct for slight misalignments.
- Location: Often the screw furthest from the cabinet frame, connecting the hinge arm to the mounting plate. Turning it typically shifts the door laterally.
- Method: Make small, incremental turns (quarter-turns) on the screw for each hinge on the door. Step back and assess the change. Adjust both top and bottom hinges evenly to maintain squareness.
-
Depth Adjustment (In/Out Adjustment):
- Purpose: This screw moves the door closer to or further away from the cabinet frame, ensuring the door sits flush with the cabinet when closed, or to match the depth of surrounding doors.
- Location: Often the screw that secures the hinge arm to the mounting plate (or a separate screw on the arm itself).
- Method: If your door isn’t closing flush, turn this screw. Adjust both hinges equally. Be cautious not to pull the door too far out, which can create unsightly gaps.
-
Height Adjustment (Vertical Adjustment):
- Purpose: This screw moves the entire door up or down, allowing you to align the tops and bottoms of multiple doors, or to level a single door relative to the cabinet frame.
- Location: This adjustment is typically made by loosening the screws that attach the mounting plate to the cabinet frame, slightly shifting the door/plate assembly up or down, and then re-tightening. Some higher-end hinges have a dedicated vertical adjustment screw on the mounting plate itself.
- Method: Loosen the mounting plate screws just enough to allow the plate to slide. Adjust the door to the desired height, then re-tighten the screws firmly. For hinges with a dedicated vertical screw, simply turn it.
Tips for Adjustment:
- Work Systematically: Adjust one door at a time.
- Small Increments: Make tiny adjustments and check the results frequently.
- Stand Back: Step away from the cabinet to get a broader perspective of the alignment.
- Gravity Assists: For doors that seem stubborn, slightly loosen all adjustment screws, allow the door to settle, and then re-tighten and adjust.
Common Troubleshooting Tips
Even with the best preparation, minor issues can arise. Here’s how to tackle them:
- Door Not Closing Flush:
- Check depth adjustment: Use the in/out screw to pull the door in or out.
- Check for obstructions: Ensure nothing inside the cabinet is preventing the door from closing fully.
- Check for hinge cup depth: If the hinge cup hole is too shallow, the hinge won’t sit properly. You might need to slightly deepen the hole.
- Uneven Gaps Between Doors:
- Use the side-to-side adjustment to even out the spacing.
- Ensure all doors are vertically aligned using the height adjustment.
- Recheck the cabinet carcass for squareness and levelness. A non-square cabinet can make even perfectly installed doors look misaligned.
- Door Sagging or Drooping:
- Ensure all hinge mounting screws (both on the door and the cabinet) are tightly secured. Loose screws are a common culprit.
- If using particle board, screws can strip over time. You might need to use wood filler in the stripped holes and re-drill, or use slightly longer/thicker screws.
- Consider adding an extra hinge if the door is particularly heavy or wide and only has two hinges.
- Door Binds or Scrapes:
- This is often due to an incorrect overlay or depth adjustment. Use the side-to-side and depth screws to create clearance.
- If the door scrapes the bottom of the cabinet, use the height adjustment.
By understanding these adjustments and troubleshooting common issues, you can achieve a professional-grade finish that speaks volumes about your attention to detail and craftsmanship. This final ‘tech’ phase of fine-tuning ensures that your project not only looks great but also functions flawlessly, enhancing the user experience and solidifying the high ‘brand’ quality of your work.

Conclusion
Installing hidden hinges is a skill that marries precision with patience, culminating in a result that significantly elevates the aesthetic and functional appeal of any cabinetry or furniture. From the initial understanding of hinge types to the meticulous drilling of cup holes and the final, satisfying adjustments, each step contributes to the clean, modern look that concealed hinges are renowned for.
Embracing this DIY task not only empowers you with valuable practical skills but also allows you to infuse your personal spaces with a touch of professional elegance, all while making a smart ‘money’ saving choice by doing it yourself. The journey from raw materials to perfectly aligned doors is immensely rewarding, offering a sense of accomplishment that transcends the practical benefits.
Remember, the beauty of hidden hinges lies in their invisibility—their seamless integration creating an uninterrupted visual flow that defines contemporary design. With the right tools, careful measurements, and a methodical approach, you can achieve this polished finish in your own home. So, gather your gear, follow these steps diligently, and prepare to unveil cabinetry that not only serves its purpose beautifully but also stands as a testament to thoughtful design and masterful execution. Your journey into the world of sophisticated, invisible hardware begins now, promising an upgrade that is both subtle and strikingly impactful.
aViewFromTheCave is a participant in the Amazon Services LLC Associates Program, an affiliate advertising program designed to provide a means for sites to earn advertising fees by advertising and linking to Amazon.com. Amazon, the Amazon logo, AmazonSupply, and the AmazonSupply logo are trademarks of Amazon.com, Inc. or its affiliates. As an Amazon Associate we earn affiliate commissions from qualifying purchases.