In an age dominated by cloud computing and lightning-fast solid-state drives (SSDs), the humble hard disk drive (HDD) still holds a crucial place, especially for users seeking vast amounts of storage at an affordable price point. For laptop owners, installing or upgrading an HDD can breathe new life into an aging machine, significantly expand storage capacity for ever-growing digital libraries, or even serve as a robust secondary drive for backups and archives. This guide will walk you through the entire process, from understanding why you might need an upgrade to the meticulous steps of installation and post-setup, ensuring your laptop is ready to handle your digital demands.
Why Consider an HDD Upgrade or Installation?
Before diving into the nuts and bolts of installation, it’s worth understanding the compelling reasons behind such an endeavor. An HDD upgrade isn’t just a technical task; it’s a strategic move that aligns with boosting productivity, managing personal finances effectively, and extending the lifecycle of your technology investments.
Boosting Performance and Extending Laptop Life
Many older laptops come equipped with slower, lower-capacity HDDs that can significantly bottleneck overall system performance. Over time, these drives can become fragmented, filled with temporary files, and burdened by a constantly expanding operating system and application footprint. Upgrading to a newer, potentially faster HDD (e.g., a 7200 RPM drive over a 5400 RPM) or simply replacing a failing one can dramatically improve boot times, application loading speeds, and general system responsiveness. This upgrade can effectively give your laptop a second wind, allowing it to perform tasks more efficiently and extending its useful life for several more years. From a productivity standpoint, a faster, more responsive laptop means less waiting and more doing, translating directly into saved time and reduced frustration during your daily tasks.
Expanding Storage for Digital Living and Work
The digital world is ever-expanding, and so are our files. High-resolution photos, 4K videos, extensive game libraries, and large work documents quickly consume even seemingly generous storage capacities. If you find yourself constantly deleting files, struggling to install new software, or relying heavily on external drives, an internal HDD upgrade is a practical solution. It provides a permanent, integrated storage solution that’s always available, whether you’re working on a complex project, managing a vast media collection, or needing ample space for critical backups. This expansion supports better digital organization and workflow, crucial for both professional content creators and casual users managing personal memories.
The Cost-Effective Alternative to a New Laptop
Perhaps one of the most compelling reasons for an HDD upgrade or installation is its cost-effectiveness. A new laptop, especially one with significant storage, can be a substantial investment. If your current laptop’s processor, RAM, and other components are still adequate for your needs, but its storage is lacking or its old HDD is failing, a new hard drive is a far more budget-friendly solution. For a fraction of the cost of a new machine, you can achieve significant performance and capacity gains, effectively deferring the expense of a full laptop replacement. This aligns perfectly with smart personal finance strategies, allowing you to optimize your existing assets before incurring new debt, thus getting more value for your money.
Essential Preparation Before You Begin
Successful HDD installation hinges on meticulous preparation. Skipping these crucial steps can lead to compatibility issues, data loss, or even damage to your laptop. This phase is about gathering the right tools, securing your existing data, and making an informed choice about your new drive.
Gathering the Right Tools and Workspace
Having the correct tools makes the process smoother and minimizes the risk of damaging your laptop. You’ll typically need:
- Small Phillips-head screwdriver set: Laptops use tiny screws, so a precision set is essential.
- Plastic spudger or guitar pick: Useful for prying open laptop cases without scratching them.
- Anti-static wrist strap: Crucial for protecting sensitive internal components from electrostatic discharge (ESD), which can cause permanent damage.
- Clean, well-lit workspace: A clutter-free area with good lighting ensures you don’t lose tiny screws and can clearly see what you’re doing.
- Container for screws: A small magnetic tray or several small bowls help keep screws organized by size and location, preventing mix-ups during reassembly.
Backing Up Your Data: A Non-Negotiable Step
This cannot be stressed enough: back up your data before you start. Whether you’re replacing a primary drive or adding a secondary one, there’s always a slight risk of unforeseen issues. A comprehensive backup ensures that your precious documents, photos, videos, and other personal files are safe. Methods include:
- Cloud storage: Services like Google Drive, OneDrive, or Dropbox offer convenient, off-site backups.
- External hard drive: A reliable local backup solution.
- Drive cloning software: If you’re replacing your primary drive and want to migrate your existing OS and files without a fresh install, cloning software (e.g., Macrium Reflect, EaseUS Todo Backup) can create an exact duplicate of your old drive onto the new one. This also serves as a backup.
Neglecting this step is a common and regrettable mistake that can lead to irreversible data loss, potentially costing you time, money (in data recovery efforts), and invaluable memories.
Understanding Compatibility: SATA, Size, and Form Factor
Laptops generally use 2.5-inch hard drives. However, within this standard, there are a few important considerations:
- SATA Interface: Modern HDDs use the Serial ATA (SATA) interface. While there are different generations (SATA I, II, III), they are generally backward compatible. A SATA III drive will work in a SATA II port, though it will operate at SATA II speeds. Most laptops from the last decade use SATA III.
- Thickness (Height): 2.5-inch HDDs come in various thicknesses, typically 7mm or 9.5mm. Slimmer laptops often require 7mm drives, while older or larger laptops might accommodate 9.5mm drives. Always check your laptop’s specifications or the dimensions of your existing drive to ensure the new one will fit in the drive bay. An incompatible thickness means the drive won’t fit or the laptop casing won’t close properly.
- Laptop Model Specifics: Some ultrabooks or very slim laptops might use M.2 or NVMe SSDs exclusively and may not have a bay for a traditional 2.5-inch HDD. Always consult your laptop’s service manual or manufacturer’s website for exact specifications on compatible drive types and sizes.
Choosing Your New HDD: Capacity vs. Performance
When selecting your new HDD, you’ll balance capacity (how much data it can hold) with performance (how fast it can read and write data):
- Capacity: HDDs are available in capacities ranging from 500GB to several terabytes. Consider your current and future storage needs. It’s often wise to go for a slightly larger capacity than you think you need, as digital data tends to grow.
- Rotational Speed (RPM): Common speeds are 5400 RPM and 7200 RPM.
- 5400 RPM: More common in laptops due to lower power consumption, quieter operation, and lower heat output. Good for general storage.
- 7200 RPM: Offers better performance, making it suitable for primary drives or demanding applications, but consumes more power and generates more heat.
- SSHD (Solid State Hybrid Drive): These drives combine a small SSD cache with a traditional HDD platter. They offer a balance of SSD-like speed for frequently accessed files and HDD-like capacity for bulk storage, often at a more attractive price point than a pure SSD.
- Brand Reputation: Stick to reputable brands like Western Digital, Seagate, or Toshiba for reliability and warranty support. While not a direct “Brand” topic, choosing a well-known brand can save you money and headaches in the long run by avoiding unreliable hardware.
The Step-by-Step Installation Process
Once prepared, the actual installation can begin. Take your time, follow each step carefully, and remember that patience is key.
Power Down and Disconnect: Safety First
Safety is paramount when working with electronics.
- Shut down your laptop: Perform a complete shutdown, not just a sleep or hibernate.
- Disconnect all power sources: Unplug the AC adapter from the wall and the laptop.
- Remove the battery: For laptops with removable batteries, eject it. For internal batteries, you might need to open the case first and disconnect the battery cable from the motherboard. This step is critical to prevent accidental short circuits or electrical shocks.
- Discharge residual power: Press and hold the power button for 10-15 seconds after disconnecting all power.
- Wear an anti-static wrist strap: Connect it to a grounded metal object (like a screw on an outlet plate, not inside the laptop) to prevent ESD.
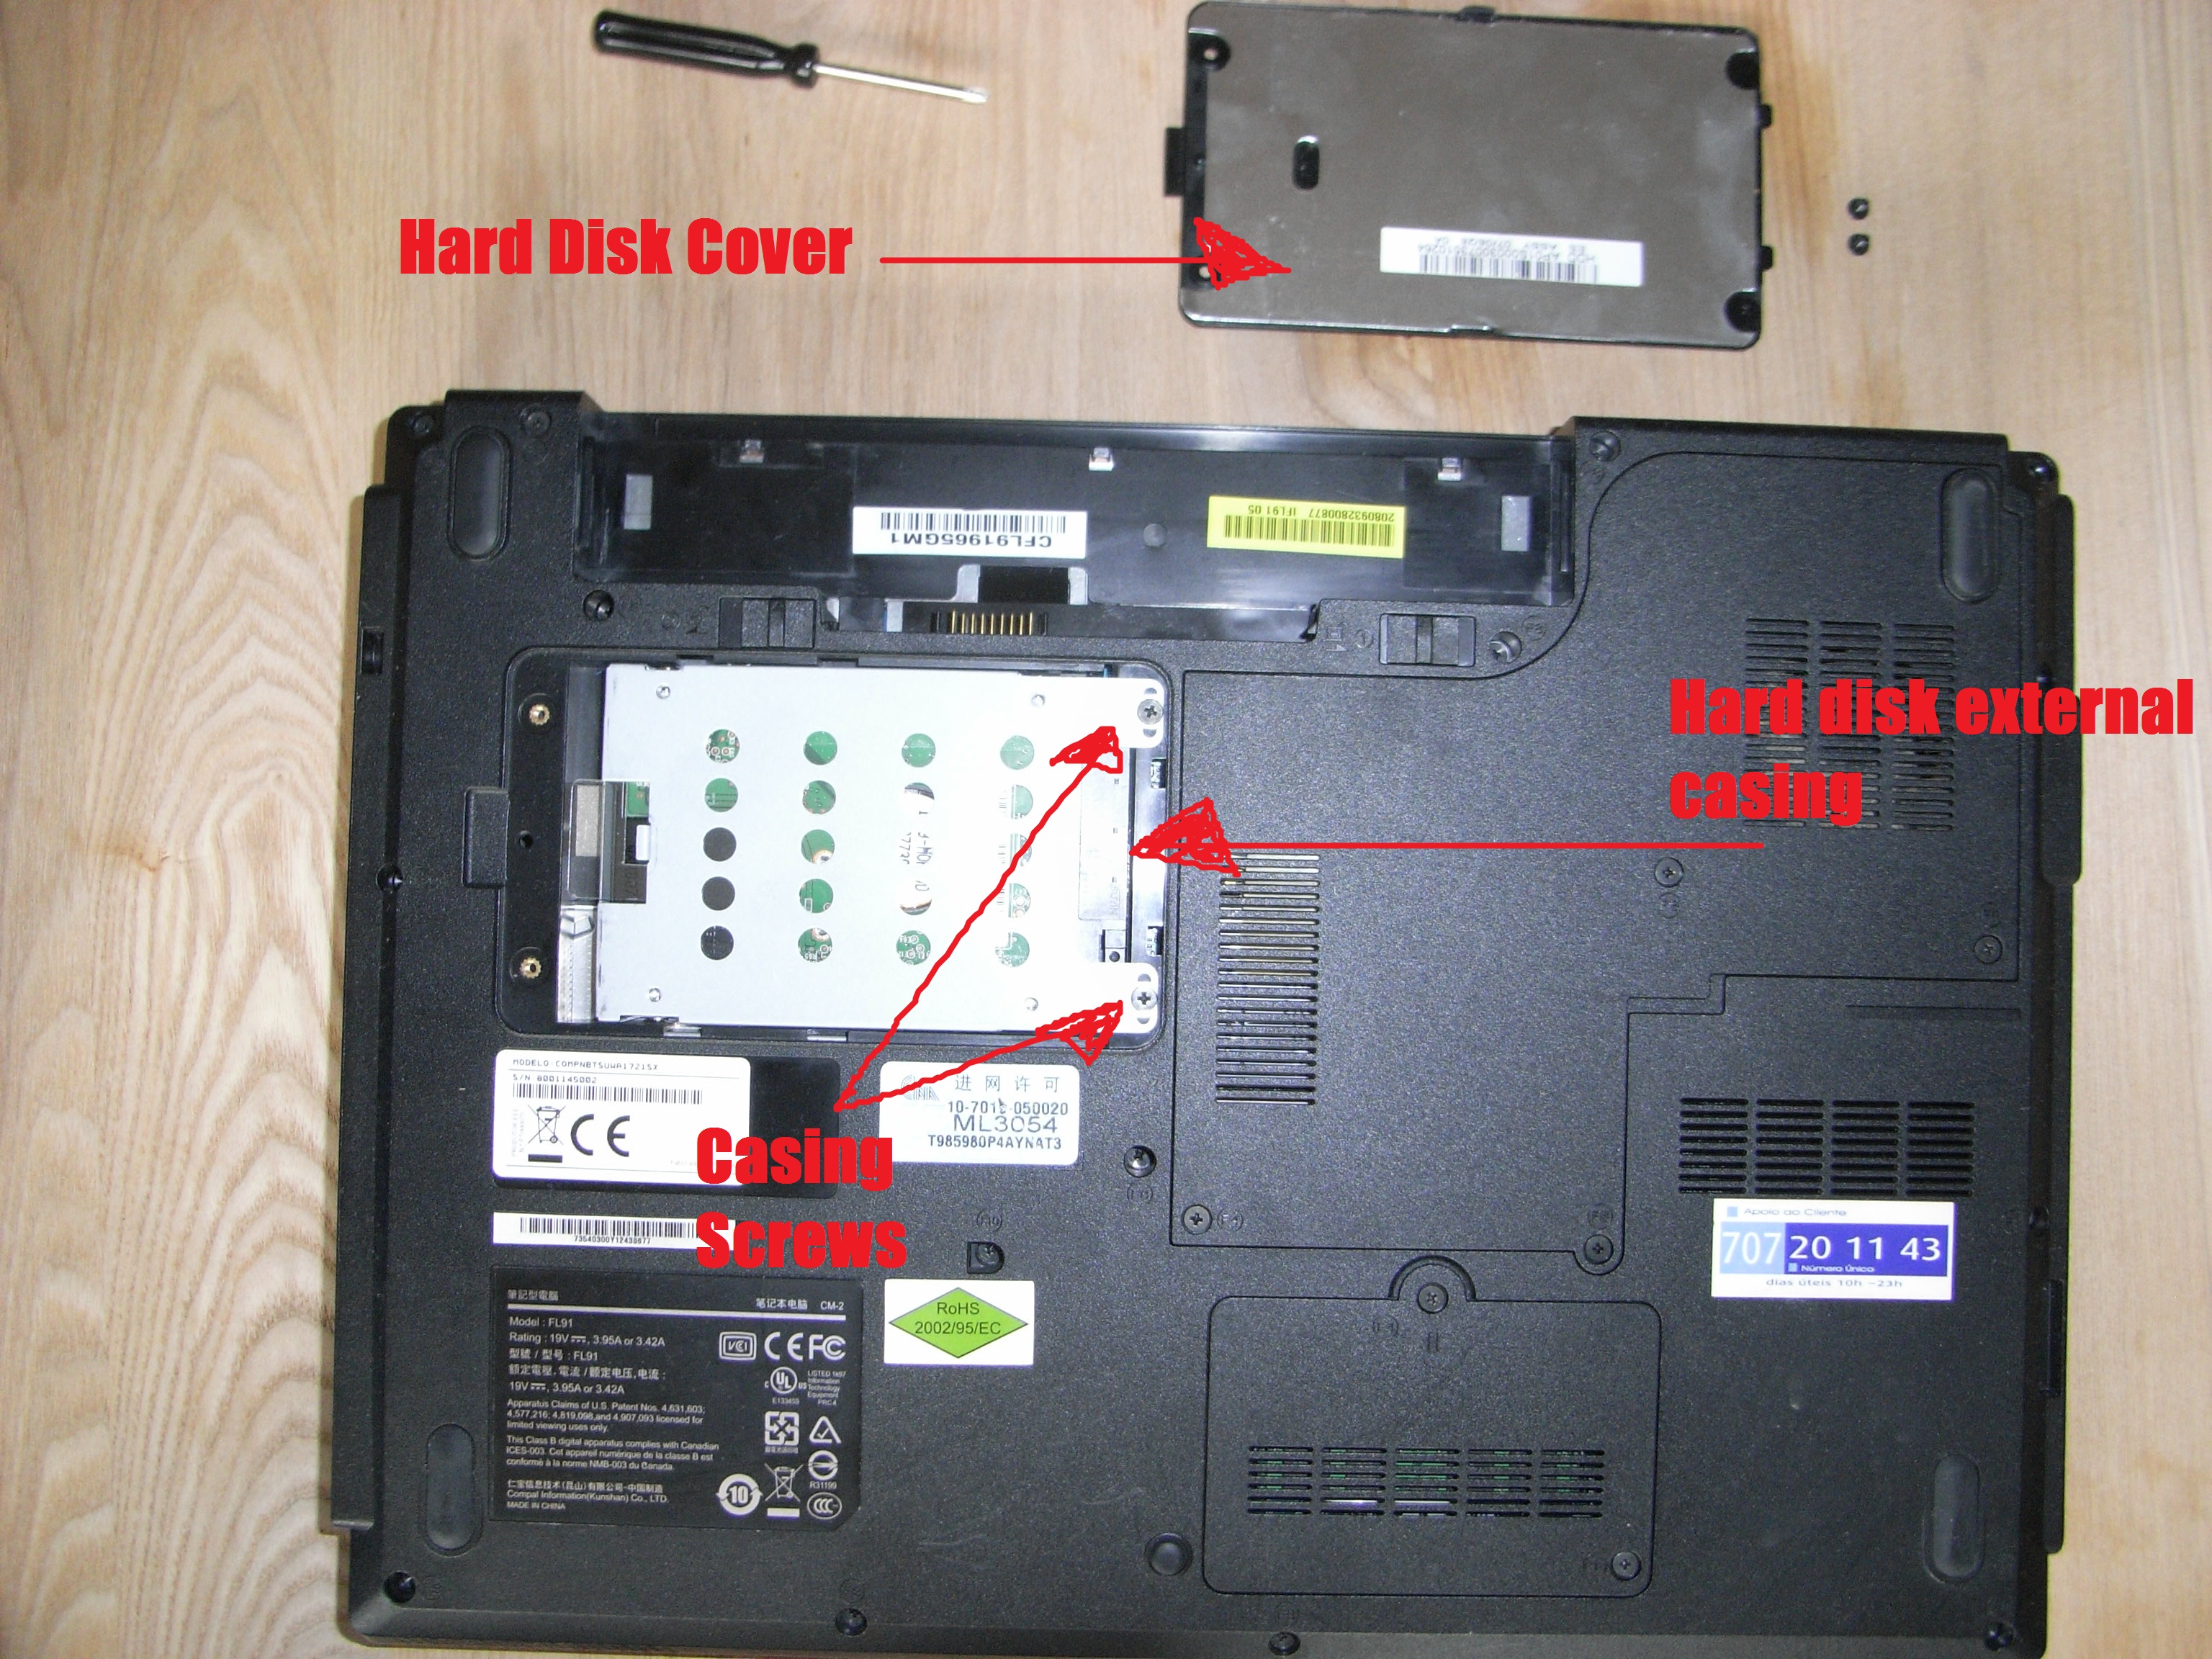
Accessing Your Laptop’s Storage Bay
This step varies greatly depending on your laptop model:
- Identify access panel(s): Many laptops have a dedicated access panel on the bottom for the HDD/SSD, RAM, and Wi-Fi card. Others require removing the entire bottom case. Consult your laptop’s manual or an online guide for your specific model.
- Remove screws: Carefully unscrew all visible screws on the bottom panel. Keep them organized, as they might vary in length and size. Some screws might be hidden under rubber feet or stickers.
- Gently pry open the case: Use your plastic spudger or guitar pick to carefully separate the bottom panel from the laptop chassis. Work slowly around the edges, releasing any plastic clips. Do not use excessive force.
Removing the Old Drive (If Applicable)
If you’re replacing an existing HDD:
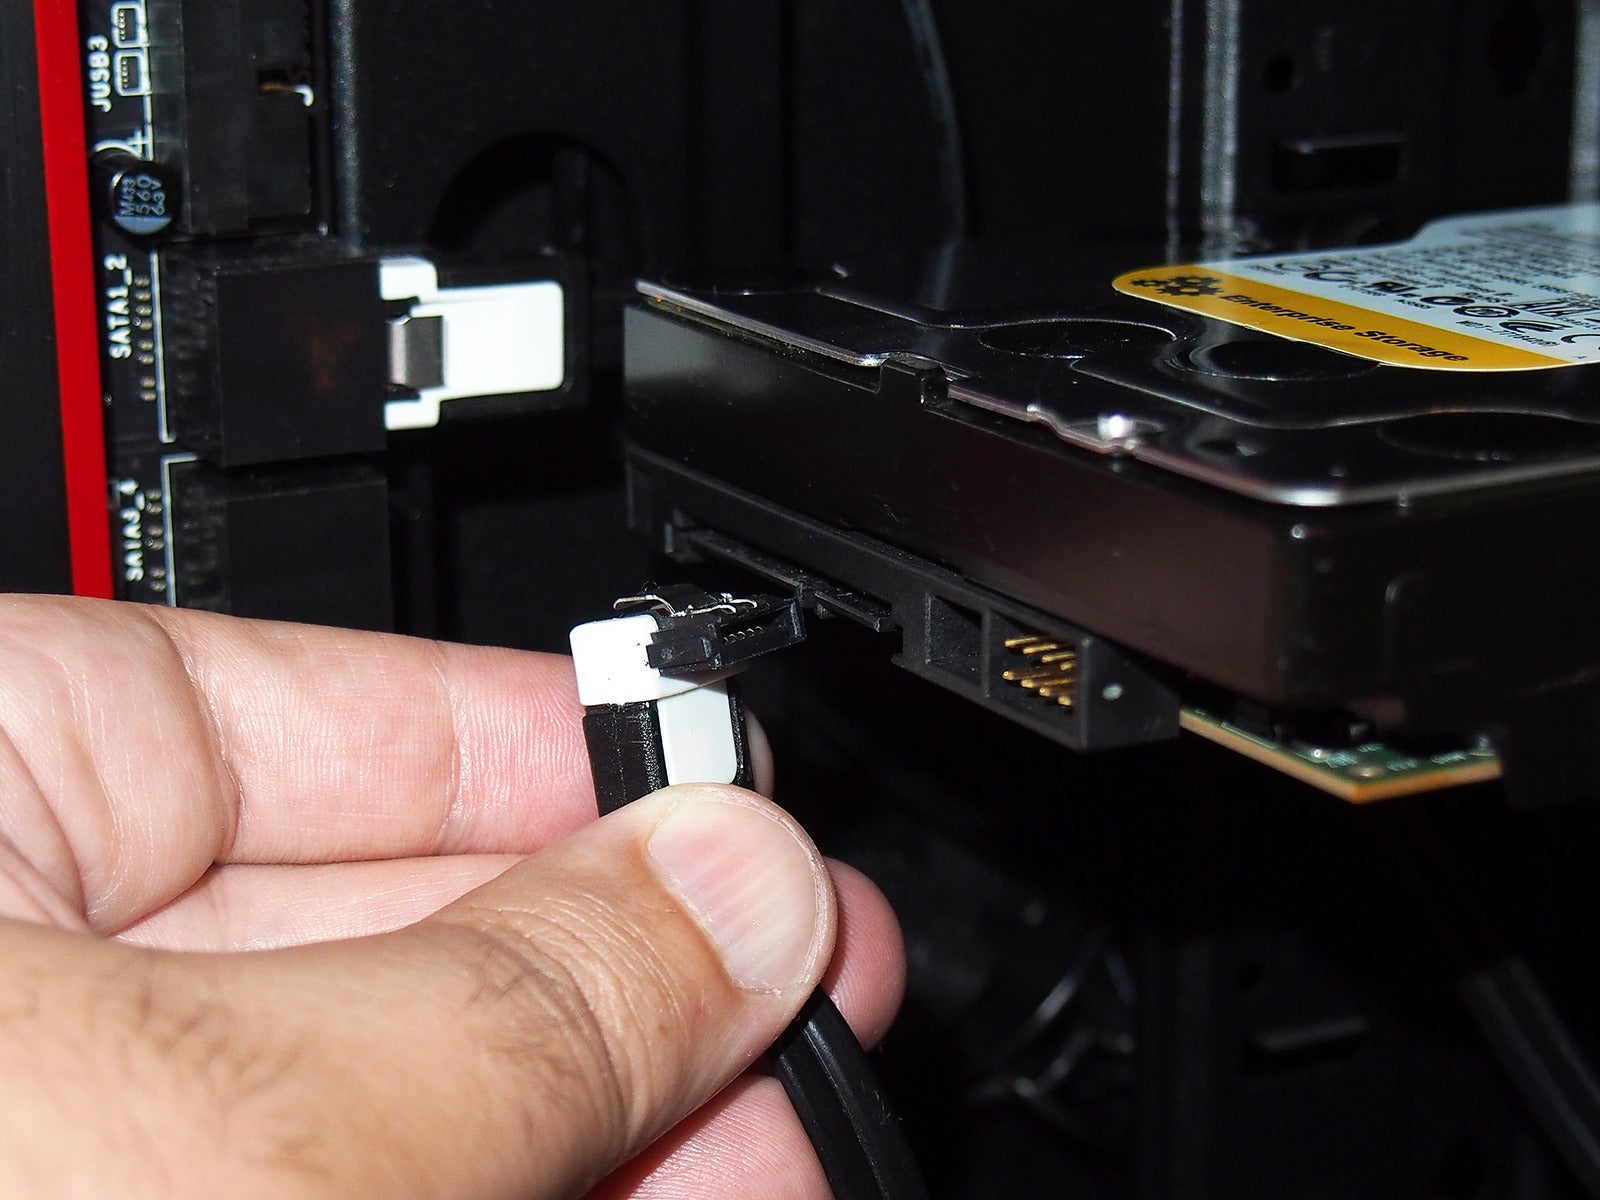
- Locate the drive: The HDD will typically be held in a metal or plastic caddy or bracket.
- Disconnect the SATA cable and power connector: Gently pull the connector straight out. For some laptops, the drive slides into a connector on the motherboard.
- Unscrew the drive caddy: The caddy is usually secured by 2-4 small screws to the laptop chassis.
- Slide out the drive: Once unsecured, carefully slide the old drive out of its bay.
- Transfer the caddy/bracket: Remove the old drive from its caddy (usually held by 2-4 screws on the sides). You’ll reuse this caddy for your new drive.
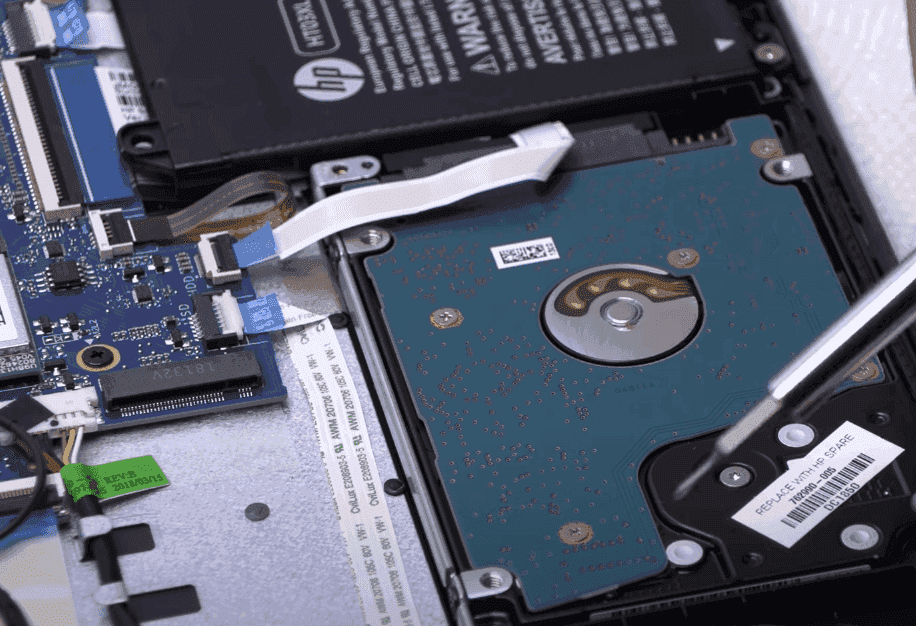
Securing Your New HDD
- Install the caddy on the new HDD: Attach the caddy or bracket you removed from the old drive onto your new HDD. Ensure the connectors are oriented correctly.
- Insert the new drive: Slide the new HDD (with its caddy) into the drive bay. Make sure the SATA data and power connectors align and connect firmly. If it’s a slide-in design, ensure it seats completely.
- Secure the caddy: Screw the caddy back into the laptop chassis to hold the drive firmly in place. Ensure no cables are pinched.
Reassembly and Initial Power Up
- Replace the bottom panel: Carefully align the bottom panel or access panel and snap it back into place. Ensure all clips engage properly.
- Re-insert screws: Screw all the bottom panel screws back into their correct locations. Do not overtighten.
- Re-install the battery: If you removed an external battery, put it back. If you disconnected an internal battery cable, reconnect it.
- Connect power: Plug in your AC adapter.
- Power on: Turn on your laptop. At this point, you should hopefully hear the fan start and see the screen light up. Don’t worry if it doesn’t immediately boot into your OS; we’ll address that next.
Post-Installation: Getting Your Laptop Ready
Installing the physical drive is only half the battle. Now, you need to prepare the drive for use, which typically involves installing an operating system or migrating your existing one.
Operating System Installation or Drive Cloning
If this is your primary drive, you have two main options:
- Clean Operating System Installation: This is recommended for optimal performance, as it starts fresh without any accumulated software clutter.
- Create a bootable USB drive: Use tools like Rufus (for Windows) or the macOS installer to create a bootable USB drive with your desired operating system.
- Access BIOS/UEFI: During startup, press the designated key (often F2, F10, F12, DEL, or ESC) to enter your laptop’s BIOS/UEFI settings.
- Set boot order: Change the boot order to prioritize booting from your USB drive.
- Install OS: Follow the on-screen prompts to install the operating system onto your new HDD. During installation, you’ll format the drive.
- Drive Cloning: If you backed up your old drive by cloning it, you can now transfer that clone to your new HDD.
- Boot from cloning software media: If your cloning software has a bootable rescue media, boot from that.
- Restore clone: Follow the software’s instructions to restore the image of your old drive onto the new HDD. This will make your new drive an exact duplicate of the old one, including the OS and all your files.
If you installed the HDD as a secondary storage drive (e.g., alongside an existing SSD), you won’t need to install an OS. You’ll simply need to initialize and format the drive within Windows Disk Management or macOS Disk Utility before it appears as usable storage.
Driver Installation and System Updates
After installing a new operating system, it’s crucial to install the necessary drivers:
- Chipset drivers: Obtain the latest chipset drivers from your laptop manufacturer’s website. These are critical for the motherboard to properly communicate with all components, including your new HDD.
- Storage controller drivers: In some cases, specific SATA controller drivers might be needed for optimal performance.
- Other drivers: Install graphics, network, audio, and other peripheral drivers.
- Windows Update/macOS Updates: Once drivers are installed, run all available system updates to ensure your OS is fully patched and optimized.
Verifying Your New Drive’s Functionality
After installation and OS setup, verify that your new HDD is recognized and functioning correctly:
- Windows: Open “Disk Management” (search for it in the Start Menu). You should see your new drive listed, correctly partitioned, and with the expected capacity. If it’s a secondary drive, ensure it’s initialized and formatted.
- macOS: Open “Disk Utility” (Applications > Utilities). Your new drive should appear there.
- File Explorer/Finder: Check if the drive appears with its assigned letter (Windows) or mount point (macOS) and if you can save and retrieve files from it.
- Performance Test (Optional): You can use disk benchmarking tools (like CrystalDiskMark for Windows) to verify the drive’s read/write speeds, though this is mostly for advanced users.
Troubleshooting Common Installation Issues
Even with careful preparation, issues can arise. Here are some common problems and their solutions:
Drive Not Detected
- Check connections: Power down the laptop, open it up, and carefully re-seat the SATA data and power cables. Ensure they are fully connected to both the drive and the motherboard.
- Check BIOS/UEFI: Enter your BIOS/UEFI settings during boot-up. Look for a “Storage” or “Main” tab that lists detected drives. If the drive isn’t listed here, it’s a connection issue or a faulty drive.
- Test on another system: If possible, try connecting the new HDD to another computer (e.g., using an external USB enclosure) to determine if the drive itself is faulty.
- Compatibility: Double-check that the drive’s thickness and interface are compatible with your laptop model.
Laptop Fails to Boot
- Boot order in BIOS/UEFI: If you performed a clean OS install, ensure the boot order is set to boot from the drive where the OS is installed.
- OS installation integrity: If the OS installation failed or was interrupted, you might need to re-install it.
- Cloning issues: If you cloned your old drive, ensure the cloning process completed successfully and that the source drive was healthy. Sometimes, cloning from a dying drive can transfer errors.
- Faulty drive: In rare cases, the new drive might be faulty.
Performance Issues After Installation
- Driver issues: Ensure all chipset and storage controller drivers are up-to-date from your laptop manufacturer’s website.
- SATA mode: Check your BIOS/UEFI settings to ensure the SATA controller mode is set to AHCI (Advanced Host Controller Interface), which is optimal for modern drives. Avoid IDE mode.
- Disk errors: Run a disk check (chkdsk in Windows) to identify and repair any file system errors.
- Fragmentation: While less of an issue with modern Windows versions, heavy fragmentation on an HDD can slow it down. Use the built-in “Defragment and Optimize Drives” tool in Windows (though newer versions do this automatically).
Installing an HDD in your laptop is a rewarding DIY project that empowers you to take control of your technology. It’s a testament to the value of understanding your hardware, offering a tangible way to save money, boost productivity, and extend the life of your valuable devices. By following this comprehensive guide, you’re not just upgrading a component; you’re investing in the longevity and efficiency of your digital workflow. Remember to prioritize safety, back up your data, and approach each step with care, and you’ll soon be enjoying the expanded storage and improved performance of your revitalized laptop.
aViewFromTheCave is a participant in the Amazon Services LLC Associates Program, an affiliate advertising program designed to provide a means for sites to earn advertising fees by advertising and linking to Amazon.com. Amazon, the Amazon logo, AmazonSupply, and the AmazonSupply logo are trademarks of Amazon.com, Inc. or its affiliates. As an Amazon Associate we earn affiliate commissions from qualifying purchases.