Ubuntu, with its robust open-source foundation and user-friendly desktop environment, has long been a favorite among developers, tech enthusiasts, and everyday users seeking an alternative to proprietary operating systems. While Ubuntu comes equipped with a capable web browser like Mozilla Firefox, many users, particularly those deeply embedded in Google’s ecosystem or requiring specific web technologies, prefer to install Google Chrome. This guide will walk you through the comprehensive process of installing Google Chrome on your Ubuntu system, ensuring a smooth, secure, and fully functional integration. We’ll explore the ‘why’ before diving into the ‘how,’ providing multiple installation methods and crucial post-installation steps.
Why Choose Google Chrome on Ubuntu? Unlocking Productivity and Performance
The decision to install a specific browser often boils down to a blend of personal preference, feature set, performance, and ecosystem compatibility. For millions, Google Chrome stands out as the browser of choice, and its benefits extend seamlessly to the Ubuntu platform. Understanding these advantages can solidify your decision and highlight why integrating Chrome into your workflow might be a significant boost for your digital activities, touching upon aspects of technology, productivity, and even digital security.
A Gateway to the Google Ecosystem: Sync, Extensions, and Services
One of Chrome’s most compelling features is its tight integration with the broader Google ecosystem. If you rely heavily on Google services like Gmail, Google Drive, Google Calendar, YouTube, or Google Workspace (Docs, Sheets, Slides), Chrome offers an unparalleled synchronized experience. Signing in with your Google account in Chrome instantly brings your bookmarks, browsing history, saved passwords, and extensions across all your devices, be it another Linux machine, Windows, macOS, Android, or iOS. This seamless synchronization is a massive productivity booster, ensuring you pick up exactly where you left off, regardless of the device you’re using.
Beyond personal data, Chrome’s vast library of extensions significantly enhances its utility. From ad blockers and productivity tools to specialized development aids and digital security enhancements, the Chrome Web Store provides an extensive range of add-ons that can tailor your browsing experience to your precise needs. For professionals, these extensions can streamline workflows, automate repetitive tasks, and provide quick access to essential information, directly impacting efficiency and output.
Performance, Compatibility, and Web Standards
Google Chrome is renowned for its speed and performance, driven by its powerful V8 JavaScript engine and efficient rendering capabilities. While modern browsers are all quite fast, Chrome often holds an edge in benchmark tests and real-world usage, especially on complex web applications. This responsiveness is crucial for a smooth user experience, particularly when dealing with data-intensive websites or rich media content.
Furthermore, Chrome boasts excellent compatibility with modern web standards. As the most widely used browser globally, web developers often prioritize testing and optimizing their websites for Chrome first. This means you are less likely to encounter rendering issues, broken layouts, or non-functional features on various websites when using Chrome. For developers working on the Ubuntu platform, Chrome’s built-in developer tools are also top-notch, offering robust features for inspecting, debugging, and profiling web applications, making it an indispensable tool for their craft.
Security and Regular Updates
In today’s digital landscape, browser security is paramount. Google invests heavily in Chrome’s security features, including sandboxing, Safe Browsing technology (which warns users about malicious websites and downloads), and automatic updates. These features work in concert to protect users from phishing attempts, malware, and other online threats.
When you install Chrome using the official methods detailed in this guide, you also benefit from Google’s commitment to regular updates. These updates not only introduce new features but, more critically, patch newly discovered security vulnerabilities. Running an up-to-date browser is one of the most fundamental steps in maintaining your digital security posture, safeguarding your personal information and system integrity. For businesses and individuals involved in online transactions or handling sensitive data, this consistent security patching is invaluable.
Customization and User Experience
While Firefox and other browsers offer robust customization, Chrome provides a familiar and intuitive user interface that many find comfortable. Beyond extensions, users can personalize their browsing experience with themes, experiment with experimental features through chrome://flags, and manage multiple user profiles – a feature incredibly useful for shared computers or for separating work and personal browsing environments. This flexibility ensures that Chrome can adapt to a wide array of user preferences and use cases, enhancing overall satisfaction and productivity.
Prerequisites and System Preparation
Before embarking on the installation journey, a few preparatory steps are essential. These steps ensure your Ubuntu system is ready to receive Google Chrome, preventing common pitfalls and ensuring a smooth installation process. Think of this as laying the groundwork for a successful build – a crucial phase in any technology deployment.
Ensuring an Up-to-Date Ubuntu System
The first and most critical step is to ensure your Ubuntu system is fully updated. Running an outdated system can lead to dependency issues, conflicts, or security vulnerabilities that might hinder the Chrome installation or compromise your system afterward. Always perform a system update before installing new major software.
Open your terminal (you can usually find it by searching for “Terminal” in your applications menu or by pressing Ctrl + Alt + T) and execute the following commands:
sudo apt update
sudo apt upgrade
sudo apt update: This command refreshes your package lists, ensuring your system knows about the latest versions of available software from your configured repositories.sudo apt upgrade: This command then upgrades all installed packages to their newest versions based on the updated lists.
If prompted to confirm, type Y and press Enter. It’s also a good practice to reboot your system after a significant upgrade, especially if a new kernel or core system components were updated:
sudo reboot
Understanding System Architecture: 64-bit Requirement
Google Chrome for Linux is exclusively available for 64-bit systems. If you are running an older 32-bit version of Ubuntu, you will not be able to install Google Chrome. Most modern computers and recent Ubuntu installations are 64-bit, but it’s good to verify if you’re unsure.
To check your system architecture, open the terminal and run:
dpkg --print-architecture
You should see amd64 for a 64-bit system. If you see i386 or something similar, it indicates a 32-bit system. In that case, you would need to install a 64-bit version of Ubuntu to run Google Chrome.
Basic Terminal Familiarity
While some methods involve downloading a file via a web browser, the most robust and recommended installation methods utilize the command line. A basic understanding of terminal commands will be beneficial. Don’t worry if you’re new to it; this guide provides all the necessary commands, and explaining them will help demystify the process. Commands like wget (for downloading files), dpkg (for managing .deb packages), and apt (Ubuntu’s primary package manager) will be your tools.
Method 1: The Direct .deb Package Installation (The Quick Start)
This method involves downloading the Google Chrome installation package directly and installing it using Ubuntu’s package manager. It’s straightforward but might require an extra step to resolve dependencies. This is often the quickest way to get Chrome up and running if you prefer a more manual approach.
Downloading the Google Chrome .deb Package
The first step is to acquire the .deb installation file for Google Chrome. You can do this in two ways:
-
Via a Web Browser:
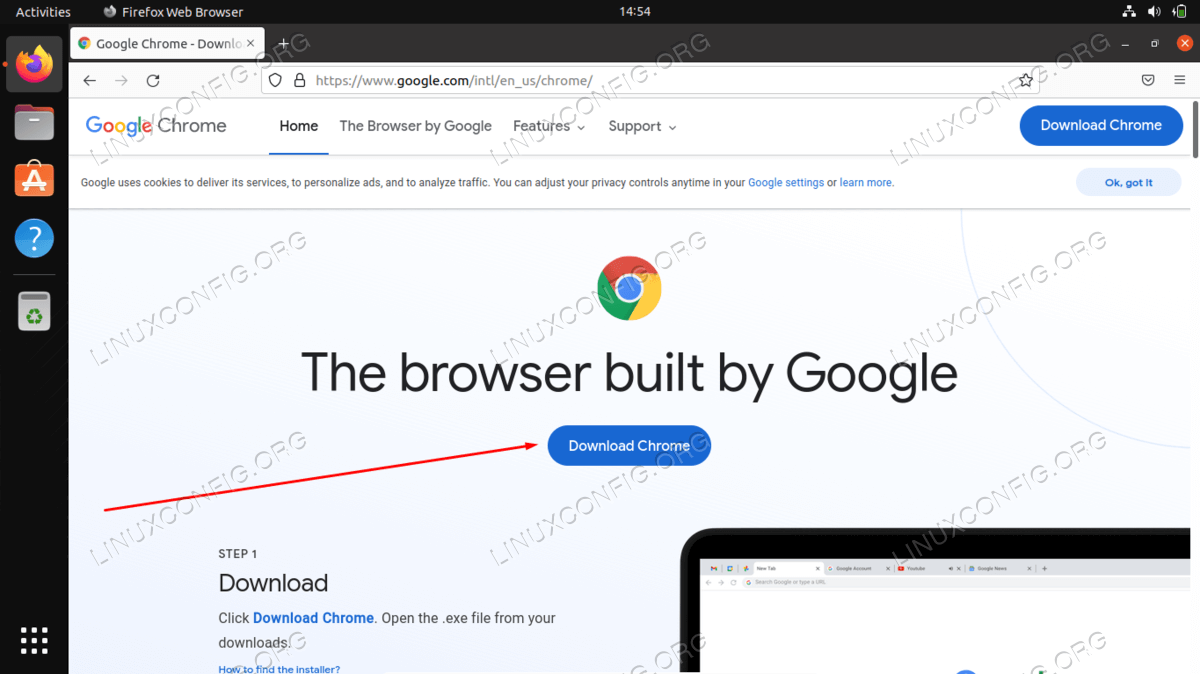
- Open your existing web browser (e.g., Firefox) on Ubuntu.
- Navigate to the official Google Chrome download page:
https://www.google.com/chrome/ - Click on the “Download Chrome” button.
- On the next page, ensure “64 bit .deb (For Debian/Ubuntu)” is selected.
- Click “Accept and Install.”
- Your browser will prompt you to save the
.debfile. Save it to yourDownloadsdirectory or a location you can easily remember.
-
Using
wgetin the Terminal:
For those who prefer the command line,wgetis a powerful tool for downloading files directly. This method is particularly useful if you’re working on a server or don’t have a graphical browser readily available.
Open your terminal and use the following command to download the latest stable version of Google Chrome. Google typically redirects to the latest version, so a generic link works:wget https://dl.google.com/linux/direct/google-chrome-stable_current_amd64.debThis command downloads the
.debfile to your current directory (e.g., your home directory if you opened the terminal directly).
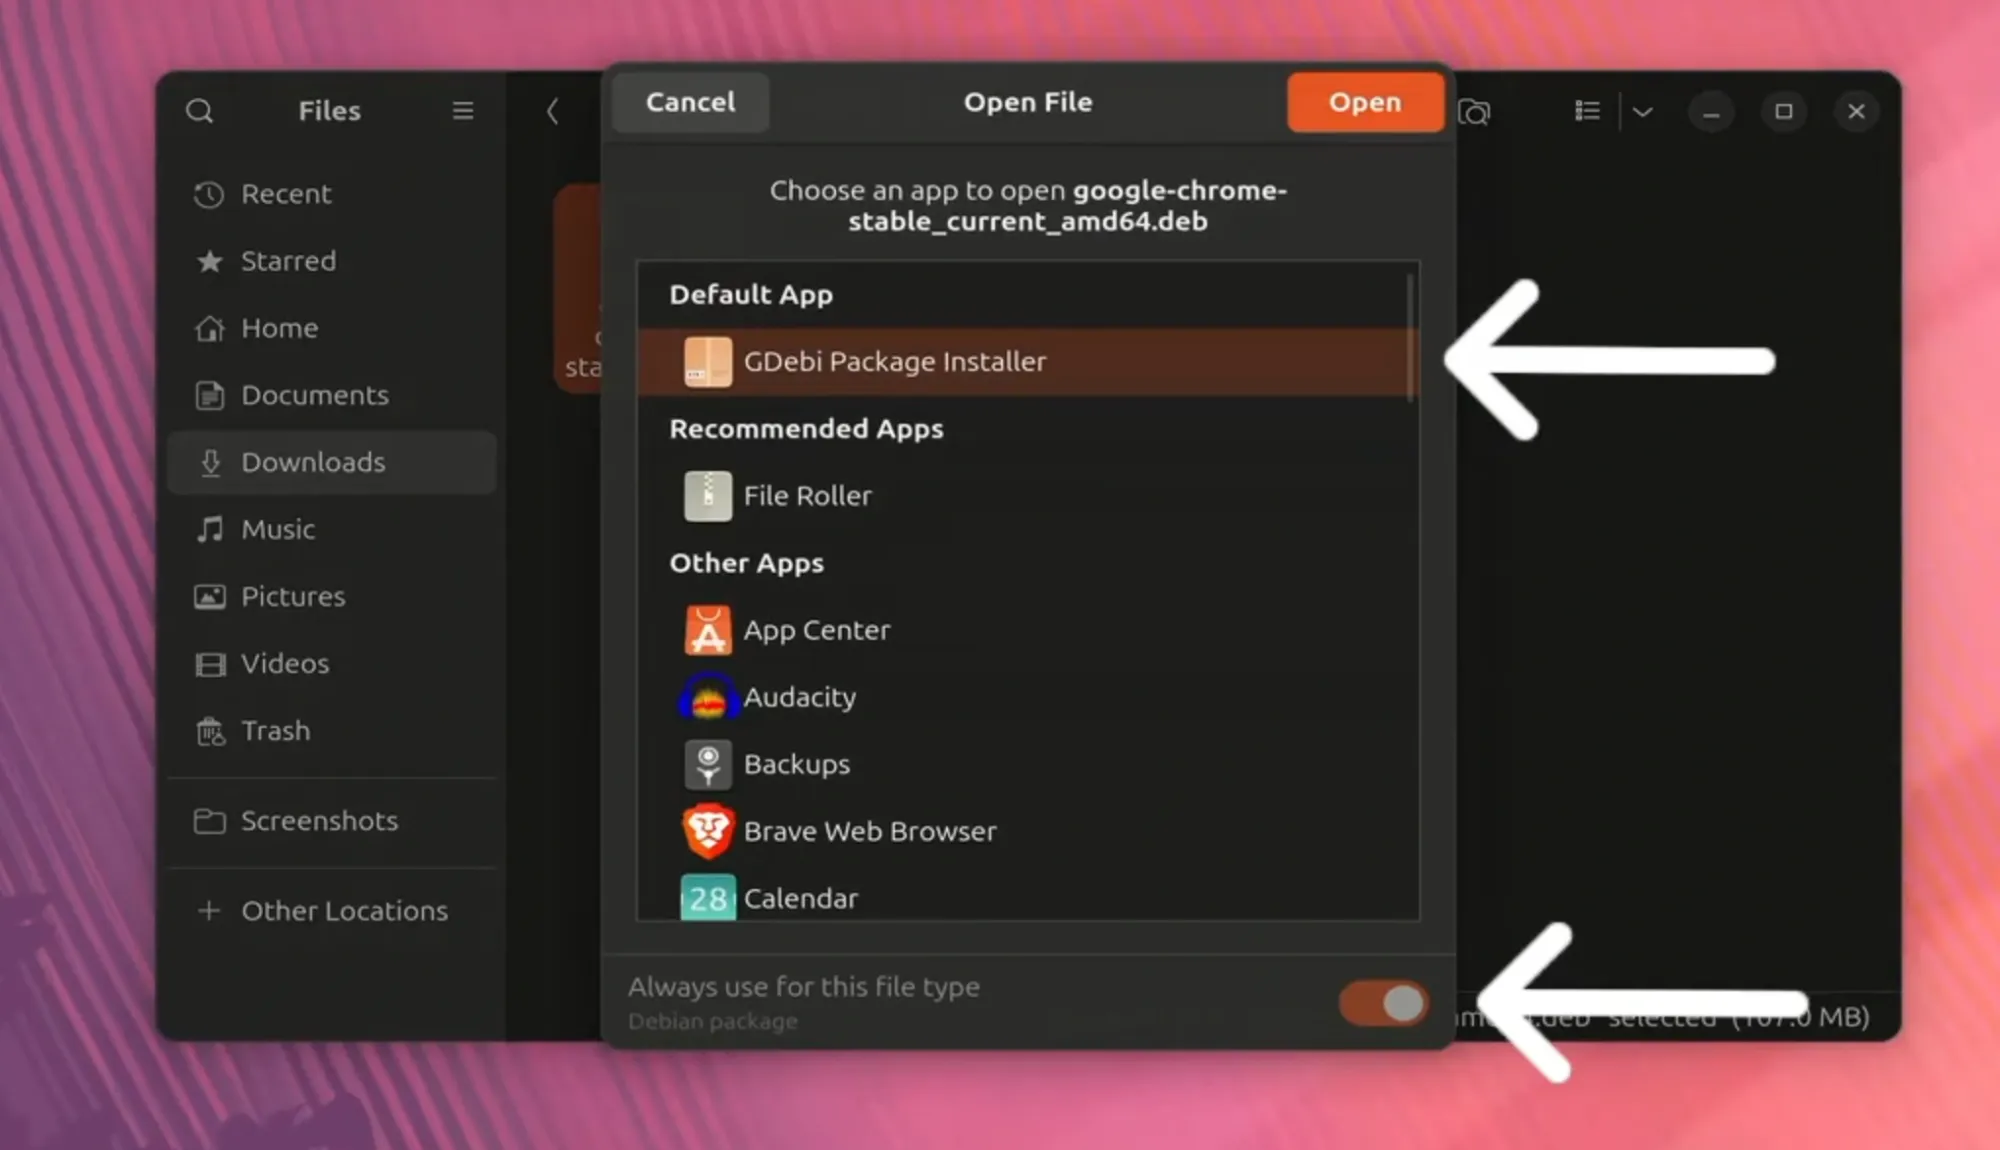
Installing Chrome with dpkg
Once the .deb file is downloaded, you can install it using the dpkg command, which is used to install, remove, and manage Debian packages.
Navigate to the directory where you saved the .deb file (e.g., cd Downloads if you downloaded it via browser, or stay in your current directory if you used wget). Then, execute the installation command:
sudo dpkg -i google-chrome-stable_current_amd64.deb
sudo: Executes the command with superuser privileges, necessary for installing software.dpkg -i: Instructsdpkgto install the specified package.google-chrome-stable_current_amd64.deb: The name of the downloaded package file.
Resolving Dependencies
After running dpkg -i, you might encounter an error message indicating “dependency problems.” This is common because .deb packages sometimes rely on other software packages that might not be pre-installed on your system. dpkg itself doesn’t automatically fetch these dependencies.
Fortunately, apt can easily fix this. Run the following command:
sudo apt install -f
apt install -f: The-for--fix-brokenoption instructsaptto find and install any missing dependencies that are preventing packages from being configured correctly. It will automatically download and install all necessary packages to resolve the dependency issues for Chrome.
Once this command completes successfully, Google Chrome should be fully installed on your system. You can then search for “Chrome” in your applications menu and launch it.
Method 2: Integrating Google’s Official Repository (The Robust Approach)
While the direct .deb method is quick, the repository method is generally preferred for long-term maintenance. When you install software from a repository, your system automatically knows where to look for updates. This ensures that Google Chrome receives security patches and feature updates alongside your other system software, keeping it current and secure without manual intervention. This method integrates Google Chrome into your Ubuntu system’s package management framework, much like how other native applications are handled.
Understanding the Advantages of a Repository
When you add Google’s official repository to your Ubuntu system, you’re telling your package manager (APT) where to find Google Chrome packages and updates. The key advantages are:
- Automatic Updates: Your system’s
apt upgradecommand will automatically check for and install new versions of Chrome. This is crucial for security and access to the latest features. - Trust and Authenticity: Repositories are typically signed with GPG keys, ensuring that the software you’re installing comes from a legitimate source and hasn’t been tampered with.
- Simplified Management: All your software updates can be managed through a single, consistent process.
Adding Google’s GPG Key
Before adding a new repository, it’s essential to add its GPG (GNU Privacy Guard) key to your system. This key is used to authenticate the packages downloaded from the repository, verifying their integrity and ensuring they come from Google. Without the GPG key, your system will warn you about untrusted packages.
Execute the following commands in your terminal:
wget -q -O - https://dl.google.com/linux/linux_signing_key.pub | sudo apt-key add -
Let’s break this down:
wget -q -O - https://dl.google.com/linux/linux_signing_key.pub: This downloads Google’s public GPG key.-q: Stands for quiet mode, suppressingwget‘s output.-O -: Outputs the downloaded file to standard output (the terminal screen) instead of saving it to a file.
|: This is a pipe, which takes the output of the first command and feeds it as input to the second command.sudo apt-key add -: This command adds the GPG key received from the pipe (-) to your system’s list of trusted keys.
You should see an “OK” message upon successful execution.
Note: For newer Ubuntu versions (20.04 LTS and above), apt-key is considered deprecated. While it still works, the more modern approach involves storing keyrings directly in /usr/share/keyrings. If you prefer the modern approach, the command would look like this, ensuring the key is stored properly and without relying on apt-key directly:
wget -O- https://dl.google.com/linux/linux_signing_key.pub | gpg --dearmor | sudo tee /etc/apt/keyrings/google-chrome.gpg > /dev/null
And then in the next step, you’d reference this keyring path. For simplicity and broad compatibility with many guides, the apt-key add method is often shown first, but it’s good to be aware of the more robust gpg --dearmor approach. For this guide, we’ll continue with the apt-key path as it’s still widely functional and understood.
Configuring the Google Chrome Repository
Now that your system trusts Google’s packages, you need to tell APT where to find them. This is done by creating a new source list file for Google Chrome within Ubuntu’s /etc/apt/sources.list.d/ directory.
Execute the following command:
echo "deb [arch=amd64] https://dl.google.com/linux/chrome/deb/ stable main" | sudo tee /etc/apt/sources.list.d/google-chrome.list
echo "...": Prints the specified line of text to standard output.deb [arch=amd64] https://dl.google.com/linux/chrome/deb/ stable main: This is the repository line itself. It specifies that this is a Debian-style repository (deb), that it’s foramd64architecture, the URL of the repository, thestablebranch, and themaincomponent.
| sudo tee /etc/apt/sources.list.d/google-chrome.list: The pipe|sends the output of theechocommand tosudo tee.tee: This command reads from standard input and writes to both standard output and one or more files. Usingsudoallows it to write to system directories. This creates the file/etc/apt/sources.list.d/google-chrome.listand writes the repository line into it.
Installing Google Chrome from the Repository
With the repository added and the GPG key in place, your system now knows how to get Google Chrome. The final step is to update your package lists again and then install the google-chrome-stable package.
sudo apt update
sudo apt install google-chrome-stable
sudo apt update: Refreshes your package lists, now including the new Google Chrome repository.sudo apt install google-chrome-stable: Installs the stable version of Google Chrome. If prompted to confirm, typeYand pressEnter.
This method is highly recommended as it automates future updates for Chrome, saving you time and ensuring you always run the latest, most secure version.
Post-Installation, Maintenance, and Uninstallation
Once Google Chrome is successfully installed, there are a few important steps to follow for verification, ongoing maintenance, and knowing how to remove it if necessary. These steps ensure a seamless experience and give you full control over the application.
Verifying the Installation
After either installation method, you can verify that Chrome is installed and ready to use.
- Launch from Applications Menu: Open your Ubuntu applications menu (usually by clicking the “Show Applications” icon in the dock or pressing the Super/Windows key). Search for “Chrome” and click on the Google Chrome icon to launch it.
- Launch from Terminal: You can also launch Chrome directly from the terminal by typing:
bash

google-chrome
This is useful for debugging or if you prefer command-line interaction. - Check Version: Once Chrome is open, you can check its version by typing
chrome://versioninto the address bar and pressing Enter. This confirms it’s the official stable build.
Upon first launch, Chrome will ask if you want to make it your default browser and if you want to send usage statistics to Google. Configure these settings according to your preference.
Keeping Chrome Updated
If you used Method 2 (repository installation), Chrome will automatically receive updates when you perform your regular system updates:
sudo apt update
sudo apt upgrade
There’s no need to manually download new .deb files. This is a significant advantage in terms of digital security and productivity, as you’re always running the latest, most patched version without extra effort.
If you used Method 1 and did not add the repository, you would need to manually download a new .deb file and re-install it periodically to update Chrome, which is less efficient and prone to forgetting. It’s highly recommended to use the repository method for ongoing updates.
Customizing Your Chrome Experience
With Chrome installed, take a moment to customize it to your liking:
- Sign In: Sign in with your Google account to sync your data, bookmarks, and extensions.
- Extensions: Visit the Chrome Web Store (
chrome.google.com/webstore) to add productivity tools, ad blockers, security extensions, and themes. - Settings: Explore Chrome’s settings (
chrome://settings) to configure privacy, appearance, search engine, and startup behavior. - Default Browser: If you didn’t set Chrome as default during the first launch, you can do so in Ubuntu’s “Settings” -> “Default Applications” or directly within Chrome’s settings.
Uninstalling Google Chrome
Should you ever need to remove Google Chrome from your Ubuntu system, it’s a straightforward process.
-
Remove the Chrome Package:
Open your terminal and run the following command to remove the Chrome browser package:sudo apt remove google-chrome-stableThis command removes the browser application itself.
-
Remove Residual Dependencies (Autoremove):
After removing a package, it’s a good practice to clean up any dependencies that were installed solely for Chrome and are no longer needed:sudo apt autoremove -
Remove Google’s Repository (Optional but Recommended):
If you added Google’s repository, you might want to remove its entry from your sources list to prevent your system from trying to update a non-existent package.sudo rm /etc/apt/sources.list.d/google-chrome.listAnd, if you added the GPG key via
apt-key, you might want to remove it as well, though it’s less critical unless you are meticulously cleaning up.sudo apt-key del <key_id>To find the
<key_id>, you can list them withapt-key list | grep -i google. Look for the ID associated with Google. -
Remove Configuration Files (Optional):
Theapt removecommand typically leaves behind configuration files in your home directory (e.g.,~/.config/google-chrome). If you want a complete wipe, including all your profiles, bookmarks, and settings, you can manually delete this directory:rm -rf ~/.config/google-chromeCaution: This command permanently deletes all your Chrome user data. Only use it if you are absolutely sure you want to remove all traces of your Chrome usage.
Troubleshooting Common Installation Issues
Even with clear instructions, things can occasionally go awry. Here are some common issues you might encounter during the installation of Google Chrome on Ubuntu and how to resolve them. Addressing these issues can save significant time and frustration, reinforcing the value of technical literacy.
Dependency Problems (After dpkg -i)
Symptom: After running sudo dpkg -i google-chrome-stable_current_amd64.deb, you see an error message indicating missing dependencies.
Solution: This is the most common issue with the direct .deb installation. As covered in Method 1, the solution is to run sudo apt install -f immediately afterward. This command tells apt to find and install all required dependencies that dpkg couldn’t handle on its own.
Download Failures (wget or Browser)
Symptom: The .deb file fails to download, or the download is interrupted.
Solution:
- Network Check: Ensure your internet connection is stable. Try pinging a reliable website like
google.com(ping google.com). wgetRetries: If usingwget, it often supports retries. You can manually re-run thewgetcommand. Sometimes, a temporary issue with Google’s download server might cause problems; waiting a few minutes and trying again can help.- Disk Space: Verify you have enough free disk space in the location where you’re downloading the file (
df -h).
Repository Errors (After adding Repository)
Symptom: After adding Google’s repository and running sudo apt update, you might see warnings or errors related to an unsigned repository or an invalid GPG key.
Solution:
- GPG Key: Double-check that you correctly added Google’s GPG key as instructed in Method 2. The
apt-key addcommand should return “OK”. If not, try re-running the command. - Repository Line: Ensure the repository line in
/etc/apt/sources.list.d/google-chrome.listis exactly as specified:deb [arch=amd64] https://dl.google.com/linux/chrome/deb/ stable main. Any typos or incorrect characters will cause issues. You can check the file’s content usingcat /etc/apt/sources.list.d/google-chrome.list. - Deprecated
apt-keywarnings: If you see warnings aboutapt-keybeing deprecated on newer Ubuntu versions, it usually doesn’t prevent installation, but for a cleaner system, consider the more modern keyring approach mentioned subtly earlier in the GPG key section.
Chrome Not Launching or Crashing
Symptom: Chrome appears to install correctly, but it doesn’t launch when clicked, or it crashes immediately.
Solution:
- System Requirements: Ensure your system meets the minimum requirements (64-bit Ubuntu). While rare, insufficient RAM could also be an issue for very old machines.
- Corrupted Profile: A corrupted user profile can sometimes prevent Chrome from launching. You can test this by trying to launch Chrome from the terminal with a new, temporary profile:
bash

google-chrome --user-data-dir=$(mktemp -d)
If Chrome launches successfully, your main profile might be corrupted. You can then try to rename your existing profile directory (~/.config/google-chrome) and let Chrome create a new one, though this means losing local data if not synced. - Permissions: Incorrect file permissions could occasionally be an issue. You can try to re-apply default permissions, though this is rare for system-installed packages.
- Graphics Drivers: Outdated or problematic graphics drivers can sometimes cause issues with graphical applications. Ensure your graphics drivers are up to date via “Software & Updates” -> “Additional Drivers”.

Conclusion: Empowering Your Ubuntu Desktop
Installing Google Chrome on Ubuntu is a straightforward process that significantly enhances the capabilities and versatility of your open-source desktop. Whether you opt for the direct .deb package for a quick setup or integrate Google’s official repository for streamlined updates, you’re equipping your system with a powerful, feature-rich, and secure web browser.
By carefully following the steps outlined in this guide, you can confidently navigate the installation, ensure your browser remains updated for optimal performance and digital security, and customize it to suit your specific productivity needs. The synergy of Ubuntu’s stable and open environment with Chrome’s pervasive web ecosystem creates a formidable platform for browsing, development, and engaging with the vast resources of the internet. Embrace the power of choice and unlock a more efficient and connected computing experience on your Ubuntu machine.
aViewFromTheCave is a participant in the Amazon Services LLC Associates Program, an affiliate advertising program designed to provide a means for sites to earn advertising fees by advertising and linking to Amazon.com. Amazon, the Amazon logo, AmazonSupply, and the AmazonSupply logo are trademarks of Amazon.com, Inc. or its affiliates. As an Amazon Associate we earn affiliate commissions from qualifying purchases.