Your Android device is an extension of your personality, a canvas for digital expression. From your wallpaper to your icon pack, every element contributes to a unique user experience. Yet, many users overlook one of the most fundamental aspects of their device’s aesthetics and usability: the font. The default font, while functional, often lacks the flair or clarity that truly reflects individual taste or enhances readability. This comprehensive guide will walk you through various methods of installing custom fonts on your Android device, catering to both non-rooted users seeking simple tweaks and advanced users looking for system-wide transformations. Dive in to discover how a simple font change can dramatically revitalize your Android experience.
Why Customize Your Android Fonts? Beyond Aesthetics
While the most immediate reason for changing fonts is often aesthetic, the impact of a well-chosen typeface extends far beyond mere visual appeal. Custom fonts can significantly enhance your device’s functionality, reflect your personal or professional brand, and even improve accessibility.
Enhancing User Experience and Readability
The readability of text on your screen directly impacts your daily interaction with your device. A font that is too thin, too cramped, or simply hard on the eyes can lead to eye strain, fatigue, and frustration. Conversely, a clear, well-spaced, and ergonomically designed font can make reading emails, browsing web pages, and interacting with apps a much more pleasant and efficient experience. For those with specific visual needs, a font change can be a crucial accessibility feature, making text easier to distinguish and process, thereby improving overall user satisfaction and productivity.
Expressing Personal Style and Brand Identity
Your Android device is a highly personal tool. Customizing its font allows you to imbue it with a distinctive character that mirrors your personal style. Whether you prefer a sleek, modern sans-serif, an elegant script, or a playful display font, the choice speaks volumes about you. Beyond individual expression, for entrepreneurs, digital marketers, or those building a personal brand online, consistent font usage across all digital touchpoints—including your mobile device—reinforces your corporate identity. Imagine having your business’s core typeface applied to your device, creating a cohesive and professional brand experience every time you pick it up. This subtle yet powerful branding element can contribute significantly to how your personal or corporate image is perceived.
Accessibility and Inclusivity
For many, default fonts on Android can be challenging to read due to various factors like visual impairments, dyslexia, or simply preference for larger text. Custom fonts offer a powerful solution, allowing users to select typefaces specifically designed for improved legibility. Fonts with larger x-heights, distinct character shapes, and optimal spacing can significantly reduce cognitive load and make text more accessible for a wider range of users. This focus on inclusivity ensures that technology remains user-friendly for everyone, demonstrating a commitment to thoughtful design and user-centric customization.
Navigating Android Font Installation: Methods for Every User
Installing custom fonts on Android devices can range from simple, app-specific changes to complex, system-wide overhauls. The method you choose largely depends on your comfort level with device modification, whether your device is rooted, and the extent of customization you desire. Broadly, methods fall into two categories: those for non-rooted devices, which are generally safer and easier but offer limited scope, and those for rooted devices, which provide unparalleled freedom but come with inherent risks.
Installing Fonts on Non-Rooted Android Devices: User-Friendly Approaches
The majority of Android users operate non-rooted devices due to convenience, security, or warranty concerns. Thankfully, there are still several effective ways to introduce custom fonts without delving into the complexities of rooting. These methods primarily leverage built-in manufacturer features, third-party applications, or specific app settings.
Leveraging Manufacturer Theme Stores (Samsung, Xiaomi, Huawei, etc.)
Many Android manufacturers, particularly those with heavily customized Android skins, offer their own theme stores that include font customization options. This is often the safest and most straightforward method for non-rooted users.
How it Works: These theme stores integrate directly with the device’s system, allowing for seamless font changes that typically apply to most UI elements and system apps.
Step-by-Step Guide (Example: Samsung Galaxy):
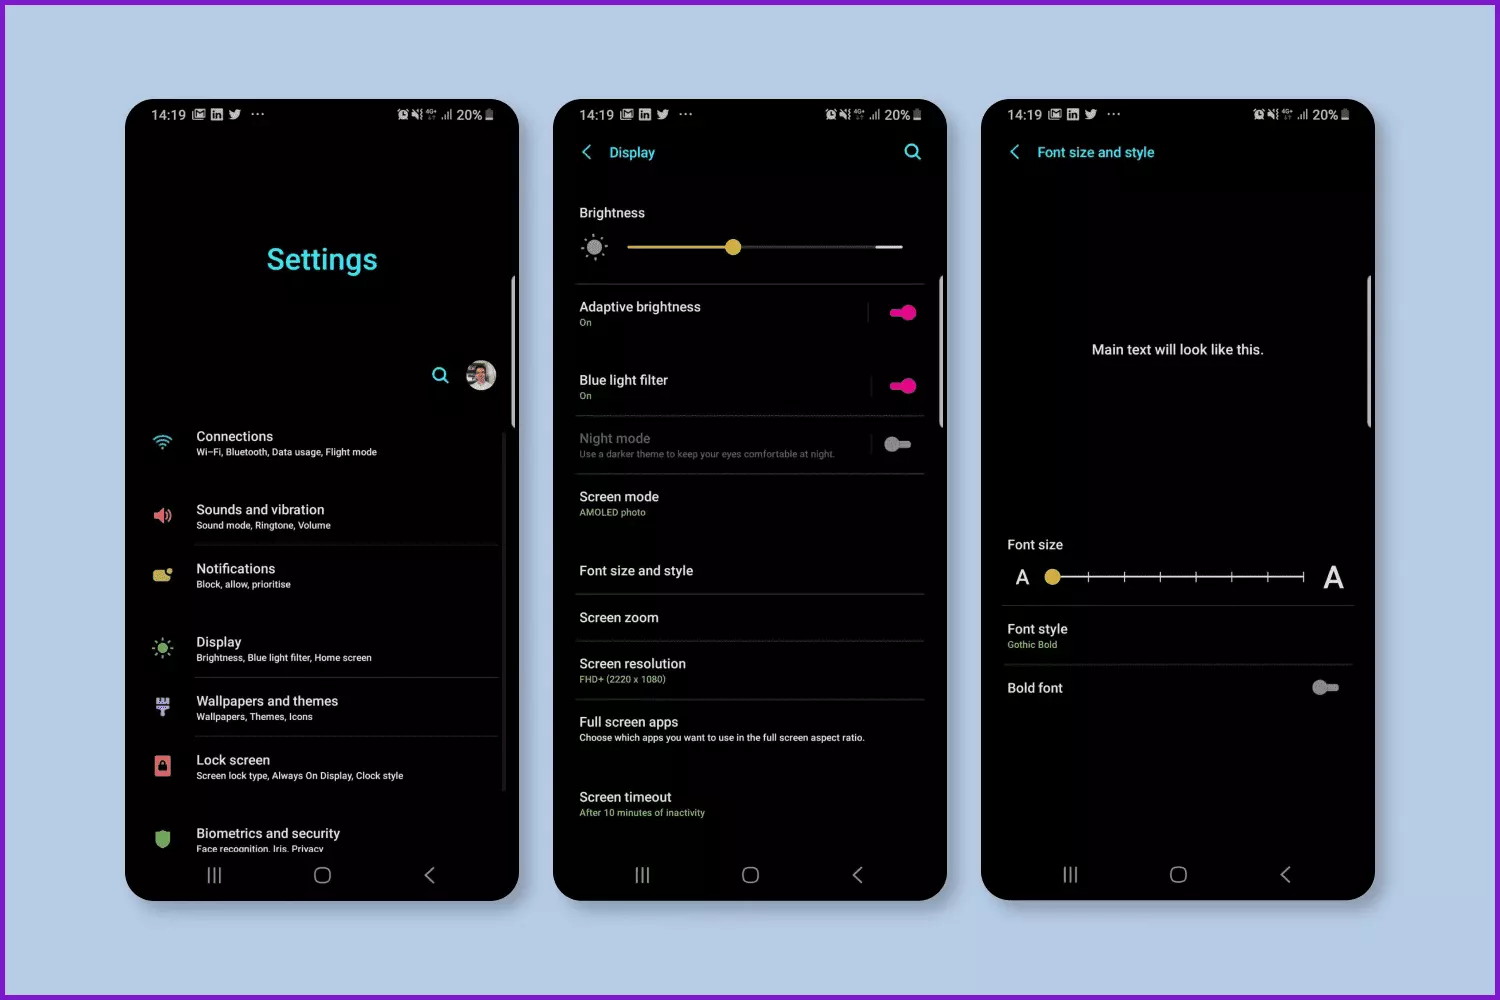
- Open the Theme Store: Navigate to your device’s “Settings” app.
- Find Display Settings: Look for “Display” and then “Font size and style.”
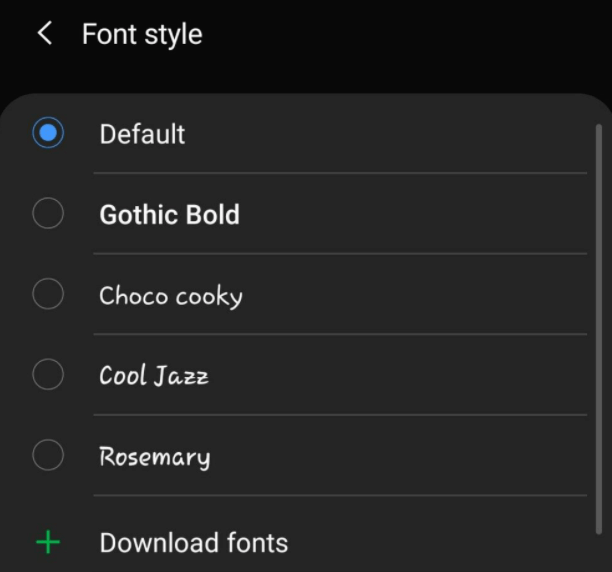
- Access Font Downloads: Tap on “Font style” and then “Download fonts” (or similar option that takes you to the Theme/Galaxy Store).
- Browse and Select: Browse the available fonts. Many stores offer a mix of free and paid options.
- Download and Apply: Select your desired font, download it, and then tap “Apply.”
- Reboot (if prompted): Some devices might require a quick reboot for the changes to take full effect.
Limitations: The primary limitation is the selection. You’re restricted to the fonts offered within the manufacturer’s store, which might not be extensive or include specific typefaces you’re looking for. Many premium fonts also come with a small fee, which for a “Money” conscious user, might be a consideration.
Customizing with Third-Party Launchers (Nova Launcher, Action Launcher, Microsoft Launcher, etc.)
Third-party launchers are popular alternatives to default Android launchers, offering extensive customization beyond what stock Android provides. While not all launchers support system-wide font changes, many allow you to change the font for app names, widget text, and other launcher-specific elements.
How it Works: Launchers replace your device’s home screen, app drawer, and sometimes the notification shade. Their font customization typically affects text displayed within the launcher’s domain, not the entire system or within other applications.
Step-by-Step Guide (Example: Nova Launcher Prime):
- Install a Launcher: Download and install a third-party launcher from the Google Play Store (e.g., Nova Launcher).
- Set as Default: Go to “Settings” > “Apps” > “Default apps” > “Home app” and select your new launcher.
- Access Launcher Settings: Long-press on your home screen or find the launcher’s icon in your app drawer, then tap “Settings.”
- Find Font Options: Look for options like “Home screen,” “App drawer,” or “Folders.” Within these sections, you might find “Icon Layout,” “Text,” or “Font” settings.
- Change Font: Select your preferred font from the available options. Some launchers allow you to import your own
.ttfor.otffont files, providing a broader range of choices.
Limitations: The most significant drawback is that these changes are confined to the launcher’s interface. Your system settings, notifications, and most third-party apps will continue to display text in the default system font. However, for enhancing your core home screen experience, it’s a powerful tool for personal branding and aesthetic refinement.
App-Specific Font Settings
Certain individual applications offer their own internal font settings, allowing you to customize the text appearance solely within that app. This is a very targeted approach and does not affect any other part of your device.
Examples:
- WhatsApp: While you can’t change the font type directly, you can use markdown to apply bold (bold), italic (italic), strikethrough (~strikethrough~), or monospace (
monospace) styles to your messages. - Document Editors (e.g., Microsoft Word, Google Docs): These apps are designed for content creation, so they offer extensive font selection capabilities within the document itself, much like their desktop counterparts.
- e-Readers (e.g., Kindle, Google Play Books): These apps allow you to choose from a variety of fonts to enhance your reading experience, often including options for size, line spacing, and background color.
How it Works: These apps have their own rendering engines and don’t rely on the system’s default font settings for their content display.
Limitations: The changes are strictly limited to the confines of the specific app. It’s not a solution for system-wide font customization but can be very useful for specific productivity or communication needs.
Gboard Keyboard Customization
While Gboard (Google Keyboard) doesn’t allow you to change the font of the text you type in other apps, it does offer extensive customization for the keyboard’s appearance itself. You can choose different themes, including those that subtly alter the font style of the keys and suggestions.
How it Works: Gboard’s customization focuses on its visual layout and input experience.
Step-by-Step Guide:
- Open Gboard Settings: Go to “Settings” > “System” > “Languages & input” > “On-screen keyboard” > “Gboard” (or open any app and tap the settings icon on the keyboard).
- Select Theme: Tap on “Theme.”
- Choose a Theme: Browse through the themes. Some themes subtly change the font used for the key labels and predictive text, offering a different visual feel.
Limitations: This method only affects the appearance of the keyboard itself, not the font of the text you are typing or reading elsewhere on your device. It’s a minor aesthetic tweak but can contribute to the overall personalized feel of your device.
Unlocking Deeper Customization: Rooted Methods for Android Fonts
For users who demand ultimate control and system-wide font changes, rooting their Android device opens up a world of possibilities. While rooting carries certain risks, modern tools have made the process safer and more reversible than ever. These methods typically involve modifying system files, allowing for comprehensive font customization that affects virtually every aspect of the Android interface.
The Power of Magisk Modules
Magisk has become the de facto standard for rooting Android devices, offering a “systemless” approach that allows for root access and modification without permanently altering the system partition. This makes it a powerful and relatively safe tool for installing system-wide custom fonts via modules.
How it Works: Magisk modules are packages that can modify various aspects of your Android system, including fonts, without touching the core system files. This systemless approach makes it easier to pass Google’s SafetyNet checks (important for banking apps, Google Pay, etc.) and revert changes if something goes wrong. Font modules typically replace the default system fonts (like Roboto) with your chosen typeface.
Prerequisites:
- Rooted Device with Magisk: Your device must be rooted with Magisk installed.
- Magisk Manager App: You’ll need the Magisk Manager app to install modules.
Step-by-Step Guide:
- Find a Font Module: Search online for Magisk font modules. Popular choices include modules for Google Sans, Product Sans, or packs of various fonts. You can find these on forums like XDA Developers or dedicated Telegram channels. Ensure the module is compatible with your Android version.
- Download the Module: Download the
.zipfile of your desired font module to your device. - Open Magisk Manager: Launch the Magisk Manager app.
- Navigate to Modules: Tap on the “Modules” icon (puzzle piece) at the bottom navigation bar.
- Install from Storage: Tap “Install from storage” (or the folder icon) and navigate to where you saved the font module
.zipfile. - Flash the Module: Select the
.zipfile. Magisk Manager will flash the module. - Reboot Your Device: Once the installation is complete, tap “Reboot.”
Advantages:
- System-wide Change: Affects nearly all text elements across the entire Android system.
- SafetyNet Friendly: Magisk’s systemless nature helps maintain SafetyNet integrity.
- Easy Reversal: If you encounter issues, you can simply disable or uninstall the module from Magisk Manager and reboot, reverting to the default font.
- Vast Selection: The Magisk community offers an incredible variety of fonts.
Risks: While generally safer than older root methods, flashing incorrect or incompatible modules can still lead to boot loops or other system instability. Always download modules from trusted sources and ensure they are compatible with your device and Android version. Backup your device before attempting significant system modifications.
Dedicated Font Installer Apps (Requiring Root Access)
Before Magisk became dominant, several dedicated apps existed that allowed rooted users to install system-wide fonts. While many of these are older and less actively maintained, the underlying concept is still valid, and some users might encounter them.
How it Works: These apps typically replace the system font files directly in /system/fonts or /data/fonts. They provide a user-friendly interface to browse, preview, and apply fonts.
Examples (Note: Use with caution, as many are outdated):
- Font Installer (by JRummy Apps): An older but popular app that allowed users to replace system fonts.
- iFont: Another app that provides a large collection of fonts and an installation method for rooted users.
Prerequisites:
- Root Access: Your device must be rooted.
- BusyBox (often required): Some older apps might require BusyBox to be installed.
Step-by-Step Guide (General Concept):
- Install the App: Download and install a rooted font installer app from the Play Store or a trusted APK source.
- Grant Root Access: Upon opening, the app will request root access. Grant it.
- Browse and Select: The app will typically show a list of available fonts or allow you to browse your device for
.ttfor.otffiles. - Install/Apply: Select your desired font and tap the “Install” or “Apply” button.
- Reboot: The app will prompt you to reboot your device for the changes to take effect.
Advantages:
- System-wide Change: Similar to Magisk modules, these apps modify system fonts.
- User-Friendly Interface: Often provides a graphical interface for selection and installation.
Risks:
- Higher Risk of Issues: Directly modifying system files carries a higher risk of soft-bricks or boot loops if something goes wrong, especially if the app isn’t well-maintained or compatible with newer Android versions.
- SafetyNet: Direct system modifications can trip SafetyNet, potentially affecting banking apps and other services.
- Outdated: Many of these apps have not been updated for newer Android versions, making them potentially unstable or incompatible.
For modern Android versions and safety, Magisk modules are overwhelmingly recommended over standalone root font installer apps due to their systemless nature and community support.
Finding, Managing, and Troubleshooting Your Custom Fonts
Once you understand the installation methods, the next step is to find the perfect font, learn how to manage your choices, and be prepared to troubleshoot any issues that might arise. This final section ensures a smooth and satisfying font customization journey.
Where to Discover Your Next Favorite Font
The internet is a treasure trove of typefaces, offering an endless array of styles to suit every preference. When searching for fonts, consider not just aesthetics but also readability and licensing.
- Google Fonts: A vast, free, and open-source library of fonts, ideal for both personal and commercial use. All fonts are under an open license, making them a safe choice for branding and professional projects.
- DaFont: One of the most popular font archives, offering thousands of free fonts, categorized by theme. Pay close attention to the licensing, as many fonts are “free for personal use” but require a license for commercial projects.
- Font Squirrel: A curated collection of high-quality, free fonts that are specifically licensed for commercial use. This is an excellent resource for businesses and content creators.
- Adobe Fonts (with Adobe Creative Cloud subscription): Offers a premium selection of thousands of fonts from top foundries, included with Creative Cloud subscriptions. These are high-quality and ideal for professional design work.
- MyFonts/Fontspring/Creative Market: Platforms for purchasing premium fonts from independent designers and foundries. These often come with more robust licensing options and unique designs for distinctive brand identities.
Always check the licensing information carefully. Using a font commercially without the proper license can lead to legal issues, especially if you’re using it for your “Brand” or “Money”-making ventures.
Reverting to Defaults and Troubleshooting Common Issues
Even with the best intentions, things can sometimes go awry. Knowing how to revert changes and troubleshoot common problems is crucial for any customization endeavor.
- Reverting on Non-Rooted Devices: If you used a manufacturer’s theme store, simply go back to the font settings and select the default font (often named “Roboto” or “Default”). For launchers, change the font back through the launcher settings or simply uninstall the launcher to revert to your device’s stock interface.
- Reverting on Rooted Devices (Magisk): Open Magisk Manager, go to the “Modules” section, find the installed font module, and either disable it (to temporarily deactivate) or uninstall it (to remove permanently). Reboot your device. This is one of Magisk’s greatest strengths: easy reversibility.
- Common Issues:
- Font not applying: Ensure you’ve followed all steps, especially rebooting. Check for compatibility issues with your Android version or specific apps.
- Text looks distorted/unreadable: The font file might be corrupted, or the font itself might not be suitable for system use (e.g., a display font used for small text). Revert to default and try a different font.
- Device bootloop (rooted only): This is the most serious issue. If your device gets stuck on the boot screen after flashing a Magisk module, you might need to boot into custom recovery (like TWRP) and manually disable/delete the module or perform a factory reset (if you don’t have TWRP, you might need to re-flash your device’s firmware). Always have backups!
Digital Security and Performance Considerations
While fonts are generally low-risk, it’s essential to practice good digital security habits, especially when dealing with system modifications.
- Trusted Sources: Only download font files and Magisk modules from reputable websites and developers. Malicious
.zipfiles or APKs can contain malware or cause system damage. This aligns with the “Digital Security” aspect of the Tech topic. - Performance Impact: Font changes typically have a negligible impact on device performance or battery life. Fonts are small files and don’t consume significant system resources.
- Compatibility: Be aware that some apps might not render custom fonts correctly, especially if they use their own proprietary rendering engines. Updates to Android or apps can sometimes break font compatibility, requiring you to update your font module or revert.

Conclusion
Customizing the fonts on your Android device is a powerful way to personalize your mobile experience, transcending mere aesthetics to impact readability, express your unique style, and even reinforce your personal or corporate brand identity. Whether you opt for the simplicity of manufacturer theme stores on a non-rooted device or delve into the deep customization offered by Magisk on a rooted system, the options are vast. By carefully selecting your fonts from trusted sources and understanding the methods involved, you can transform your device into a truly personal and highly functional digital companion. So, go ahead, explore the typographic landscape, and let your Android device speak in a font that’s uniquely you.
aViewFromTheCave is a participant in the Amazon Services LLC Associates Program, an affiliate advertising program designed to provide a means for sites to earn advertising fees by advertising and linking to Amazon.com. Amazon, the Amazon logo, AmazonSupply, and the AmazonSupply logo are trademarks of Amazon.com, Inc. or its affiliates. As an Amazon Associate we earn affiliate commissions from qualifying purchases.