Navigating roads in adverse weather conditions like dense fog, heavy rain, or swirling snow can be a daunting experience, even for the most seasoned drivers. Visibility can drop dramatically, turning familiar routes into treacherous paths. This is where fog lamps come into their own, acting as a crucial safety feature designed to cut through precipitation and illuminate the road directly in front of your vehicle, enhancing your safety and the safety of others. While many modern vehicles come equipped with factory-installed fog lamps, a significant number do not, leaving owners to consider aftermarket solutions.
For those with a knack for automotive tinkering, installing fog lamps can be a rewarding and cost-effective DIY project. This comprehensive guide will walk you through the entire process, from understanding the components and gathering your tools to the intricate wiring and final testing, ensuring a successful and safe installation. We’ll also touch upon how this technological upgrade impacts your vehicle’s overall performance, aesthetic, and even its value, aligning with the broader themes of technology, brand, and personal finance that define our digital landscape.
Illuminating the Path: Why Fog Lamps Matter
The decision to install fog lamps often stems from a desire for enhanced safety and improved driving experience. Beyond simply adding an aesthetic touch to your vehicle, fog lamps serve a critical functional purpose that directly influences your peace of mind on the road.
Enhanced Safety and Visibility
The primary function of fog lamps is to improve visibility in challenging atmospheric conditions where regular headlamps fall short. Standard high beams reflect off fog, rain, or snow particles, creating a blinding glare that can worsen visibility. Low beams, while better, still have a limited ability to penetrate these conditions effectively. Fog lamps, by contrast, are mounted low on the vehicle and project a wide, flat beam of light directed downwards. This unique beam pattern cuts under the fog, illuminating the road surface and the shoulders directly ahead without causing excessive glare.
This targeted illumination significantly reduces the risk of accidents by allowing you to spot obstacles, road markings, and other vehicles much sooner. In an era where driver safety technologies are paramount, retrofitting your vehicle with fog lamps is a tangible investment in your and your passengers’ well-being. From a “Tech” perspective, this is a practical application of lighting technology to solve a real-world problem, leveraging specific beam patterns and mounting positions for optimal performance in low-visibility scenarios.
The DIY Advantage: Cost-Effectiveness and Control
Opting for a DIY fog lamp installation offers several compelling advantages, particularly from a “Money” standpoint. Professional installation services can be costly, often adding a significant premium for labor. By undertaking the project yourself, you can save a substantial amount, allocating those savings to higher-quality components or other vehicle upgrades. This financial prudence makes the enhancement more accessible and allows you to gain a deeper understanding of your vehicle’s electrical system and mechanical workings.
Beyond the immediate cost savings, the DIY approach provides a profound sense of control and accomplishment. You choose the specific fog lamp kit that best suits your needs, aesthetic preferences, and budget, rather than being limited to the options offered by a professional installer. This autonomy empowers you to select reputable “Brand” components, ensuring reliability and longevity, which can, in turn, contribute to your vehicle’s long-term “Brand” perception and even its resale value. A well-executed DIY project, using quality parts, can be an investment that pays dividends in both safety and potential future value.
Preparation is Key: Laying the Groundwork for Success
Before you even think about wielding a screwdriver or cutting a wire, thorough preparation is paramount. This foundational stage determines the success, safety, and efficiency of your installation. Rushing through this phase can lead to costly mistakes, electrical issues, or a less-than-optimal outcome.
Understanding Your Vehicle and Choosing the Right Kit
The first step in preparation involves intimately understanding your vehicle. Does your car have pre-existing cutouts or mounting points for fog lamps? Many car models, even those without factory fog lamps, come with designated areas in the bumper or grille, sometimes covered by removable plastic blanks. Checking your vehicle’s owner’s manual or consulting online forums specific to your car model can provide invaluable insights. This “Tech” investigation is crucial, as it dictates the type of kit you’ll need.
When it comes to selecting the actual fog lamp kit, the market offers a wide array of options, primarily categorized by light source and “Brand.”
- Halogen Lamps: These are traditional, affordable, and produce a yellowish light. While effective, they consume more power and have a shorter lifespan than LEDs.
- LED Lamps: Increasingly popular, LEDs offer superior brightness, energy efficiency, and a longer lifespan. They typically produce a crisp white light, often matching modern vehicle aesthetics. However, they tend to be more expensive.
- HID Lamps: High-Intensity Discharge lamps offer very bright light but are complex to install, require ballasts, and can be prone to glare if not properly aimed. They are less common for aftermarket fog lamp installations.
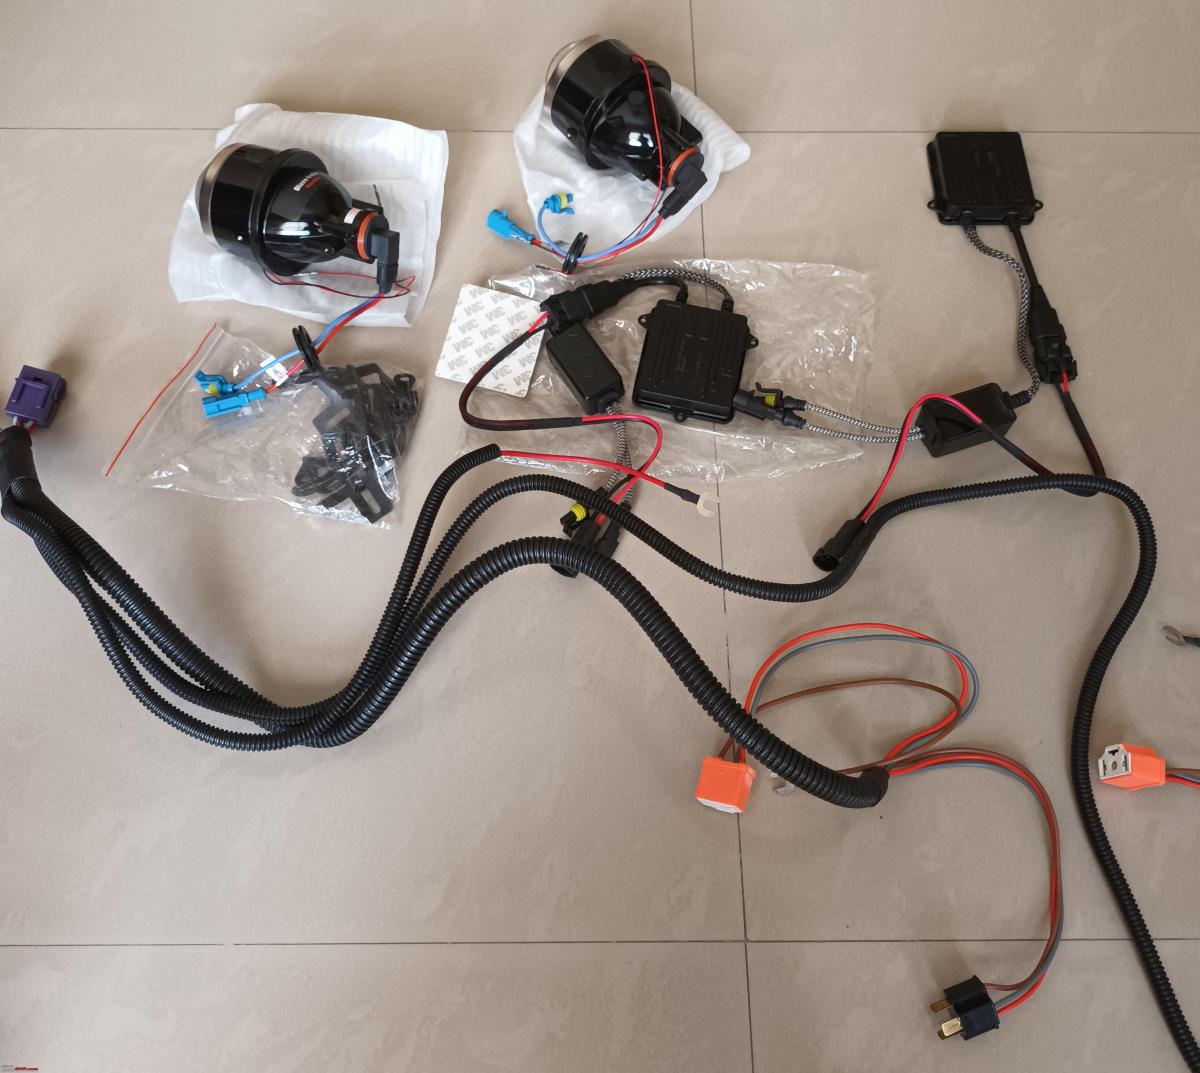
Beyond the light source, consider the “Brand” reputation of the kit manufacturer. Opting for well-known brands, even if slightly more expensive, can offer assurances of quality, reliability, and better customer support. A cheap, no-name kit might save you “Money” upfront but could lead to premature failure, poor performance, or even electrical hazards, ultimately damaging your vehicle’s “Brand” integrity and costing you more in the long run. Ensure the kit is compatible with your specific make and model, both in terms of physical fitment and electrical specifications. Look for kits that include a wiring harness, relay, fuse, and switch, as these streamline the installation process.
Essential Tools and Safety Protocols
Having the right tools at hand not only makes the job easier but also safer and more efficient. For a typical fog lamp installation, you’ll generally need:
- Basic Hand Tools: Screwdrivers (Philips and flathead), socket set, wrenches, wire strippers, wire crimpers, utility knife, pliers.
- Electrical Tools: Multimeter (essential for testing voltage, continuity, and diagnosing issues), electrical tape, heat shrink tubing, zip ties.
- Drill: If you need to create new mounting holes or a hole for the switch.
- Protective Gear: Safety glasses and work gloves are non-negotiable to protect against debris, sharp edges, and electrical hazards.
Safety is paramount. Before beginning any work, especially involving the vehicle’s electrical system, always:
- Disconnect the Battery: Remove the negative terminal first to prevent accidental short circuits or electrical shocks.
- Work in a Well-Lit Area: Good lighting helps you see connections clearly and reduces the risk of mistakes.
- Exercise Caution with Sharp Objects: Be mindful of sharp edges on tools, wires, and vehicle components.
- Understand Your Vehicle’s Wiring Diagram: If you’re tapping into existing circuits, having a basic understanding of your car’s wiring can prevent damage to other systems.
These “Tech” best practices ensure that your DIY project is not only successful but also safe, protecting both you and your vehicle.
Navigating Legalities and Best Practices
Before you even finalize your kit purchase, it’s crucial to be aware of local laws and regulations regarding aftermarket lighting. “Brand” reputation isn’t just about quality; it’s also about compliance. Different regions have varying rules concerning the color, intensity, number, and usage of auxiliary lights. For instance, some areas restrict the use of fog lamps to only specific weather conditions, while others have strict guidelines on their alignment and how they interact with other vehicle lights (e.g., automatically turning off when high beams are engaged).
Ignoring these regulations can lead to fines, failed inspections, and even voiding your insurance in the event of an accident. A quick search of your local Department of Motor Vehicles (DMV) website or equivalent traffic authority can provide the necessary information. This pre-emptive “Money” saving step prevents future legal and financial headaches. Adhering to these rules also reflects positively on you as a responsible vehicle owner, reinforcing a positive “Personal Brand” image on the road.
Furthermore, consider the “best practices” for fog lamp installation:
- Proper Aiming: Fog lamps should be aimed low and slightly outwards. Improper aiming can blind oncoming drivers, negating their safety benefits and potentially leading to “Brand” damage for your vehicle’s perceived maintenance.
- Independent Switch: While some installations tap into existing headlight circuits, it’s generally best practice to install fog lamps with an independent switch, allowing you to control them separately. This offers flexibility and ensures compliance with regulations that prohibit fog lamps from being on with high beams.
- Proper Fuse Protection: Always install an inline fuse for the main power feed to the fog lamps, located as close to the battery as possible. This protects your vehicle’s electrical system from overcurrents and potential fires, a critical “Tech” safety measure.
The Installation Journey: Step-by-Step Guide
With your preparations complete, tools laid out, and safety measures in place, you’re ready to embark on the hands-on installation process. This section breaks down the physical mounting and the crucial electrical wiring into manageable steps.
Mounting the Lamps: Precision and Stability
The first physical step involves securely mounting the fog lamp units onto your vehicle. This can vary significantly depending on your car model and the chosen kit.
- Access the Mounting Area: This often requires removing parts of the front bumper, grille, or inner fender liners. Consult your vehicle’s service manual or an online guide for specific instructions on how to safely remove these components without causing damage. Take your time, locate all clips and screws, and store them carefully.
- Identify Mounting Points:
- Pre-existing Locations: If your vehicle has factory-designed cutouts or mounting brackets, the process is straightforward. Simply insert the fog lamp units into these spaces and secure them using the provided screws or clips from the kit. Ensure a snug fit to prevent vibrations.
- Aftermarket Mounting: If no pre-existing points are available, you’ll need to identify suitable, sturdy locations on your bumper or chassis. These points must be robust enough to support the lamps and withstand road vibrations. You might need to drill new holes, reinforcing them with washers and nuts for maximum stability. Pay close attention to the structural integrity of the area.
- Aligning the Lamps: Once mounted, ensure the lamps are properly oriented. Most fog lamps have a specific top and bottom. Improper orientation can significantly affect their beam pattern and effectiveness. Make minor adjustments to their angle if possible, but the final aim will be done after wiring.
- Route the Wiring (Preliminary): While you’re in the bumper area, it’s a good time to pre-route the wiring from the lamps towards the engine bay. Use zip ties to secure the wires away from hot engine components, moving parts, and sharp edges. Utilize existing wire channels or loom where possible to protect the wires and maintain a neat “Tech” installation.
Mastering the Wiring: The Heart of the System
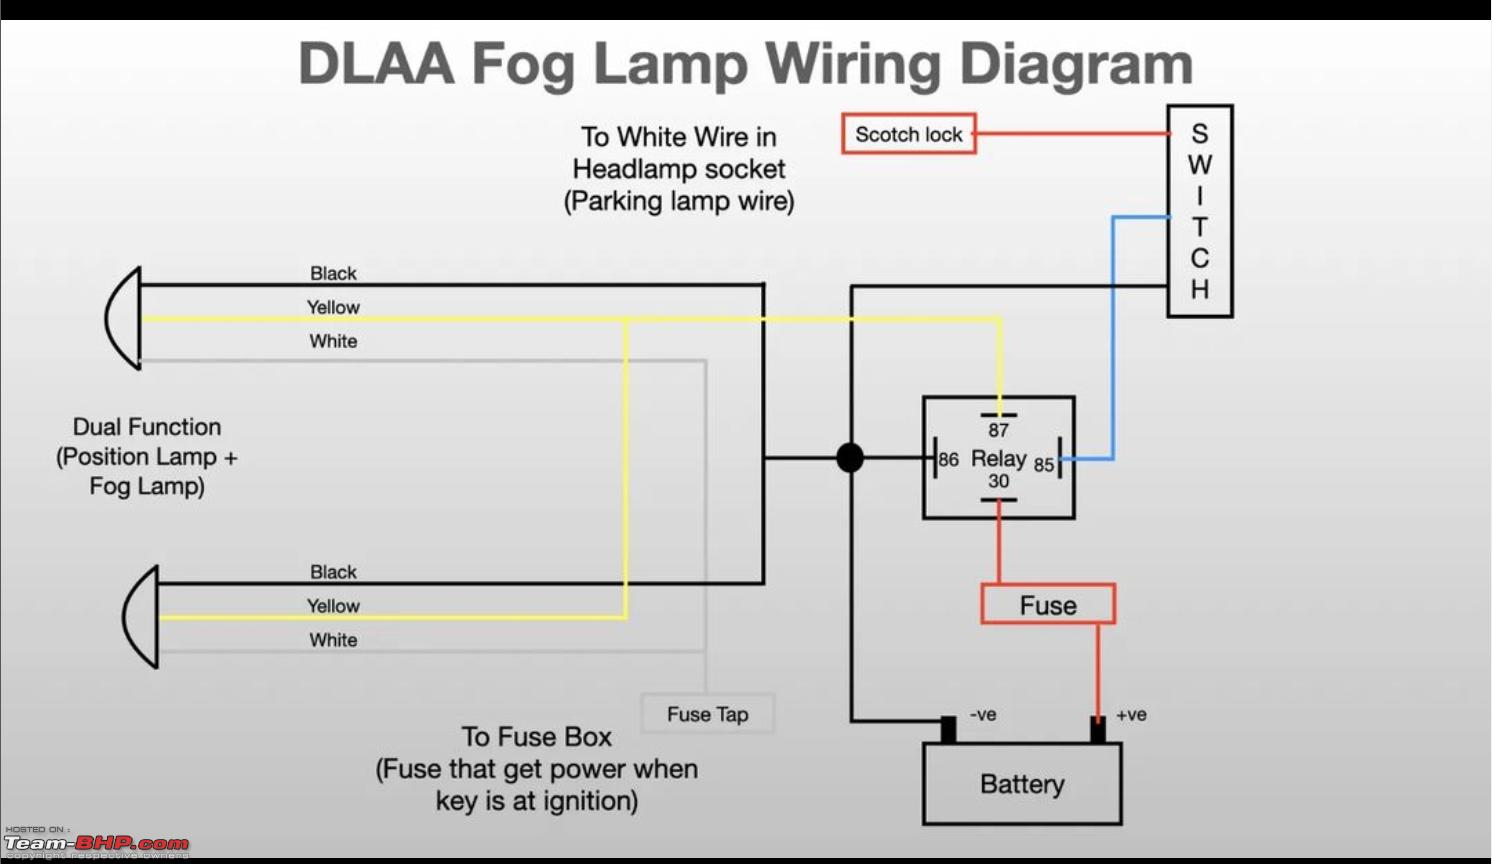
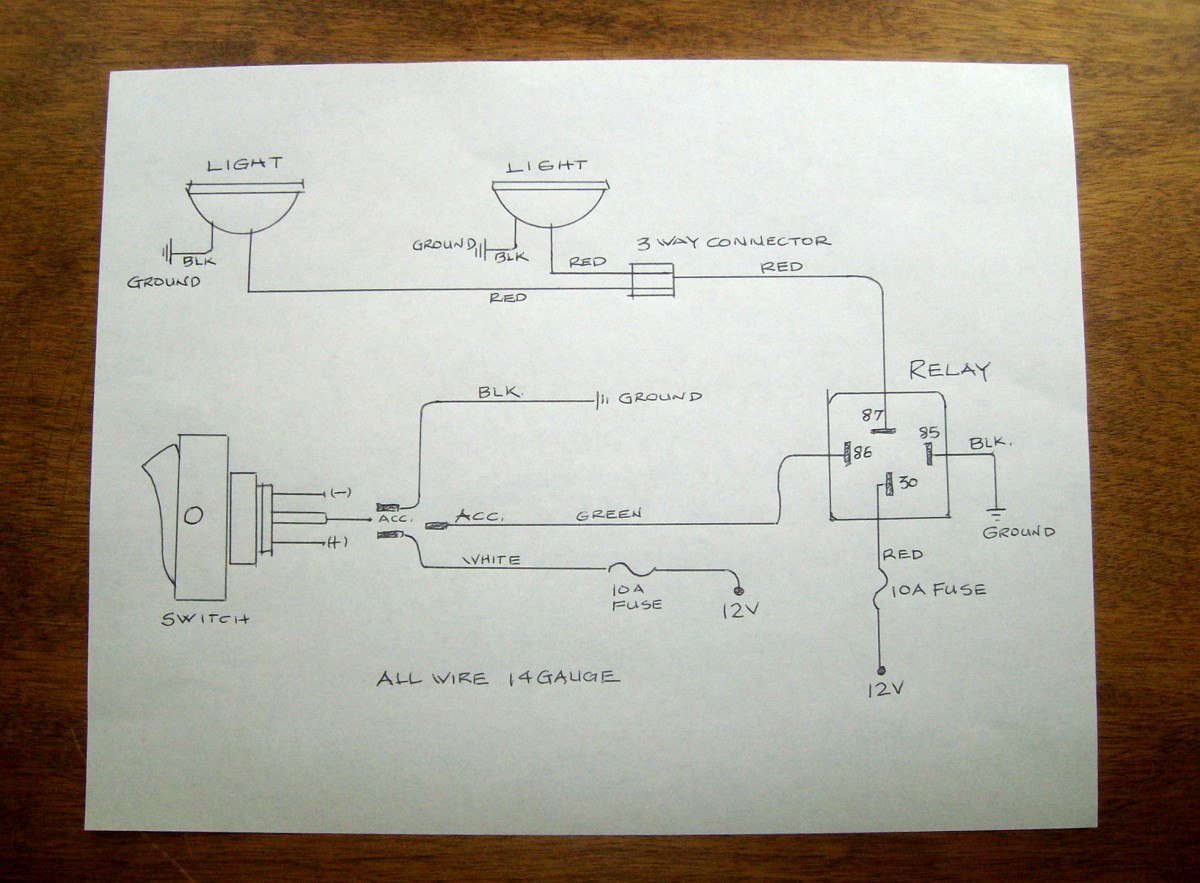
This is arguably the most critical and potentially complex part of the installation. A well-executed wiring job ensures reliable performance and, more importantly, electrical safety. Most aftermarket kits will provide a wiring harness, but understanding the fundamental principles is vital. The core of any fog lamp circuit typically involves a power source, a fuse, a relay, a switch, the lamps themselves, and a ground.
Understanding the Relay (Tech Focus):
A relay is an electrically operated switch that allows a low-current switch circuit (from your dashboard switch) to control a high-current circuit (powering the fog lamps). This protects your delicate dashboard switch from the high current demand of the lamps, preventing it from overheating or failing. A standard automotive relay has four or five pins:
- Pin 30 (Input Power): Connects directly to the battery’s positive terminal (via a fuse). This is the main power supply for the lamps.
- Pin 87 (Output Power): Connects to the positive terminal of the fog lamps. When the relay is activated, power flows from Pin 30 to Pin 87.
- Pin 85 (Coil Ground): Connects to a chassis ground point.
- Pin 86 (Coil Trigger): Connects to the output of your dashboard switch. When the switch is flipped, it sends a small positive current (or ground, depending on the switch type) to Pin 86, which energizes the relay’s internal coil, closing the circuit between Pin 30 and Pin 87.
Step-by-Step Wiring Process:
- Mount the Relay: Find a secure, dry location in the engine bay, away from excessive heat or vibration. Many kits include a mounting tab for the relay.
- Power Source (Pin 30):
- Run a sufficiently gauged wire (check your kit’s specifications) from Pin 30 of the relay directly to the positive terminal of your car battery.
- Crucially, install an inline fuse holder as close to the battery terminal as possible. The fuse rating should match the total amperage draw of your fog lamps (e.g., two 55W lamps at 12V draw ~9.2A, so a 15A fuse would be appropriate). This fuse is your primary defense against electrical overloads, safeguarding your vehicle’s electrical system (critical “Tech” and “Money” protection).
- Output to Lamps (Pin 87):
- Run a wire from Pin 87 of the relay to the positive wires of your fog lamps. You will likely need to split this wire to connect to both lamps. Use crimp connectors or solder for secure connections.
- Grounding the Lamps:
- Connect the negative wires from each fog lamp to a reliable chassis ground point. A good ground connection is essential for the lamps to function correctly. Scrape away any paint to ensure metal-on-metal contact, then secure the ground wire with a ring terminal and a bolt.
- Control Circuit (Pin 86 & Pin 85):
- Pin 85 (Ground): Connect Pin 85 of the relay to a reliable chassis ground in the engine bay.
- Pin 86 (Switch Trigger): This wire will run from the relay, through the firewall into the vehicle’s cabin, and connect to one terminal of your dashboard switch.
Integrating the Switch and Securing Connections
The final stage of wiring involves installing the control switch and meticulously securing all connections.
- Install the Switch:
- Decide on a suitable location for your dashboard switch. Common spots include blank switch panels, near existing light controls, or on the lower dash.
- If no blank exists, you might need to drill a hole. Measure carefully and use the correct drill bit size for your switch.
- Run the wire from relay Pin 86 into the cabin to one terminal of your switch.
- Connect the other terminal of your switch to a switched 12V power source (i.e., a circuit that only receives power when the ignition is on). This prevents the fog lamps from being accidentally left on and draining your battery. You can often tap into the fuse box using an “add-a-circuit” fuse tap, or find an appropriate wire using your multimeter to test for switched power. Avoid tapping into critical circuits like airbags or ABS.
- Ensure all switch connections are secure and insulated.
- Route and Secure All Wires: This step is crucial for both functionality and safety.
- Use wire loom or automotive convoluted tubing to protect all exposed wiring, especially in the engine bay, from heat, abrasion, and moisture. This is vital for long-term “Tech” reliability.
- Secure all wiring runs with zip ties, ensuring they are tightly fastened away from moving parts (like steering components or belts), exhaust manifolds, and any sharp edges. Loose wires can chafe, short out, or become entangled, leading to dangerous failures.
- Ensure any wires passing through the firewall are protected by a rubber grommet to prevent chafing.
- Double-Check All Connections: Before reconnecting the battery, perform a thorough visual inspection of every connection point. Ensure wires are properly stripped, crimped, or soldered, and that all exposed conductors are insulated with electrical tape or heat shrink tubing. Confirm that the fuse is correctly installed and of the appropriate rating. This diligence is a core “Tech” best practice.
Finalizing Your Installation: Testing, Adjustment, and Maintenance
With all connections made and secured, you’re on the home stretch. The final steps involve verifying the system’s functionality, making necessary adjustments, and establishing a routine for ongoing maintenance to protect your “Brand” investment.
Initial Power-Up and Aiming Your New Lights
- Reconnect the Battery: Carefully reattach the negative terminal of your car battery. You might hear a few clicks or see dashboard lights flicker as systems reset.
- Initial Functionality Test:
- Turn on your vehicle’s ignition (but you don’t necessarily need to start the engine).
- Activate your new fog lamp switch.
- Check if both fog lamps illuminate. If they do, congratulations!
- If they don’t, immediately proceed to troubleshooting.
- Aiming the Fog Lamps (Tech & Safety):
- Park your vehicle on a level surface, about 25 feet (7.5 meters) from a wall or garage door.
- Turn on your fog lamps (and perhaps your low beams for reference).
- Most fog lamps have adjustment screws or bolts. Adjust them so that the top edge of the fog lamp beam pattern is about 4 inches (10 cm) below the center of the lamp when projected onto the wall. The beam should be wide and flat, not projecting upwards.
- Ensure both lamps are aimed symmetrically. Proper aiming is crucial for effectiveness and to avoid blinding oncoming drivers, reflecting well on your “Brand” as a considerate driver.
Common Troubleshooting and Future-Proofing
Even with careful installation, issues can arise. Knowing how to troubleshoot can save you time and “Money.”
- Lamps Not Lighting Up:
- Check the Fuse: This is the most common culprit. A blown fuse indicates an overcurrent. Replace it with a fuse of the correct rating. If it blows again immediately, you have a short circuit somewhere in the wiring.
- Check Ground Connections: Ensure all ground wires (from lamps and relay Pin 85) are firmly connected to clean, bare metal chassis points.
- Check Relay Function: With a multimeter, test for voltage at Pin 30 (constant power), Pin 87 (power to lamps when switch is on), and Pin 86 (power from switch when on). If you hear a click from the relay when the switch is flipped, the control circuit (Pins 85 and 86) is likely working.
- Check Switch Connections: Ensure the switch is receiving power and sending it to relay Pin 86 when activated.
- Check Lamp Bulbs/LEDs: Verify that the bulbs or LED units themselves are not faulty.
- Lamps Flickering: Often indicates a loose connection, particularly a poor ground. Recheck all connections, ensuring they are tight.
- Lamps Stay On: The relay might be stuck closed, or the switch wiring is incorrect (e.g., permanently receiving power).
Future-Proofing Your Installation:
To ensure longevity and maintain your vehicle’s “Brand” integrity, consider these tips:
- Weather Sealing: If your kit didn’t come with waterproof connectors, consider adding dielectric grease to electrical connections and using heat shrink tubing to seal exposed wires.
- Regular Checks: Periodically check all connections for corrosion or looseness, especially after extreme weather or off-road driving.
- Quality Components: Investing in higher-quality “Tech” components from reputable “Brands” initially pays off by reducing the frequency of repairs and replacements, saving you “Money” in the long run.
Maintaining Your Investment for Long-Term Performance
Like any vehicle component, fog lamps require minimal but consistent maintenance to ensure they continue to perform optimally and contribute positively to your vehicle’s aesthetic and “Brand” value.
- Clean Lenses Regularly: Road grime, salt, and insect splatter can build up on the lamp lenses, significantly reducing light output. Clean them with a soft cloth and automotive glass cleaner. Avoid abrasive materials that could scratch the lens.
- Inspect Wiring: During routine under-hood checks, quickly visually inspect the wiring for any signs of wear, fraying, or loose zip ties. Address any issues promptly.
- Check Aim: Bumps and vibrations can sometimes cause the lamps to shift aim. Periodically recheck their aiming against a wall, especially if you notice a change in their light pattern.
- Bulb/LED Replacement: If you’ve installed halogen lamps, bulbs will eventually burn out. Keep a spare set on hand. LED units typically last much longer, but if one fails, it usually requires replacing the entire lamp assembly.
By adhering to these simple maintenance practices, you’re not just ensuring your fog lamps work when you need them most; you’re also protecting the “Money” you invested in the installation and maintaining the overall “Brand” image of a well-cared-for vehicle.
Conclusion: Driving with Confidence
Installing fog lamps is more than just adding an accessory to your vehicle; it’s a significant upgrade in safety, visibility, and driving confidence, especially in challenging weather conditions. By undertaking this DIY project, you not only save money but also gain valuable technical insight into your vehicle’s electrical system, enhancing your “Tech” prowess.
From selecting high-quality “Brand” components to meticulously wiring the circuit and ensuring proper aiming, every step contributes to a successful outcome. The investment of your time and effort translates directly into a safer driving experience for you and your passengers, showcasing your commitment to vehicle maintenance and personal safety – a positive reflection of your “Personal Brand.”
Remember, attention to detail, adherence to safety protocols, and a commitment to understanding the “Tech” involved are the pillars of a successful installation. Once completed, you’ll be able to face foggy mornings and rainy nights with renewed confidence, knowing that your path ahead is well-illuminated and your vehicle is equipped for whatever the road throws your way. Drive safe!
aViewFromTheCave is a participant in the Amazon Services LLC Associates Program, an affiliate advertising program designed to provide a means for sites to earn advertising fees by advertising and linking to Amazon.com. Amazon, the Amazon logo, AmazonSupply, and the AmazonSupply logo are trademarks of Amazon.com, Inc. or its affiliates. As an Amazon Associate we earn affiliate commissions from qualifying purchases.