
Random Access Memory (RAM) is often described as the “short-term memory” of a computer. It is the workspace where your processor keeps the data it needs to access quickly. Whether you are a creative professional rendering 4K video, a competitive gamer seeking high frame rates, or a developer running multiple virtual machines, understanding the specific details of your RAM is critical.
Knowing your RAM specifications—such as capacity, speed, type, and form factor—is the first step toward troubleshooting performance bottlenecks or planning a hardware upgrade. This guide provides an in-depth technical walkthrough on how to identify your RAM across various operating systems and hardware configurations.

1. Identifying RAM Specifications via Windows Built-in Tools
For the vast majority of PC users, Windows provides several native utilities that range from user-friendly graphical interfaces to deep-dive command-line tools. You do not always need to open your computer case to see what is inside.
Using the Windows Task Manager
The Task Manager is the quickest way to get a snapshot of your system’s performance and hardware.
- Press
Ctrl + Shift + Escto open the Task Manager. - If it opens in a small window, click “More details.”
- Navigate to the Performance tab and select Memory from the sidebar.
In this view, Windows provides a wealth of information. You will see the total capacity (e.g., 16GB), the current speed (e.g., 3200 MHz), and the number of slots used. This last detail is vital for upgrades; if your motherboard has four slots and only two are used, you have room for expansion without replacing your current modules.
Accessing System Information (msinfo32)
For a more formal report of your total physical memory, the System Information tool is ideal. Type “System Information” in the Windows search bar or run msinfo32. While this tool won’t give you the clock speed of individual sticks, it provides an authoritative look at “Installed Physical Memory (RAM)” versus “Total Virtual Memory,” which is useful for diagnosing how Windows manages its page files.
Leveraging the Command Prompt (WMIC)
For power users and IT administrators who need specific details like the manufacturer or part number without third-party software, the Windows Management Instrumentation Command-line (WMIC) is the best option.
- Open the Command Prompt as an Administrator.
- Type the following command:
wmic memorychip get devicelocator, memorytype, capacity, speed, manufacturer, partnumber - Press Enter.
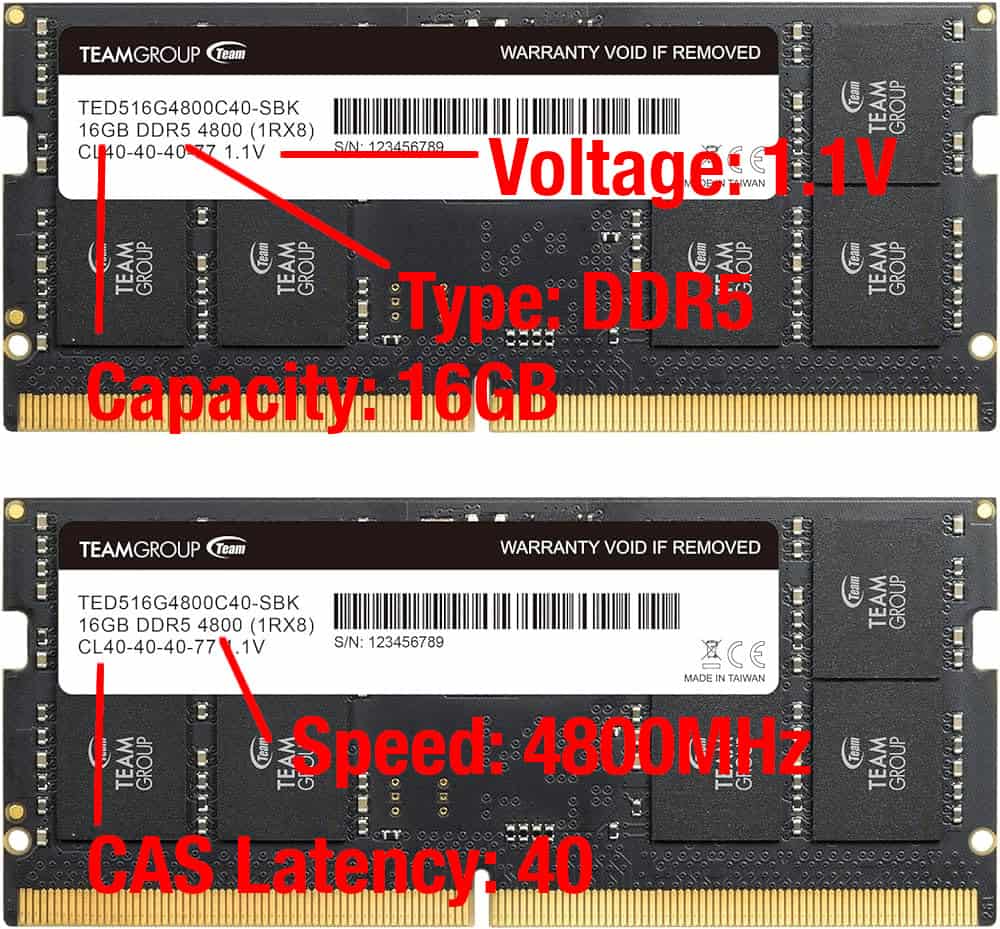
This command returns the exact part number of your RAM sticks. You can copy this part number into a search engine to find the exact datasheet, including timings (CAS latency) and voltage requirements.
2. Determining RAM on macOS and Linux Environments
Unlike the modular world of Windows PCs, modern Apple hardware and various Linux distributions require different approaches to hardware identification.
Checking RAM on macOS (Intel and Apple Silicon)
Apple has moved toward a “Unified Memory Architecture” in its M-series chips, where RAM is integrated into the SoC (System on a Chip). However, identifying it remains simple.
- About This Mac: Click the Apple logo in the top-left corner and select “About This Mac.” This shows the total amount of memory and the type (e.g., 16 GB LPDDR5).
- System Report: For deeper details, click “More Info” (on newer macOS versions) or “System Report” in the “About This Mac” window. Under the Hardware section, select Memory. This lists the status of each “bank” or slot and tells you if the memory is ECC (Error Correction Code) or non-ECC.
Identifying RAM in Linux via Terminal
Linux users have several powerful commands to probe hardware. The most common is free -m, which shows used and available memory in megabytes. However, to see hardware specs, you need:
- dmidecode: Running
sudo dmidecode --type 17provides a detailed readout of every memory device found, including the manufacturer, serial number, and maximum supported speed. - lshw: Running
sudo lshw -short -C memoryprovides a concise table of the RAM configuration, showing which slots are populated and the total capacity of the motherboard’s memory bank.
3. Utilizing Third-Party Diagnostic Software for Granular Detail
While built-in tools are excellent, they sometimes lack the “SPD” (Serial Presence Detect) data—the information programmed into the RAM chip by the manufacturer. Third-party tools are the gold standard for enthusiasts.
CPU-Z: The Industry Standard
CPU-Z is a lightweight, free utility that is essential for any tech enthusiast. It provides two critical tabs:
- Memory Tab: Shows the current operating frequency and timings of your RAM. Note that for DDR (Double Data Rate) memory, the frequency shown here is often half the advertised speed (e.g., a 3600MHz kit will show as 1800MHz).
- SPD Tab: This is the most important section. It allows you to select each individual slot on your motherboard. It reveals the module’s manufacturer (e.g., Samsung, Micron, SK Hynix), the “XMP” (Extreme Memory Profile) ratings, and the manufacturing date.
HWiNFO and Speccy
If you require a more comprehensive overview of how your RAM interacts with your thermal sensors and CPU, HWiNFO is the professional choice. It can monitor real-time memory voltages and temperatures, which is crucial for overclocking. Speccy, developed by Piriform, offers a more visual, user-friendly interface for those who find CPU-Z too clinical.
4. Understanding the Technical Specifications: What the Data Means
Knowing you have “16GB of DDR4” is only half the battle. To truly understand your hardware, you must interpret the technical jargon associated with RAM.
DDR Generations (DDR3 vs. DDR4 vs. DDR5)
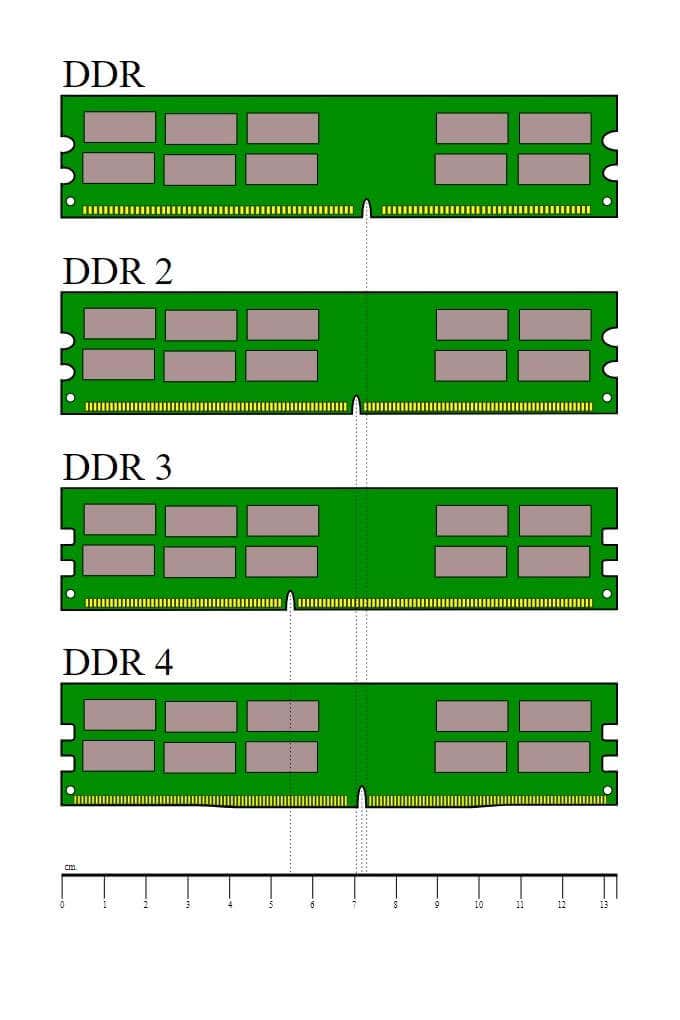
The “DDR” generation determines the physical shape and electrical compatibility of the RAM.
- DDR4: The current standard for most mid-range systems, offering a balance of speed and efficiency.
- DDR5: The newest standard, featuring much higher bandwidth and “on-die ECC.”
You cannot plug DDR4 RAM into a DDR5 slot; the “notch” on the bottom of the stick is positioned differently to prevent electrical damage.
Clock Speed (MHz) and Transfer Rate (MT/s)
Speed is measured in MegaTransfers per second (MT/s), though commonly referred to as MHz. Higher speeds allow the CPU to access data faster. However, speed is limited by what your motherboard and CPU’s memory controller can handle. If you buy 4000MHz RAM but your CPU only supports 3200MHz, the RAM will “downclock” to the lower speed.
Channels: Single vs. Dual vs. Quad
When you check your RAM, look at whether it is running in “Dual Channel” mode. A system with two 8GB sticks running in dual channel is significantly faster than a system with a single 16GB stick. Dual-channel doubles the communication bandwidth between the memory and the processor.
5. Physical Inspection and Hardware Safety
If your computer won’t boot, or if software tools are giving conflicting information, a physical inspection is the final word.
Reading the Sticker
Almost every RAM module has a sticker on the side of the heat spreader or directly on the green PCB. This sticker contains the “Part Number.” When upgrading, it is always best to buy a second stick with an identical part number to ensure total compatibility and avoid system instability.
Desktop vs. Laptop RAM (DIMM vs. SO-DIMM)
While checking your RAM, identify the form factor.
- DIMM: Long sticks used in desktop PCs.
- SO-DIMM: Small Outline DIMMs, which are about half the length and used in laptops, NUCs, and some iMacs.
Knowing this distinction is vital before making a purchase, as they are not interchangeable.
Conclusion: Why RAM Knowledge is Power
Identifying your RAM is more than just a technical curiosity; it is a foundational skill for maintaining a healthy digital environment. By understanding your capacity, you can determine if “Slowdown” is caused by memory exhaustion. By knowing your speed and generation, you can make informed decisions about whether a simple RAM addition will suffice or if a full motherboard and CPU upgrade is necessary.
In an era where software demands are constantly scaling—thanks to AI tools, browser bloat, and high-fidelity gaming—being able to accurately audit your system’s “short-term memory” ensures that your hardware remains an asset rather than a bottleneck. Whether you use the Windows Task Manager, the Linux Terminal, or specialized tools like CPU-Z, the data you gather is the first step toward a faster, more efficient computing experience.
aViewFromTheCave is a participant in the Amazon Services LLC Associates Program, an affiliate advertising program designed to provide a means for sites to earn advertising fees by advertising and linking to Amazon.com. Amazon, the Amazon logo, AmazonSupply, and the AmazonSupply logo are trademarks of Amazon.com, Inc. or its affiliates. As an Amazon Associate we earn affiliate commissions from qualifying purchases.