
The indelible mark of a Sharpie marker, while often a testament to creativity or important labeling, can also present a persistent challenge when unwanted. Whether it’s a stray mark on a cherished surface, a mistake during a DIY project, or even a security concern, knowing how to effectively remove Sharpie ink is a valuable skill. This article delves into the technological and material science principles behind effective Sharpie removal, exploring the chemistry of the ink and the mechanisms by which various solvents and techniques disrupt its bond with surfaces.
The key to understanding Sharpie removal lies in its composition. Sharpie ink is a permanent marker ink, characterized by its vibrant pigments and a solvent base that allows it to penetrate porous surfaces and dry quickly, forming a durable mark. The solvent, typically an alcohol (like isopropyl alcohol or ethanol) or a glycol ether, evaporates, leaving behind the pigment particles suspended in a resin binder. This binder is what makes the ink “permanent,” adhering strongly to most surfaces. Therefore, effective removal requires a solvent that can re-dissolve this binder or lift the pigment particles without damaging the underlying material.
The Chemistry of Permanent Ink and Surface Interaction
Understanding the fundamental chemistry of Sharpie ink is crucial before exploring removal techniques. Permanent marker ink is not a single, monolithic entity. It’s a sophisticated formulation designed for permanence, involving several key components that contribute to its tenacious grip on surfaces.
Pigments and Binders: The Foundation of Permanence
At its core, Sharpie ink contains pigments that provide color. These pigments are finely ground particles, often organic or inorganic compounds, chosen for their colorfastness and resistance to fading. However, pigments alone would simply brush off a surface. The “magic” of permanence comes from the binder. The binder is a resinous substance, typically a polymer, that, once the solvent evaporates, forms a film that traps the pigment particles and adheres them to the surface. This binder is designed to be resistant to water, light, and abrasion, which is why casual washing or wiping is usually ineffective.
Solvents: The Evaporating Agent
The initial liquid state of Sharpie ink is due to its solvent. Historically, Sharpies used a variety of solvents, but commonly, they are alcohol-based (like isopropyl alcohol) or utilize glycol ethers. These solvents are volatile, meaning they evaporate quickly. As the solvent evaporates, the binder solidifies, creating the permanent mark. The choice of solvent is critical; it must be effective at dissolving the binder and releasing the pigment without being overly aggressive and damaging the surface itself.
Surface Adhesion: The Battleground
The interaction between the Sharpie ink and the surface it marks is a complex interplay of intermolecular forces. On porous surfaces like wood or fabric, the solvent and binder can penetrate the microscopic pores, creating a physical lock that is difficult to break. On non-porous surfaces like glass or plastic, the adhesion is primarily due to Van der Waals forces and other surface interactions. The goal of removal is to overcome these forces, either by dissolving the binder or by creating an interface that allows the ink to be lifted away.
Leveraging Solvents: The Primary Arsenal for Sharpie Removal
The most common and effective methods for removing Sharpie ink rely on the principle of dissolution. By introducing a solvent that can re-liquefy the binder, the ink can be loosened and lifted from the surface. The effectiveness of a particular solvent depends on its chemical compatibility with both the ink and the surface.
Alcohol-Based Solvents: The Go-To Choices
Isopropyl alcohol (rubbing alcohol) is perhaps the most widely recommended and readily available solvent for Sharpie removal. Its moderate volatility and ability to dissolve many resins make it highly effective on a variety of surfaces. Denatured alcohol, which is ethanol with additives to make it undrinkable, also works similarly. For a practical approach, applying a generous amount of isopropyl alcohol to a cotton ball or cloth and dabbing or gently rubbing the affected area is often the first step. It’s important to work from the outside of the mark inward to avoid spreading it.
Ethanol, the alcohol found in hand sanitizers, can also be effective. Many hand sanitizers contain a high percentage of alcohol and can be surprisingly potent for tackling fresh Sharpie marks. The gel consistency can sometimes provide a slightly longer contact time, allowing the alcohol to work more effectively before evaporating.
Acetone and Nail Polish Remover: Powerful, But Use with Caution
Acetone, a stronger solvent commonly found in nail polish remover, can be extremely effective at dissolving Sharpie ink. However, its potency comes with a significant caveat: acetone is also a very strong solvent for many plastics, paints, and finishes. Therefore, it should only be used on robust, non-sensitive surfaces like glass, ceramic tiles, or metal, and always after testing in an inconspicuous area. Applying acetone with a cotton swab or cloth, and working quickly, is recommended to minimize contact time and potential damage to the underlying material.

Specialized Solvents: Engineered for Tougher Jobs
Beyond common household items, a variety of specialized solvents are formulated for ink removal. These can include industrial-grade cleaners, graffiti removers, or even products specifically designed for marker removal. These products often contain a blend of solvents and surfactants, which help to lift and suspend the ink particles, making them easier to wipe away. When dealing with particularly stubborn marks or sensitive surfaces, consulting product labels and following manufacturer instructions is paramount. These specialized solvents might offer a more targeted approach, but they also require careful handling and understanding of their chemical properties.
Non-Solvent and Alternative Removal Methods: When Chemistry Isn’t Enough
While solvents are the primary tools, certain situations call for alternative approaches. These methods often work by physically lifting the ink, abrading it away, or utilizing chemical reactions that break down the ink’s structure.
The Power of Abrasion: Gentle Scrubbing and Erasers
For non-porous surfaces, a gentle abrasive can sometimes lift the ink. Baking soda paste, made by mixing baking soda with water, can act as a mild abrasive. Applying the paste to the mark and gently scrubbing with a soft cloth or sponge can help to lift the ink without scratching the surface. Similarly, melamine foam erasers (often marketed as “magic erasers”) work on a microscopic level through a fine abrasive action. They are particularly effective on smooth, non-porous surfaces and can work wonders on walls or countertops marked with Sharpie. It is crucial to use these abrasive methods with a light touch, especially on delicate finishes, and to rinse the surface thoroughly afterward.
Heat and Steam: Disrupting the Binder
Heat can sometimes soften the binder in Sharpie ink, making it more susceptible to removal. Applying gentle heat, such as from a hairdryer on a low setting, can sometimes loosen the ink enough to be wiped away with a cloth. Steam can also be effective, particularly on fabric. The combination of heat and moisture can break down the ink’s bond with the fibers. However, caution is advised, as excessive heat can damage some fabrics or surfaces. Always test in an inconspicuous area and use moderate heat settings.
Toothpaste: A Surprising Household Aid
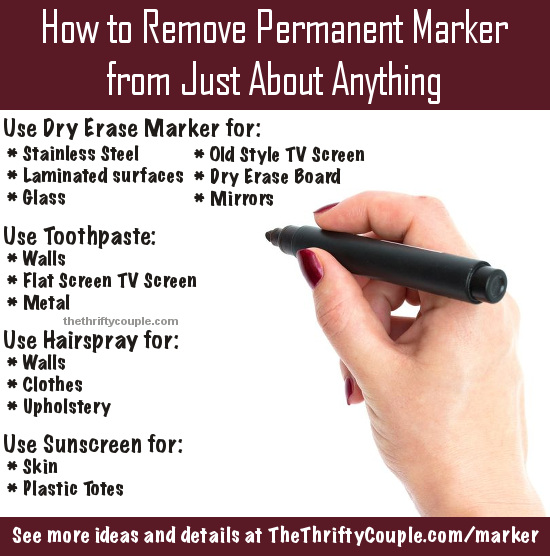
Non-gel, white toothpaste can sometimes be an effective, albeit less conventional, Sharpie remover. The mild abrasiveness of the toothpaste, combined with certain cleaning agents, can help to lift ink from non-porous surfaces. Applying a small amount of toothpaste to the mark, gently rubbing with a soft cloth, and then wiping clean can yield surprising results. This method is generally safe for many surfaces, but as with any method, a patch test is always recommended.
Surface-Specific Considerations: Protecting Your Valuables
The effectiveness and safety of any Sharpie removal method are heavily dependent on the type of surface being treated. What works perfectly on glass might permanently damage polished wood. Therefore, understanding the material properties of the surface is paramount.
Porous Surfaces: Wood, Fabric, and Walls
Porous materials like unsealed wood, certain fabrics, and painted or wallpapered walls present a greater challenge. The ink penetrates these surfaces, making it harder to lift without causing damage. For wood, gentle sanding might be an option for unfinished pieces, but for finished surfaces, solvents like isopropyl alcohol applied sparingly with a cotton swab might be the best bet, followed by immediate cleaning and potentially refinishing. On fabric, pre-treating with isopropyl alcohol or a specialized fabric ink remover, followed by washing, is often necessary. For painted walls or wallpaper, testing any solvent in an inconspicuous area is vital, as aggressive solvents can lift paint or dissolve adhesive. In many cases, for deep penetration into porous materials, complete removal may not be achievable without resurfacing or repainting.
Non-Porous Surfaces: Glass, Metal, and Plastic
Non-porous surfaces offer more options. Glass and ceramics are generally quite resilient and can withstand a wide range of solvents, including acetone. Metal surfaces are also relatively robust, but care should be taken with painted or coated metals, as strong solvents could affect the finish. Plastics can be more delicate. While some plastics are resistant to isopropyl alcohol, others can be etched or clouded by it. Acetone is particularly aggressive towards many types of plastic. For plastic surfaces, it’s generally best to start with the mildest effective option, such as isopropyl alcohol or even a simple soap and water solution for very fresh marks, and to avoid strong solvents unless absolutely necessary and after thorough testing.

Delicate and Finished Surfaces: The Need for Subtlety
Materials like polished wood, certain synthetic fabrics, leather, and delicate electronics require the utmost care. For these, it’s essential to avoid harsh chemicals and abrasive actions. Gentle methods are key. For instance, on leather, a specialized leather cleaner or a very diluted solution of mild soap might be tried. For electronics, caution is paramount, and often, professional cleaning or specialized electronic cleaning solutions are the only safe options. Always err on the side of caution, test in an obscure spot, and prioritize the integrity of the material over the complete eradication of a mark if there’s any doubt.
In conclusion, removing Sharpie marks is a common household and professional challenge that can be effectively managed with the right knowledge and approach. By understanding the composition of the ink and the nature of the surface, individuals can select the most appropriate removal method, whether it involves the power of solvents, the finesse of abrasion, or the gentle application of heat. Always remember to test any removal agent in an inconspicuous area first to prevent unintended damage, ensuring that the solution to your Sharpie problem doesn’t create a new one.
aViewFromTheCave is a participant in the Amazon Services LLC Associates Program, an affiliate advertising program designed to provide a means for sites to earn advertising fees by advertising and linking to Amazon.com. Amazon, the Amazon logo, AmazonSupply, and the AmazonSupply logo are trademarks of Amazon.com, Inc. or its affiliates. As an Amazon Associate we earn affiliate commissions from qualifying purchases.