The decision of what to place beneath your raised garden beds is a critical one, impacting not only the immediate stability and longevity of your garden structure but also its long-term health and productivity. This foundational layer acts as more than just a buffer; it’s an integral component of a successful raised bed ecosystem. The choice of materials, application, and intent behind what goes beneath your garden beds can significantly influence drainage, weed suppression, soil structure, and even the cost and sustainability of your gardening endeavor. This exploration delves into the various options available, offering a professional and insightful perspective on how to best prepare the ground beneath your raised garden beds for optimal results.
The Importance of a Well-Prepared Base
Before we delve into specific materials, it’s crucial to understand why a prepared base is so important. Simply placing a raised bed directly onto unprepared ground can lead to a host of problems. Poor drainage can waterlog the roots of your plants, leading to root rot and stunted growth. Unwanted vegetation can aggressively compete with your cultivated crops for nutrients and water, requiring constant and often frustrating intervention. Furthermore, a poorly prepared base can compromise the structural integrity of your raised bed over time, leading to sagging, shifting, and eventual collapse.
A properly prepared base offers several key benefits:
- Enhanced Drainage: Most materials placed beneath raised beds will improve water runoff, preventing saturation and promoting healthy root development.
- Effective Weed and Pest Barrier: Certain layers can effectively suppress existing weeds and prevent them from encroaching from the soil below. This can also deter some burrowing pests.
- Improved Soil Aeration: Some base materials can contribute to better air circulation within the soil profile of your raised bed.
- Structural Support: A firm and level base ensures your raised bed remains stable and maintains its shape.
- Nutrient Management: Certain organic materials can decompose over time, contributing beneficial nutrients to your garden soil.
The specific needs of your garden, including climate, soil type, and the types of plants you intend to grow, will influence the optimal choice for your raised bed base.
Layering for Success: From Weed Suppression to Soil Foundation
The most effective approach to preparing the base of a raised garden bed often involves a strategic layering system. This allows you to address multiple objectives simultaneously, creating a robust foundation that supports plant health and minimizes maintenance. The principle is to build from the ground up, with each layer serving a distinct purpose.
1. The Initial Ground Preparation: Clearing and Leveling
The very first step, regardless of the materials you plan to use, is to prepare the existing ground. This typically involves clearing the area where the raised bed will sit.
Removing Existing Vegetation
- Manual Removal: For smaller areas, this is often the most straightforward and environmentally friendly method. Dig out all grass, weeds, and their root systems as thoroughly as possible. Be diligent, as persistent roots can sprout new growth.
- Tilling (Optional and Context-Dependent): For larger areas or compacted soil, shallow tilling can help break up the surface. However, be cautious not to over-till, as this can disrupt soil structure and bring dormant weed seeds to the surface. If you choose to till, ensure you then remove any churned-up vegetation.
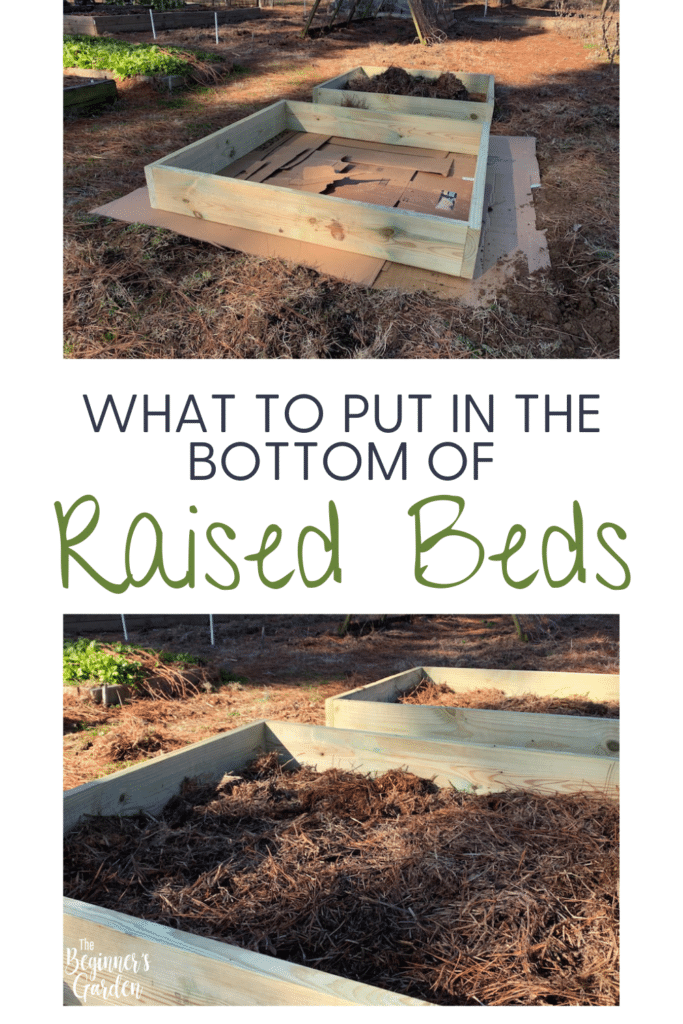
- Sheet Mulching/Lasagna Gardening (as an initial step): If you have ample time before construction, you can begin the process of sheet mulching on the ground where the bed will be. This involves layering organic materials like cardboard, compost, and grass clippings directly on the ground. This will suppress weeds and start the decomposition process, essentially creating a nutrient-rich base. You would then place your raised bed on top of this pre-prepared layer.
Leveling the Site
- Importance of Leveling: A level base is crucial for the structural integrity of your raised bed. Uneven ground can cause the frame to shift, leading to uneven soil distribution and potential collapse.
- Tools for Leveling: Use a spirit level and a shovel or rake to achieve a flat surface. If the ground has a significant slope, you may need to excavate on the higher side and fill on the lower side, compacting the soil as you go to create a stable, level platform.
2. The Weed Barrier: Preventing Underground Intrusion
Once the ground is cleared and leveled, the next crucial layer is a barrier to prevent unwanted vegetation from growing up into your raised bed. This is especially important if you are placing the bed on an area with established grass or persistent weeds.
Cardboard: The Eco-Friendly Choice
- Benefits: Cardboard is an excellent, inexpensive, and readily available weed barrier. It effectively smothers existing vegetation and breaks down over time, contributing organic matter to the soil.
- How to Use: Lay down overlapping sheets of plain, unprinted cardboard (avoid glossy or heavily inked cardboard). Ensure there are no gaps where weeds can penetrate. Wetting the cardboard can help it conform to the ground and start the decomposition process. You can place this directly on the cleared soil.
Landscape Fabric (Geotextile): A Durable Option
- Benefits: Heavy-duty landscape fabric offers a long-lasting and permeable barrier against weeds. It allows water and air to pass through, preventing the soil from becoming waterlogged, while effectively blocking weed growth.
- Considerations: Opt for a high-quality, woven geotextile fabric designed for landscaping. Avoid flimsy, non-woven fabrics that can degrade quickly. Ensure it’s permeable to allow for drainage.
- Installation: Lay the fabric across the prepared ground, overlapping edges generously. Secure it with landscape staples to prevent shifting.
Newspaper: A Readily Available Alternative
- Benefits: Similar to cardboard, layers of newspaper can effectively suppress weeds. It’s also a good source of organic matter.
- How to Use: Use multiple layers of plain newspaper (avoid glossy inserts). Overlap generously. Wetting the newspaper will help it stay in place and begin the decomposition process.
3. The Drainage and Aeration Layer: Facilitating Healthy Roots
Beneath your primary growing medium, a layer designed to enhance drainage and aeration is vital. This prevents water from pooling at the bottom of the raised bed, which can lead to root rot and other diseases.
Gravel or Crushed Stone: For Superior Drainage
- Benefits: A layer of gravel or crushed stone provides excellent drainage and creates a void space for water to escape. This is particularly useful in areas with heavy clay soil or where waterlogging is a significant concern.
- Considerations: Use coarse gravel or crushed stone, about 2-4 inches deep. Avoid fine sand, which can compact and impede drainage. Ensure the stone is clean to avoid introducing unwanted soil or seeds.
Broken Pottery or Terracotta Shards: A Recycled Option
- Benefits: Reusing broken pieces of terracotta pots or other ceramic materials can provide a similar drainage benefit to gravel, with the added advantage of upcycling.
- How to Use: Scatter these pieces loosely across the base. Ensure there are ample air pockets between them.
Coarse Organic Matter (Twigs, Small Branches): A Biodegradable Approach
- Benefits: A layer of coarse organic material, such as twigs, small branches, or wood chips, can provide drainage and will eventually decompose, adding nutrients to the soil. This is often referred to as the “hugelkultur” principle at a smaller scale.
- Considerations: Ensure the material is well-rotted or aged to prevent excessive nitrogen draw from the soil as it decomposes. Avoid treated lumber or materials that might leach harmful chemicals.
4. The Soil Transition Layer: Bridging the Gap
In some cases, you might want to introduce a layer that acts as a transition between your weed barrier/drainage layer and your primary growing medium. This can help prevent the finer soil particles from washing down into the drainage layer.
Coarse Compost or Mulch: Providing a Buffer
- Benefits: A layer of coarser compost or wood chip mulch can serve as a buffer. It allows water to drain through while preventing the soil from sifting down. It also contributes organic matter.
- How to Use: Apply a layer of about 2-3 inches.
Burlap or Hessian Fabric: A Natural Barrier
- Benefits: Natural burlap or Hessian fabric can be used as a permeable barrier. It allows water to pass through but prevents finer soil particles from migrating downwards. It will also eventually decompose.
- Considerations: Ensure the fabric is made from natural fibers and is free from synthetic coatings.
Strategic Considerations for Your Raised Bed Base
Beyond the physical materials, several strategic factors should guide your decision-making process for what to put under your raised garden beds. These considerations ensure your chosen method aligns with your gardening goals, budget, and environmental values.
Environmental Impact and Sustainability
The choices you make for your raised bed base can have a significant environmental footprint. Prioritizing sustainable options is a key aspect of modern gardening.
Recycled and Reclaimed Materials
- Benefits: Utilizing materials like salvaged lumber (ensure it’s untreated), broken pottery, cardboard from packaging, or even well-rotted leaves and grass clippings reduces waste and conserves resources.
- Sourcing: Look for materials locally to minimize transportation emissions. Community recycling centers, local businesses, or even your own property can be sources of free or low-cost materials.
Biodegradable Options
- Benefits: Materials that naturally decompose over time, such as cardboard, newspaper, twigs, and certain types of mulch, contribute to soil health and avoid long-term waste.
- Integration: These biodegradable layers can be incorporated into the soil over time, enriching it and reducing the need for future soil replenishment.
Cost-Effectiveness and Budget Allocation
The cost of materials can vary considerably. Planning your base layers thoughtfully can help manage your budget without compromising on effectiveness.
DIY and Low-Cost Solutions
- Cardboard and Newspaper: These are often free or very inexpensive and provide excellent weed suppression.
- Yard Waste: Utilizing fallen branches, leaves, and grass clippings can significantly reduce the need to purchase external materials. Ensure these are free of disease or invasive seeds.
Investing in Long-Term Durability
- Landscape Fabric: While an upfront cost, high-quality landscape fabric can last for many years, reducing the need for frequent replacement and ongoing weed management.
- Gravel/Stone: While requiring an initial investment, a well-placed gravel layer can provide excellent, long-lasting drainage.
Specific Plant Needs and Soil Conditions
The ultimate purpose of your raised bed – the types of plants you intend to grow – and the existing soil conditions beneath should heavily influence your base layer choices.
For Water-Sensitive Plants
- Prioritize Drainage: If you’re growing plants that are highly susceptible to root rot, such as many succulents or vegetables like carrots, a robust drainage layer of gravel or coarse organic matter is essential.
- Avoid Water Retention: Steer clear of materials that might retain excessive moisture.

For Areas with Poor Existing Drainage
- Elevated Drainage: If the ground beneath your raised bed is naturally boggy or has heavy clay soil, investing in a substantial drainage layer is paramount. This creates a dedicated channel for water to escape.
In conclusion, the “what to put under raised garden beds” question is far from a trivial detail. It’s a foundational element of successful raised bed gardening. By carefully considering the benefits of weed suppression, drainage, aeration, and sustainability, you can craft a base that not only supports the immediate structure but also fosters a thriving and productive garden for years to come. A well-prepared foundation is an investment that pays dividends in plant health, reduced maintenance, and the overall enjoyment of your gardening space.
aViewFromTheCave is a participant in the Amazon Services LLC Associates Program, an affiliate advertising program designed to provide a means for sites to earn advertising fees by advertising and linking to Amazon.com. Amazon, the Amazon logo, AmazonSupply, and the AmazonSupply logo are trademarks of Amazon.com, Inc. or its affiliates. As an Amazon Associate we earn affiliate commissions from qualifying purchases.