In today’s fast-paced financial landscape, the ability to move money quickly, securely, and without incurring hefty fees is paramount. For millions of Americans, Zelle has emerged as a frontrunner in facilitating these essential transactions. Paired with the robust infrastructure of a major financial institution like Chase, Zelle offers a powerful and convenient solution for personal finance management. This guide delves into the specifics of setting up Zelle with your Chase account, empowering you to take full advantage of this indispensable financial tool for everything from splitting dinner bills to sending emergency funds.
Understanding Zelle and Its Role in Modern Personal Finance
Before diving into the setup process, it’s crucial to grasp what Zelle is and how it integrates into the broader context of personal finance. Zelle isn’t just another payment app; it’s a network of financial institutions enabling direct bank-to-bank transfers, making it a unique and powerful player in the digital payment ecosystem.
What is Zelle and Why is it Popular?
Zelle is a U.S.-based digital payment network that allows individuals to send and receive money directly between bank accounts, typically within minutes. Unlike some third-party payment apps that hold funds in an intermediary account, Zelle operates by directly moving money from one linked bank account to another. This direct integration is a significant differentiator, contributing to its speed and often, its fee-free nature.
Its popularity stems from several key financial advantages:
- Speed: Funds are typically available in the recipient’s bank account in minutes, making it ideal for time-sensitive payments.
- Convenience: Users can send money using only an email address or U.S. mobile phone number, eliminating the need for bank account details.
- Cost-Effectiveness: When used through a participating bank like Chase, Zelle transactions are usually free, saving users from transfer fees often associated with other payment methods.
- Integration: Being integrated directly into banking apps means users don’t need to manage separate funds in a third-party wallet; money moves directly from their existing bank balance.
For managing personal finances, Zelle simplifies tasks such as splitting rent, contributing to group gifts, reimbursing friends, or even paying small service providers without the hassle of cash or checks.
Zelle vs. Traditional Payment Methods: A Financial Comparison
When evaluating payment options, it’s helpful to compare Zelle against more traditional methods and even other digital alternatives from a financial perspective.
- Checks: While still used, checks are slow, require physical handling, and can incur fees for checkbooks or bounced checks. Zelle is instant and digital.
- Cash: Cash is quick for in-person transactions but carries security risks and isn’t practical for remote payments. Zelle offers digital security and remote capabilities.
- Wire Transfers: Wires are fast for large sums but often come with significant fees, especially for international transfers, and require detailed bank information. Zelle is typically free for smaller, domestic transfers.
- Other P2P Apps (e.g., PayPal, Venmo, Cash App): While these also offer speed and convenience, they often involve holding funds in a separate digital wallet, which may require an additional step to transfer to a bank account, or charge fees for instant transfers. Zelle’s direct bank-to-bank model often eliminates these extra steps and fees for standard transactions.
From a financial standpoint, Zelle offers a compelling blend of speed, cost efficiency, and directness that makes it superior for many everyday transactions compared to its counterparts, particularly when integrated with a trusted financial institution.
The Benefits of Using Zelle with a Major Bank like Chase
Using Zelle through your Chase account enhances the experience with an added layer of trust, security, and convenience.
- Seamless Integration: Zelle is built directly into the Chase Mobile® app and online banking portal, meaning no separate app download is needed if you already use Chase’s digital platforms.
- Enhanced Security: Leveraging Chase’s robust security infrastructure, your Zelle transactions are protected by the bank’s existing fraud monitoring and encryption technologies. This provides peace of mind that your financial data is handled securely.
- Familiar User Experience: Existing Chase customers can navigate Zelle within an environment they already trust and understand, reducing the learning curve and potential for errors.
- Direct Access to Funds: Money sent or received via Zelle instantly impacts your Chase account balance, offering immediate access to your funds without extra transfer steps.
- Integrated Support: Should you encounter any issues, you can rely on Chase’s customer service, which is well-versed in assisting with Zelle-related inquiries.
Preparing for Your Zelle Setup with Chase
Setting up Zelle with Chase is a straightforward process, but a few preliminary steps ensure a smooth and successful enrollment. Adequate preparation minimizes potential hiccups and helps you start sending and receiving money without delay.
Essential Prerequisites: What You’ll Need
To successfully enroll in Zelle through your Chase account, gather the following essentials:
- An active Chase checking or savings account: Zelle needs to link to an active bank account for sending and receiving funds. Ensure your account is in good standing.
- Access to the Chase Mobile® app or Chase Online: You’ll typically enroll and manage Zelle through one of these platforms. Make sure you have the latest version of the app installed on your smartphone or access to Chase’s secure website.
- A U.S. mobile phone number: This number will be linked to your Zelle profile and used by others to send you money. It must be an active, U.S.-based number.
- An email address: Similar to your phone number, an email address can also be used as your Zelle identifier. Ensure it’s one you regularly check.
- Internet connection: A stable internet connection is necessary for accessing your Chase accounts online or through the mobile app.
Ensuring Your Chase Account is Ready
Before you begin the Zelle enrollment, take a moment to confirm your Chase account details are up-to-date and ready for digital transactions.
- Verify Contact Information: Ensure the mobile phone number and email address you intend to use for Zelle are already on file and current with Chase. Mismatched information can cause delays or prevent enrollment.
- Review Account Status: Confirm your checking or savings account is active and not subject to any holds or restrictions that might prevent money transfers.
- Set Up Online Access: If you haven’t already, enroll in Chase Online and download the Chase Mobile® app. These are the primary portals for Zelle management.
Addressing Common Concerns Before You Begin
While Zelle is secure, understanding its nuances can prevent common issues and enhance your financial safety.
- Transaction Limits: Be aware that Chase, like other banks, imposes daily and weekly transaction limits for Zelle for security reasons. These limits can vary based on your account type and history. It’s wise to check current limits within your Chase online banking or app.
- Understanding Irreversibility: Money sent via Zelle is typically irreversible. Once you authorize a payment, it’s instantly transferred. This emphasizes the importance of sending money only to people you know and trust and double-checking recipient details.
- Security Precautions: Never share your banking login credentials. Be wary of unsolicited requests for money or suspicious texts/emails claiming to be Zelle or Chase. Chase and Zelle will never ask for your password via email or text.
- Linkage to One Account: Your Zelle profile (linked to a phone number or email) can generally only be associated with one bank account at a time. If you use multiple banks, decide which account you want to link to Zelle.
Step-by-Step Guide to Setting Up Zelle Through Chase
With your preparations complete, you’re ready to enroll in Zelle through your Chase account. The process is designed to be user-friendly and can typically be completed in just a few minutes.
Accessing Zelle via the Chase Mobile App
The Chase Mobile® app is the most convenient way to set up and manage Zelle.
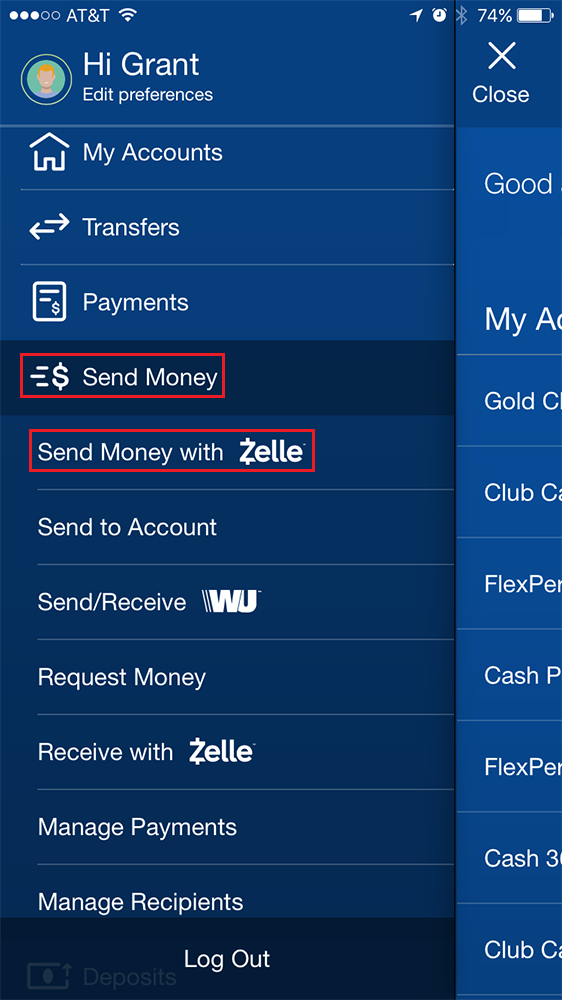
- Log In: Open the Chase Mobile® app on your smartphone and log in using your user ID and password.
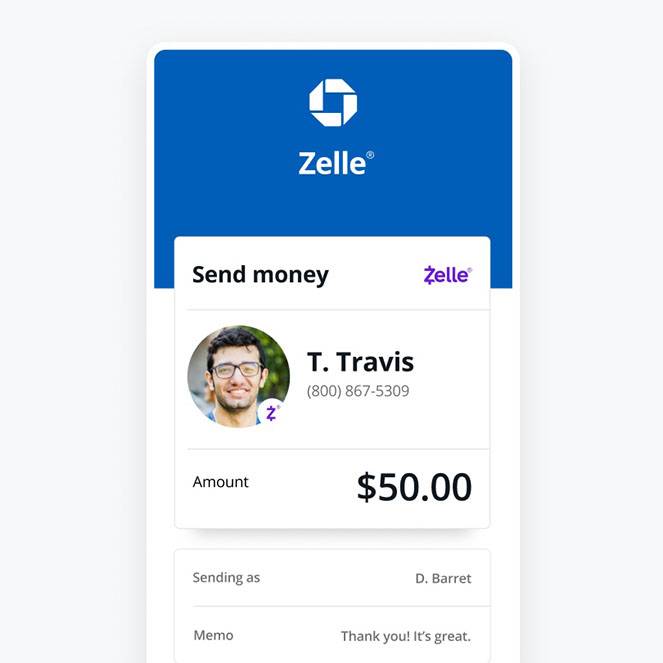
- Navigate to Zelle: Once logged in, look for the “Pay & Transfer” menu option. Tap on it, and then select “Send money with Zelle®.” If you’re a new user, you might see an option like “Get started with Zelle®” or “Enroll.”
Registering Your Profile and Linking Your Account
Follow the on-screen prompts to register your Zelle profile:
- Enroll Now: Tap “Enroll Now” or “Get Started.”
- Agree to Terms: Read and accept the Zelle service agreement and privacy policy. This is an important step as it outlines your responsibilities and the service’s terms.
- Choose Account: Select the Chase checking or savings account you wish to link to Zelle for sending and receiving money. This will be your default funding account.
- Confirm Contact Info: The app will likely display the email address and U.S. mobile phone number associated with your Chase account. Confirm these are correct or enter the preferred contact method you want to use for Zelle. This is how others will find you and send you money.
- Verification: Chase will send a verification code to the phone number or email address you provided. Enter this code into the app to verify your identity and confirm your Zelle enrollment.
Confirming Your Enrollment
Once you’ve entered the verification code successfully, you’ll receive a confirmation message within the app or via email, indicating that your Zelle account has been successfully set up with Chase. You are now ready to send and receive money.
What to Do If You Encounter Issues
While the process is generally smooth, issues can arise.
- Error Messages: If you receive an error message, carefully read its content. It often provides clues about the problem (e.g., “invalid phone number,” “account not eligible”).
- Verification Code Not Received: Double-check the phone number or email address you provided. Ensure it’s active and that you have signal (for SMS) or check your spam/junk folder (for email). You may also have the option to resend the code.
- Already Enrolled: If you have previously linked your phone number or email to Zelle through another bank or credit union, you may need to transfer the enrollment to Chase. Zelle usually allows you to move your profile to a different bank from within the new bank’s app.
- Contact Chase Support: If you’re unable to resolve the issue on your own, the best course of action is to contact Chase customer service directly. They can provide personalized assistance and troubleshoot specific account-related problems.
Maximizing Your Zelle Experience with Chase for Financial Efficiency
Once Zelle is set up, understanding best practices for sending, receiving, and managing your transactions will ensure you use this financial tool most effectively and securely.
Sending Money: Best Practices for Financial Security
Using Zelle for transfers is quick, but it’s crucial to exercise caution:
- Know Your Recipient: Only send money to people you personally know and trust. Zelle is designed for person-to-person payments between friends, family, and trusted acquaintances.
- Double-Check Details: Always verify the recipient’s U.S. mobile phone number or email address before sending money. Even a single digit or letter wrong can send your money to the wrong person, and as transfers are irreversible, you may not get it back.
- Small Test Transfer (Optional): For a first-time transfer to a new recipient, consider sending a small amount (e.g., $1) first to confirm it goes through correctly, then send the larger sum.
- Understand Fraud Scams: Be vigilant against common Zelle scams, such as requests for money from unknown individuals, overpayment scams, or fake tech support impersonations. Chase will never ask you to send money via Zelle to “verify” your account.
Receiving Money: How it Works and What to Expect
Receiving money through Zelle is generally even simpler than sending it:
- Automatic Deposit: If your U.S. mobile phone number or email address is already enrolled with Zelle through Chase, money sent to you will be automatically deposited into your linked Chase account, usually within minutes.
- Notifications: You’ll typically receive an email or text notification from Zelle (or Chase) confirming that money has been sent to you.
- Not Enrolled? If someone sends money to an email or phone number not yet enrolled with Zelle, you’ll receive a notification prompting you to enroll to receive the funds. You’ll typically have 14 days to enroll before the payment expires.
Managing Transaction Limits and Security Features
Familiarize yourself with the financial safeguards and limitations:
- Monitor Limits: Keep track of your daily and weekly Zelle transaction limits through Chase. If you need to send a larger sum, plan accordingly or use an alternative payment method. These limits are in place to protect your funds.
- Fraud Protection: Chase implements advanced security measures to detect and prevent unauthorized activity. Report any suspicious transactions or activity on your account immediately to Chase.
- Account Monitoring: Regularly review your Chase account statements and Zelle transaction history to ensure all activity is legitimate.
Integrating Zelle into Your Personal Finance Strategy
Zelle can be a powerful tool within your broader financial strategy:
- Budgeting: Use Zelle to track outgoing payments to specific categories (e.g., “Dining Out” when splitting restaurant bills).
- Bill Splitting: Efficiently split utility bills, rent, or group expenses with roommates or friends, ensuring everyone pays their share promptly.
- Small Business Use Cases: For sole proprietors or small businesses, Zelle can be a convenient way to accept payments from customers for services rendered, especially for smaller transactions where credit card fees might be prohibitive. However, it’s important to differentiate personal vs. business Zelle accounts if possible, and note Zelle is primarily designed for personal use.
- Emergency Transfers: In urgent situations, Zelle provides a rapid means to send money to family or friends in need, offering immediate financial relief.
The Financial Implications and Future of Digital Payments
The rise of Zelle and similar platforms signifies a fundamental shift in how we manage and interact with our money. Understanding the broader financial implications is key to navigating this evolving landscape.
Cost Savings and Convenience: A Monetary Advantage
The most immediate financial benefits of Zelle are the direct cost savings and the invaluable convenience it offers.
- Reduced Fees: By largely eliminating transfer fees, Zelle keeps more money in your pocket, especially for frequent small transfers that would accumulate costs with traditional methods.
- Time as Money: The instant nature of Zelle means funds are available quickly, avoiding delays that might impact bill payments, urgent needs, or investment opportunities where immediate access to capital is beneficial. The time saved from not having to visit an ATM, write checks, or wait for transfers is a significant, albeit indirect, monetary advantage.
- Simpler Reconciliation: With transactions directly reflected in your Chase account, reconciling your finances becomes simpler, aiding in better budget management and financial tracking.
Security Measures and Financial Protection
While convenience is a highlight, robust security is the bedrock of Zelle’s utility.
- Bank-Level Security: As a service integrated into bank apps like Chase’s, Zelle benefits from the extensive security infrastructure already in place at financial institutions. This includes encryption, fraud monitoring systems, and multi-factor authentication.
- Zelle’s Own Safeguards: Zelle itself has built-in security protocols to protect users, though user vigilance remains critical. The network focuses on authenticated transfers between known parties.
- User Responsibility: It’s paramount for users to play their part by protecting their login credentials, using strong passwords, and being extremely cautious about who they send money to. Chase’s fraud protection policies typically do not cover unauthorized Zelle payments where you willingly sent money to a scammer.

The Evolution of Digital Wallets and Banking
Zelle is a crucial component of the ongoing evolution of digital payments and the future of banking.
- Seamless Interoperability: Zelle exemplifies the trend towards greater interoperability between different financial institutions, creating a more unified and accessible payment ecosystem.
- Impact on Traditional Banking: Services like Zelle are pushing traditional banks to innovate and integrate more digital solutions, ensuring they remain relevant and competitive in an increasingly digital-first world. This pressure benefits consumers through better, faster, and more convenient services.
- Future Trends: We can expect further integration of payment solutions with broader financial management tools, potentially offering more sophisticated budgeting, savings, and investment features directly within banking apps. The drive towards instant, secure, and low-cost transactions will continue to shape how we interact with our money in the years to come, with Zelle remaining a key player in this transformation.
By effectively setting up and utilizing Zelle with your Chase account, you’re not just gaining a convenient payment method; you’re actively engaging with the forefront of modern personal finance, poised to manage your money with greater efficiency, security, and insight.
aViewFromTheCave is a participant in the Amazon Services LLC Associates Program, an affiliate advertising program designed to provide a means for sites to earn advertising fees by advertising and linking to Amazon.com. Amazon, the Amazon logo, AmazonSupply, and the AmazonSupply logo are trademarks of Amazon.com, Inc. or its affiliates. As an Amazon Associate we earn affiliate commissions from qualifying purchases.