In the ever-evolving landscape of computing, the unsung hero working tirelessly behind your vibrant displays and seamless multimedia experiences is your graphics driver. Often overlooked until a problem arises, these essential pieces of software act as the bridge between your operating system and your graphics processing unit (GPU). Keeping them updated is not merely a technical formality but a critical practice for maintaining optimal system performance, stability, and security.
Whether you’re a hardcore gamer seeking every frame per second, a creative professional demanding flawless rendering, or simply a casual user expecting a smooth desktop experience, understanding how and why to upgrade your graphics driver is paramount. This guide will walk you through the process, from identifying your hardware to troubleshooting common issues, ensuring you can harness the full potential of your graphics card.
Why Upgrading Your Graphics Driver Is Crucial
Regularly updating your graphics drivers might seem like an optional chore, but its impact on your system’s performance and overall health is profound. Neglecting these updates can lead to a myriad of issues, from minor graphical glitches to significant performance bottlenecks and even system instability.
Enhanced Performance and Stability
One of the most immediate and noticeable benefits of an updated graphics driver is improved performance. Graphics card manufacturers – NVIDIA, AMD, and Intel – continuously release new driver versions that include optimizations for popular games and applications. These optimizations can lead to higher frame rates, reduced latency, and smoother gameplay. Beyond gaming, updated drivers can accelerate tasks in productivity software, video editing suites, and 3D rendering applications, making your workflow more efficient. Furthermore, driver updates often include bug fixes that address stability issues, preventing crashes, freezes, and graphical artifacts that might plague older versions.
Access to New Features and Technologies
Graphics technology is constantly advancing, and new features are frequently introduced. These can range from cutting-edge rendering techniques like ray tracing and DLSS (Deep Learning Super Sampling) to display technologies such as G-Sync or FreeSync. To unlock these capabilities, you need the corresponding driver support. Without the latest drivers, your powerful new graphics card might be operating with significant limitations, unable to utilize its full feature set or interact optimally with new monitors or VR headsets. Driver updates also ensure compatibility with the latest APIs (Application Programming Interfaces) like DirectX and Vulkan, which modern applications and games rely upon.
Critical Security Patches
While less frequent than performance or feature updates, graphics drivers can occasionally contain security vulnerabilities. When these are discovered, manufacturers promptly release patches to protect users. Exploitable vulnerabilities in graphics drivers could potentially allow malicious software to gain unauthorized access to your system, compromise data, or disrupt operations. Staying updated ensures your system is protected against the latest identified threats, adding an essential layer to your overall digital security posture.
Improved Gaming and Multimedia Experience
For gamers, new drivers often provide “Game Ready” or “Day Zero” updates timed with major game releases. These drivers are specifically optimized to deliver the best possible experience from launch day, reducing stutters, fixing visual bugs, and enhancing performance. For multimedia users, updated drivers can improve video playback quality, ensure compatibility with new codecs, and optimize hardware acceleration for streaming services or video editing, leading to a more immersive and trouble-free experience across all forms of digital content.
Preparing for Your Graphics Driver Upgrade
Before diving into the upgrade process, a few preparatory steps can save you considerable frustration. These steps ensure you have the correct information, a fallback plan, and a clean slate for the new installation.
Identifying Your Current Graphics Card and Driver Version
The first and most crucial step is to know what graphics card you have. This information dictates which drivers you need to download.
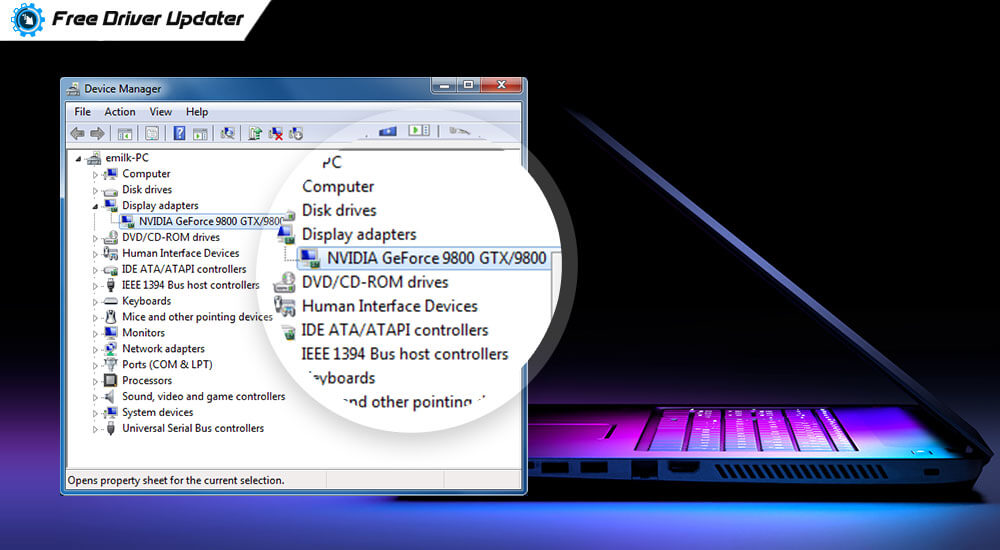
- For Windows 10/11:
- Right-click on the Start button and select “Device Manager.”
- Expand “Display adapters.” You will see your graphics card(s) listed (e.g., NVIDIA GeForce RTX 3070, AMD Radeon RX 6800, Intel UHD Graphics).
- Right-click on your graphics card and select “Properties.”
- Go to the “Driver” tab. Here you will find the “Driver Version” and “Driver Date.” Note this down.
Knowing your specific card model is essential for downloading the correct driver from the manufacturer’s website.
Backing Up Your System
While graphics driver updates are generally safe, there’s always a slim chance of something going wrong. Creating a system restore point is a quick and effective way to have a rollback option.
- For Windows 10/11:
- Type “Create a restore point” into the Windows search bar and select the corresponding result.
- In the “System Properties” window, ensure system protection is “On” for your primary drive (usually C:).
- Click “Create…”
- Give the restore point a descriptive name (e.g., “Before GPU Driver Update [Date]”) and click “Create.”
This allows you to revert your system to its previous state if the new driver causes unforeseen issues.
Deciding on the Right Driver Version
Graphics card manufacturers typically offer several driver versions:
- Stable/Recommended: These are fully tested, widely compatible, and generally the safest choice for most users.
- Beta/Optional: These drivers might include early access to new features or specific game optimizations but can be less stable and may contain bugs. Unless you have a specific reason or are comfortable with potential issues, it’s best to stick to stable releases.
For the vast majority of users, downloading the latest stable driver directly from the manufacturer’s website is the recommended approach.
Methods for Upgrading Your Graphics Driver
There are several ways to upgrade your graphics driver, each with its own advantages and recommended use cases. The “clean installation” method is generally preferred for avoiding conflicts.
Method 1: Using Your Graphics Card Manufacturer’s Software
NVIDIA and AMD provide dedicated software utilities that simplify the driver update process, often including additional features like game optimization and streaming tools.
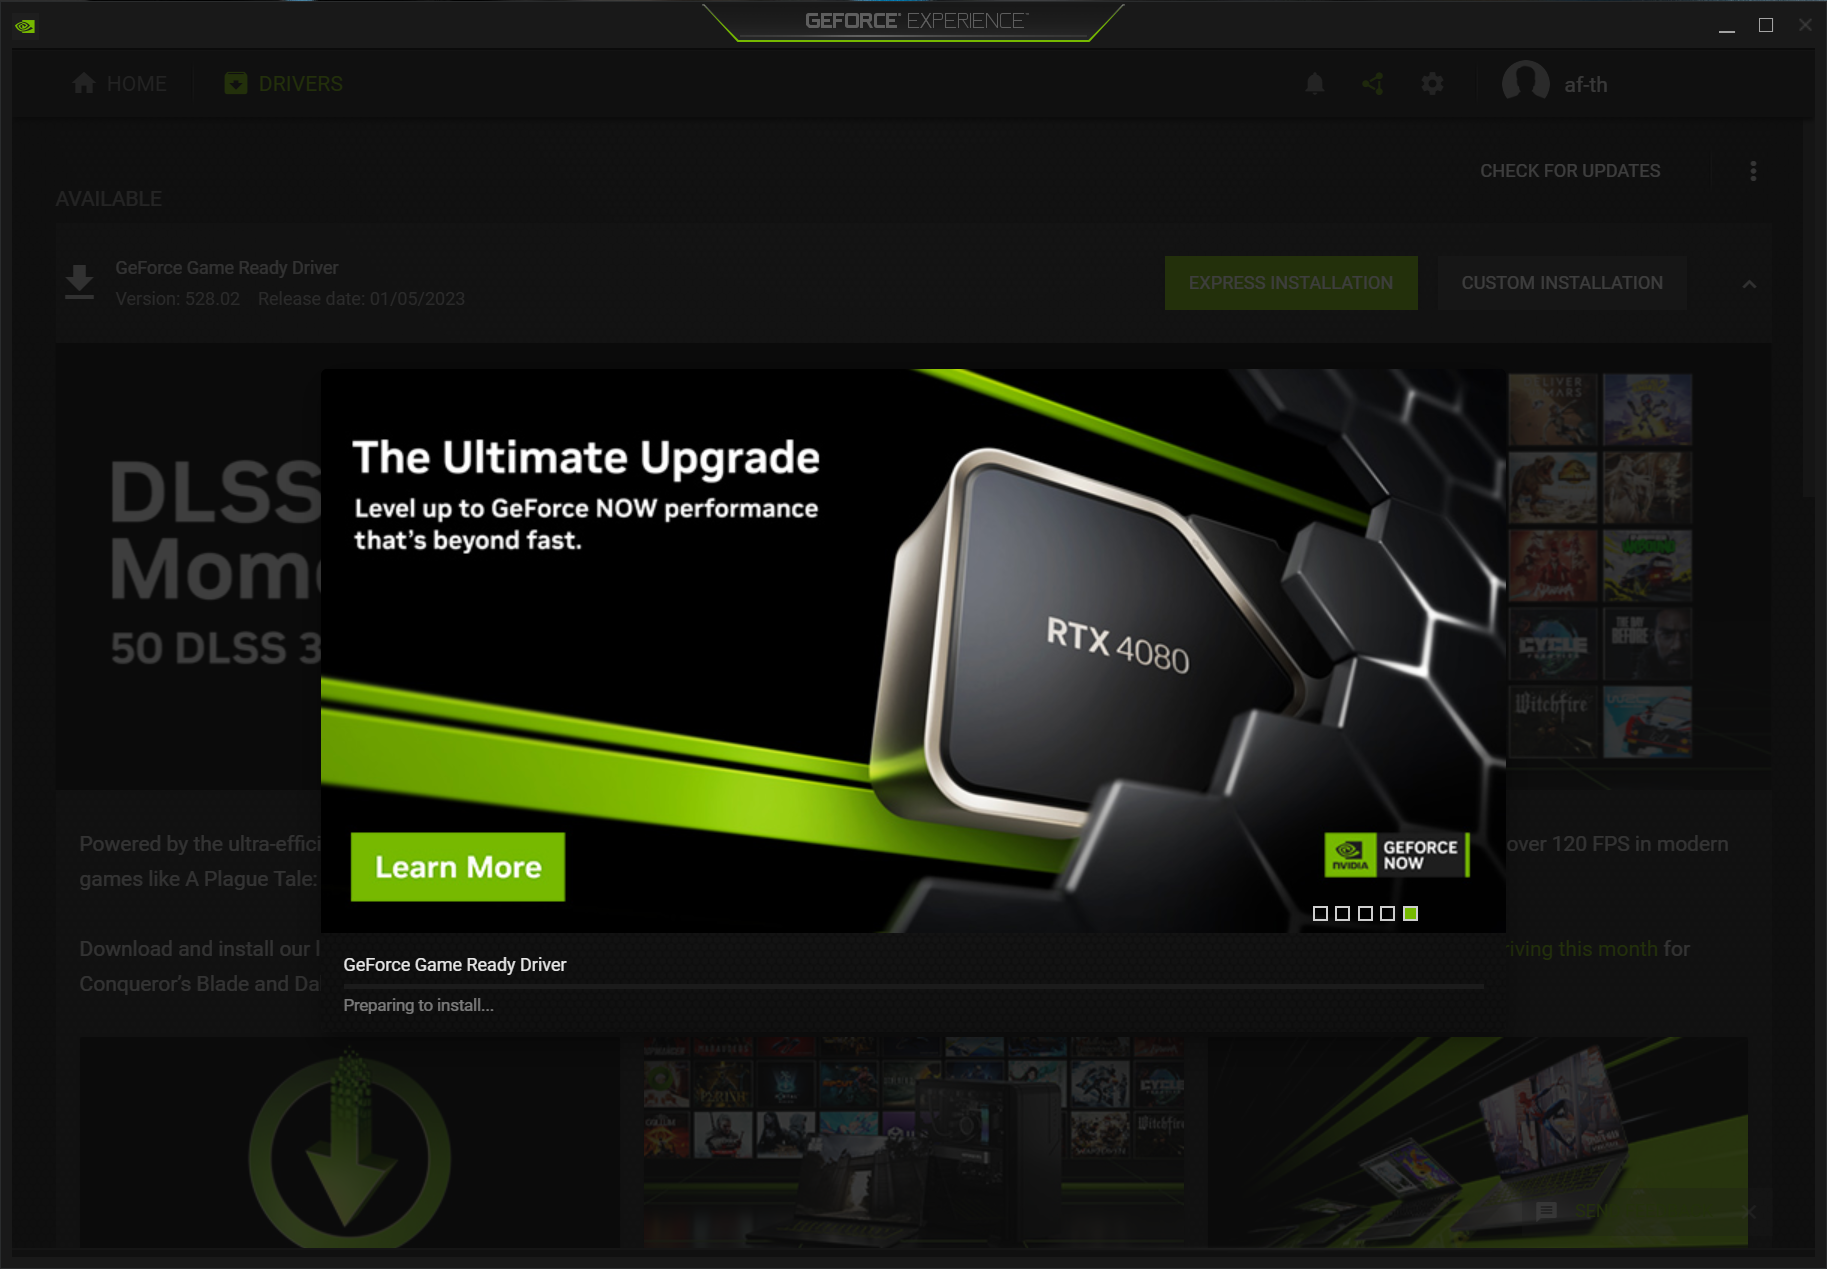
For NVIDIA Graphics Cards (GeForce Experience)
- Download & Install GeForce Experience: If you don’t have it, download it from NVIDIA’s website.
- Launch GeForce Experience: Sign in or create an account if prompted.
- Navigate to Drivers Tab: Click on the “Drivers” tab at the top.
- Check for Updates: GeForce Experience will automatically check for new drivers.
- Download Driver: If a new driver is available, click “Download.”
- Installation:
- Express Installation: This is the default and easiest option.
- Custom Installation: Choose this for more control, especially if you want to perform a “clean installation” by checking the box “Perform a clean installation.” This uninstalls old drivers before installing new ones, preventing potential conflicts.
- Follow Prompts: The screen may flicker or go black briefly during installation. Restart your PC if prompted.
For AMD Graphics Cards (Radeon Software)
- Download & Install Radeon Software: If you don’t have it, download it from AMD’s website.
- Launch Radeon Software: Right-click on your desktop and select “AMD Radeon Software.”
- Check for Updates: In the bottom-left corner, you’ll see a “New Updates” notification or a gear icon for settings. Click the gear icon, then go to “System” > “Software.”
- Download Driver: If a new driver is available, click “Download.”
- Installation:
- Upgrade: This is the standard update.
- Factory Reset: This performs a clean installation, removing all old settings and drivers. This is highly recommended for major driver updates or troubleshooting.
- Follow Prompts: The screen may flicker or go black. Restart your PC if prompted.
Method 2: Manual Download and Installation
This method is universal for all graphics cards (NVIDIA, AMD, Intel) and is often preferred for performing a truly clean installation, especially when troubleshooting issues or when manufacturer software isn’t desired.
Locating the Correct Driver
- Visit the Manufacturer’s Website:
- NVIDIA: nvidia.com/drivers
- AMD: amd.com/support
- Intel: intel.com/support/graphics
- Use the Driver Finder Tool: Most sites have a tool where you select your product type, series, and specific model. Be precise.
- Download the Latest Stable Driver: Choose the correct operating system (Windows 10/11 64-bit) and download the recommended driver package.
Clean Installation Steps (Recommended for Best Results)
- Download Display Driver Uninstaller (DDU): This free utility is crucial for thoroughly removing old driver remnants. Get it from a trusted source like wagnardsoft.com.
- Boot into Safe Mode: This is essential for DDU to work effectively.
- Go to “Settings” > “Update & Security” (Windows 10) or “System” > “Recovery” (Windows 11) > “Restart now” under Advanced startup.
- After restarting, choose “Troubleshoot” > “Advanced options” > “Startup Settings” > “Restart.”
- Press F4 or 4 to “Enable Safe Mode.”
- Run DDU:
- Launch DDU. Select “GPU” and then your graphics card manufacturer (NVIDIA, AMD, or Intel).
- Click “Clean and restart.” DDU will remove all driver files and restart your PC in normal mode.
- Install New Driver:
- Once your PC restarts, run the driver installer package you downloaded earlier.
- Follow the on-screen prompts. For NVIDIA, choose “Custom” and select “Perform a clean installation” if you didn’t use DDU. For AMD, choose “Factory Reset.”
- Complete the installation and restart your PC when prompted.
Method 3: Using Windows Device Manager (Least Recommended)
While Windows Device Manager offers an option to update drivers, it’s generally the least reliable method for graphics drivers. It often only finds generic or slightly older versions that Microsoft has validated, rather than the latest manufacturer-specific optimizations.
- Open Device Manager: Right-click on the Start button and select “Device Manager.”
- Expand “Display adapters”:
- Right-click on your graphics card: Select “Update driver.”
- Search for drivers automatically: Windows will attempt to find and install a driver. If it says “The best drivers for your device are already installed,” it means Windows doesn’t have a newer driver in its local or online repository.
This method is primarily useful for initial setup or if you’re experiencing severe display issues and need a basic driver to get your system running normally.
Method 4: For Laptops with Integrated Graphics (OEM Specific Drivers)
Many laptops, especially those without a dedicated GPU, rely on integrated graphics (e.g., Intel UHD Graphics). For these, it’s often best to download drivers directly from your laptop manufacturer’s (OEM) support website (e.g., Dell, HP, Lenovo). OEMs often customize drivers for their specific hardware configurations, and generic drivers from Intel might not function correctly or offer optimal performance.
- Visit your laptop manufacturer’s support website.
- Enter your laptop’s model number or service tag.
- Navigate to the “Drivers & Downloads” section.
- Locate the latest graphics driver for your specific model and OS.
- Download and install it, following their instructions.
Troubleshooting Common Graphics Driver Issues
Even with careful preparation, issues can sometimes arise after a graphics driver update. Knowing how to troubleshoot these problems can save you a lot of headache.
Display Problems After Upgrade
- Black Screen/No Signal: If your screen goes black and stays that way, try restarting your PC. If it persists, boot into Safe Mode (as described in Method 2) and uninstall the problematic driver using DDU, then restart.
- Resolution Issues/Incorrect Aspect Ratio: Go to Display Settings (right-click on desktop) and ensure the correct resolution and refresh rate are selected.
- Graphical Artifacts/Flickering: These often indicate a corrupted driver installation or an unstable driver. Reinstall the driver using the “clean installation” method (DDU) or roll back to a previous stable version.
Performance Decreases
If your performance worsens after an update, it could be due to a bug in the new driver, or an incompatibility with your specific system.
- Rollback Driver: The quickest solution is often to roll back to the previous driver version that was working well.
- Open Device Manager.
- Expand “Display adapters” and right-click your graphics card.
- Go to the “Driver” tab and click “Roll Back Driver.” Follow the prompts. (This option is only available if a previous driver version is detected.)
- Check for Newer Hotfixes: Sometimes manufacturers quickly release hotfix drivers to address performance regressions. Check their websites.
Driver Installation Failures
- Error Messages: Note down any error codes or messages. These can be valuable for searching online forums or manufacturer support.
- Antivirus Interference: Temporarily disable your antivirus software during the installation process, as it might sometimes interfere.
- Corrupted Download: Re-download the driver file; it might have been corrupted during the initial download.
- System Requirements: Ensure your graphics card is actually supported by the driver version you’re trying to install.
Rolling Back Your Driver
As mentioned above, rolling back is often the first step in troubleshooting. If the “Roll Back Driver” option in Device Manager isn’t available, or if you prefer a cleaner approach:
- Boot into Safe Mode.
- Use DDU to completely uninstall the problematic driver.
- Restart your PC.
- Install the previous, known-good driver version that you downloaded beforehand (it’s wise to keep a backup of a stable driver installer).
Maintaining Your Graphics Drivers and System Health
Upgrading your graphics driver is not a one-time event but rather an ongoing maintenance task. Establishing good habits can keep your system running smoothly year-round.
Establishing a Regular Update Schedule
While there’s no need to update every single time a new driver is released (unless you’re facing specific issues or playing a brand-new title), setting a regular schedule is beneficial.
- Monthly Check: For casual users, a monthly check for stable drivers is sufficient.
- Game/App Specific: For gamers or professionals using demanding software, update when new “Game Ready” or “Studio” drivers are released that specifically target your applications.
- Avoid Over-Updating: Don’t chase every beta driver unless you’re an enthusiast or explicitly need features that are only in beta. Stability often outweighs being on the absolute bleeding edge.
Monitoring Driver Performance
After an update, pay attention to your system’s behavior.
- Observe Stability: Are applications crashing less? Is your system feeling snappier?
- Check Performance: Use benchmarks (e.g., 3DMark, Unigine Heaven/Superposition) or in-game FPS counters to verify performance improvements or regressions.
- Temperature Monitoring: Keep an eye on your GPU temperatures using tools like HWMonitor or GPU-Z, especially during demanding tasks, to ensure optimal cooling with the new driver.
Keeping Other Drivers Updated
While graphics drivers are critical, remember that other system drivers (chipset, audio, network, storage) also contribute to overall system stability and performance. Regularly check your motherboard manufacturer’s website for chipset drivers, and consider using Windows Update for other peripheral drivers, though direct downloads are always an option.

General System Maintenance Tips
A well-maintained operating system complements up-to-date drivers.
- Disk Cleanup: Periodically clear temporary files and system clutter.
- Defragment Hard Drives: For traditional HDDs, defragmentation can improve file access times. SSDs do not require defragmentation.
- Malware Scans: Regularly scan for viruses and malware.
- Adequate Cooling: Ensure your PC has good airflow and clean dust from fans and heatsinks. Overheating can lead to performance throttling and instability, regardless of driver quality.
By consistently following these practices, you can ensure your graphics card, and indeed your entire system, performs at its peak, providing you with a reliable, high-performance computing experience. A well-maintained graphics driver is the backbone of visual excellence, ensuring your digital world remains crisp, responsive, and secure.
aViewFromTheCave is a participant in the Amazon Services LLC Associates Program, an affiliate advertising program designed to provide a means for sites to earn advertising fees by advertising and linking to Amazon.com. Amazon, the Amazon logo, AmazonSupply, and the AmazonSupply logo are trademarks of Amazon.com, Inc. or its affiliates. As an Amazon Associate we earn affiliate commissions from qualifying purchases.