
In the evolving landscape of digital entertainment, traditional television viewing has largely been supplanted by streaming services, offering unprecedented flexibility and personalized experiences. Among these, YouTube TV stands out as a robust live TV streaming platform, bringing together the convenience of cable with the agility of the internet. A cornerstone of its appeal, and often a deciding factor for potential subscribers, is its sophisticated Digital Video Recorder (DVR) functionality. Far from the physical set-top boxes of yesteryear, YouTube TV’s Cloud DVR redefines how we capture and watch our favorite shows, sports, and movies.
This guide will demystify the process of DVRing on YouTube TV, exploring its unique features, providing step-by-step instructions, and offering insights to maximize your viewing experience. Whether you’re looking to record a single episode, an entire series, or ensure you never miss a pivotal sports match, understanding YouTube TV’s DVR capabilities is key to unlocking the full potential of your subscription. Prepare to take control of your television schedule like never before, eliminating the constraints of live broadcasting and embracing a world where your favorite content is always available on your terms.
Understanding YouTube TV’s Cloud DVR System
YouTube TV has set itself apart in the crowded live TV streaming market, largely due to its innovative and incredibly user-friendly Cloud DVR system. Unlike the physical DVRs that once dominated living rooms, YouTube TV’s offering exists entirely in the cloud, bringing a host of benefits that traditional hardware simply cannot match. Grasping the fundamentals of this system is the first step toward mastering your viewing experience.
The Unlimited Cloud DVR Advantage
One of the most compelling features of YouTube TV’s Cloud DVR is its truly unlimited storage. This is a game-changer for anyone accustomed to managing storage quotas on physical DVRs, where hard drive space was a perpetual concern. With YouTube TV, you can record as many shows, movies, and sporting events as you wish, without ever having to worry about hitting a storage limit. This liberates users from the tough decisions of which beloved series to delete to make room for new content.
Beyond infinite storage, recordings on YouTube TV are kept for a generous nine-month period. This extensive retention window means you can catch up on shows at your leisure, revisit classic games, or re-watch episodes without feeling rushed. Furthermore, the Cloud DVR supports simultaneous recordings without any limit. This means if multiple shows you love air at the exact same time, YouTube TV will capture all of them, ensuring no conflicts or missed content. This comprehensive approach to recording capability fundamentally changes how you interact with live television, putting convenience and access firmly in your control.
How Cloud DVR Differs from Traditional DVRs
The shift from physical to cloud-based DVR represents a significant technological leap. Traditional DVRs were hardware-dependent; they resided in your home, required maintenance, and their recordings were tied to that specific device. If your hard drive failed, your recordings were gone. If you wanted to watch a show while traveling, you were out of luck unless you had a complicated remote access setup.
YouTube TV’s Cloud DVR, by contrast, is entirely internet-based. Your recordings are stored on YouTube’s servers, not on your device. This means your entire library of recorded content is accessible from anywhere with an internet connection, on any supported device – be it your smartphone, tablet, computer, smart TV, or streaming stick. There’s no hardware to buy, no storage to manage, and no maintenance required. Software updates are handled automatically by YouTube, ensuring you always have the latest features and a reliable service. This seamless, device-agnostic accessibility is perhaps the greatest differentiator, transforming DVR content from a stationary asset into a mobile, ubiquitous library.
Navigating the Library Tab
The nerve center for all your recorded and saved content on YouTube TV is the “Library” tab. Located prominently within the YouTube TV interface, this section is intuitively designed to give you quick access to everything you’ve recorded, favorited, or purchased. Once you initiate a recording (which we’ll cover in the next section), it automatically appears here.
Within the Library, your content is intelligently organized. You’ll find categories such as “Shows,” “Movies,” “Sports,” “Events,” and “Purchases,” allowing for easy filtering and discovery. If you’ve recorded a series, all available episodes will be grouped together, often distinguishing between new and watched episodes. This streamlined organization makes it simple to pick up where you left off, discover new episodes, or delve into your saved movies and games. The Library also serves as the hub for managing your scheduled recordings, giving you a clear overview of what’s set to record in the future and allowing you to adjust preferences as needed. Familiarizing yourself with the Library is crucial for an efficient and enjoyable YouTube TV DVR experience.
Step-by-Step Guide to Recording Content
Recording content on YouTube TV is an incredibly straightforward process, designed to be intuitive whether you’re new to streaming or a seasoned pro. The beauty of its cloud-based system means that once you tell it what to record, YouTube TV handles the rest, regardless of when or where the content airs. This section will walk you through the precise steps for recording different types of programming.
Recording Live TV (Show or Movie)
When you’re watching live television on YouTube TV and decide you want to save the current program for later, the process is remarkably simple.
- While Watching Live: If you’re currently tuned into a show or movie you wish to record, simply navigate to the playback controls. You’ll typically see an option to “Add to Library” or a plus (+) icon. Clicking this icon will instantly add the program to your Cloud DVR. YouTube TV will start recording from the moment you click “Add to Library” and will also record any future airings of that specific program. For ongoing shows, this action essentially tells YouTube TV to record all subsequent episodes.
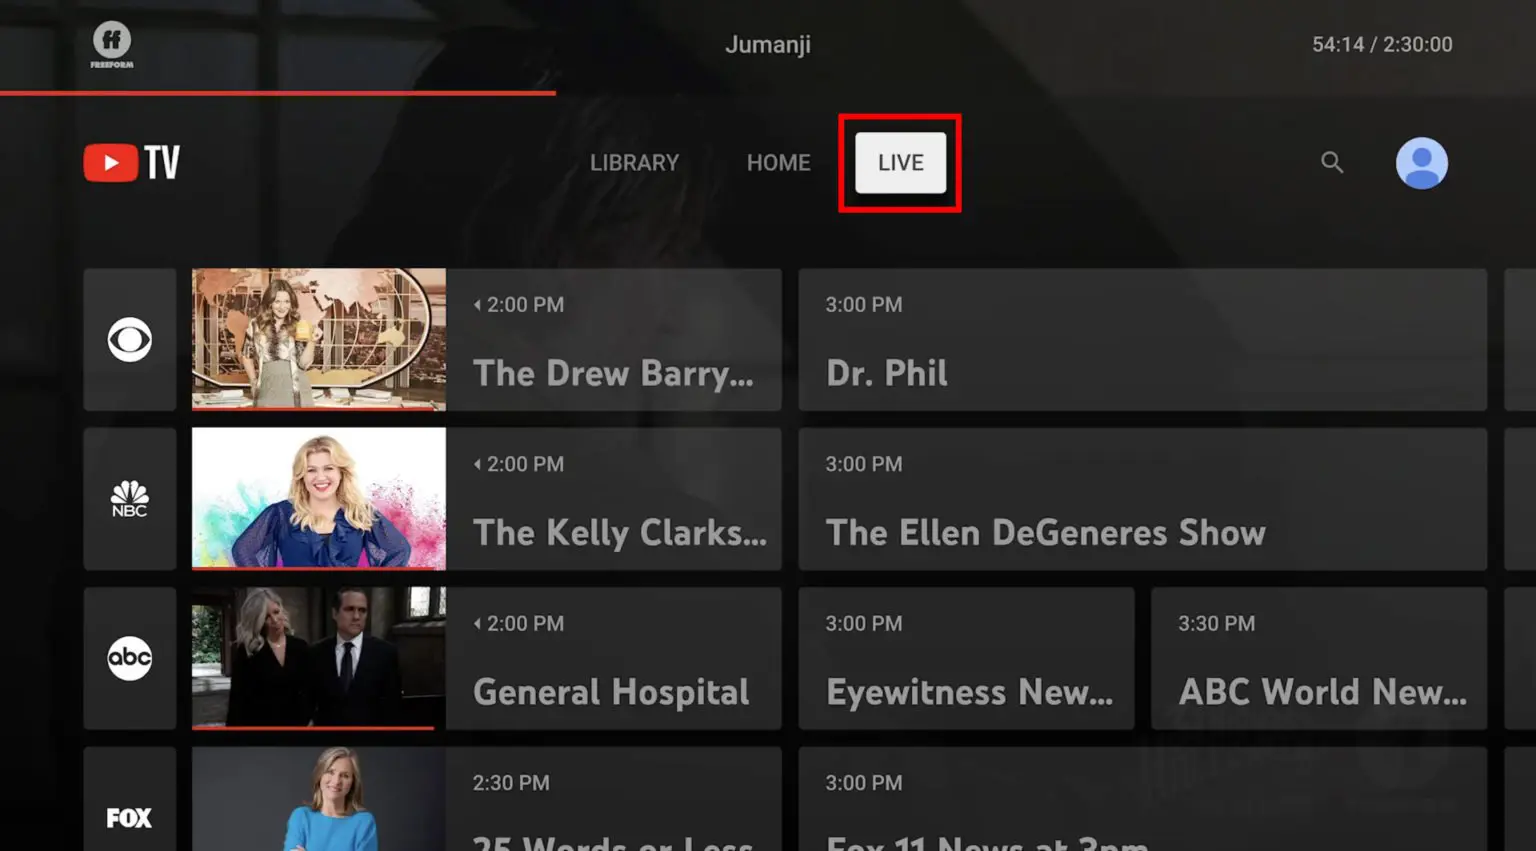
- From the Live Guide or Home Screen: You don’t have to be actively watching a program to record it. You can browse the “Live” guide or scroll through the “Home” tab to find upcoming shows or movies.
- Select the program: Click on the title of the show or movie you want to record. This will take you to its dedicated information page.
- Add to Library: On the information page, locate and click the “Add to Library” button (or the plus (+) icon).
Once added, YouTube TV will automatically record all future airings of that specific show or movie. If it’s a single movie or event, it will record that instance and hold it in your library for nine months.
Recording an Entire Series
For ongoing television series, YouTube TV’s DVR system is particularly powerful, allowing you to “set it and forget it.” By adding a series to your library, you ensure that you’ll catch every new episode without manual intervention.
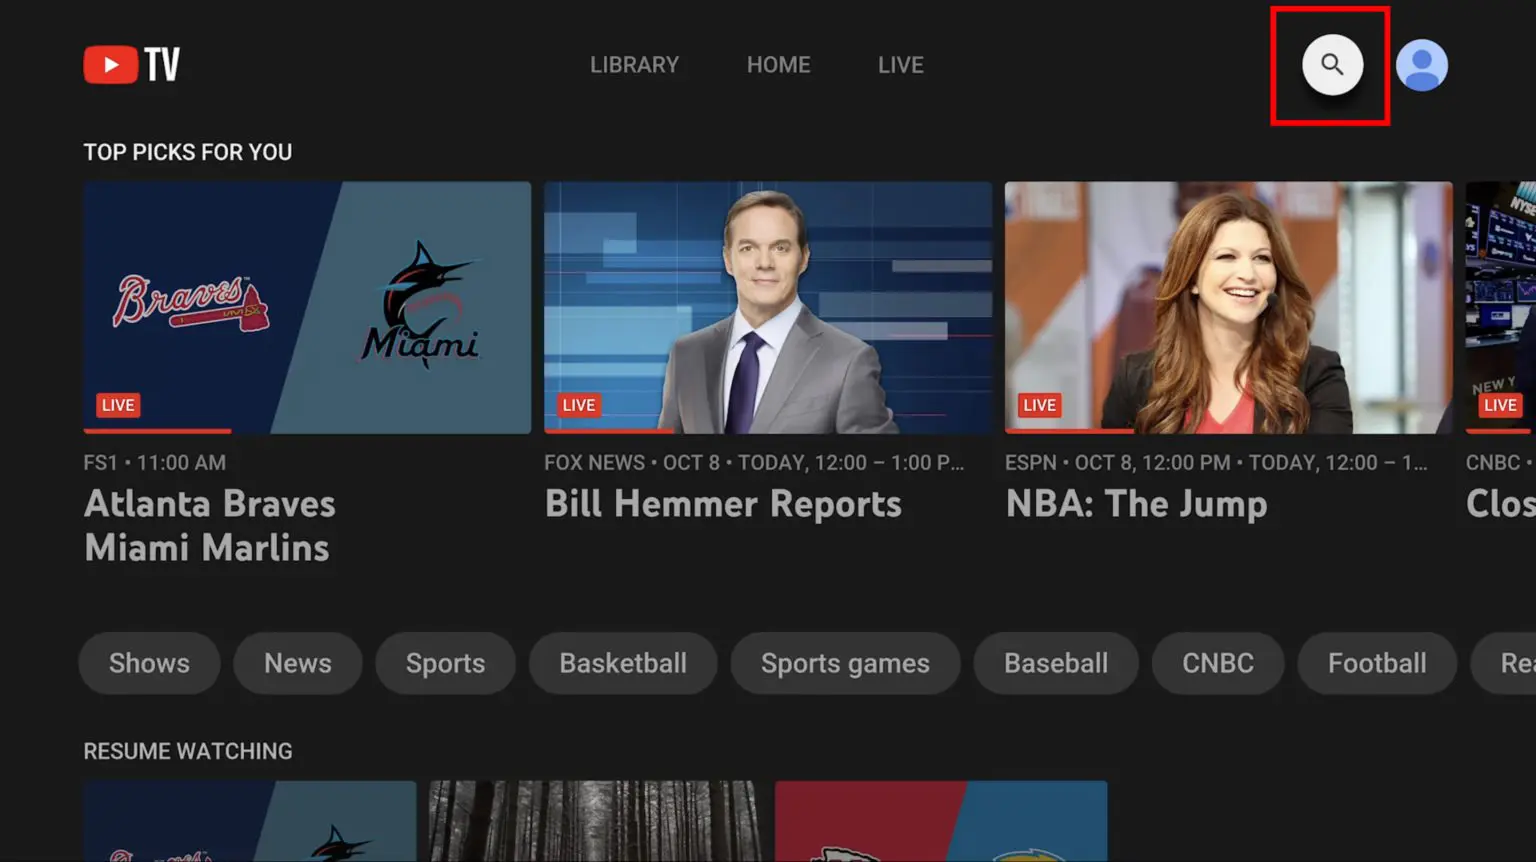
- Search for the Series: Use the search function (magnifying glass icon) to find the specific series you want to record. You can type in the show’s title directly.
- Navigate to the Series Page: From the search results, click on the series title to go to its dedicated information page. This page typically displays details about the show, available episodes (both live and on-demand), and cast information.
- Add to Library: On the series information page, click the “Add to Library” button (or the plus (+) icon).
- What Happens Next: Once you add a series, YouTube TV will automatically record all new episodes of that series as they air on any channel included in your subscription. These recordings will appear in your Library under the “Shows” category.
- Recording Preferences (Optional): For some series, YouTube TV might offer options to specify whether you want to record “New episodes only” or “All airings” (which includes reruns). While “New episodes only” is often the default and preferred setting, “All airings” can be useful for catching up on older seasons or seeing reruns. These preferences can often be adjusted within the series’ page in your Library.
Recording Specific Sporting Events or Teams
Sports fans will find YouTube TV’s DVR capabilities particularly robust for ensuring they never miss a game. The platform is designed to make recording and following your favorite teams effortless.
- Utilize the Sports Section: Navigate to the “Sports” section from the YouTube TV main menu. This area is tailored to help you discover live and upcoming sporting events.
- Add a Specific Event: If you see a particular game listed that you want to record, click on it to go to its information page. Just like with shows and movies, you’ll find an “Add to Library” button (or plus icon). Clicking this will ensure that specific game is recorded.
- Follow a Team for Automatic Recordings: This is where YouTube TV truly shines for sports enthusiasts.
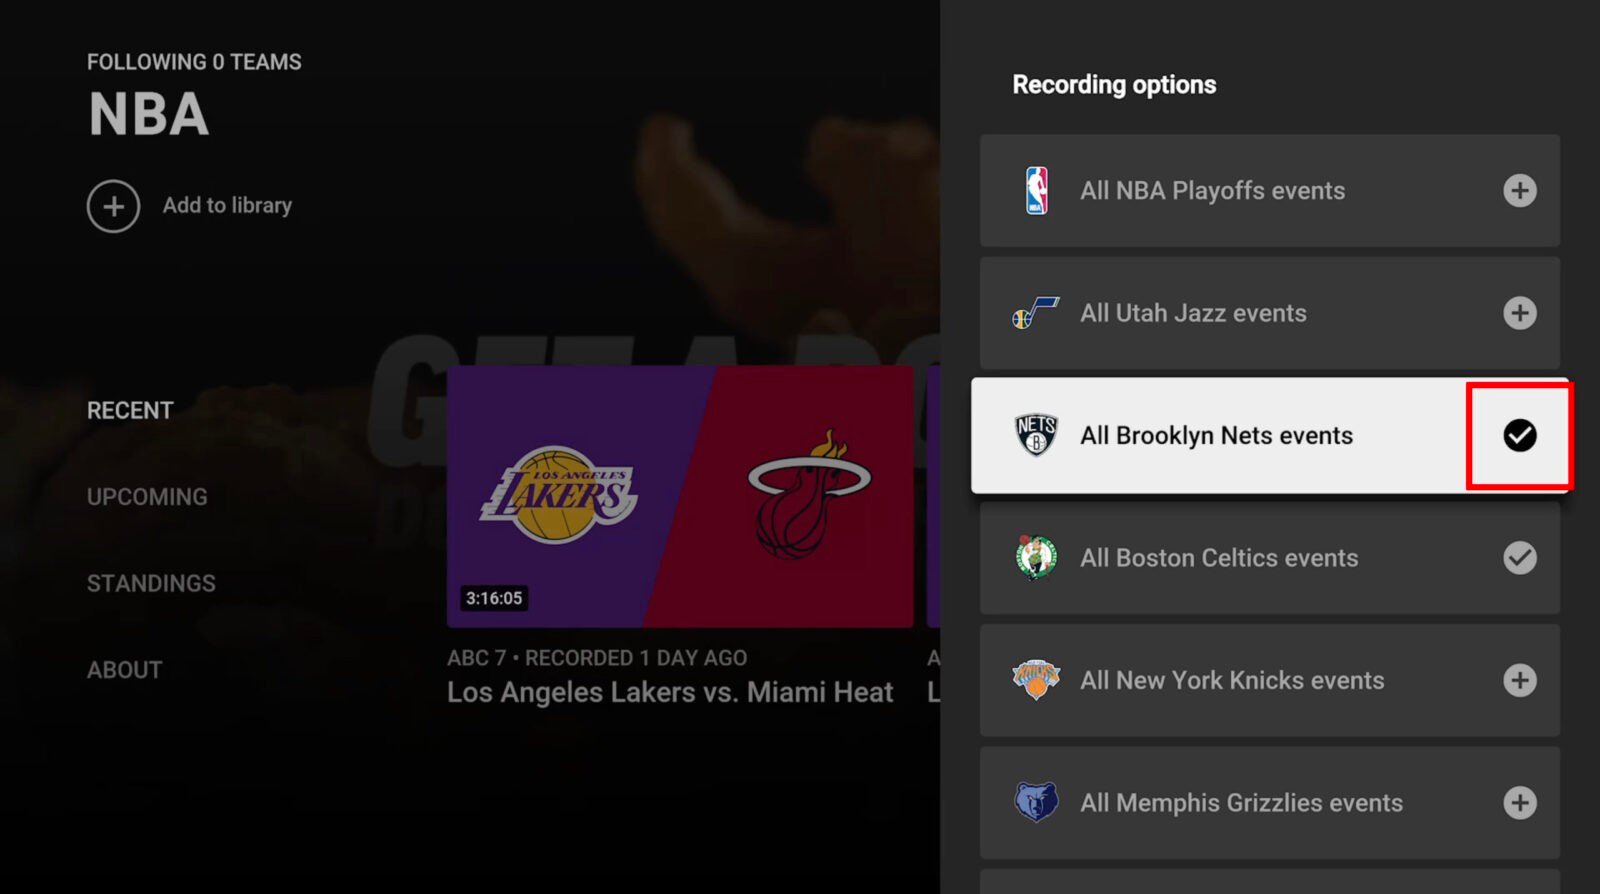
- Find Your Team: Within the “Sports” section, you can often browse by sport (e.g., NFL, NBA, MLB) or league. Once you locate your favorite team, click on its name to go to its dedicated page.
- Add to Library: On the team’s page, you’ll see an “Add to Library” button (or a plus icon). Clicking this tells YouTube TV to automatically record all future games involving that team that air on channels within your subscription.
- Benefits: This ensures you’ll capture regular season games, playoffs, and any other relevant broadcasts without having to individually set each recording. Your Library will then populate with all your team’s games, ready for you to watch at your convenience.
By following these simple steps, you can confidently build a personalized library of content, ensuring that your favorite shows, movies, and sports are always available on demand, waiting for you in the cloud.
Managing and Watching Your DVR Content
Once you’ve successfully added content to your YouTube TV Library, the next step is to efficiently manage and enjoy your recorded programs. YouTube TV provides intuitive tools for accessing, playing back, and organizing your DVR content, ensuring a seamless viewing experience.
Accessing Your Recordings
All your recorded content resides within the “Library” tab, which is the central hub for your saved entertainment.
- Navigate to the Library: From the main YouTube TV interface, select the “Library” tab.
- Browse Categories: Within the Library, your content is automatically categorized. You’ll find sections for “Shows,” “Movies,” “Sports,” “Events,” and potentially “Purchases” if you’ve bought anything.
- Find Your Program:
- For Series: Click on “Shows” to see all the series you’ve added. Each series will be represented by a thumbnail. Clicking on a series will take you to its dedicated page, listing all recorded episodes, often organized by season or air date. Unwatched episodes are usually highlighted, making it easy to see where you left off.
- For Movies/Events: Click on “Movies” or “Sports” to find your individual recorded films or sporting events.
- “Continue Watching” and “New in your Library”: The Library often features a “Continue Watching” rail at the top, allowing you to quickly resume programs you were in the middle of. There might also be a “New in your Library” section, showcasing recently recorded episodes or events.
Playback Features and Options
YouTube TV’s playback interface is designed for convenience, offering a range of features that enhance your viewing of recorded content.
- Standard Playback Controls: Once you select a recording, it will begin to play. You’ll have access to standard controls like play/pause, fast-forward, and rewind.
- Ad Skipping: A significant advantage of YouTube TV’s Cloud DVR is the ability to fast-forward through commercials on most recorded content. When watching a DVR recording, simply use the fast-forward button on your remote or device interface to skip past ad breaks. It’s important to note that while this works for the vast majority of recordings, a few networks may impose restrictions that prevent ad skipping on certain shows, typically replacing commercials with shorter, unskippable promotional content or, in rare cases, forcing you to watch the original ads.
- Start from Beginning: If you join a live recording in progress, YouTube TV often gives you the option to “Start from beginning,” allowing you to watch the entire program from its opening moments, even as it continues to record.
- Multi-Device Playback: Since your recordings are in the cloud, you can start watching a show on one device (e.g., your TV) and seamlessly pick up exactly where you left off on another (e.g., your phone) simply by accessing your Library. This flexibility is a core benefit of cloud-based DVR.
- Quality Settings: You can also adjust video quality settings during playback, depending on your internet connection, ensuring a smooth stream without excessive buffering.
Deleting and Organizing Recordings
While YouTube TV offers unlimited storage and recordings expire automatically after nine months, you might still want to manage your library to keep it tidy or remove content you’ve finished watching.
- Automatic Expiration: The primary “deletion” mechanism is the automatic expiration after nine months. You generally don’t need to manually delete recordings due to storage constraints.
- Removing from View: If you’ve finished a series or an event and don’t want it cluttering your “New in your Library” or “Continue Watching” sections, you can often “mark as watched” or remove it from these active views. While you can’t permanently “delete” a recording before its nine-month expiration (as it’s tied to the network’s airing rights and universal cloud storage), you can remove the series from your Library list.
- Go to the series/movie’s page in your Library.
- Click the “In your Library” button (which usually has a checkmark or minus sign). This will “un-add” the content, and it will no longer record new episodes or appear as an active part of your saved content, though the existing recordings will remain accessible if you search for them until they naturally expire.
- Understanding “Watched” vs. “Unwatched”: YouTube TV effectively tracks which episodes you’ve watched. This helps in quickly identifying new content and picking up where you left off. Your Library will typically prioritize unwatched content or recently aired episodes, making organization largely automatic.
By leveraging these management and playback features, you can ensure your YouTube TV DVR experience is as smooth, personalized, and efficient as possible, putting you firmly in charge of your entertainment schedule.
Advanced Tips and Troubleshooting
While YouTube TV’s Cloud DVR is remarkably intuitive, a deeper understanding of its nuances can further enhance your experience. Knowing how to maximize its features and troubleshoot common queries will ensure you get the most out of your subscription.
Maximizing Your DVR Experience
Optimizing your use of YouTube TV’s DVR goes beyond simply hitting the record button. Several features and strategies can refine your viewing habits.
- Using Profiles for Personalized Libraries: If you share your YouTube TV subscription with family or housemates, utilize individual user profiles. Each profile comes with its own personalized Library. This means one person’s recorded sports won’t clutter another’s drama series, and each user gets their own “Continue Watching” history, customized recommendations, and an independent set of recordings. It’s an essential feature for household harmony and truly personalizing the DVR experience.
- Setting Recording Preferences for Series: While the default for series is often “New episodes only,” some users might want to record “All airings” for specific shows, especially if they are trying to catch up on older seasons or enjoy reruns. You can adjust this preference by navigating to the series page in your Library. Look for an “Episodes” or “Recording preferences” option where you can toggle between recording only new content or every broadcast of the show.
- Discovering Content to Record: Don’t just wait for shows you know. Actively explore YouTube TV’s various sections – Home, Live, Sports, Movies, and Shows. The platform’s recommendation engine often highlights upcoming programs you might enjoy. Adding these to your Library as you discover them ensures a continuous stream of fresh content tailored to your interests. Also, keep an eye on upcoming “Events” for one-off specials or concerts that might not fall neatly into a series or movie category.
Common Questions and Solutions
Even with the most user-friendly technology, questions or minor hiccups can arise. Here are solutions to some common DVR-related queries on YouTube TV:
- Why isn’t my show recording?
- Not Added to Library: Double-check that you’ve actually added the show or series to your Library by clicking the “Add to Library” button.
- Channel Not Included: Ensure the channel airing the show is part of your YouTube TV subscription. Some regional sports networks or premium channels require add-ons.
- Geo-restrictions: Very rarely, content might be unavailable for recording in certain geographic areas due to licensing agreements.
- Series Preference: For series, verify that your recording preference is set to “All airings” if you’re trying to catch reruns, or “New episodes only” if you expect new content.
- Can I skip ads?
- Generally, yes! YouTube TV’s Cloud DVR allows you to fast-forward through most commercials on recorded content. However, be aware that a small number of networks or specific programs may employ technology to prevent ad skipping or replace original commercials with unskippable promos. This is dictated by content providers, not YouTube TV.
- What happens if a show reruns?
- If you’ve set a series to record “All airings,” YouTube TV will capture every instance the show broadcasts, regardless of whether it’s a new episode or a rerun. If you only want new content, ensure your preference is set to “New episodes only.” YouTube TV is smart enough to detect duplicates and usually only presents unique episodes in your library, even if multiple airings were recorded.
Beyond DVR: On-Demand Content Integration
One of the seamless aspects of YouTube TV is how it integrates DVR recordings with on-demand (VOD – Video On Demand) content. This can sometimes lead to confusion, but it’s generally a benefit.
- DVR vs. VOD Versions: When you go to watch a show you’ve recorded, YouTube TV might offer you a choice between your DVR recording and an on-demand version provided by the network.
- DVR Version: This is the exact broadcast you recorded. You can typically fast-forward through commercials. It will expire after nine months.
- VOD Version: This is the version provided by the network, usually available shortly after airing. It often has unskippable commercials inserted by the network and is available for a limited time (e.g., a few weeks) but not necessarily nine months.
- Why the Choice? YouTube TV often defaults to showing you your DVR recording if available because it provides the best experience (ad-skipping). However, sometimes the VOD version might be displayed first if your DVR recording isn’t fully processed yet or if there’s a technical reason. Understanding that you usually have a choice between the two can alleviate confusion about ad-skipping capabilities. If you can’t skip ads, check if you’re watching the VOD version and if your DVR recording is also available.
- Seamless Content Access: This integration means that even if a recording fails for some reason (which is rare), an on-demand version might still be available, ensuring you don’t miss out on your content. It provides a robust safety net for your viewing habits.
By mastering these advanced tips and understanding the underlying mechanisms of YouTube TV’s DVR, you can transform your viewing experience from passive consumption to an active, personalized, and entirely on-demand entertainment journey.
In conclusion, YouTube TV’s Cloud DVR is a standout feature that significantly elevates the live TV streaming experience. Its unlimited storage, nine-month retention period, and multi-device accessibility truly set it apart from traditional DVR systems. From the effortless process of adding individual shows or entire series to your library, to the intelligent management of sports teams, YouTube TV empowers subscribers to craft a viewing schedule that perfectly aligns with their lifestyle. The intuitive Library tab, coupled with robust playback options like ad-skipping, ensures that accessing and enjoying your recorded content is as seamless as possible. Furthermore, understanding the interplay between DVR and on-demand content, along with savvy usage of profiles and recording preferences, allows for an even more personalized and efficient experience. By leveraging the full potential of YouTube TV’s DVR, you’re not just watching television; you’re curating your own dynamic, cloud-based entertainment hub, ensuring that your favorite content is always just a click away, whenever and wherever you choose to watch. Embrace the freedom and flexibility that modern streaming offers, and never miss a moment again.
aViewFromTheCave is a participant in the Amazon Services LLC Associates Program, an affiliate advertising program designed to provide a means for sites to earn advertising fees by advertising and linking to Amazon.com. Amazon, the Amazon logo, AmazonSupply, and the AmazonSupply logo are trademarks of Amazon.com, Inc. or its affiliates. As an Amazon Associate we earn affiliate commissions from qualifying purchases.