In the modern digital landscape, the physical wallet is rapidly being replaced by the digital interface. Among the leaders of this fintech revolution is Venmo, a peer-to-peer (P2P) payment application that has transformed from a simple utility into a social phenomenon. Owned by PayPal, Venmo bridges the gap between social networking and financial transactions, allowing users to send and receive money with a few taps on a smartphone. Understanding how to use Venmo effectively requires more than just knowing where the “Pay” button is; it involves navigating a sophisticated app ecosystem, understanding digital security protocols, and mastering the user interface (UI) to ensure seamless transactions.

This guide explores the technical nuances of Venmo, providing a comprehensive tutorial on how to use the app while focusing on the software’s architecture and the digital safety measures that protect your data.
Setting Up the Digital Infrastructure: Getting Started with the Venmo App
Before you can send your first dollar, you must establish a secure and functional account. Venmo is primarily a mobile-first platform, optimized for iOS and Android, though limited functionality exists on desktop browsers. The setup process is the foundation of your digital payment experience.
App Installation and Account Configuration
The journey begins at the App Store or Google Play Store. Once the application is downloaded, the initial configuration requires a blend of personal identification and digital verification. Users must provide a mobile phone number and an email address. This isn’t just for communication; it serves as the first layer of the app’s multi-factor authentication system.
During setup, you will be prompted to create a username (often preceded by the ‘@’ symbol). This handle becomes your digital identity within the Venmo ecosystem. From a technical perspective, this unique identifier allows the database to route funds accurately without exposing sensitive bank account numbers to other users.
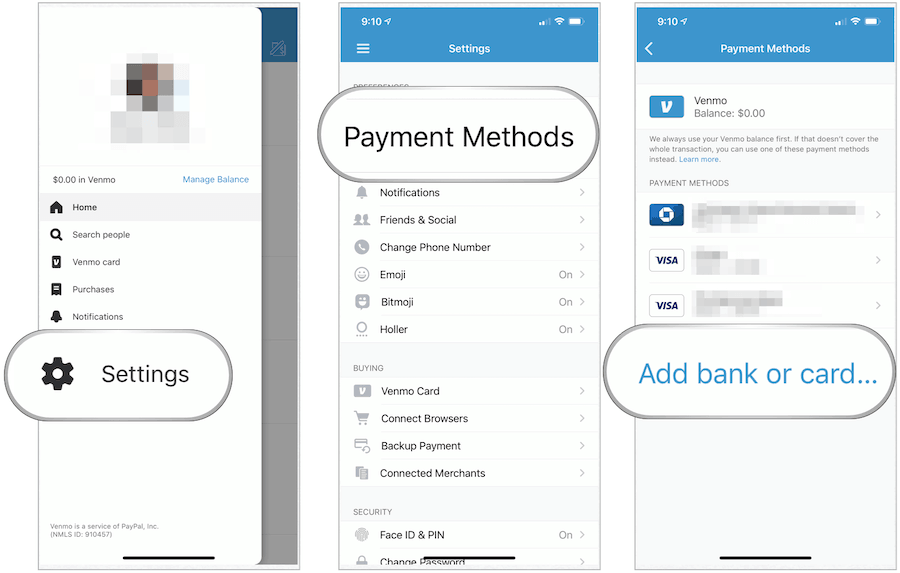
Linking Your Bank and the Verification API
To move money into the digital world, you must link a funding source. Venmo utilizes sophisticated APIs to connect with thousands of financial institutions. You have two primary options: linking a bank account or a debit/credit card.
Linking a bank account usually involves “Instant Verification” through services like Plaid. This third-party integration allows Venmo to securely verify your account balance and ownership without the app ever seeing your login credentials directly. Alternatively, the manual verification process involves Venmo sending micro-deposits to your account, which you must then confirm within the app. This ensures that the technical bridge between the traditional banking system and the Venmo digital ledger is secure and verified.
Executing Your First Transaction: A Step-by-Step Technical Protocol
Once your profile is configured and your funding source is verified, the core functionality of the app—sending money—becomes available. The process is designed to be intuitive, but understanding the underlying mechanics can prevent common user errors.
Navigating the User Interface (UI)
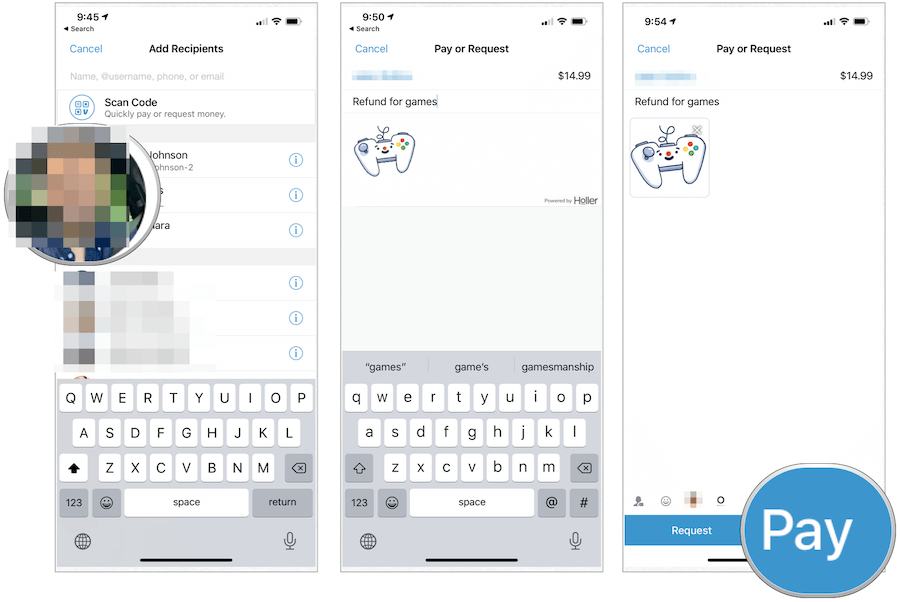
The Venmo UI is centered around the “Pay or Request” button, typically located at the bottom center of the screen or as a floating action button. Upon tapping this, the app opens a search interface. Here, you can search for a recipient by their name, @username, phone number, or email.
The app’s search algorithm prioritizes your existing contacts, frequently paid users, and individuals in your geographical proximity (if location services are enabled). This “smart search” functionality is designed to minimize the risk of sending funds to the wrong individual, a common pitfall in P2P payment software.
The Payment Execution Workflow
After selecting a recipient, the app moves to the transaction screen. Here is the technical sequence to follow:
- Input Amount: Enter the specific numerical value of the transfer.
- The Note Field: Venmo requires a note for every transaction. This serves as a ledger entry for both the sender and receiver. From a technical standpoint, this metadata is stored alongside the transaction ID in Venmo’s cloud servers.
- Selecting the Funding Source: Before hitting “Pay,” users can toggle between their Venmo balance and their linked bank account. If the Venmo balance is insufficient, the app will automatically draw the remainder from the secondary source.
- Confirmation: Once “Pay” is tapped, the app executes a real-time ledger update. While the actual movement of cash between banks may take days (via the ACH network), the Venmo interface reflects the change instantly, providing immediate UX feedback.
Understanding Social Feed Controls and Privacy Toggles
Unique to Venmo is its social feed. Every transaction has a privacy setting: Public, Friends, or Private.
- Public: Visible to the entire Venmo community.
- Friends: Visible only to the participants and their mutual contacts.
- Private: Visible only to the sender and recipient.
Technically, these settings modify the visibility permissions of the transaction’s metadata in the app’s database. For maximum digital security and privacy, many tech-savvy users default their settings to “Private” in the app’s privacy menu to prevent data scraping of their social and financial habits.
Advanced Tech Features and Integration
As Venmo has matured, it has integrated advanced features that leverage smartphone hardware and modern software integrations to enhance the user experience.
Scanning QR Codes for Seamless Transfers
To eliminate the risk of “fat-finger” errors (typing the wrong username), Venmo utilizes QR code technology. Every user has a unique, encrypted QR code. By accessing the “Scan” feature within the app, a user can use their phone’s camera to instantly identify another user’s profile. This hardware-software integration ensures 100% accuracy in recipient selection, making it the preferred method for in-person transactions or business payments.
Group Split Functionality and Business Profiles
Venmo recently introduced a “Split” feature that uses a simple algorithmic calculation to divide a single bill among multiple users. This eliminates the need for manual math. Furthermore, for users operating as freelancers or small business owners, Venmo offers “Business Profiles.” These profiles provide additional technical tools, such as tax documentation (1099-K forms) and the ability to accept payments for goods and services with built-in purchase protection, distinguishing them from standard personal P2P transfers.
Security Protocols and Digital Safeguards
In any application that handles financial data, security is the paramount technical concern. Venmo employs several layers of defense to protect its users from unauthorized access and digital fraud.
Enabling Multi-Factor Authentication (MFA)
Venmo utilizes MFA to ensure that only the authorized user can access the account. If the app detects a login attempt from a new device or IP address, it triggers a verification code sent via SMS or email. For users seeking higher security, Venmo supports biometric authentication, such as FaceID or TouchID. This integrates the app’s software with the secure enclave hardware of modern smartphones, ensuring that a lost or stolen phone does not result in a compromised account.
Data Encryption and Fraud Protection Mechanisms
Under the hood, Venmo uses high-level encryption to protect user data. When you input your bank information, it is encrypted and stored on secure servers. Venmo’s backend systems also run continuous fraud-detection algorithms. These AI-driven tools monitor for suspicious patterns, such as a sudden high-value transfer to a new contact or multiple login attempts from disparate geographic locations. If the system flags a transaction as high-risk, it may temporarily freeze the transfer or require additional identity verification.
Optimizing Your Experience and Troubleshooting
To get the most out of the Venmo app, users should understand the difference between the various transfer speeds and how to maintain the application’s health.
Instant Transfer vs. Standard ACH
Once you receive money in your Venmo balance, you have two ways to move it to your bank:
- Standard Transfer: This utilizes the Automated Clearing House (ACH) network. It is free but typically takes 1–3 business days.
- Instant Transfer: This utilizes the “Original Credit Transaction” (OCT) technology via debit card networks. For a small percentage fee, the funds are pushed to your bank account within minutes. This is a technical feat made possible by real-time payment rails that bypass the traditional multi-day clearing cycle.
Managing Transaction Limits and App Updates
To prevent money laundering and major fraud, Venmo imposes rolling weekly transaction limits. Users can increase these limits by completing a “Verified Identity” check, which involves providing a Social Security Number. This technical requirement aligns the app with federal “Know Your Customer” (KYC) regulations.
Lastly, keeping the app updated is critical. Developers frequently release patches that fix security vulnerabilities and improve UI performance. By ensuring your app is on the latest version, you are benefiting from the most recent advancements in mobile payment technology and security protocols.
By mastering these technical aspects—from the initial API-driven bank link to the encrypted QR code scans—you can use Venmo not just as a tool, but as a secure, efficient extension of your digital life. Whether you are splitting a dinner bill or running a side hustle, understanding the tech behind the “Pay” button ensures your digital transactions remain seamless and secure.
aViewFromTheCave is a participant in the Amazon Services LLC Associates Program, an affiliate advertising program designed to provide a means for sites to earn advertising fees by advertising and linking to Amazon.com. Amazon, the Amazon logo, AmazonSupply, and the AmazonSupply logo are trademarks of Amazon.com, Inc. or its affiliates. As an Amazon Associate we earn affiliate commissions from qualifying purchases.