
In the contemporary digital landscape, the ability to capture high-quality video content—whether for professional tutorials, competitive gaming highlights, or software demonstrations—has become a fundamental skill. For users equipped with NVIDIA hardware, this process is streamlined through a suite of powerful, hardware-accelerated tools designed to record high-bitrate video with minimal impact on system performance. At the heart of this capability lies the NVIDIA Encoder (NVENC), a dedicated part of the Graphics Processing Unit (GPU) that handles video encoding, leaving the CPU free to manage other complex tasks.
Understanding how to record with NVIDIA involves more than just clicking a button; it requires a deep dive into the software ecosystem provided by the manufacturer, specifically the GeForce Experience overlay and the newly unified NVIDIA App. By leveraging these tools, creators can achieve professional-grade results that were once reserved for expensive external capture cards.
Understanding the NVIDIA Recording Ecosystem
Before diving into the technical configurations, it is essential to understand the software architecture that makes NVIDIA recording possible. For over a decade, NVIDIA GeForce Experience has been the primary gateway for users to optimize games and record footage. However, the ecosystem is currently transitioning toward the “NVIDIA App,” a more streamlined, modernized interface that integrates the control panel and GeForce Experience into a single, high-performance application.
The Power of NVENC (NVIDIA Encoder)
The secret sauce behind NVIDIA’s recording superiority is NVENC. Unlike software-based recording (X264), which utilizes the CPU and can lead to significant frame rate drops and system stuttering, NVENC is a physical circuit on the silicon of the GPU. Because it is a dedicated hardware block, it can encode high-definition video in real-time without taxing the resources needed to run a game or a complex 3D application. For owners of the RTX 40-series cards, this has evolved further with the introduction of AV1 encoding, which offers significantly better visual quality at lower bitrates compared to traditional H.264 or H.265 (HEVC) formats.
Hardware and Software Prerequisites
To begin recording, you must ensure your hardware meets the minimum requirements. Generally, any NVIDIA GPU from the GTX 600 series or newer supports some form of NVENC. On the software side, you need the NVIDIA GeForce Experience or the beta NVIDIA App installed. Keeping your Game Ready Drivers updated is crucial, as driver updates often include optimizations for encoding stability and support for the latest codecs.
Step-by-Step Configuration for High-Fidelity Recording
Setting up NVIDIA’s recording tool—often referred to as ShadowPlay—is straightforward, but achieving professional fidelity requires fine-tuning the settings to match your specific needs.
Accessing and Enabling the Overlay
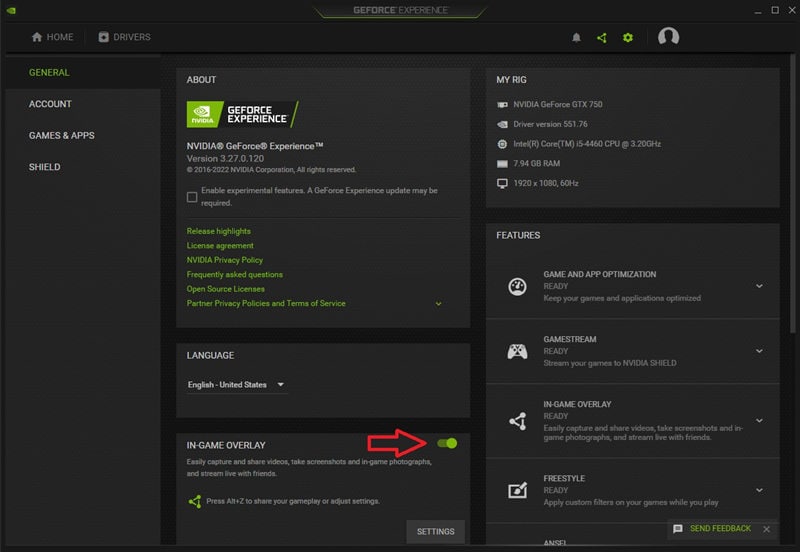
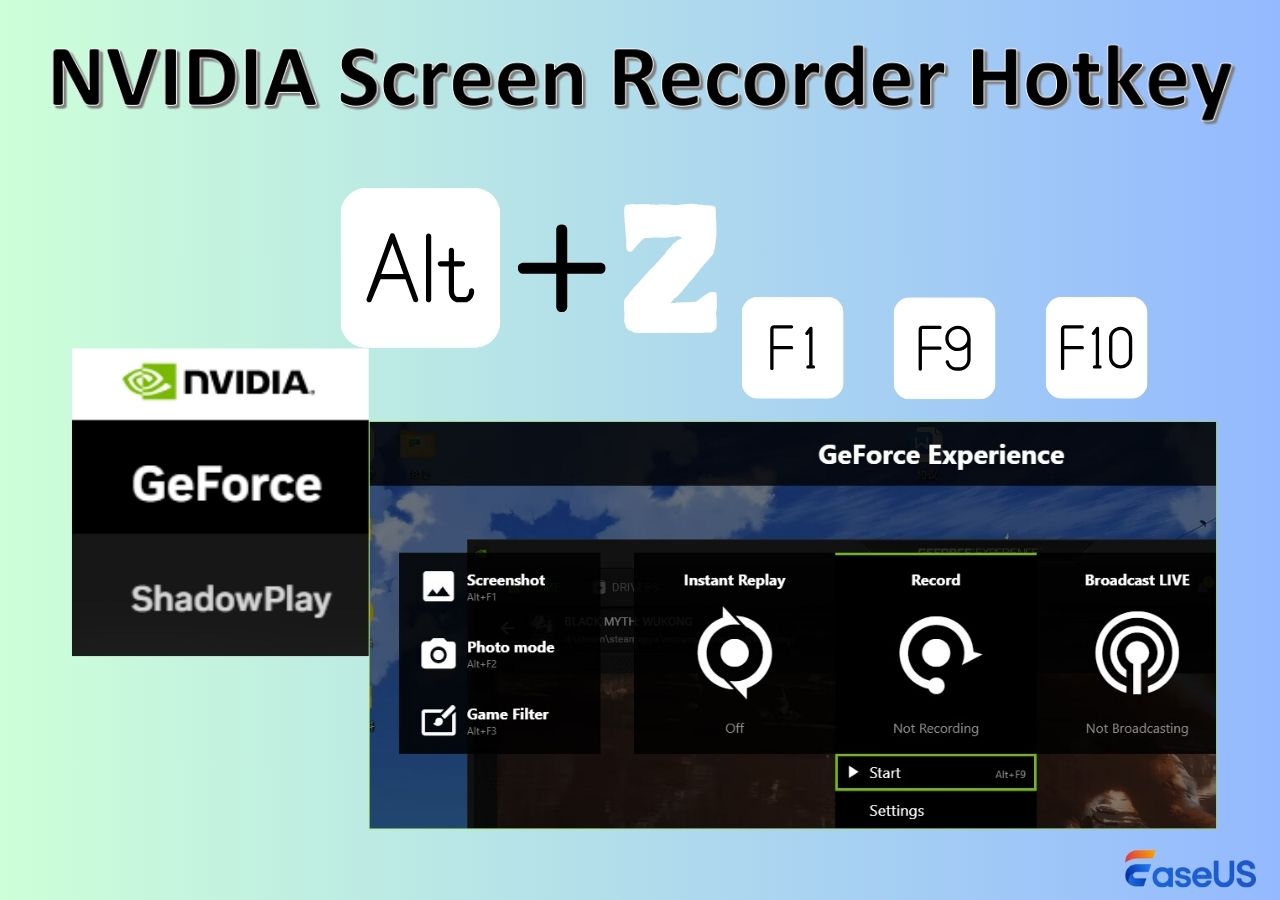
The primary interface for recording is the In-Game Overlay. By default, this is accessed by pressing Alt + Z. If the overlay does not appear, ensure it is enabled within the settings of the GeForce Experience or NVIDIA App. Once open, you are presented with a central hub featuring options for “Instant Replay,” “Record,” and “Broadcast Live.”
Optimizing Quality Settings
To customize your recording quality, click on the “Record” icon and select “Settings.” Here, you can define the parameters of your output:
-
Resolution: For most web platforms, 1080p is standard, but if you have a 1440p or 4K monitor, recording at “In-game” resolution will provide the crispest results.
-
Frame Rate: For smooth motion, 60 FPS is highly recommended. If you are recording a static tutorial, 30 FPS may suffice and will significantly reduce file sizes.
-
Bitrate: This is the most critical setting for visual clarity. For 1080p at 60 FPS, a bitrate of 20-30 Mbps is usually sufficient. For 4K recording, you should push this to 50-80 Mbps to avoid blocky artifacts in fast-moving scenes.
Advanced Audio Configuration
A common mistake among novice creators is recording all audio onto a single track. NVIDIA’s software allows you to “Separate both tracks,” which places your system audio (the game or app) and your microphone audio on different layers. This is invaluable during the editing phase, as it allows you to adjust your voice volume or remove background noise without affecting the original sound of the software you were recording.
Advanced Features for Professional Content Creation
NVIDIA offers several specialized recording modes that cater to different workflows, ranging from “set-it-and-forget-it” styles to manual, high-control captures.
Instant Replay: Capturing the Unplanned
Instant Replay is perhaps the most celebrated feature of the NVIDIA suite. When enabled, the GPU constantly records in the background but does not save the file to your hard drive. Instead, it keeps a rolling buffer of the last 1 to 20 minutes (depending on your setting) in your system’s temporary memory. When something noteworthy happens, you hit a hotkey (default Alt + F10), and that window of time is saved to your disk. This is the ultimate tool for capturing “water cooler moments” without filling up your storage with hours of unwanted footage.
NVIDIA Highlights
For gamers, NVIDIA Highlights takes the concept of Instant Replay a step further through game-engine integration. In supported titles, the software automatically detects significant events—such as a “triple kill” in a shooter or a successful quest completion—and saves a clip automatically. This eliminates the need for the user to manually trigger the save, allowing for total focus on the task at hand.
Desktop Capture and Privacy Settings
By default, NVIDIA’s recording software is often restricted to full-screen applications to protect user privacy. However, if you need to record a tutorial for a web browser or a software suite like Adobe Creative Cloud, you must enable “Desktop Capture.” Within the “Privacy Control” section of the overlay settings, toggle “Desktop Capture” to “On.” This allows the software to record everything visible on your monitor, regardless of whether a game is running.
Performance Optimization and Troubleshooting
While NVIDIA’s hardware encoding is incredibly efficient, issues can still arise. Optimizing your environment ensures that your recordings are stable and your system remains responsive.
Minimizing Performance Impact
If you notice a slight dip in performance while recording, consider the following optimizations:
-
Disk Speed: High-bitrate video generates massive amounts of data per second. Ensure you are saving your recordings to a fast SSD rather than a mechanical HDD to avoid write-speed bottlenecks that can cause stuttering in the video file.
-
Encoder Selection: If you are using an RTX 40-series card, prioritize the AV1 codec. It provides superior compression, meaning you can achieve better visual quality at a lower bitrate, reducing the overall load on your storage bandwidth.
-
Background Processes: While NVENC handles the encoding, your system still needs to manage the file writing. Close unnecessary background applications to ensure maximum system stability.
Resolving Common Technical Hurdles
-
The Black Screen Issue: This often occurs when recording protected content (like Netflix or certain workspace apps with DRM). Additionally, ensure that your display is plugged directly into the NVIDIA GPU and not the motherboard’s integrated graphics port.
-
Missing Audio: If your recording is silent, double-check your “Audio” settings in the overlay. Ensure the correct “Playback Device” and “Microphone” are selected. If using the “Separate both tracks” feature, remember that many standard video players (like Windows Media Player) may only play one track at a time; you will need a professional editor like Premiere Pro or DaVinci Resolve to see both.
-
Overlay Not Opening: This can be caused by third-party overlays (like Steam or Discord) conflicting with NVIDIA. Try disabling other overlays or restarting the “NVIDIA Container” service in the Windows Task Manager.

The Future of Capture: AI and the NVIDIA App
The trajectory of NVIDIA’s recording technology is moving toward deeper AI integration. With the launch of the unified NVIDIA App, the company is simplifying the user experience while introducing AI-driven enhancements.
Features like NVIDIA Broadcast are increasingly being integrated into the recording workflow. These tools use AI to remove background noise from your microphone and apply virtual backgrounds or “eye contact” filters to your webcam in real-time, all while you record. Furthermore, the shift toward HDR (High Dynamic Range) recording is becoming more accessible. NVIDIA’s latest software allows users to capture footage in HDR and even use “RTX Dynamic HDR” to upscale SDR content into HDR, providing a visual depth that was previously impossible in standard recordings.
By mastering these tools, you transform your PC from a simple workstation or gaming machine into a professional broadcast studio. Whether you are documenting a complex technical bug for a development team or creating high-octane content for a global audience, NVIDIA’s hardware-accelerated recording suite provides the reliability and quality necessary to excel in a visual-first digital world. To stay ahead, continue experimenting with bitrate balances and keep an eye on the evolving capabilities of the NVIDIA App as it continues to redefine the boundaries of desktop video capture.
aViewFromTheCave is a participant in the Amazon Services LLC Associates Program, an affiliate advertising program designed to provide a means for sites to earn advertising fees by advertising and linking to Amazon.com. Amazon, the Amazon logo, AmazonSupply, and the AmazonSupply logo are trademarks of Amazon.com, Inc. or its affiliates. As an Amazon Associate we earn affiliate commissions from qualifying purchases.