
In the rapidly evolving landscape of personal finance, digital payment platforms have become indispensable tools for managing day-to-day transactions. Among these, Venmo stands out as a leading peer-to-peer payment service, renowned for its ease of use, social features, and quick transfer capabilities. While Venmo is most famously used for sending money between friends for shared expenses or small purchases, its utility extends significantly when seamlessly integrated with your traditional banking accounts. Understanding how to effectively transfer money from your bank to Venmo is a fundamental skill for anyone looking to leverage this platform for budgeting, spending, or simply facilitating transactions with greater flexibility. This comprehensive guide will demystify the process, exploring the nuances of funding your Venmo balance, understanding associated costs and timelines, and integrating this financial tool securely into your personal finance strategy.

Understanding Venmo and Its Role in Personal Finance
Venmo has transformed the way many individuals handle small-to-medium financial exchanges, moving beyond the traditional cash or check methods. Before diving into the mechanics of bank transfers, it’s crucial to grasp what Venmo is and why linking it to your bank is a cornerstone of its functionality within personal finance.
What is Venmo?
At its core, Venmo is a mobile payment service owned by PayPal, designed primarily for peer-to-peer transactions. It allows users to send and receive money from each other quickly and easily, often with a social feed displaying transactions (privacy settings allow users to control visibility). Beyond simply sending money to friends, Venmo can also be used to pay at participating merchants, directly within certain apps, or even via a Venmo debit card. Its appeal lies in its convenience, speed, and the elimination of the need for physical cash or complicated bank transfers for everyday payments. For many, it acts as a digital wallet that bridges the gap between traditional banking and instant, social money transfers.
Why Link Your Bank Account?
Linking your bank account to Venmo is not just a convenience; it’s a fundamental requirement for unlocking the platform’s full potential. Without a linked bank account, your ability to fund your Venmo balance, pay for transactions when your Venmo balance is insufficient, or even cash out received funds is severely limited. Your bank account serves as the primary funding source for adding money to your Venmo balance. This connection enables you to top up your Venmo wallet, ensuring you always have funds available for immediate payments. Furthermore, it provides a crucial security layer, allowing Venmo to verify your identity and manage the flow of funds in a regulated manner. For personal finance, it means your Venmo activity is rooted in a verifiable financial institution, providing a clear audit trail and greater control over your money.
Key Benefits of Using Venmo for Transfers
The benefits of integrating Venmo into your personal finance arsenal, particularly for bank transfers, are manifold. Firstly, speed is a significant advantage. While standard bank transfers can take days, Venmo’s peer-to-peer system often facilitates near-instantaneous transfers between users, and funds from your bank can typically be added to your Venmo balance within 1-3 business days (or instantly for a fee). Secondly, ease of use is paramount. The intuitive interface of the Venmo app simplifies what could otherwise be a cumbersome process of initiating bank transfers. Third, Venmo is exceptionally useful for splitting bills or expenses among friends, whether it’s for dinner, rent, or a group trip, allowing for precise financial management in shared scenarios. Lastly, for standard transfers, there are no direct fees for sending money from a linked bank account or Venmo balance, making it a cost-effective solution for everyday financial interactions, a key consideration for anyone managing a budget.
Step-by-Step Guide: Adding Funds from Your Bank to Venmo
The process of transferring money from your bank to Venmo is straightforward once your bank account is linked. This section walks you through the essential steps, from initial setup to understanding the different transfer options.
Linking Your Bank Account
Before you can transfer money, your bank account must be securely linked to your Venmo profile. This is typically a one-time setup process:
-
Open the Venmo App: Log in to your Venmo account on your mobile device.
-
Navigate to Settings: Tap on the “Me” tab (often represented by your profile picture or initials), then access the “Settings” icon (usually a gear or cogwheel).
-
Select “Payment Methods”: Under “Preferences,” you’ll find “Payment Methods.” Tap on this.
-
Add a Bank Account: Choose “Add a bank or card” and then select “Bank.”
-
Verification Options: Venmo offers two primary methods for linking:
-
Instant Verification: This is the quickest and most common method. You’ll be prompted to log in to your bank’s online portal directly through Venmo’s secure interface. This allows Venmo to instantly verify your account details.
-
Manual Verification (Micro-Deposits): If instant verification isn’t an option or you prefer not to share your banking login, you can manually enter your bank’s routing number and your bank account number. Venmo will then send two small deposits (micro-deposits, typically a few cents each) to your bank account within 1-3 business days. Once these appear in your bank statement, you’ll return to the Venmo app and enter the exact amounts to confirm your account.
-
-
Confirm and Save: Follow any additional prompts to confirm and save your linked bank account.
It’s crucial to ensure the information you provide is accurate to avoid delays or security issues. Always verify your bank’s routing number and your account number from an official source, like a check or your bank’s online portal.
Initiating a Transfer to Your Venmo Balance
Once your bank account is linked, adding money to your Venmo balance is simple:
-
Go to the “Me” Tab: From the Venmo home screen, tap on the “Me” tab.
-
Select “Add Money”: You’ll see an option titled “Add Money” (or sometimes “Manage Balance”). Tap this.
-
Enter the Amount: Input the exact amount of money you wish to transfer from your linked bank account to your Venmo balance.
-
Select Bank Account: Confirm that your linked bank account is selected as the funding source.
-
Review and Confirm: Double-check the amount and the funding source, then tap “Add Money” to initiate the transfer.
You’ll receive a confirmation in the app, and often an email, acknowledging the request. The funds will then be processed.
Understanding Transfer Limits and Timelines
When transferring money, it’s important to be aware of Venmo’s limits and the timeframes involved:
-
Standard Transfers (Free): Funds transferred from your bank to your Venmo balance via standard transfer typically take 1 to 3 business days to arrive. This timeframe can vary depending on your bank and the time of day the transfer is initiated. Weekends and holidays can extend this period. There are usually daily or weekly limits for standard transfers, which can vary based on your account verification status.
-
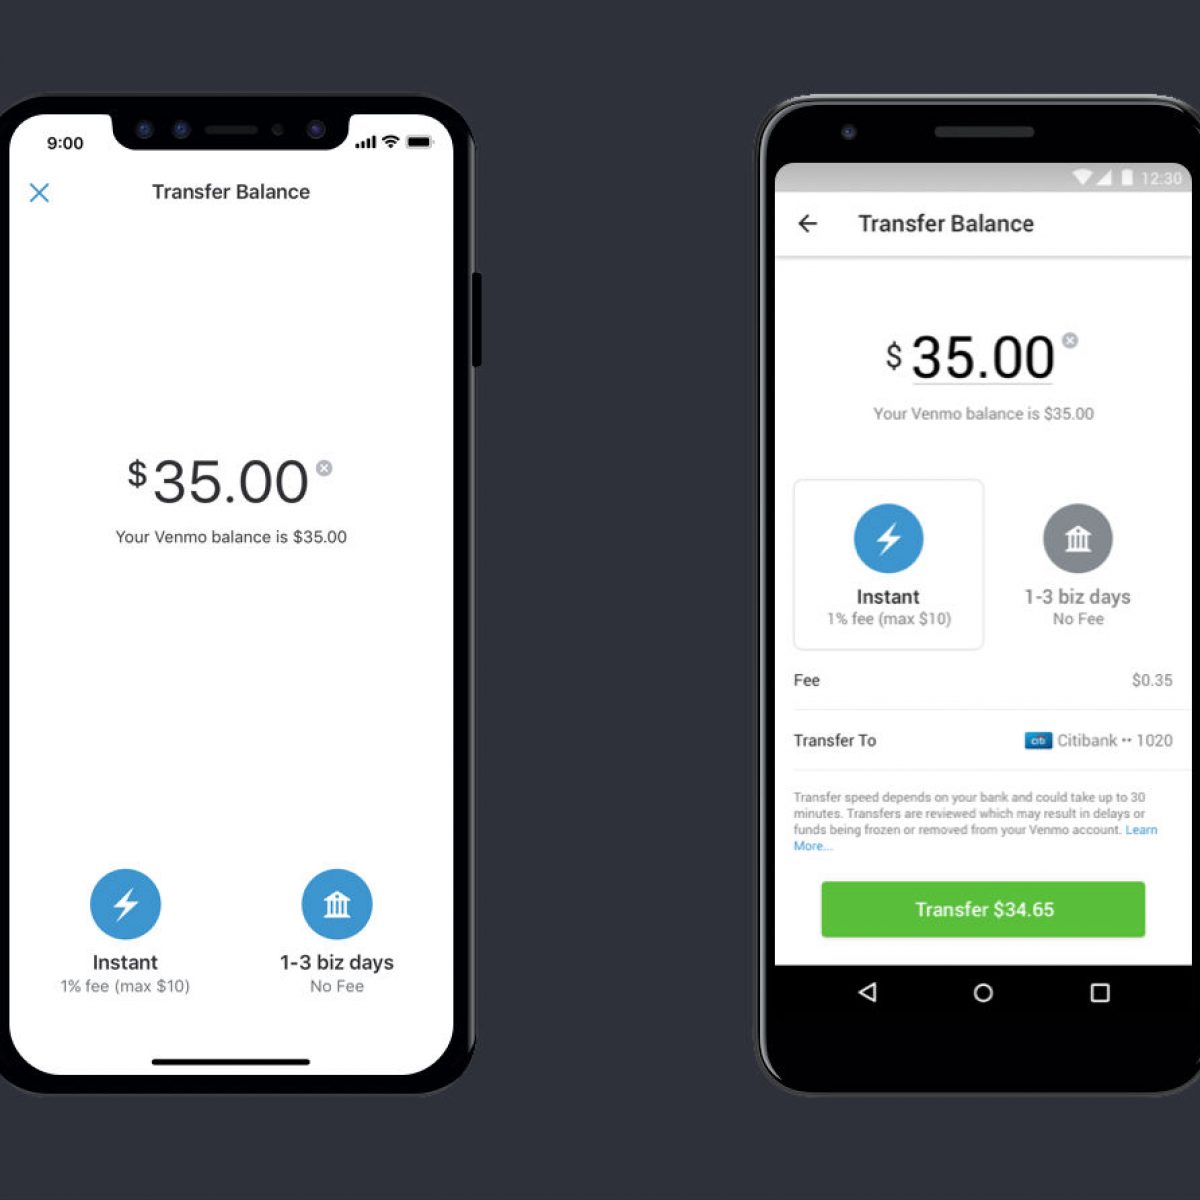
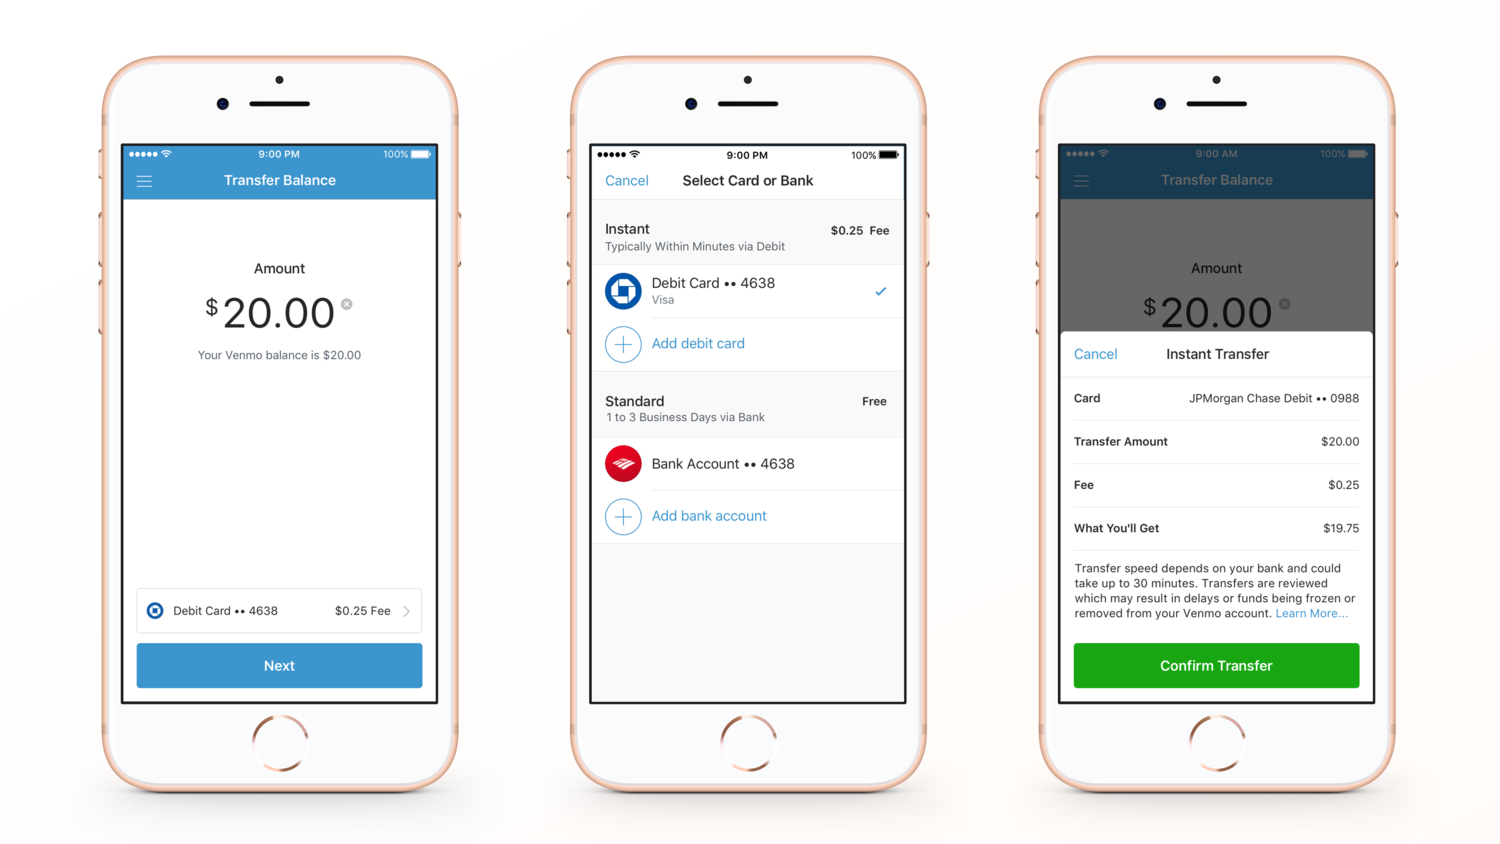
Instant Transfers (Fee-Based): For those situations where you need funds immediately, Venmo offers an Instant Transfer option. This allows money to be moved from your linked bank account to your Venmo balance (or from your Venmo balance to your bank account) within minutes, usually 30 minutes or less. However, this service comes with a fee, which is typically a percentage of the transfer amount (e.g., 1.75% with a minimum fee of $0.25 and a maximum of $25.00). Instant Transfer also has its own set of daily and weekly limits, which are generally higher than standard transfer limits.
-
Verification Status: Unverified Venmo accounts have lower transaction limits than verified accounts. Completing identity verification (providing your SSN, date of birth, etc.) can significantly increase your limits, allowing for larger transfers and more flexibility in your personal financial management.
Always check the current limits and fees within the Venmo app or on their official website, as they can change. Being aware of these details helps you plan your financial transactions effectively and avoid unexpected delays or costs.
Alternatives and Scenarios: Paying Directly vs. Funding Balance
While directly funding your Venmo balance is a common approach, it’s not the only way your bank account interacts with Venmo. Understanding these alternative scenarios can help optimize your use of the platform for various financial needs.
Paying Friends Directly from Your Bank (via Venmo)
One of Venmo’s most convenient features is its ability to draw funds directly from your linked bank account even if your Venmo balance is insufficient or zero. When you send money to a friend:
-
Default Funding Source: Venmo first attempts to use your existing Venmo balance.
-
Bank Account as Backup: If your Venmo balance doesn’t cover the full amount, Venmo will automatically debit the remaining amount (or the full amount if your balance is zero) from your linked bank account. This happens seamlessly in the background, making payments effortless.
-
No Pre-Funding Needed: This means you don’t always have to pre-fund your Venmo balance to make a payment. As long as your bank account has sufficient funds, the transaction will go through.
This automatic debit feature simplifies peer-to-peer payments, making Venmo highly flexible for spontaneous transactions without the need for constant balance management. However, it’s vital to ensure your bank account always has enough funds to cover such debits to avoid overdraft fees from your bank.
Receiving Money and Cashing Out
The flow of money isn’t just one-way. When you receive money on Venmo, it resides in your Venmo balance. From there, you have options:
-
Keep it in Venmo: You can leave the funds in your Venmo balance to use for future payments to friends or Venmo-enabled merchants. This can be a useful strategy for managing a specific budget for social spending.
-
Cash Out to Your Bank: If you prefer to move the received funds back into your traditional bank account, you can initiate a transfer. This process is essentially the reverse of adding money:
-
Go to the “Me” tab and tap “Transfer Balance” or “Transfer Money.”
-
Enter the amount you wish to transfer.
-
Select your linked bank account as the destination.
-
Choose between standard (free, 1-3 business days) or instant (fee-based, within minutes) transfer.
-
Confirm the transfer.
-
This “cashing out” functionality highlights the bank account’s central role as the primary hub for your funds, allowing for easy movement between your digital wallet and your conventional banking.
When to Fund Your Venmo Balance Versus Direct Bank Debits
The choice between pre-funding your Venmo balance and allowing direct debits from your bank often comes down to personal finance preferences and specific scenarios:
-
Funding Your Balance (Proactive):
-
Budgeting: If you want to set a specific budget for social spending, splitting bills, or small purchases, funding your Venmo balance with a fixed amount can help you stick to that budget. Once the balance is depleted, you know you’ve hit your limit.
-
Security: Some users prefer to keep a limited amount in their Venmo balance as a security measure, rather than having every transaction directly linked to their main bank account. This can mitigate risk if your Venmo account were ever compromised (though Venmo has robust security measures).
-
Control: It provides a clear, separate pool of money for Venmo transactions, offering better visibility and control over specific spending categories.
-
-
Direct Bank Debits (Reactive):
-
Convenience: For most users, allowing Venmo to debit directly from their bank is the ultimate convenience. You don’t need to constantly monitor or top up your Venmo balance; just make the payment, and Venmo handles the rest.
-
Infrequent Use: If you only use Venmo occasionally for one-off payments, it might not be worth the effort of pre-funding.
-
Large Transactions: For larger payments, relying on direct bank debits ensures you don’t hit Venmo balance limits and simplifies the process.
-
Ultimately, the best approach depends on your individual financial habits, how frequently you use Venmo, and your comfort level with linking a direct payment method. Both methods offer flexibility, allowing you to tailor Venmo’s use to your personal finance strategy.
Security, Fees, and Best Practices for Bank-to-Venmo Transfers
While convenient, using digital payment platforms like Venmo requires a mindful approach to security and a clear understanding of costs. Integrating Venmo into your personal finance strategy means adopting best practices to protect your money and information.
Protecting Your Financial Information
The security of your bank account and personal data is paramount. Venmo employs various security measures, but user vigilance is equally critical:
-
Venmo’s Security: Venmo uses data encryption and fraud detection tools to protect your account. All financial information is stored on secure servers. They also offer Purchase Protection for eligible payments.
-
Strong Passwords & 2FA: Always use a strong, unique password for your Venmo account. Enable two-factor authentication (2FA) for an extra layer of security. This requires a code from your phone in addition to your password, making unauthorized access much harder.
-
Beware of Scams: Be highly suspicious of unsolicited payment requests, phishing emails, or messages asking for your Venmo login credentials or personal financial information. Venmo will never ask for your password via email or text. Only send money to people you know and trust.
-
Monitor Your Accounts: Regularly check your Venmo transaction history and your linked bank account statements for any unauthorized activity. Report suspicious transactions immediately to Venmo support and your bank.
-
Device Security: Keep your mobile device operating system and Venmo app updated. Use a passcode or biometric security (fingerprint/face ID) to lock your phone.
By taking these proactive steps, you significantly reduce the risk of fraud and keep your financial information secure when using Venmo.
Understanding Venmo’s Fee Structure
A key element of responsible personal finance is understanding all associated costs. While many Venmo services are free, certain transactions do incur fees:
-
Free Transactions:
-
Sending money from your Venmo balance.
-
Sending money from a linked bank account.
-
Receiving money.
-
Standard transfers to your bank account (1-3 business days).
-
-
Fee-Based Transactions:
-
Instant Transfers: A fee (typically 1.75%, min $0.25, max $25.00) is charged for instant transfers from Venmo balance to bank or from bank to Venmo balance. This is the primary fee you’ll encounter when actively managing funds between your bank and Venmo with speed as a priority.
-
Credit Card Payments: A 3% fee is applied when sending money using a credit card as the funding source. To avoid this fee, use your bank account or debit card.
-
Cryptocurrency Transactions: Buying and selling cryptocurrency on Venmo involves fees that vary based on the transaction amount.
-
Merchant Transactions: While paying at participating merchants is often free for the buyer, certain business profile transactions may have specific fees, though these typically affect the seller.
-
Always be mindful of the fee disclosure before confirming any transaction, especially for instant transfers or when using a credit card.
Troubleshooting Common Transfer Issues
Even with a smooth process, occasional issues can arise when transferring money:
-
Delayed Standard Transfers: If a standard transfer from your bank to Venmo (or vice versa) takes longer than 3 business days, first check your bank statement to see if the transaction has processed. Weekends and holidays do not count as business days. If it’s significantly delayed, contact Venmo support and your bank.
-
Failed Transfers:
-
Incorrect Bank Information: Double-check that your routing and account numbers are correct. Mismatches will cause transfers to fail.
-
Insufficient Funds: If you initiated a transfer from your bank and your bank account didn’t have enough money, it will fail.
-
Bank Restrictions: Sometimes banks may temporarily hold or decline transactions for security reasons. Contact your bank to inquire.
-
Venmo Limits: Ensure your transfer amount doesn’t exceed your daily or weekly Venmo limits.
-
-
Account Holds: Venmo may place a temporary hold on transfers or accounts if they detect suspicious activity or if a transfer violates their user agreement. In such cases, contact Venmo support directly to resolve the issue.
Having your bank information readily available and being prepared to contact both Venmo support and your bank can help resolve most issues efficiently.
Integrating Venmo into Your Personal Finance Strategy
Effectively using Venmo for bank transfers goes beyond just knowing the steps; it involves integrating it wisely into your broader personal finance framework:
-
Budgeting for Venmo: Treat your Venmo balance or Venmo transactions as a category within your overall budget. Assign a monthly allowance for Venmo spending to maintain control.
-
Transaction Tracking: Regularly review your Venmo transaction history. This helps you track your spending, categorize expenses, and identify where your money is going, especially for social or shared expenses.
-
Strategic Funding: Decide whether to regularly pre-fund your Venmo balance for specific spending or rely on direct bank debits for convenience. Your choice should align with your budgeting style and risk tolerance.
-
Avoiding Overdrafts: Always ensure your linked bank account has sufficient funds to cover any Venmo debits, whether direct payments or transfers to your Venmo balance, to avoid costly overdraft fees from your bank.
-
Emergency Fund Consideration: Do not treat your Venmo balance as an emergency fund. Funds held in Venmo are not typically FDIC insured in the same way traditional bank accounts are. For substantial savings, always use a reputable bank or credit union.
By treating Venmo as a legitimate and integrated financial tool, rather than an isolated app, you can enhance your financial agility, simplify daily transactions, and maintain better control over your money.
Conclusion
Transferring money from your bank to Venmo is a fundamental aspect of leveraging this popular payment platform for your personal financial needs. From securely linking your bank account and initiating transfers to understanding fees, limits, and security protocols, the process is designed for convenience and efficiency. By following the step-by-step guides and adopting best practices for managing your digital transactions, you can confidently use Venmo to fund your balance, pay friends, and manage shared expenses with ease. Integrating Venmo thoughtfully into your broader personal finance strategy empowers you with a versatile tool that bridges the gap between traditional banking and the demands of modern, instant financial interactions, ensuring your money is where you need it, when you need it.
aViewFromTheCave is a participant in the Amazon Services LLC Associates Program, an affiliate advertising program designed to provide a means for sites to earn advertising fees by advertising and linking to Amazon.com. Amazon, the Amazon logo, AmazonSupply, and the AmazonSupply logo are trademarks of Amazon.com, Inc. or its affiliates. As an Amazon Associate we earn affiliate commissions from qualifying purchases.