
Random Access Memory (RAM) is often dubbed the short-term memory of your computer, a crucial component that directly influences your system’s multitasking capabilities, application responsiveness, and overall speed. Unlike long-term storage like an SSD or HDD, RAM holds the data that your computer is actively using, allowing the CPU to access it almost instantaneously. Whether you’re building a new PC, upgrading an aging system to handle more demanding software, or troubleshooting performance issues, properly installing RAM is a fundamental skill for any computer user. While the process might seem daunting at first glance, especially for novices, it is a straightforward procedure that, when executed correctly, can significantly enhance your computing experience. This guide will walk you through every step, from understanding RAM basics to verifying your installation, ensuring a smooth and successful upgrade.
Understanding RAM: The Basics Before You Begin
Before you even think about opening your PC case, it’s essential to grasp the fundamentals of RAM. Knowing what you’re working with will not only make the installation process clearer but also help you make informed decisions about your hardware choices.
What is RAM and Why is it Important?
At its core, RAM is a type of volatile computer memory that can be accessed randomly; that is, any byte of memory can be accessed without touching the preceding bytes. It’s where your operating system, applications, and current data are stored for quick retrieval by the CPU. Imagine your computer’s storage drive (SSD/HDD) as a vast library of books. When you want to read a book, you don’t read it directly from the library shelf; instead, you bring it to your desk. RAM is that desk – a temporary workspace where active tasks and data reside, readily available for the CPU.
The more RAM you have, the larger your “desk” is, allowing you to run more applications simultaneously, open more browser tabs, or process larger files without your system slowing down. A lack of sufficient RAM often leads to your computer relying on “virtual memory,” using a portion of your slower storage drive as a makeshift RAM, resulting in noticeable performance bottlenecks and frustrating stuttering.
Types of RAM: DDR Generations and Compatibility
RAM technology has evolved significantly over the years, primarily categorized by DDR (Double Data Rate) generations. We’ve seen DDR1, DDR2, DDR3, DDR4, and most recently, DDR5. Each generation offers improvements in speed, efficiency, and capacity, but crucially, they are not cross-compatible. A DDR4 module will not fit into a DDR3 slot, and vice-versa, due to physical differences in the notch (keyway) placement on the module’s edge connector.
-
DDR3: Common in systems from the late 2000s to mid-2010s.
-
DDR4: The standard for most systems built between the mid-2010s and early 2020s. Offers higher speeds and lower voltage than DDR3.
-
DDR5: The latest generation, emerging in 2021. Features even higher speeds, greater bandwidth, and improved power efficiency, becoming standard in newer high-end systems.
Beyond the DDR generation, RAM modules also come in different form factors:
-
DIMM (Dual In-line Memory Module): The standard for desktop computers and servers.
-
SO-DIMM (Small Outline Dual In-line Memory Module): A smaller version used in laptops, small form-factor PCs, and some all-in-one desktops.
Ensuring your new RAM matches the DDR generation and form factor supported by your motherboard is absolutely paramount for compatibility. Consult your motherboard manual or the manufacturer’s website for specific details.
Key Specifications: Speed, Latency, and Capacity
When choosing RAM, several specifications come into play, influencing performance and compatibility:
-
Capacity: Measured in gigabytes (GB), this is the total amount of data the RAM can hold. Common capacities include 8GB, 16GB, 32GB, and 64GB. For general use, 8GB is a minimum, 16GB is ideal for most users and gamers, while 32GB or more is recommended for content creators, serious multi-taskers, and professionals.
-
Speed: Measured in megahertz (MHz) or megatransfers per second (MT/s), this indicates how quickly the RAM can process data. Higher speeds generally translate to better performance, especially in CPU-intensive tasks and gaming. Common speeds for DDR4 might be 2400MHz, 3200MHz, or 3600MHz, while DDR5 can range from 4800MHz upwards.
-
Latency (CAS Latency – CL): This refers to the delay between when the memory controller requests data and when the data is available. Lower CAS Latency values (e.g., CL16 vs. CL18) are better, indicating quicker response times. While speed is often prioritized, lower latency can also contribute to a snappier feel.
For optimal performance, especially in dual-channel or quad-channel configurations (where two or four RAM modules work together to increase bandwidth), it’s best to use identical RAM modules in terms of generation, capacity, speed, and latency. Buying RAM in “kits” (e.g., 2x8GB matched sticks) is highly recommended for guaranteed compatibility and stability.
Pre-Installation Checklist: Ensuring a Smooth Upgrade
Preparation is key to a successful RAM installation. A few minutes spent planning and gathering tools can save you hours of troubleshooting.
Identify Your System’s Needs and Current RAM
Before buying new RAM, you need to understand your current system’s configuration and what it can support.
-
Current RAM Usage: On Windows, open Task Manager (Ctrl+Shift+Esc), go to the Performance tab, and select Memory. On macOS, open Activity Monitor, then the Memory tab. This shows how much RAM you currently have and how much is typically in use, helping you determine if an upgrade is truly needed.
-
Detailed RAM and Motherboard Specs: For a complete picture, use a free utility like CPU-Z (for Windows) to identify your motherboard model, current RAM type (DDR3/4/5), speed, latency, and how many slots are occupied.
-
Motherboard Compatibility: Crucially, check your motherboard’s manual or the manufacturer’s official website. This will tell you:
-
The maximum supported RAM capacity.
-
The supported DDR generation (e.g., DDR4 only).
-
The maximum supported RAM speed (e.g., up to 3200MHz, or higher with XMP).
-
The number of RAM slots available.
-
The recommended slot configuration for dual-channel operation (e.g., slots 2 and 4).
-
Purchasing the Right RAM Modules
Armed with your system’s specifications, you can confidently purchase new RAM.
-
Match DDR Generation and Form Factor: This is non-negotiable. If you have a desktop motherboard that uses DDR4 DIMMs, you must buy DDR4 DIMMs.
-
Prioritize Kits: Always try to buy RAM in kits (e.g., 2x16GB) rather than individual sticks, especially for dual-channel setups. This ensures the modules are factory-tested to work together, minimizing compatibility issues.
-
Speed and Latency: Aim for the highest speed your motherboard supports within your budget. If you’re mixing new RAM with old, try to match the speed and latency of your existing modules. If the speeds differ, all modules will operate at the speed of the slowest stick.
-
Capacity: Choose a capacity that meets your current and future needs. A good rule of thumb is 16GB for most users, 32GB for professionals or enthusiasts.
Essential Tools and Safety Precautions
Working inside a computer requires some basic tools and, more importantly, strict adherence to safety protocols.
-
Tools:
-
Phillips Head Screwdriver: The most common tool for opening PC cases and removing components.
-
Anti-static Wrist Strap (Recommended): This is crucial for preventing electrostatic discharge (ESD), which can permanently damage sensitive electronic components. Clip it to an unpainted metal part of your PC case.
-
-
Safety Precautions:
-
Unplug the PC: Always, without exception, disconnect your computer from the power outlet before opening the case or touching any internal components.
-
Discharge Residual Power: After unplugging, press and hold the power button on your PC for 10-15 seconds. This drains any residual power stored in the capacitors, preventing accidental shocks and protecting components.
-
Ground Yourself: If you don’t have an anti-static wrist strap, frequently touch an unpainted metal part of your PC case or another grounded metal object to discharge any static electricity built up on your body. Avoid working on carpeted floors.
-
Clean Workspace: Work on a flat, clean, and well-lit surface, free of clutter and static-generating materials.
-
Handle with Care: Always handle RAM modules by their edges, avoiding contact with the gold electrical contacts or the chips themselves. Oils and static from your fingers can damage them.
-
The Step-by-Step RAM Installation Process
With preparations complete, you’re ready for the physical installation. Take your time, follow each step carefully, and remember the mantra: gentle but firm.
Opening Your PC Case
-
Lay the Case Flat: Place your PC case on its side on your clean workspace, with the motherboard access panel facing upwards.
-
Remove the Side Panel: Most PC cases have thumb screws or standard screws holding the side panel in place. Unscrew them and gently slide or pivot the panel off. Set it aside in a safe place.
-
Identify Components: Take a moment to locate the motherboard and the existing RAM slots. These are usually long, narrow slots typically located to the right or above the CPU cooler, often in banks of two or four.
Locating and Preparing RAM Slots
-
Identify RAM Slots: Your motherboard will have DIMM slots. If you’re adding RAM, identify the empty slots. If you’re replacing RAM, locate the occupied slots.
-
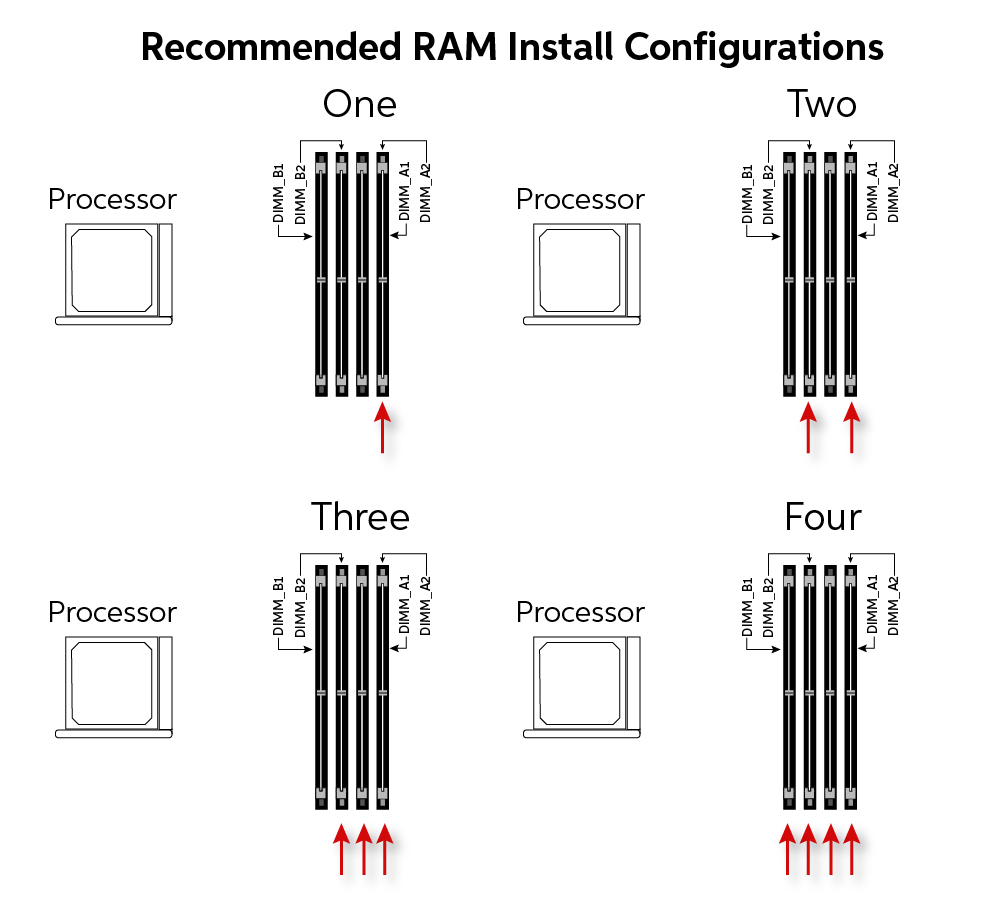
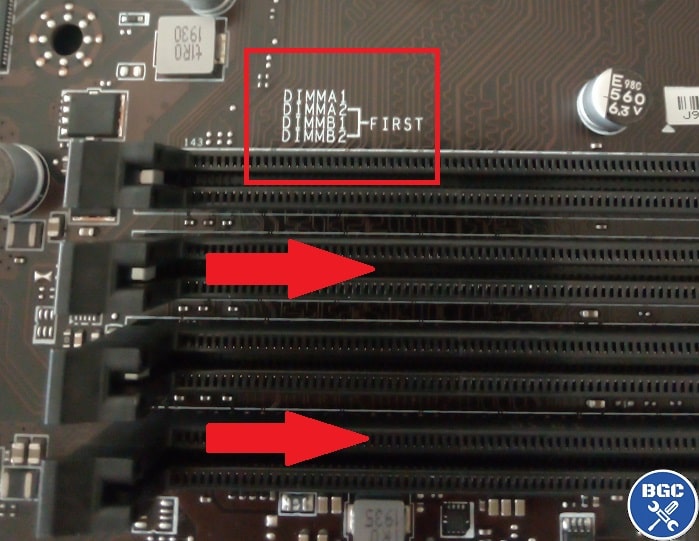
Understand Dual-Channel (or Quad-Channel): For optimal performance, RAM should be installed in specific slots to enable dual-channel (or quad-channel) mode. Your motherboard manual will specify which slots to use (e.g., A2 and B2, or slots 1 and 3 if numbered consecutively). They are often color-coded, or simply alternate, e.g., 2nd and 4th slots from the CPU. Incorrect placement might result in single-channel mode, reducing performance.
-
Open Retention Clips: Each RAM slot has small clips at either end. Gently push these clips outwards until they spring open. These clips will secure the RAM module in place.
Installing New RAM Modules
-
Unpack RAM: Carefully remove the new RAM modules from their anti-static packaging. Remember to handle them by the edges.
-
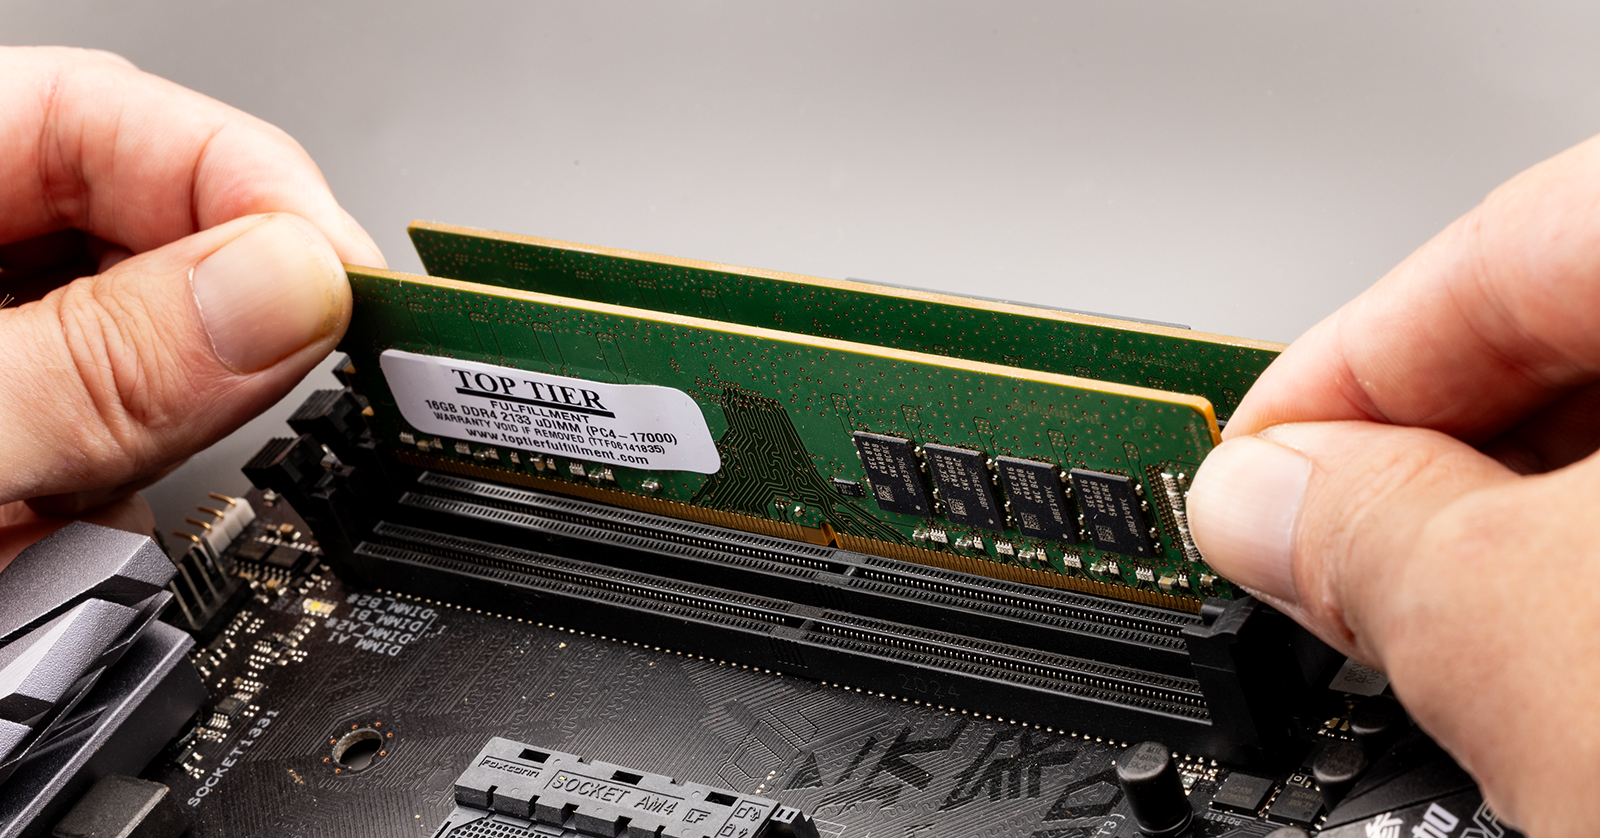
Align the Notch: Look at the gold contact edge of the RAM stick. You’ll notice a small notch in the middle. This notch must align perfectly with the raised key in the RAM slot on the motherboard. This ensures the module is inserted in the correct orientation and prevents improper installation (and potential damage).
-
Insert and Press Firmly: With the notch aligned, place the RAM module into the slot. Apply even, firm pressure to both ends of the RAM stick simultaneously, pressing straight down. You should feel a slight resistance, and as the module seats correctly, the retention clips on either side should click into place, securing the RAM. Do not force it if it doesn’t seem to go in; re-check the alignment.
-
Verify Seating: Double-check that both clips have fully engaged and that the RAM module is seated flush and level in the slot, with no gold contacts visible.
Removing Old RAM (If Upgrading)
If you are replacing existing RAM, you’ll need to remove the old modules first:
-
Open Clips: Gently press outwards on the retention clips at both ends of the slot where the old RAM is installed. The module should pop up slightly.
-
Gently Pull Out: Once the clips are released, grasp the RAM module by its edges and gently pull it straight out of the slot.
-
Store Safely: Place the old RAM in its original anti-static packaging or another anti-static bag to protect it from ESD or physical damage if you plan to keep or reuse it.
Post-Installation: Verifying and Troubleshooting
Once the physical installation is complete, it’s time to close up your PC and confirm everything is working as expected.
Initial Boot-Up and BIOS/UEFI Check
-
Close Case and Reconnect: Carefully replace the side panel of your PC case and secure it with its screws. Reconnect all peripherals (monitor, keyboard, mouse) and the power cable.
-
Power On: Press the power button. The first boot after a RAM upgrade might take a little longer than usual, or even go through a couple of reboots as the system detects the new memory. This is often normal.
-
Access BIOS/UEFI: Immediately after pressing the power button, repeatedly press the designated key (commonly Del, F2, F10, or F12 – check your motherboard manual) to enter your system’s BIOS/UEFI settings.
-
Verify RAM: Within the BIOS/UEFI, navigate to a section that displays system information, memory settings, or hardware status. Here you should see the total installed RAM capacity and its detected speed.
-
Enable XMP/DOCP (if applicable): If you purchased high-speed RAM (e.g., 3200MHz or higher), it might initially be detected at a lower, default speed (e.g., 2133MHz or 2400MHz). To enable the RAM’s advertised speed, you’ll need to enable its Extreme Memory Profile (XMP on Intel platforms) or DOCP (Direct Overclock Profile on AMD platforms). Find this setting in the advanced memory or overclocking sections of your BIOS/UEFI and select the appropriate profile. Save changes and exit.
Operating System Verification
Once your computer boots into your operating system:
-
Windows: Open Task Manager (Ctrl+Shift+Esc), go to the Performance tab, and click on Memory. You should see the total installed RAM listed.
-
macOS: Go to Apple menu > About This Mac. The overview tab will show your total RAM.
-
Linux: Open a terminal and type
free -horhtop. -
Memory Diagnostics: For an extra layer of reassurance, especially if you experience any instability, run a memory diagnostic tool. Windows has a built-in “Windows Memory Diagnostic” tool (search for it in the Start menu). Third-party tools like MemTest86 can also be used for more thorough testing.
Common Troubleshooting Scenarios
-
PC Not Booting (No Display, Beep Codes): This is the most common issue.
-
Re-seat RAM: Power off, unplug, and carefully re-seat each RAM module. Ensure the clips click firmly into place.
-
Try One Stick at a Time: If you installed multiple modules, try booting with just one stick in the primary slot (check manual) to isolate a potentially faulty module or slot.
-
Check Compatibility: Double-check that the RAM generation and type are correct for your motherboard.
-
Clear CMOS: If you tried enabling XMP and your PC won’t boot, you might need to clear your motherboard’s CMOS (refer to your motherboard manual for how to do this, usually involving removing a small battery or shorting pins) to reset BIOS settings to default.
-
-
RAM Recognized but at Lower Speed: This means XMP/DOCP is not enabled. Go back into BIOS/UEFI and enable the correct profile.
-
System Instability/Crashes:
-
Run memory diagnostics to check for errors.
-
Ensure RAM is fully seated.
-
Check for bent pins in the CPU socket (if you’ve removed the CPU cooler during the process).
-
Try different slot configurations.
-
Conclusion
Installing RAM might seem like a small task, but its impact on your computer’s performance is profound. By meticulously following this guide, understanding the technical nuances, and observing crucial safety precautions, you can confidently upgrade your system’s memory. From identifying the right modules to the precise act of seating them in their slots, each step contributes to a stable and significantly more responsive machine. Enjoy the immediate boost in multitasking efficiency, faster application loading, and a smoother overall computing experience that properly installed RAM brings to your desktop or laptop. Your computer’s short-term memory just got a major upgrade!
aViewFromTheCave is a participant in the Amazon Services LLC Associates Program, an affiliate advertising program designed to provide a means for sites to earn advertising fees by advertising and linking to Amazon.com. Amazon, the Amazon logo, AmazonSupply, and the AmazonSupply logo are trademarks of Amazon.com, Inc. or its affiliates. As an Amazon Associate we earn affiliate commissions from qualifying purchases.