
Xcode is Apple’s integrated development environment (IDE) for macOS, iOS, watchOS, and tvOS. It’s an indispensable tool for anyone looking to develop applications for the Apple ecosystem, providing everything from source code editing and debugging to UI design and performance analysis. For aspiring and seasoned developers alike, the first step into Apple platform development is invariably installing Xcode on your Mac. This guide will walk you through the entire process, from understanding system requirements to troubleshooting common issues, ensuring a smooth setup for your development journey.
Understanding Xcode and Its System Requirements
Before you embark on the installation process, it’s crucial to understand what Xcode is, why it’s essential, and most importantly, whether your Mac meets the necessary specifications. This foresight will prevent potential frustrations and ensure a seamless setup.
What is Xcode?
Xcode is much more than just a code editor; it’s a powerful suite of software development tools provided free by Apple. It bundles a vast array of components vital for creating apps, including:
-
Integrated Development Environment (IDE): A central hub for writing code, managing projects, and interacting with various tools.
-
Compilers: Tools like Clang and Swift Compiler that translate your human-readable code into machine-executable instructions.
-
Software Development Kits (SDKs): Collections of frameworks, APIs, and documentation that allow you to interact with specific Apple platforms (e.g., iOS SDK, macOS SDK).
-
Interface Builder: A visual tool for designing user interfaces by dragging and dropping elements, making UI development intuitive.
-
Debugging Tools: Instruments for identifying and fixing bugs in your code, including breakpoints, variable inspection, and performance analysis.
-
Simulators: Virtual devices (iPhone, iPad, Apple Watch, Apple TV) that allow you to test your applications without needing physical hardware.
-
Asset Catalogs: Tools for managing app assets like images, icons, and sounds efficiently.
Xcode supports development in Apple’s primary programming language, Swift, as well as Objective-C, C, C++, and more. It integrates tightly with the macOS operating system and the entire Apple developer ecosystem, making it the de facto choice for native app development.
Why Install Xcode?
The reasons to install Xcode are manifold, particularly if you’re serious about developing for Apple platforms:
-
Native App Development: Xcode is the only official IDE for building native applications for iPhone, iPad, Mac, Apple Watch, and Apple TV. It provides the full spectrum of tools required for creating high-performance, feature-rich apps that adhere to Apple’s design guidelines.
-
Access to Latest Technologies: Apple frequently updates its operating systems and introduces new frameworks and APIs. Xcode is updated in lockstep, ensuring developers have immediate access to the latest SDKs, features, and security enhancements.
-
Comprehensive Testing and Debugging: With integrated simulators and powerful debugging tools, Xcode allows you to thoroughly test your applications across various device configurations and troubleshoot issues effectively.
-
App Store Submission: Xcode is integral to the process of signing, archiving, and submitting your applications to the Apple App Store, handling code signing certificates, provisioning profiles, and build management.
-
Community and Resources: Being the official tool, Xcode benefits from extensive documentation, tutorials, and a vast developer community, making it easier to find solutions and support.
Checking Your Mac’s Compatibility
Xcode is a demanding application, and its system requirements can be quite specific, especially concerning the macOS version. Running Xcode on an unsupported or underpowered Mac will lead to poor performance and an unproductive development experience.
-
Operating System (macOS): This is the most critical requirement. Each major version of Xcode is tied to a specific minimum macOS version. For example, Xcode 15 requires macOS Ventura 13.5 or later. If your macOS is outdated, you may need to upgrade it first. You can check your macOS version by clicking the Apple menu () > About This Mac.
-
Disk Space: Xcode is notoriously large. A fresh installation, including essential components, can easily consume 30-50 GB of disk space. Moreover, the download file itself (a
.xiparchive from the developer portal) can be over 10 GB, and extracting it temporarily requires even more space. Ensure you have at least 60-80 GB of free space available before you begin. -
RAM (Memory): While Xcode can technically run with 8 GB of RAM, this is considered a bare minimum. For serious development, especially with multiple simulators running or large projects, 16 GB of RAM is highly recommended, and 32 GB offers a significantly smoother experience.
-
Processor: Xcode runs on both Intel-based Macs and Apple Silicon (M1, M2, M3 chips). Newer versions of Xcode are optimized for Apple Silicon, offering superior performance. While most modern processors will suffice, a faster multi-core processor will greatly reduce compilation times and improve overall responsiveness.
-
Internet Connection: You’ll need a stable and reasonably fast internet connection to download Xcode, which is a large file.
Meeting these requirements is paramount for a successful and efficient Xcode installation and development workflow.
Methods for Installing Xcode
There are primarily two ways to install Xcode on your Mac, each with its advantages. The most suitable method depends on your specific needs, whether you’re a new developer looking for the simplest approach or an experienced user requiring access to specific versions.
Method 1: App Store (Recommended for Most Users)
The Mac App Store offers the most straightforward and user-friendly way to install Xcode. It’s Apple’s official distribution channel and handles updates automatically, making it ideal for beginners and those who always want the latest stable version.
Advantages:
-
Simplicity: The process is highly automated and requires minimal manual intervention.
-
Automatic Updates: The App Store keeps Xcode updated with the latest stable releases, ensuring you always have the most current tools.
-
Trusted Source: Downloads are verified by Apple, reducing security concerns.
-
No Developer Account Required (initially): You don’t need a paid Apple Developer Program membership just to download Xcode from the App Store.
Steps to Install from the App Store:
-
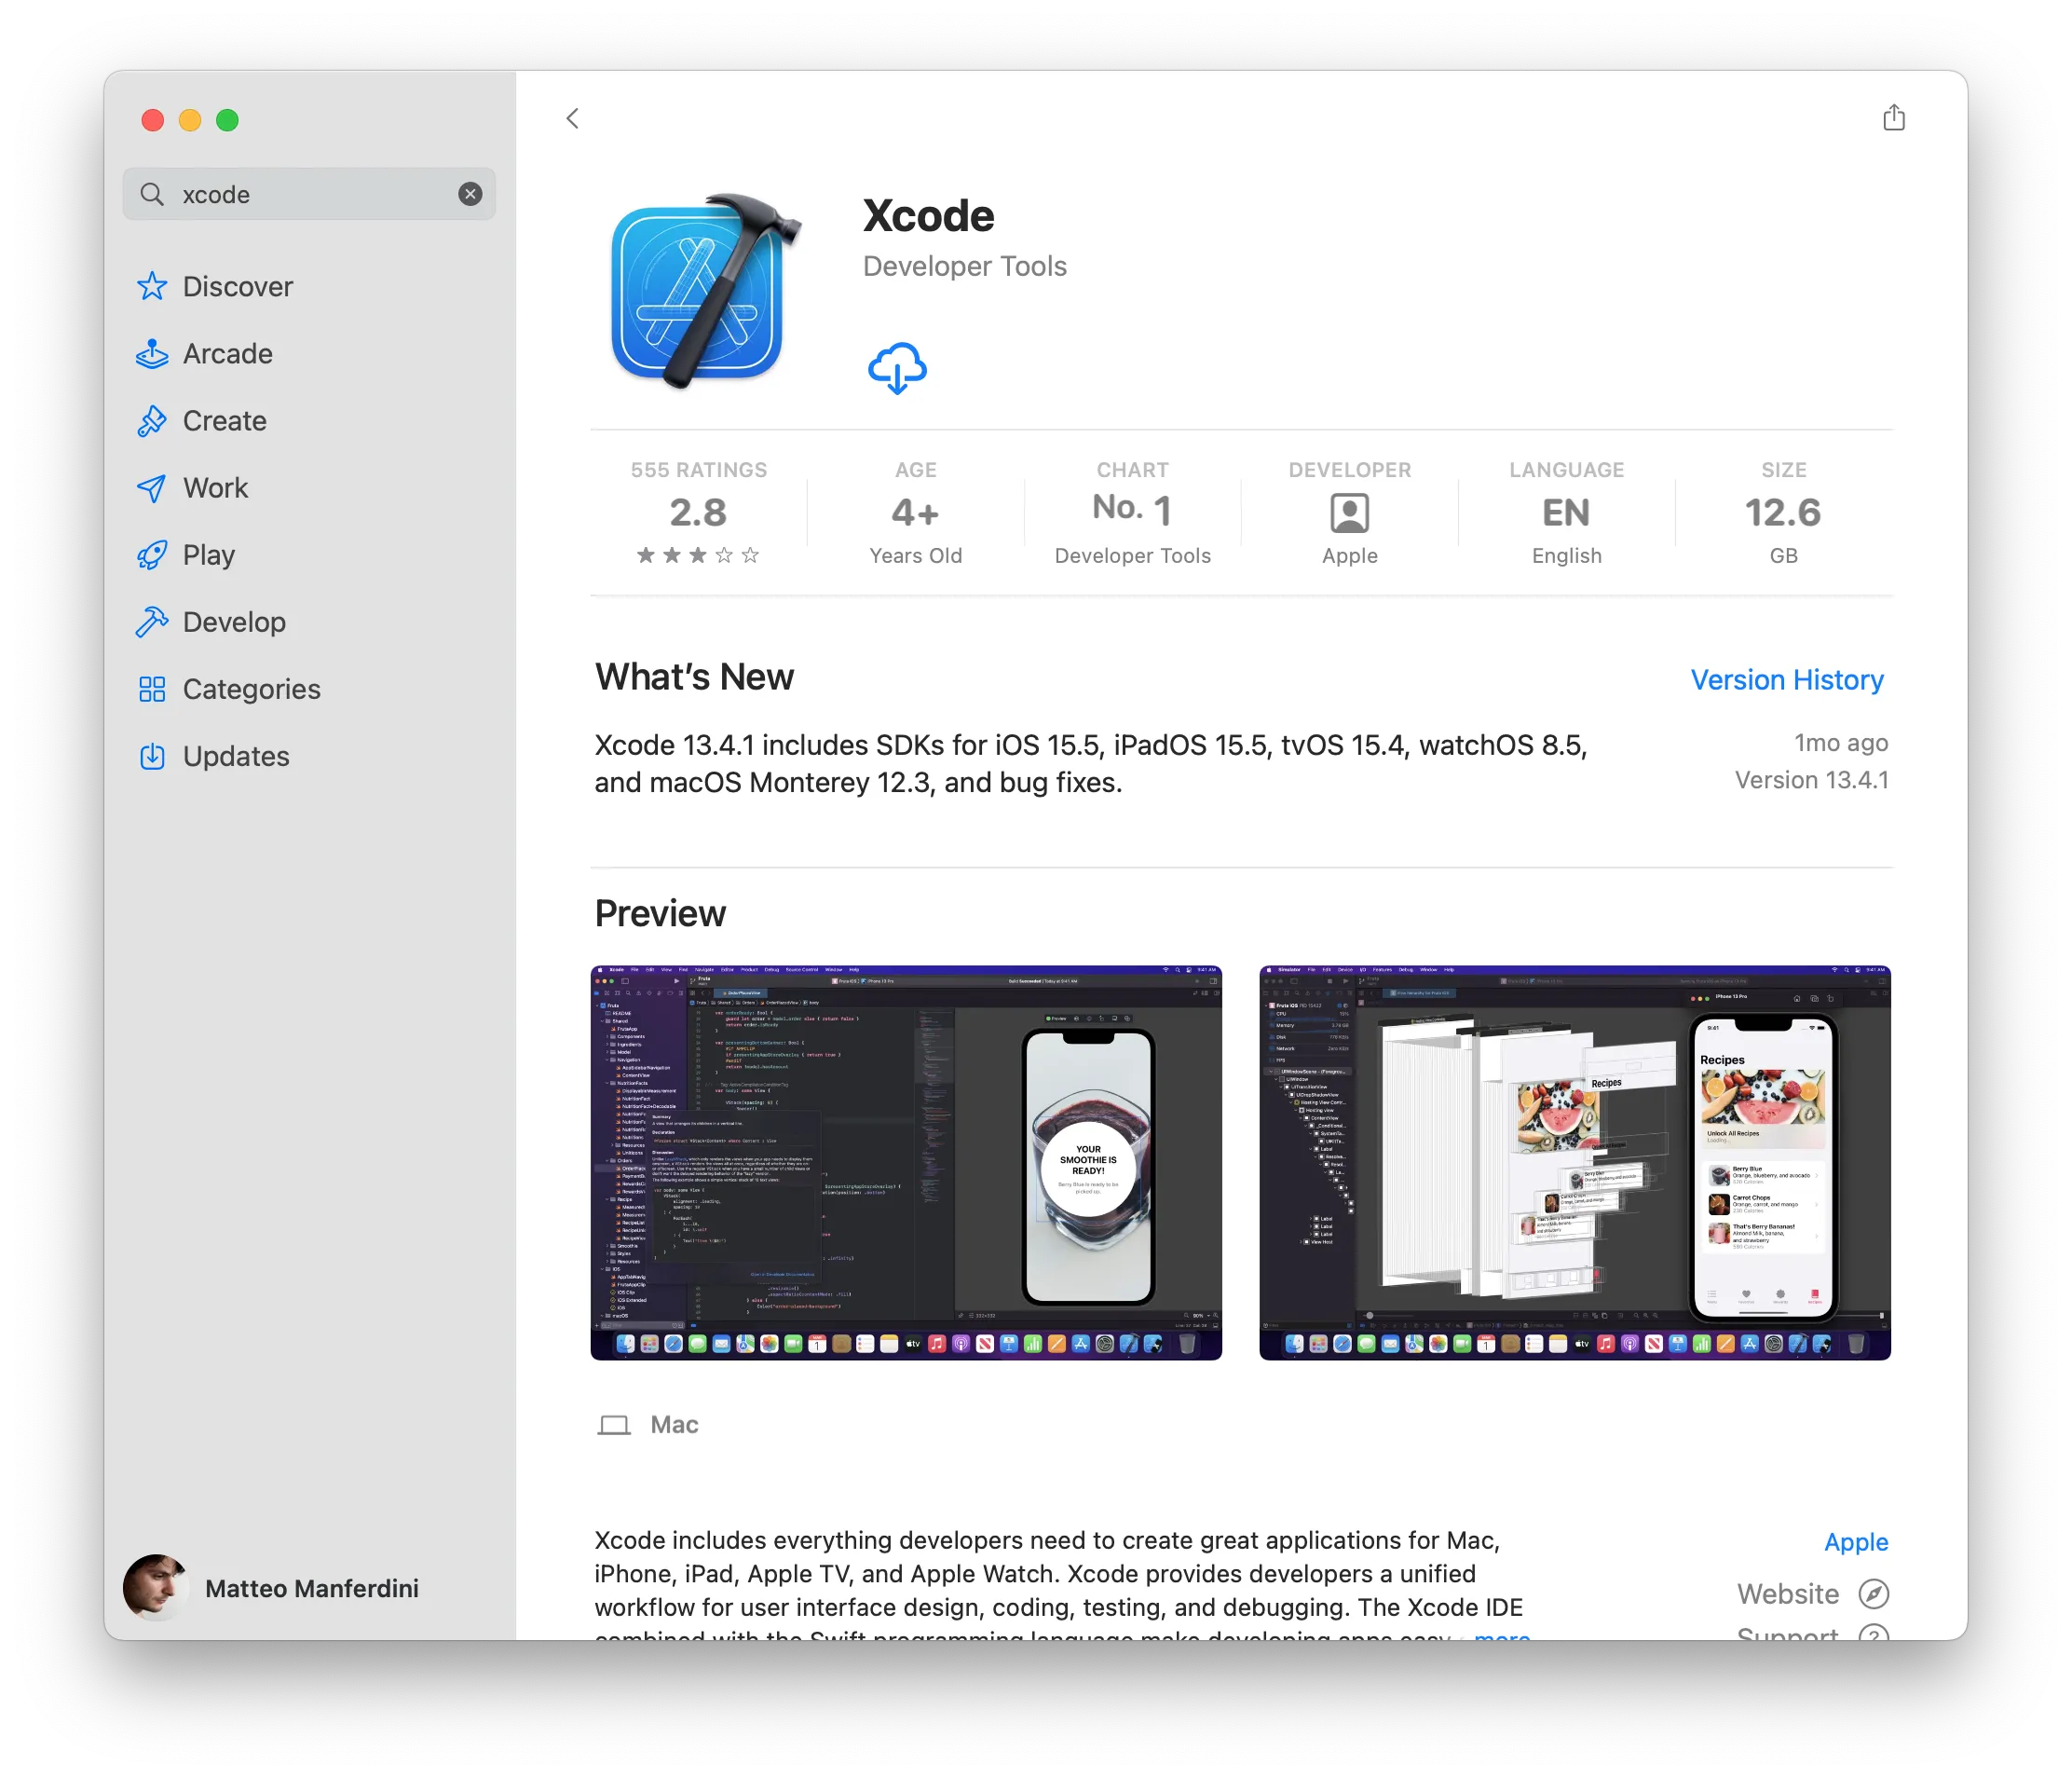
Open the App Store: Click on the blue App Store icon in your Dock or find it in your Applications folder.
-
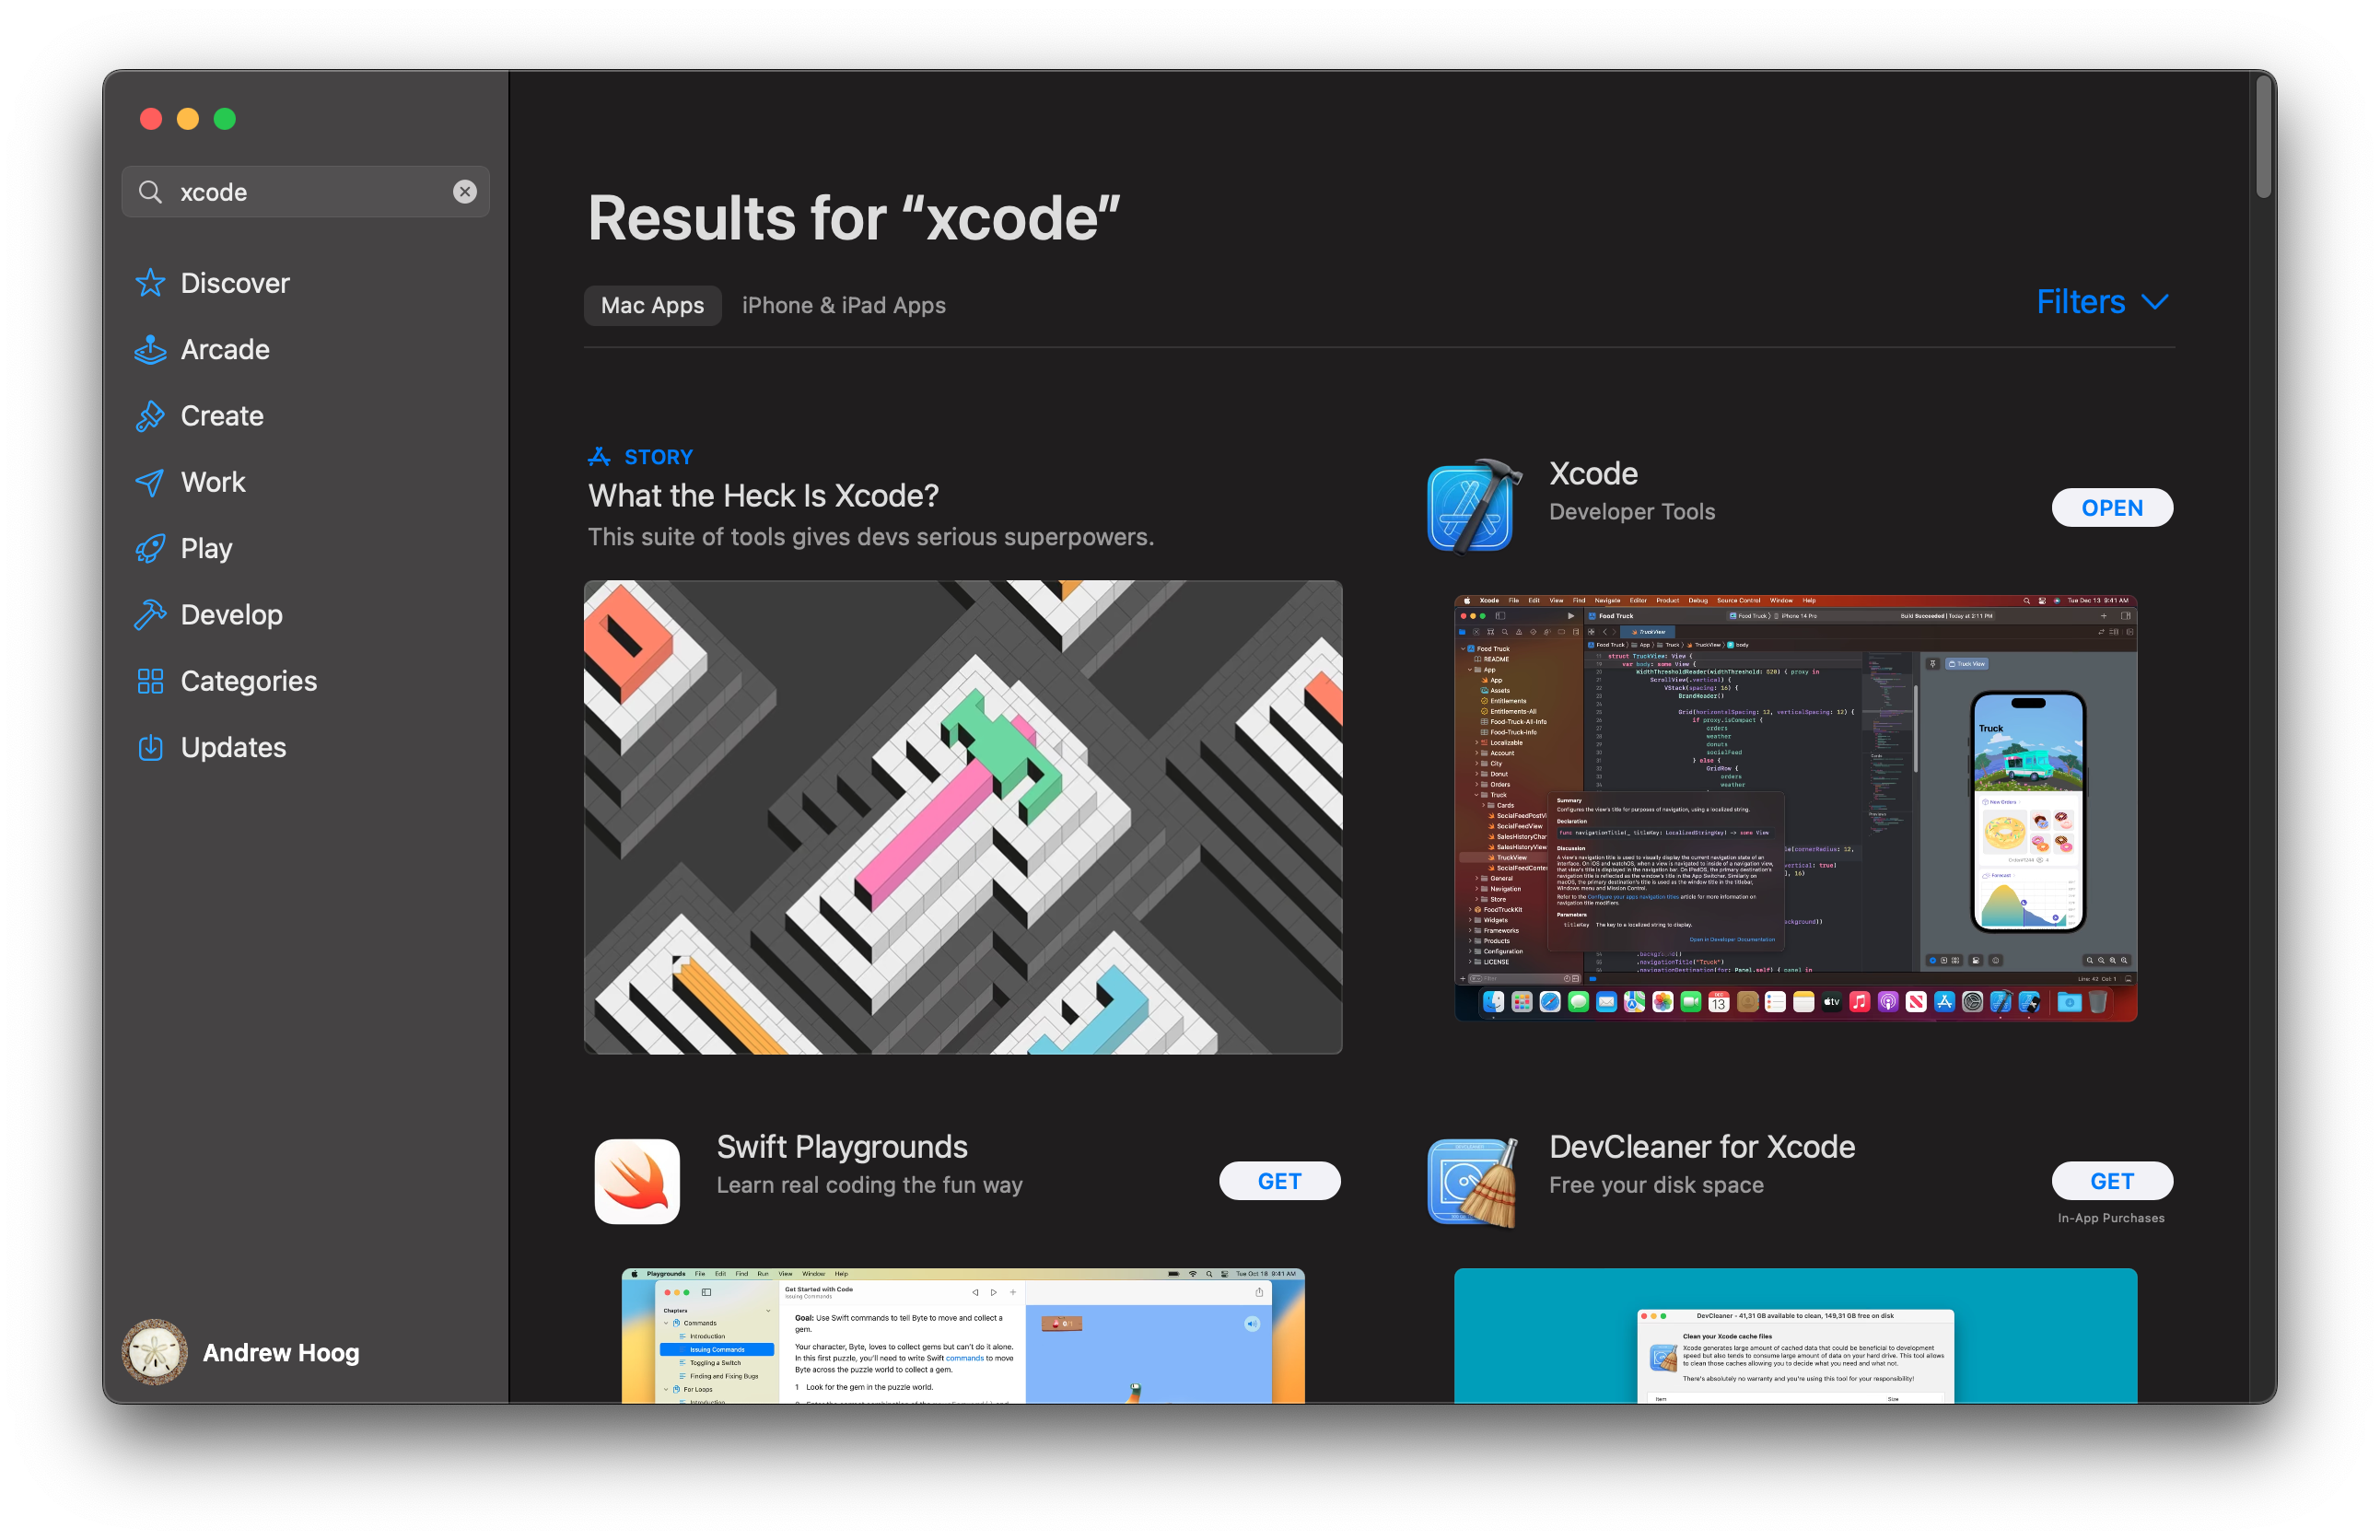
Search for Xcode: In the App Store’s search bar (usually in the top-left corner), type “Xcode” and press Enter.
-
Find Xcode: The first result should be “Xcode” by Apple. Click on it to view its details page.
-
Initiate Download: Click the “Get” or “Install” button next to the Xcode icon. If you’ve previously downloaded it, the button might display a cloud icon with a down arrow.
-
Authenticate: You’ll be prompted to enter your Apple ID and password, or authenticate using Touch ID/Face ID if configured.
-
Wait for Download and Installation: Xcode is a massive download (often 10-15 GB). The App Store will download and then automatically install the application. This process can take a significant amount of time, depending on your internet speed and Mac’s performance. You can monitor the progress from the App Store or your Launchpad.
-
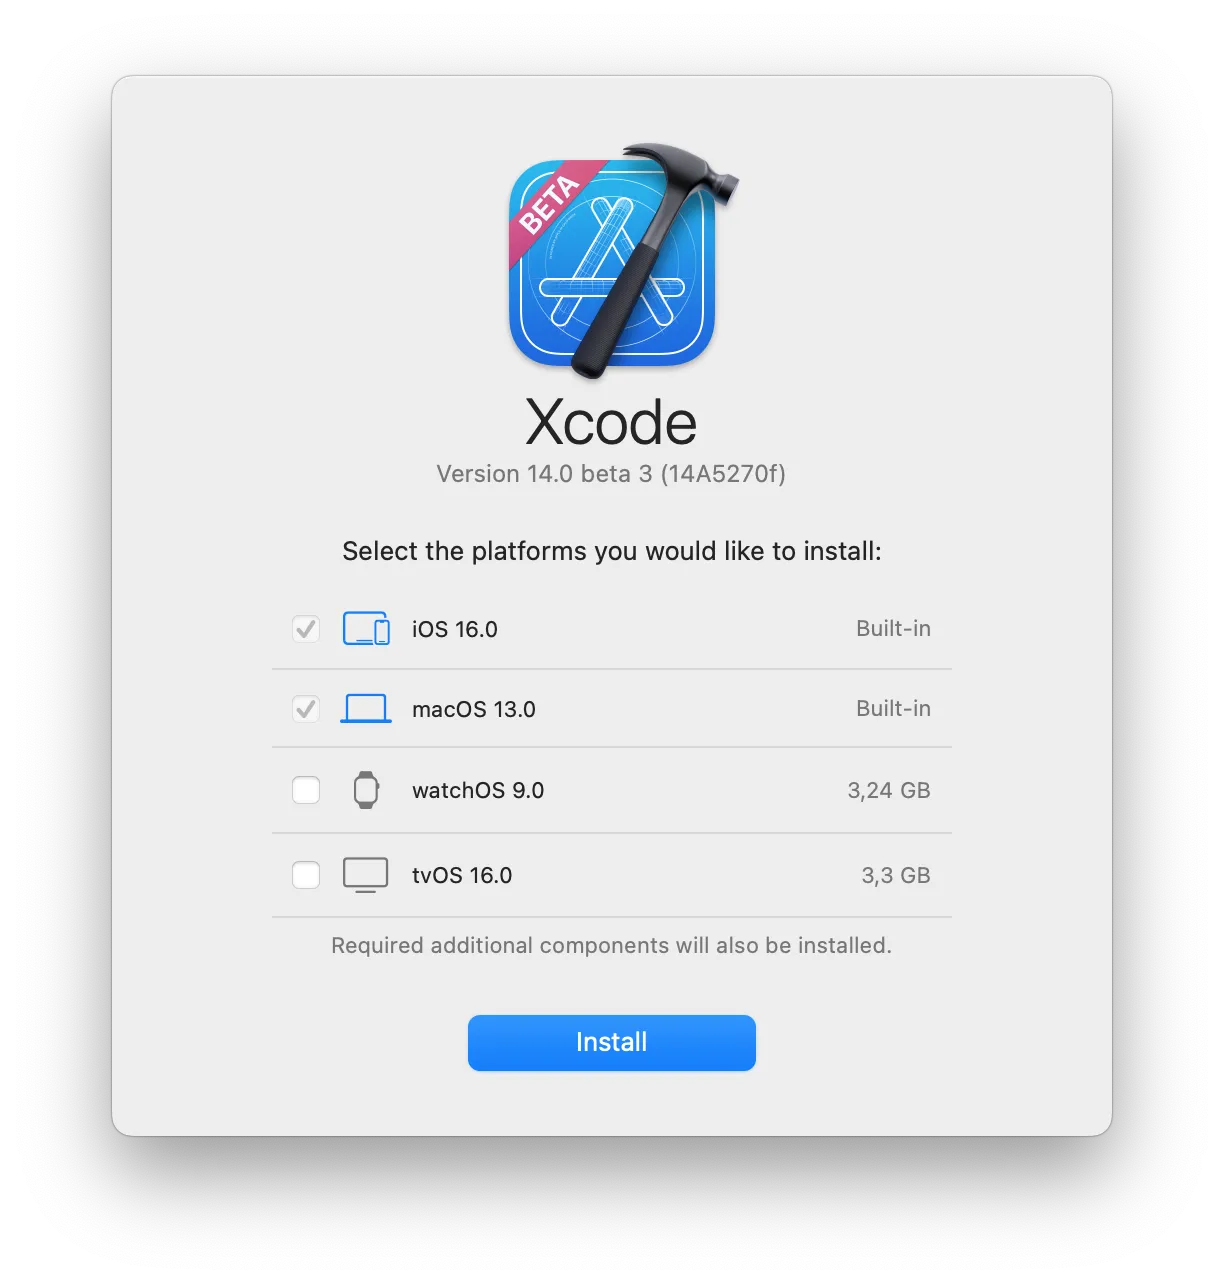
First Launch Setup: Once installed, navigate to your Applications folder and open “Xcode.app”. The first time you launch it, Xcode will perform additional setup, including installing “additional required components.” This step is crucial and can take another 5-10 minutes. You’ll be asked to agree to the Xcode and Apple SDKs license agreement.
Troubleshooting App Store Installation:
-
Slow Download: Ensure a stable internet connection. You might try pausing and resuming the download.
-
“Insufficient Disk Space”: Refer to the previous section and free up necessary space.
-
Installation Stuck: Restart your Mac and try again. Ensure macOS is up-to-date.
Method 2: Apple Developer Website (For Specific Versions/Beta)
The Apple Developer website provides access to current, older, and beta versions of Xcode. This method is often preferred by experienced developers who need to work with specific Xcode versions for project compatibility or test upcoming features.
Advantages:
-
Version Control: Access to specific previous versions of Xcode, which is essential for maintaining compatibility with older projects or macOS versions.
-
Beta Access: Download beta versions of Xcode to test unreleased features or prepare for upcoming macOS/iOS releases.
-
Potentially Faster Downloads: Sometimes, downloading directly from Apple’s developer portal servers can be faster than through the App Store, especially for large files.
Requirements:
- Apple Developer Account: You need to be signed in with an Apple ID that is registered as an Apple Developer. This doesn’t necessarily require a paid membership, but you need to have accepted the developer agreement.
Steps to Install from the Apple Developer Website:
-
Visit the Downloads Page: Open your web browser and navigate to
developer.apple.com/download/more/. -
Sign In: You’ll be prompted to sign in with your Apple ID and password.
-
Search for Xcode: Use the search bar on the page to find the specific Xcode version you need (e.g., “Xcode 15”, “Xcode 14.3.1”).
-
Download the
.xipFile: Locate the desired Xcode version and click the download link. This will download a large.xip(Xcode Archive) file to your Downloads folder. These files are typically 10-25 GB. -
Extract the
.xipFile: Once the download is complete, double-click the.xipfile in your Downloads folder. macOS’s Archive Utility will begin extracting the “Xcode.app” application. This process can take a very long time (30 minutes to several hours) and requires a significant amount of temporary disk space (often double the.xipfile size). -
Move Xcode to Applications: Once extracted, you’ll find “Xcode.app” in your Downloads folder. Drag and drop it into your
/Applicationsfolder. You might be prompted for your administrator password. -
First Launch Setup: Open “Xcode.app” from your Applications folder. Similar to the App Store installation, you’ll need to accept the license agreement and wait for “additional required components” to install.
Troubleshooting Developer Website Installation:
-
Extraction Issues: Ensure you have enough disk space. If extraction fails repeatedly, try a different extraction utility or re-download the
.xipfile. -
“Xcode.app” is Damaged: If you get an error that the app is damaged, it might be due to an incomplete download or a corrupted file. Delete it and re-download.
Post-Installation: Command Line Tools
Regardless of how you install Xcode, you’ll almost certainly need the Xcode Command Line Tools. These provide essential Unix tools, compilers (like gcc, clang), Git, Make, and other utilities that are crucial for command-line development, Homebrew, Ruby, Python, and many other developer workflows, even if you primarily use Xcode’s GUI.
How to Install Command Line Tools:
-
Open Terminal: Find the Terminal app in
Applications/Utilitiesor search for it using Spotlight (Cmd + Space). -
Execute Command: Type the following command and press Enter:
xcode-select --install -
Follow Prompts: A dialog box will appear asking if you want to install the command-line developer tools. Click “Install” and agree to the license agreement.
-
Wait for Installation: The tools will download and install automatically.
-
Verify Installation: Once complete, you can verify by typing
git --versionorgcc --versionin Terminal. If they return version numbers, the tools are installed correctly.
Initializing and Optimizing Your Xcode Environment
After successfully installing Xcode, a few initial steps and configurations will help you optimize your development environment for better performance and a smoother workflow.
First Launch and Additional Components
When you first open Xcode, you’ll encounter a crucial “Installing components…” dialog. This isn’t just a formality; Xcode is downloading and installing essential SDKs, simulators for various iOS versions, and other development resources that are too large to bundle with the initial application download. Do not interrupt this process.
-
Accept License Agreement: Read and accept the Xcode and Apple SDKs license agreement.
-
Wait for Component Installation: This step can take a while (5-15 minutes or more) depending on your internet speed and Mac’s performance. Ensure your Mac remains awake and connected to the internet. These components are stored in
/Library/Developer/CommandLineToolsand~/Library/Developer/Xcode.
Configuring Xcode Preferences
Once the initial setup is complete, dive into Xcode’s preferences to tailor the IDE to your needs. Go to Xcode > Preferences (or Cmd + Comma).
-
Accounts: This is vital. Add your Apple ID here (the same one associated with your developer account). This enables Xcode to manage your team memberships, retrieve provisioning profiles, and facilitate app signing and submission.
-
Locations: Pay attention to “Derived Data” and “Archives.” Derived Data is where Xcode stores build products, index files, and other temporary assets. It can grow very large over time. You might consider moving it to a faster drive or regularly cleaning it.
-
Components: Here you can download additional simulator runtimes for different iOS, watchOS, or tvOS versions if your projects require testing against specific older or newer OS versions that weren’t included in the initial install.
-
Text Editing: Customize fonts, colors, themes, indentation, and code completion settings to match your coding style.
-
Key Bindings: Adjust keyboard shortcuts to optimize your workflow.
-
Themes: Choose from various color themes for the editor and console.
Managing Multiple Xcode Versions (Advanced)
For advanced users or teams working on projects with specific SDK requirements, it’s common to have multiple versions of Xcode installed simultaneously. This allows you to test against older macOS/iOS versions or use beta versions without disrupting your primary development environment.
-
Installation: When downloading from the developer portal, you can install multiple
Xcode.appfiles by renaming them (e.g., “Xcode 14.app”, “Xcode 15.app”) before moving them to the/Applicationsfolder. The App Store only allows one version. -
Switching Default Xcode: To tell your command-line tools (like
git,xcrun) which Xcode version to use as the default, use thexcode-selectcommand in Terminal:sudo xcode-select -s /Applications/Xcode 15.app/Contents/DeveloperReplace “Xcode 15.app” with the path to your desired Xcode version. You can check the currently selected version with
xcode-select -p. -
Project-Specific Settings: Within Xcode, for a given project, you can sometimes specify which SDK or toolchain to use in the project settings, allowing more granular control.
Common Issues and Troubleshooting During Xcode Installation
Despite the streamlined installation process, developers occasionally encounter hiccups. Knowing how to diagnose and resolve these common problems can save you considerable time and frustration.
“Insufficient Disk Space”
This is perhaps the most frequent issue. Xcode is a massive application, and the installation process (especially from the .xip file) requires a substantial amount of temporary space.
Solution:
-
Check Free Space: Go to Apple menu () > About This Mac > Storage.
-
Free Up Space:
-
Empty Trash: A simple but effective step.
-
Delete Unnecessary Files: Large movie files, old downloads, or unused applications.
-
Analyze Storage: Click “Manage…” in the Storage tab to use macOS’s built-in tools for identifying and removing large files.
-
Clean Derived Data: If you had a previous Xcode install, delete the contents of
~/Library/Developer/Xcode/DerivedData. -
Delete Old Simulators: In Xcode preferences > Components, remove simulators for OS versions you no longer need.
-
Slow Download or Installation
Large files and internet speeds can cause delays.
Solution:
-
Check Internet Connection: Run a speed test to ensure your internet is performing as expected.
-
Use Wired Connection: If possible, switch from Wi-Fi to an Ethernet connection for better stability and speed.
-
Pause and Resume: In the App Store, you can pause and resume the download.
-
Try Developer Portal: If the App Store download is consistently slow, try downloading the
.xipfile directly fromdeveloper.apple.com/download/more/. -
Prevent Sleep: Ensure your Mac is set not to go to sleep during the download process, especially for the
.xipextraction.
Installation Stuck or Failed
Sometimes the process might halt unexpectedly.
Solution:
-
Restart Mac: A full system restart can often clear transient issues.
-
Ensure macOS is Up-to-Date: An outdated macOS might be incompatible with the latest Xcode. Go to System Settings (or System Preferences) > General > Software Update.
-
Check Console Logs: Open
Console.app(inApplications/Utilities) and look for error messages related to “Installer,” “App Store,” or “Xcode” during the time the installation failed. These logs can provide clues. -
Re-attempt Installation: Delete any partially installed Xcode files and try the installation again from scratch.
Xcode Not Launching or Crashing
If Xcode launches but then immediately crashes, or fails to open at all.
Solution:
-
Restart Mac: Always the first step.
-
Delete Derived Data: Corrupted Derived Data can sometimes prevent Xcode from launching. Delete the contents of
~/Library/Developer/Xcode/DerivedData. -
Reset Xcode Settings: Open Terminal and run:
defaults delete com.apple.dt.Xcode. This resets Xcode’s preferences to their default state. -
Reinstall Command Line Tools: Run
xcode-select --installin Terminal, even if they were previously installed. -
Check System Logs: Use
Console.appfor crash reports related to Xcode. -
Reinstall Xcode: As a last resort, delete Xcode.app from your Applications folder and reinstall it using one of the methods above.
“xcrun: error: invalid active developer path…”
This error often appears when using command-line tools like Git or Homebrew after an Xcode installation or update. It means the system doesn’t know where to find the developer tools.
Solution:
-
Reset
xcode-select: Open Terminal and type:sudo xcode-select --resetYou may need to enter your administrator password.
-
Reinstall Command Line Tools: If the above doesn’t work, force a reinstall of the command-line tools:
xcode-select --install
By understanding these common issues and their solutions, you can efficiently troubleshoot and get back to developing your next great app.
Conclusion
Installing Xcode on your Mac is the gateway to developing powerful and engaging applications for the entire Apple ecosystem. While the process can seem daunting due to the sheer size of the application and its components, following this comprehensive guide ensures a smooth and successful setup. Whether you choose the simplicity of the App Store or the flexibility of the Apple Developer website, understanding the system requirements, the installation steps, and how to troubleshoot common issues will empower you to confidently set up your development environment.
With Xcode successfully installed and configured, you’re ready to dive into the world of Swift, SwiftUI, Objective-C, and Apple’s robust frameworks. The journey from initial idea to a fully functional app begins with this fundamental step, opening up a realm of creative possibilities and technological innovation. Happy coding!
aViewFromTheCave is a participant in the Amazon Services LLC Associates Program, an affiliate advertising program designed to provide a means for sites to earn advertising fees by advertising and linking to Amazon.com. Amazon, the Amazon logo, AmazonSupply, and the AmazonSupply logo are trademarks of Amazon.com, Inc. or its affiliates. As an Amazon Associate we earn affiliate commissions from qualifying purchases.