
In the ever-evolving landscape of digital entertainment, Kodi stands as a prominent open-source media center, renowned for its versatility and extensibility. At the heart of Kodi’s appeal are its addons, which transform the platform into a powerhouse for accessing a vast array of content. Among these, “The Crew” addon has consistently risen in popularity, earning a reputation as a robust and feature-rich option for streaming movies, TV shows, live sports, and more. This comprehensive guide will walk you through the process of installing The Crew addon, ensuring you can harness its full potential for an unparalleled entertainment experience.
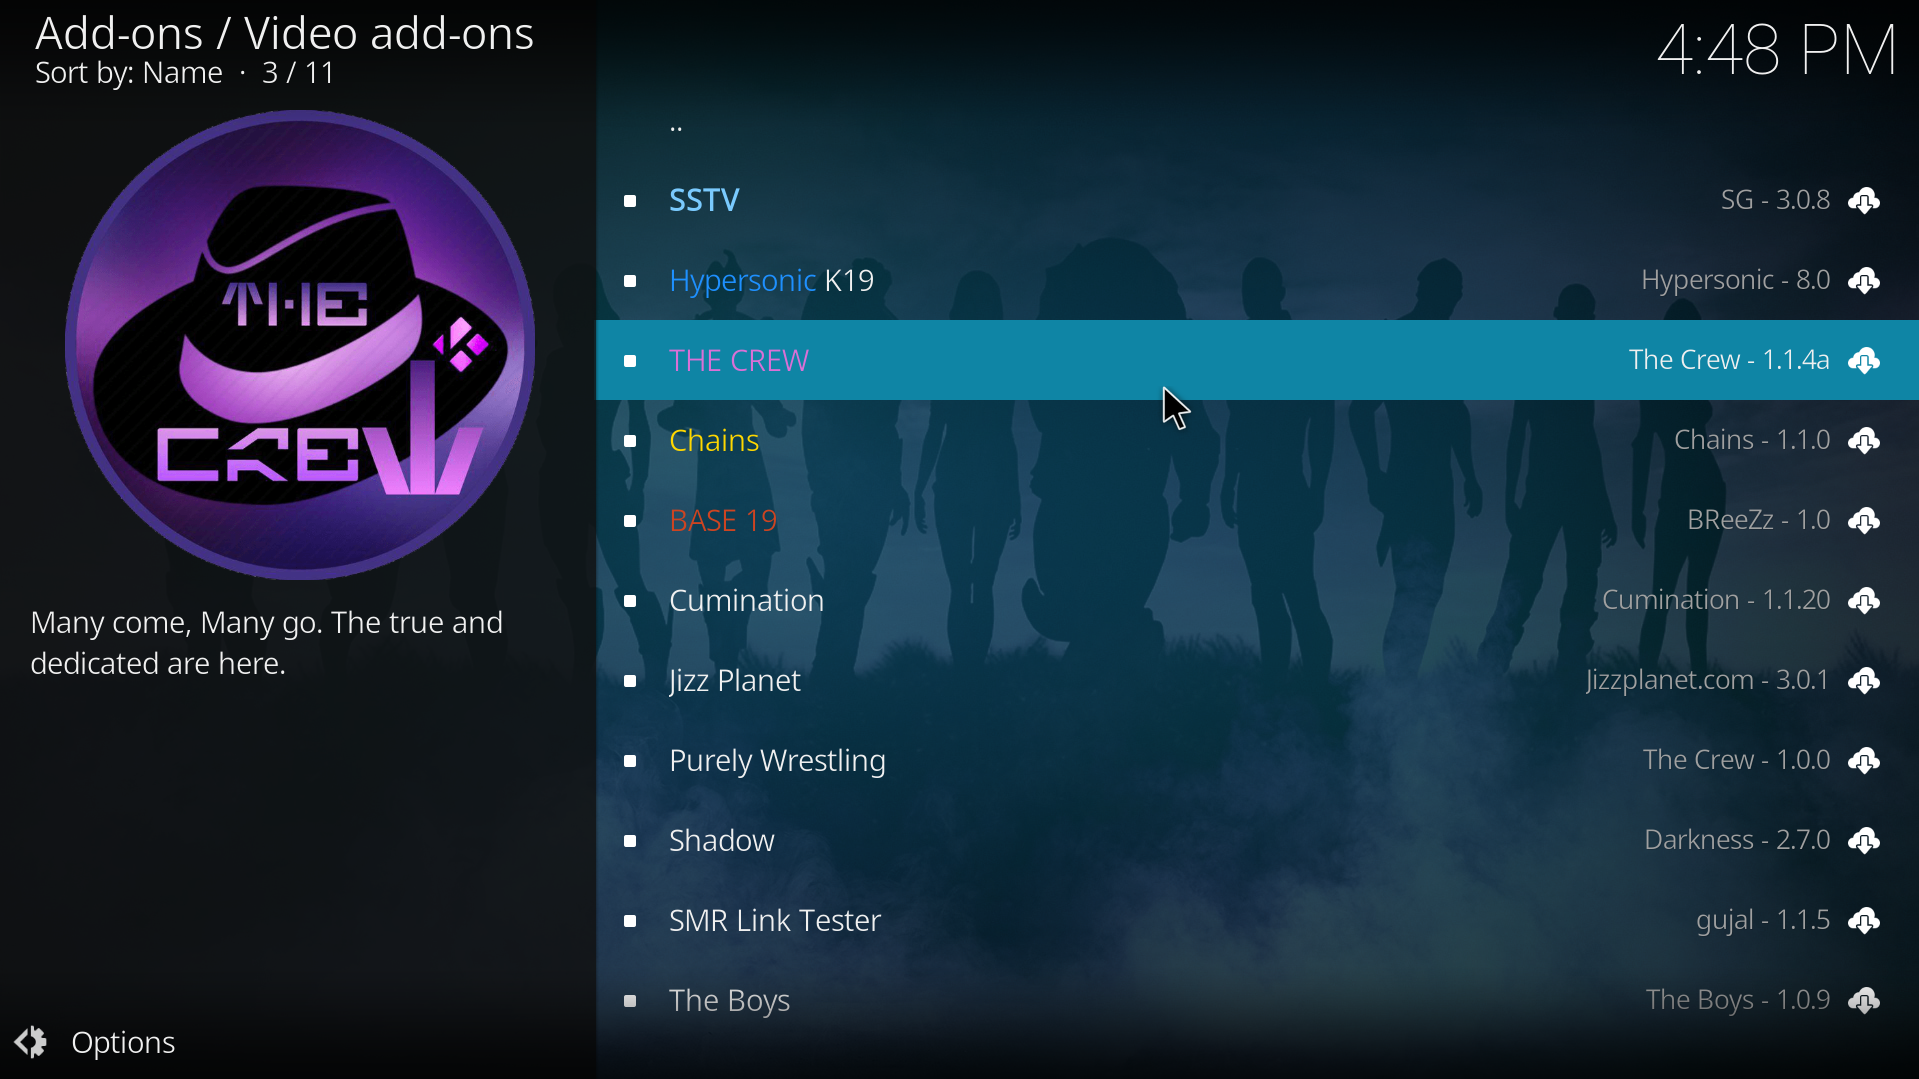
Understanding The Crew Addon and Its Ecosystem
Before diving into the technical steps, it’s crucial to understand what The Crew addon is, why it’s favored by many Kodi users, and the foundational requirements for its smooth operation. This context will not only demystify the installation process but also empower you to make informed decisions about your digital streaming setup.
What is The Crew Addon?
The Crew is a third-party Kodi video addon, meaning it is developed by independent creators and is not officially endorsed or maintained by the Kodi Foundation. It operates by scraping public content sources across the internet, organizing them into an easily navigable interface within Kodi. Users can access a wide variety of content, including on-demand movies and TV series, live television channels, sports events, documentaries, and even dedicated sections for specific genres or collections. Its strength lies in its diverse content library, frequent updates, and integration with popular services like Real-Debrid and Trakt, which significantly enhance the user experience.
Why Choose The Crew?
The appeal of The Crew addon stems from several key factors that set it apart from many alternatives. Firstly, its content breadth is truly remarkable, offering everything from the latest blockbusters to classic films and an extensive catalog of TV shows. Secondly, The Crew is known for its reliability; its developers are proactive in maintaining and updating the addon, ensuring that links are fresh and features function as expected. Thirdly, its integration capabilities with premium services like Real-Debrid provide access to higher-quality, buffer-free streams, dramatically improving the viewing experience. Lastly, its user-friendly interface, despite the vast content, makes navigation intuitive even for new users.
Prerequisites for Installation
To ensure a seamless installation and optimal performance of The Crew addon, a few prerequisites are essential. The most fundamental requirement is a stable internet connection. Kodi itself must be installed on your chosen device (Windows, Mac, Android, Firestick, Raspberry Pi, etc.). Given that The Crew is a third-party addon, you will need to enable “Unknown Sources” within Kodi’s settings, a security feature that prevents unauthorized installations by default. While not strictly mandatory for installation, using a Virtual Private Network (VPN) is highly recommended. A VPN encrypts your internet traffic, protecting your online privacy and potentially bypassing geo-restrictions or ISP throttling, which can impact streaming quality.
Preparing Your Kodi Environment
A clean and properly configured Kodi environment is the bedrock for a successful addon installation and a positive user experience. This section details the necessary preparatory steps, from adjusting security settings to understanding the role of a VPN.
Enabling Unknown Sources
Kodi, by default, restricts installations from sources it doesn’t recognize as a security measure. To install The Crew, which comes from an unofficial repository, you must override this setting.
-
Launch Kodi: Open the Kodi application on your device.
-
Access Settings: Navigate to the main Kodi screen and click on the “Gear” icon (Settings) located usually in the top-left corner.
-
Go to System: Select “System” from the settings menu.
-
Add-ons Menu: On the left-hand pane, hover over “Add-ons.”
-
Enable Unknown Sources: On the right-hand side, you will see an option for “Unknown sources.” Toggle this option to the “On” position.
-
Confirm Warning: A warning message will appear, advising you of the potential risks of installing addons from unknown sources. Read it carefully and click “Yes” to confirm. This step is crucial and must be completed before you can proceed with adding the repository.
The Importance of a VPN
As mentioned earlier, a VPN is more than just an optional extra for Kodi users; it’s a vital tool for digital security and an enhanced streaming experience. When you stream content, your Internet Service Provider (ISP) can see your online activity. This data can be used for throttling your internet speed, leading to buffering, or even for legal purposes if you inadvertently access copyrighted material. A reputable VPN encrypts your internet connection, masking your IP address and making your online activities anonymous. This prevents your ISP from monitoring your streaming habits, allows you to bypass geo-restrictions on certain content, and protects your privacy from potential threats. Before starting the installation of any third-party addon, it’s highly advisable to connect to a VPN server.
Clearing Cache and Old Repositories
While not always necessary, performing a clean-up before installing a new addon can prevent conflicts and optimize performance, especially if you’ve had many addons or repositories installed previously.
-
Clear Cache: Within Kodi, you can often use a maintenance addon (like Open Wizard or Indigo) to clear the cache. If you don’t have one, some device-specific methods exist, like clearing cache directly from your Android device’s app settings. Regular cache clearing helps remove temporary files that can slow down Kodi.
-
Remove Old Repositories: If you have broken or unused repositories, they can sometimes interfere with new installations.
-
Go to Settings > File Manager.
-
Identify any old repository sources you no longer use, right-click (or long-press) on them, and select “Remove source.”
-
Then go to Settings > Add-ons > Install from repository. Right-click (or long-press) on any old, unused repositories and select “Information,” then “Uninstall.”
-
A clean slate minimizes potential conflicts and ensures a smoother installation of The Crew.
Step-by-Step Installation Guide for The Crew Addon
With your Kodi environment prepared, you are now ready to install The Crew addon. This section provides a detailed, step-by-step walkthrough of the entire process, ensuring you can follow along easily.
Adding The Crew Repository Source
The first step is to tell Kodi where to find The Crew addon’s repository.
-
Return to Settings: From the Kodi home screen, click the “Gear” icon (Settings).
-
Enter File Manager: Select “File Manager.”
-
Add Source: Click on “Add source” on the left side of the screen.
-
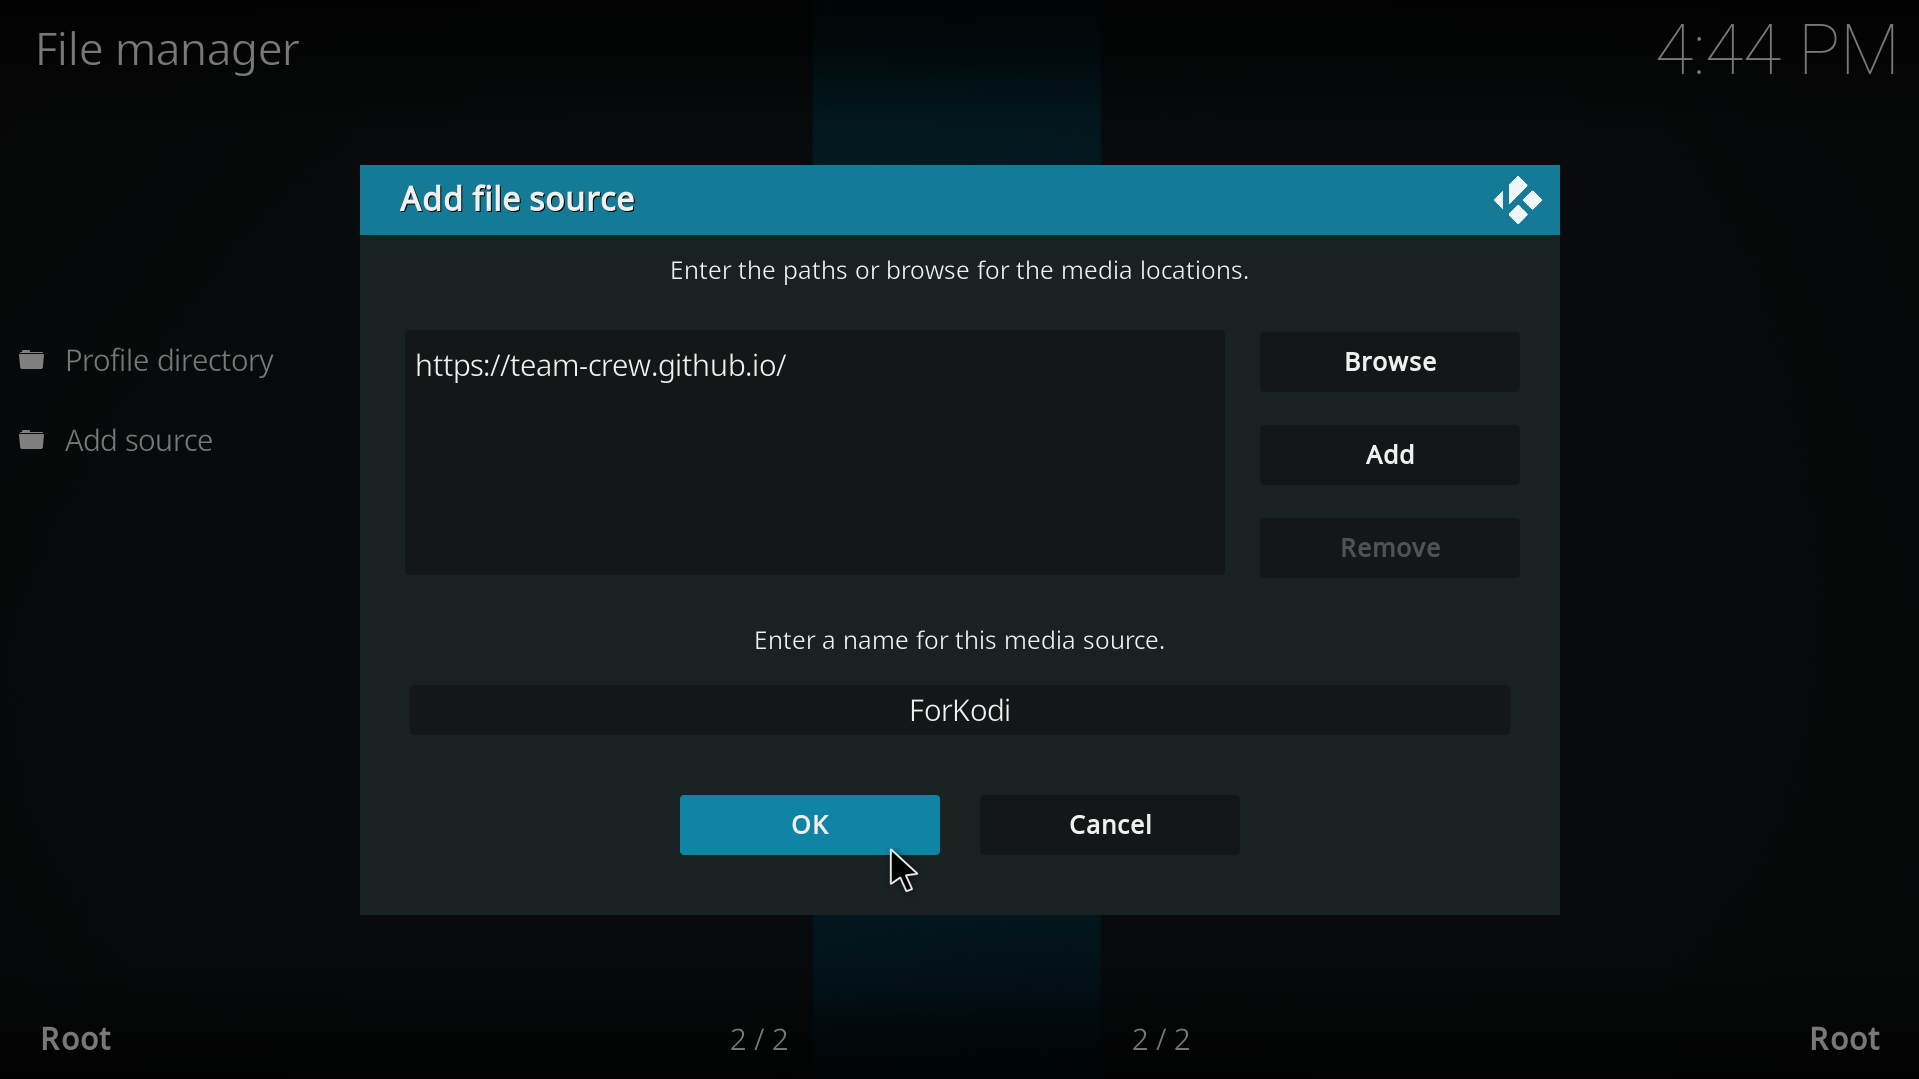
Edit File Source: A pop-up box titled “Add file source” will appear. Click on
<None>. -
Enter Path: Carefully type the exact URL for The Crew repository:
https://crew-addon.org/orhttps://team-crew.github.io/(verify the most current URL if issues arise, as repository URLs can occasionally change). Double-check for typos, as even a single character can prevent the installation. Click “OK.” -
Name the Source: In the “Enter a name for this media source” field, type a memorable name like
TheCrewRepoorCrew. Click “OK.” -
Verify: You should now see “TheCrewRepo” (or whatever name you chose) listed in your File Manager.
Installing The Crew Repository
Once Kodi knows where to find the repository, the next step is to install the repository itself.
-
Return to Settings: Go back to the Kodi main screen and click the “Gear” icon (Settings).
-
Go to Add-ons: Select “Add-ons.”
-
Install from Zip File: Click on “Install from zip file.”
-
Confirm Warning: You might see a warning about “Allowing Unknown Sources” again. Confirm “Yes” if prompted.
-
Select Source: A new window will appear, listing your file sources. Select the name you gave earlier, e.g.,
TheCrewRepo. -
Select Repository Zip: Inside the source, you will typically find a
.zipfile. It might be named something likerepository.thecrew-X.X.X.zip(where X.X.X is the version number). Select this file. -
Installation Notification: Wait for a notification to appear in the top-right corner, stating “The Crew Repo Add-on installed.” This confirms the repository has been successfully added to your Kodi system.
Installing The Crew Video Addon
With the repository installed, you can now install The Crew video addon itself.
-
Return to Add-ons Menu: From the “Add-ons” menu, click on “Install from repository.”
-
Select The Crew Repo: Find and select “The Crew Repo” from the list of installed repositories.
-
Video Add-ons: Click on “Video add-ons.”
-
Select The Crew: Locate and select “The Crew” from the list of available video addons.
-
Install Button: On The Crew addon information page, click the “Install” button.
-
Confirm Dependencies: A pop-up will show a list of additional addons (dependencies) that The Crew requires to function. Click “OK” to install them.
-
Installation Notification: Wait for the “The Crew Add-on installed” notification to appear. This signifies that the addon is ready for use.
-
Launch The Crew: You can now access The Crew from the Kodi home screen by navigating to “Add-ons” and then “Video add-ons,” where you’ll find “The Crew” listed.
Post-Installation: Configuration and Optimization
Installing The Crew is just the first step. To truly unlock its potential and tailor it to your preferences, some post-installation configuration and optimization are highly recommended.
Initial Setup and Customization
Upon launching The Crew for the first time, you might notice various sections like Movies, TV Shows, Sports, etc. However, to enhance your experience, consider these integrations:
-
Real-Debrid Integration: This is arguably the most impactful upgrade. Real-Debrid is a premium unrestricted multi-hoster that provides access to high-quality, buffer-free links. Inside The Crew’s settings, navigate to “Accounts” or “Settings,” and look for Real-Debrid authorization. You’ll typically get a code to enter on the Real-Debrid website, linking your account.
-
Trakt Integration: Trakt.tv is a service that tracks your watched movies and TV shows, syncs your progress across devices, and helps manage your watchlists. The Crew supports Trakt integration; you’ll find an option to authorize your Trakt account within the addon’s settings.
-
Subtitles: For an optimal viewing experience, ensure subtitle services are enabled and configured in Kodi’s main settings and potentially within The Crew if it has its own subtitle options.
Navigating The Crew Interface
The Crew’s interface is generally intuitive. You’ll find categories like:
-
Movies: Explore by genre, year, popular, trending, etc.
-
TV Shows: Browse by network, genre, new episodes, etc.
-
Sports: Live sports events, replays, and specific sports channels.
-
IPTV: Live TV channels (though often less reliable than dedicated IPTV services).
-
Kids: Content specifically curated for younger audiences.
-
Search: A powerful tool to find specific titles.
Spend some time exploring the various sections to familiarize yourself with the content structure.
Troubleshooting Common Issues
Even with careful installation, users might encounter issues.
-
Buffering: Often caused by a slow internet connection (use a VPN to prevent ISP throttling), server load (try different links), or insufficient device resources. Clear cache, restart Kodi, or upgrade your Real-Debrid account.
-
“No Stream Available”: This usually means no working links were found for the selected content. Try another source or check if the content is very new or very old. Real-Debrid significantly reduces this issue.
-
Dependency Errors: If you see an error about a missing dependency, it usually means one of the required helper addons failed to install. Try restarting Kodi, clearing the cache, or, as a last resort, reinstalling The Crew from scratch after ensuring all old repository files are removed.
-
Addon Not Opening: Check your internet connection, ensure Kodi is updated, and try restarting your device. If it persists, a full reinstallation might be necessary.
Keeping The Crew Updated
Addons like The Crew receive regular updates to fix bugs, add new features, and refresh content scrapers.
-
Automatic Updates: Kodi typically handles addon updates automatically if the repository is active. Ensure “Automatic updates” is enabled in Kodi’s Add-on settings.
-
Manual Checks: You can manually check for updates by going to
Add-ons > Video add-ons, hovering over The Crew, opening its context menu (C key on keyboard, or menu button on remote), selecting “Information,” and then “Update.”
Best Practices for Using Kodi Addons Safely and Effectively
While The Crew provides a gateway to extensive entertainment, it’s paramount to practice responsible usage to ensure digital security, privacy, and long-term enjoyment of your Kodi setup.
Digital Security and Privacy
The primary recommendation for any third-party Kodi addon user is to always use a reliable VPN. As discussed, a VPN encrypts your traffic, protects your identity, and secures your data from ISPs, hackers, and other surveillance. This is non-negotiable for maintaining privacy while streaming. Additionally, be mindful of what other addons you install; stick to well-known, reputable sources and avoid obscure or unmaintained repositories that could potentially harbor malicious software. Keep your Kodi application itself updated to benefit from the latest security patches.
Legal Considerations
The legal landscape surrounding third-party Kodi addons can be complex and varies significantly by region. While Kodi itself is a legal media player, the legality of streaming copyrighted content without proper licensing is questionable in many jurisdictions. The Crew, like many similar addons, aggregates links from various sources, some of which may not be authorized to distribute the content. Users are responsible for understanding and complying with the copyright laws in their country of residence. Using a VPN is also crucial in this context, as it helps obscure your online activities, offering a layer of privacy protection. This advice is for informational purposes only and does not constitute legal counsel.

Maintaining Kodi Performance
To keep Kodi running smoothly with The Crew and other addons:
-
Regular Cache Clearing: Periodically clear Kodi’s cache using a maintenance addon or by clearing your device’s app cache. This frees up space and can improve performance.
-
Remove Unused Addons/Repositories: Just as you prepared your system, regularly uninstall addons and repositories you no longer use. This reduces clutter and potential conflicts.
-
Monitor Storage: Ensure your device has sufficient free storage space, especially if you download content. Low storage can significantly impact performance.
-
Update Kodi and Addons: Keep your Kodi application updated to the latest stable version and ensure all your addons, including The Crew, are configured for automatic updates.
By following this comprehensive guide and adhering to best practices, you can confidently install, configure, and enjoy The Crew addon, transforming your Kodi media center into a powerful hub for diverse digital entertainment, all while maintaining a secure and optimized streaming environment.
aViewFromTheCave is a participant in the Amazon Services LLC Associates Program, an affiliate advertising program designed to provide a means for sites to earn advertising fees by advertising and linking to Amazon.com. Amazon, the Amazon logo, AmazonSupply, and the AmazonSupply logo are trademarks of Amazon.com, Inc. or its affiliates. As an Amazon Associate we earn affiliate commissions from qualifying purchases.