
In the realm of web development and database management, efficiency and control are paramount. Developers, system administrators, and even advanced users frequently interact with MySQL or MariaDB databases, which power countless websites and applications. While command-line interfaces (CLIs) offer powerful control, a graphical user interface (GUI) can significantly streamline complex tasks, making database administration more intuitive and less prone to error. This is precisely where phpMyAdmin steps in.
phpMyAdmin is a free and open-source web-based application written in PHP, designed to handle the administration of MySQL or MariaDB over the web. It provides a robust, user-friendly interface for performing a wide array of database operations, from creating and dropping databases, tables, views, fields, and indexes, to executing SQL queries, managing users and permissions, and exporting/importing data. Its ubiquity makes it a de facto standard for database management in hosting environments and local development setups alike. Understanding how to properly install and secure phpMyAdmin is a fundamental skill for anyone working with relational databases in a web context. This guide will walk you through the essential steps, considerations, and best practices for setting up phpMyAdmin, ensuring a secure and efficient database management experience.
The Foundation: Prerequisites for a Successful Installation
Before embarking on the installation of phpMyAdmin, it’s crucial to ensure your system meets the fundamental requirements. phpMyAdmin isn’t a standalone application; it operates as part of a larger ecosystem, typically a web server environment equipped with a database and PHP interpreter. Understanding this ecosystem, often referred to as a LAMP (Linux, Apache, MySQL/MariaDB, PHP) or LEMP (Linux, Nginx, MySQL/MariaDB, PHP) stack, is the first step toward a seamless setup.
Understanding the LAMP/LEMP Stack
The acronyms LAMP and LEMP refer to a popular set of open-source software used to run dynamic websites and web applications.
-
Linux: The operating system (though phpMyAdmin can be installed on Windows with WAMP or XAMPP, or macOS with MAMP).
-
Apache/ EngineX (Nginx): The web server software responsible for serving web content.
-
MySQL/MariaDB: The relational database management system that stores your data. MariaDB is a popular drop-in replacement for MySQL.
-
PHP: The server-side scripting language that phpMyAdmin itself is written in, and which processes dynamic web content.
For phpMyAdmin to function, you need all components of at least one of these stacks installed and properly configured. This guide will assume you have a working web server (Apache or Nginx), a database server (MySQL or MariaDB), and PHP installed. If not, you’ll need to set these up first, as they are foundational dependencies.
Required Software Components and Versions
To run phpMyAdmin effectively, specific versions of PHP and the database server are required. While phpMyAdmin strives for backward compatibility, using the latest stable versions generally provides the best performance, security, and feature set.
-
Web Server: Apache HTTP Server or Nginx. Ensure your web server is running and configured to serve PHP files.
-
Database Server: MySQL 5.5+ or MariaDB 5.5+. It’s recommended to use a modern, supported version.
-
PHP: phpMyAdmin has specific PHP version requirements. For example, phpMyAdmin 5.2 requires PHP 7.2 or newer. Always check the official phpMyAdmin documentation for the exact PHP version compatibility with the version you intend to install. Crucially, several PHP extensions are also mandatory:
-
php-mbstring: For multibyte string handling. -
php-json: For JSON data handling. -
php-gd: For image manipulation (e.g., CAPTCHAs). -
php-mysqlorphp-mysqli: For connecting to MySQL/MariaDB.mysqliis generally preferred for its improved interface. -
php-zip: For importing/exporting compressed files. -
php-bz2: For Bzip2 compression support (optional, but recommended). -
php-curl: For cURL support (optional, but useful for certain features). -
php-xml: For XML parsing. -
php-fpm(if using Nginx): PHP FastCGI Process Manager.
-
Ensure all these PHP extensions are installed and enabled in your php.ini configuration. Missing extensions are a common cause of installation failures or partial functionality.
System Requirements and Best Practices
While phpMyAdmin itself is relatively lightweight, the underlying stack can demand resources.
-
Disk Space: A few hundred MBs for the phpMyAdmin files, plus ample space for your database data.
-
RAM: Dependent on your database usage. For a basic setup, 1-2GB might suffice, but production environments with active databases will require more.
-
CPU: Modern multi-core processors are ideal.
-
Internet Connection: Required for downloading packages and updates.
Best practices before installation:
-
Update your system: Always run
sudo apt update && sudo apt upgrade(Debian/Ubuntu) orsudo yum update(CentOS/RHEL) to ensure all existing packages are up-to-date. -
Backup: If you are installing on an existing server, always back up critical data and configuration files before making significant changes.
-
Root/Sudo Access: You’ll need administrative privileges to install packages and configure system files.
Step-by-Step Installation Guides
The method for installing phpMyAdmin varies slightly depending on your operating system and preferred approach (package manager vs. manual download). Here, we’ll cover the most common scenarios for Linux distributions.
Installing on Ubuntu/Debian (using APT)
For Debian-based systems like Ubuntu, the Advanced Package Tool (APT) makes installation straightforward.
-
Update Package List:
sudo apt update -
Install phpMyAdmin:
sudo apt install phpmyadminDuring the installation, you’ll be prompted to:
-
Choose the web server you want phpMyAdmin to configure automatically. Select
apache2orlighttpd(if you’re using Nginx, you’ll select “None” and configure manually later). -
Confirm whether to configure the database for phpMyAdmin with
dbconfig-common. It’s generally recommended to selectYesas it simplifies the process. -
Set a password for the phpMyAdmin application’s database user. Make sure to choose a strong, unique password.
-
-
Enable PHP Extensions (if prompted or needed):
The installer usually handles this, but if you encounter issues, ensure necessary PHP extensions are enabled:
sudo phpenmod mysqli mbstring gd xml bz2 zipThen restart Apache/Nginx and PHP-FPM if applicable:
sudo systemctl restart apache2 # OR for Nginx: sudo systemctl restart nginx sudo systemctl restart php<VERSION>-fpm # e.g., php7.4-fpm -
Verify Apache Configuration (if using Nginx, skip to manual configuration):
The APT installer typically creates an Apache configuration file for phpMyAdmin (e.g.,
/etc/apache2/conf-available/phpmyadmin.conf) and symlinks it. You might need to ensure thephpmyadmin.conffile is included in your Apache configuration if it’s not automatically loaded.You can usually access phpMyAdmin at
http://your_server_ip_or_domain/phpmyadmin.
Installing on CentOS/RHEL (using YUM/DNF)
For Red Hat-based systems, you’ll use YUM (older versions) or DNF (newer versions) to install packages. You’ll likely need to enable the EPEL (Extra Packages for Enterprise Linux) repository first.
-
Enable EPEL and Remi repositories (Remi provides newer PHP versions):
sudo dnf install epel-release sudo dnf install https://rpms.remirepo.net/enterprise/remi-release-8.rpm # For RHEL 8/CentOS 8+ sudo dnf module enable php:remi-8.0 # Example for PHP 8.0, adjust as needed -
Update System:
sudo dnf update -
Install phpMyAdmin and Dependencies:
sudo dnf install phpmyadmin php-mysqlnd php-json php-mbstring php-gd php-zip php-xml php-bz2If you’re using Apache, it should automatically configure it. For Nginx, you’ll need manual configuration.
-
Restart Web Server and PHP-FPM:
sudo systemctl restart httpd # For Apache

# OR for Nginx:

sudo systemctl restart nginx

sudo systemctl restart php-fpm
Manual Installation (for Other Systems or Custom Configurations)
Manual installation offers the most flexibility, especially for Nginx users or specific PHP versions not available through package managers.
-
Download phpMyAdmin:
Go to the official phpMyAdmin website (www.phpmyadmin.net) and download the latest stable release (usually a
.tar.gzor.zipfile). -
Extract and Place Files:
Create a directory for phpMyAdmin in your web server’s document root (e.g.,
/var/www/html/phpmyadminfor Apache, or/usr/share/nginx/html/phpmyadminfor Nginx).sudo mkdir -p /var/www/html/phpmyadmin sudo mv phpMyAdmin-<VERSION>-all-languages.tar.gz /var/www/html/phpmyadmin cd /var/www/html/phpmyadmin sudo tar -xvf phpMyAdmin-<VERSION>-all-languages.tar.gz --strip-components=1 sudo rm phpMyAdmin-<VERSION>-all-languages.tar.gz -
Create Configuration File:
Copy the example configuration file:
sudo cp config.sample.inc.php config.inc.phpEdit
config.inc.phpusing a text editor (sudo nano config.inc.php). At minimum, you might want to:-
Set a
blowfish_secretfor cookie authentication (a random string of 32 characters or more):$cfg['blowfish_secret'] = 'YOUR_SUPER_SECRET_BLOWFISH_KEY_HERE'; /* YOU MUST FILL IN THIS FOR COOKIE AUTH! */ -
Adjust
upload_dirandsave_dirif you need specific directories for imports/exports.
-
-
Set Permissions:
Ensure your web server user (e.g.,
www-datafor Apache/Nginx on Debian,apacheon CentOS) has appropriate ownership and permissions over the phpMyAdmin directory.sudo chown -R www-data:www-data /var/www/html/phpmyadmin sudo chmod -R 755 /var/www/html/phpmyadmin -
Configure Web Server (Nginx Example):
If you’re using Nginx, you’ll need to create a server block or add a location block to an existing one.
# Example Nginx configuration for phpMyAdmin server {listen 80; server_name your_domain_or_ip; root /var/www/html; # Your main web root location /phpmyadmin { # Access phpMyAdmin via /phpmyadmin URL index index.php; alias /var/www/html/phpmyadmin; # Path to phpMyAdmin files try_files $uri $uri/ =404; location ~ .php$ { include snippets/fastcgi-php.conf; fastcgi_pass unix:/var/run/php/php<VERSION>-fpm.sock; # Adjust PHP-FPM socket fastcgi_param SCRIPT_FILENAME $request_filename; include fastcgi_params; } }}
Reload Nginx and PHP-FPM:
sudo systemctl reload nginx sudo systemctl reload php<VERSION>-fpm

Initial Configuration and Security Hardening
Once phpMyAdmin is installed, the next critical steps involve initial configuration and, most importantly, securing your installation. Because phpMyAdmin offers direct access to your databases, it’s a prime target for attackers.
Accessing phpMyAdmin Post-Installation
Open your web browser and navigate to the URL where phpMyAdmin is installed.
-
Package Manager Install:
http://your_server_ip_or_domain/phpmyadmin -
Manual Install (using Nginx example above):
http://your_domain_or_ip/phpmyadmin
You should see the phpMyAdmin login screen. You can log in using your MySQL/MariaDB root user credentials or any other user with sufficient database privileges.
Securing Your phpMyAdmin Installation
Securing phpMyAdmin is non-negotiable. Compromise here can mean complete loss of your database data.
-
Change Default URL:
The default
/phpmyadminURL is widely known. Renaming the directory or alias (e.g., to/dbmanageror a less obvious name) makes it harder for automated bots to find.-
Apache: Edit
phpmyadmin.confor modify the alias. -
Nginx/Manual: Rename the directory and update your Nginx configuration.
-
-
Strong Passwords:
Always use strong, unique passwords for your database users, especially the root user. Consider using a password manager.
-
Limit User Privileges:
Avoid using the MySQL
rootuser for daily phpMyAdmin operations. Create specific database users with only the necessary privileges for the databases they need to manage. This follows the principle of least privilege. -
Implement SSL/TLS:
Ensure all communication with phpMyAdmin occurs over HTTPS. Obtain an SSL certificate (e.g., from Let’s Encrypt) and configure your web server to redirect HTTP traffic to HTTPS. This encrypts data in transit, protecting your login credentials and database content from eavesdropping.
-
IP Address Restrictions:
If you only access phpMyAdmin from a fixed set of IP addresses, configure your web server to only allow access from those IPs.
-
Apache (
.htaccessorphpmyadmin.conf):<Directory /usr/share/phpmyadmin>Require ip 192.168.1.0/24 # Your trusted IP range Require ip 10.0.0.1 # A specific trusted IP</Directory>
-
Nginx (
locationblock):location /phpmyadmin {allow 192.168.1.0/24; allow 10.0.0.1; deny all; # ... other phpMyAdmin config ...}
-
-
HTTP Authentication (Optional Layer):
Add an extra layer of HTTP Basic Authentication (using
.htaccessfor Apache orauth_basicfor Nginx) on top of phpMyAdmin’s own login. This means a user would need to enter credentials twice to access phpMyAdmin. -
Disable
rootlogin via phpMyAdmin (Highly Recommended):For critical production environments, consider disabling the ability to log in as the MySQL
rootuser directly via phpMyAdmin. This forces you to use less privileged users, reducing the attack surface. This typically involves modifying MySQL user permissions or adding specific directives inconfig.inc.php. -
Keep phpMyAdmin Updated:
Regularly check for and apply updates to phpMyAdmin. Updates often include security patches for newly discovered vulnerabilities.
Troubleshooting Common Issues
-
“Error: The mbstring extension is missing.”: Install
php-mbstringand restart PHP-FPM/web server. -
“Error: The json extension is missing.”: Install
php-json. -
“MySQL said: #2002 – No such file or directory”: This usually means phpMyAdmin can’t connect to the MySQL/MariaDB server. Check if the database server is running (
sudo systemctl status mysqlormariadb). Verify host and port settings inconfig.inc.php. -
Blank page or download prompt: Indicates PHP isn’t being processed by your web server for the phpMyAdmin directory. Check your web server (Apache/Nginx) and PHP-FPM configuration.
-
“Access Denied” after login: Incorrect MySQL/MariaDB credentials or insufficient user privileges.
Essential Features and Best Practices for Database Management
With phpMyAdmin installed and secured, you can now leverage its powerful features for efficient database administration.
Navigating the Interface
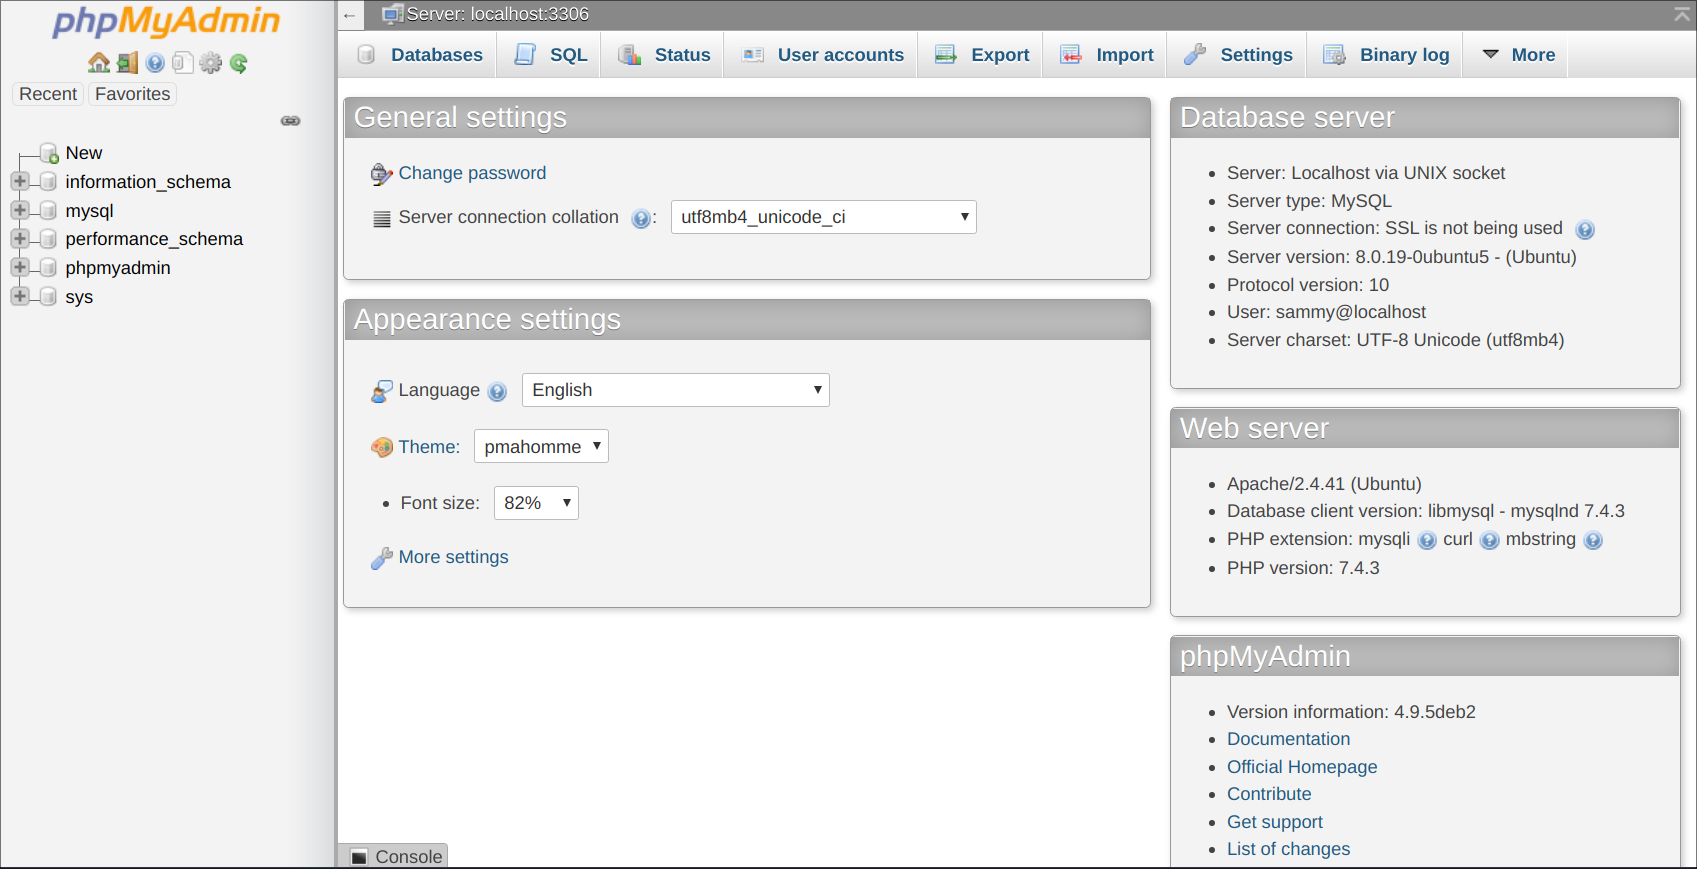
Upon logging in, you’ll find a clean, intuitive interface.
-
Left Panel: Lists databases you have access to. Clicking a database expands to show its tables.
-
Main Panel: Displays information or actions based on your selection in the left panel.
-
Top Tabs: Context-sensitive tabs (e.g., Structure, SQL, Search, Export, Import, Operations, Privileges) appear for databases and tables, allowing you to perform various tasks.
Performing Common Database Operations
phpMyAdmin simplifies many tasks that would be cumbersome via the command line.
-
Creating Databases/Tables:
-
To create a new database, click “New” in the left panel or the “Databases” tab at the top.
-
To create a new table, select a database and then go to the “Structure” tab and use the “Create table” section.
-
-
Editing/Deleting Databases/Tables:
- Select a database/table, then use the “Operations” tab for actions like renaming, copying, or dropping (deleting). Be extremely careful with delete operations, as they are often irreversible.
-
Executing SQL Queries:
- The “SQL” tab allows you to type and execute raw SQL queries. This is powerful but requires a good understanding of SQL. Always be cautious when executing
DELETEorUPDATEqueries withoutWHEREclauses.
- The “SQL” tab allows you to type and execute raw SQL queries. This is powerful but requires a good understanding of SQL. Always be cautious when executing
-
Managing Data (Browsing, Inserting, Updating, Deleting Rows):
-
Select a table, then click the “Browse” tab to view its data.
-
You can edit individual rows by clicking the “Edit” icon (pencil) next to a row or delete rows using the “Delete” icon (X).
-
The “Insert” tab allows you to add new rows of data.
-
Importing and Exporting Data
These are crucial features for backups, migrations, and transferring data between environments.
-
Exporting Data:
-
Select the database or table you wish to export.
-
Go to the “Export” tab.
-
Choose your export method (Quick for basic, Custom for more options like specific tables, compression, SQL format options).
-
Select the format (SQL is common for backups, CSV for spreadsheets).
-
Click “Go” to download the exported file.
-
-
Importing Data:
-
Select the target database (or create a new one).
-
Go to the “Import” tab.
-
Browse to your
.sqlor.csvfile. -
Ensure the character set and format are correct.
-
Click “Go” to start the import process. Large files might require adjustments to PHP’s
upload_max_filesizeandpost_max_sizeinphp.ini.
-
Maintaining and Upgrading phpMyAdmin
Regular maintenance and timely upgrades are vital for security, performance, and accessing new features.
Keeping Your Installation Up-to-Date
-
Package Manager Installations: For installations done via APT or DNF, updates are as simple as running your system’s package update commands:
sudo apt update && sudo apt upgrade phpmyadmin # Ubuntu/Debian

sudo dnf update phpmyadmin # CentOS/RHEL
This ensures you receive security patches and minor version upgrades.
-
Manual Installations: For manual installs, you’ll need to periodically check the official phpMyAdmin website for new releases. The upgrade process typically involves:
-
Backing up your
config.inc.phpfile and any custom themes. -
Downloading the new version.
-
Deleting the old phpMyAdmin files (excluding your
config.inc.php). -
Extracting the new version into the same directory.
-
Restoring your
config.inc.phpand any other custom files. -
Verifying all necessary PHP extensions for the new version are installed.
-
Backup and Recovery Strategies
phpMyAdmin is a tool for database management, but your ultimate backup strategy should encompass the database itself.
-
Regular Database Backups: Use phpMyAdmin’s export feature regularly. For production environments, consider automated
mysqldumpscripts or dedicated database backup solutions, as these can handle larger databases more robustly. -
Backup phpMyAdmin Configuration: Always keep a copy of your
config.inc.phpfile. This file contains critical settings, including yourblowfish_secret, which is essential if you use cookie authentication.
Conclusion
phpMyAdmin stands as an indispensable tool in the arsenal of anyone managing MySQL or MariaDB databases through a web interface. Its ease of use, coupled with a comprehensive feature set, transforms the often-complex world of database administration into a more accessible and efficient endeavor. From creating and structuring databases to executing intricate SQL queries and managing user privileges, phpMyAdmin empowers users with granular control over their data.
However, convenience must always be balanced with caution. The web-based nature of phpMyAdmin makes it a potential gateway for malicious actors if not properly secured. The journey from installation to daily management is punctuated by critical security checkpoints: implementing strong passwords, enforcing SSL, restricting access, and diligently applying updates. By adhering to the installation best practices and adopting a proactive security posture, you can harness the full power of phpMyAdmin, ensuring your database infrastructure remains robust, responsive, and resilient against potential threats. Master its installation, understand its features, and, most importantly, secure it with diligence, and phpMyAdmin will prove to be an invaluable asset in your technical toolkit.
aViewFromTheCave is a participant in the Amazon Services LLC Associates Program, an affiliate advertising program designed to provide a means for sites to earn advertising fees by advertising and linking to Amazon.com. Amazon, the Amazon logo, AmazonSupply, and the AmazonSupply logo are trademarks of Amazon.com, Inc. or its affiliates. As an Amazon Associate we earn affiliate commissions from qualifying purchases.